Managed Cloud Servers Questions
Timeline Backups Pro pricing in HostShop
Timeline Backups is a powerful and reliable backup solution designed specifically for cloud servers. Offering Timeline Backups as part of your HostShop services provides numerous benefits for both you and your customers. By default the price of Timeline Backups is 15% of the value of the server. You can choose to increase this if you want to make a higher markup on backups.
Benefits of Timeline Backups:
Enhanced Data Protection:
Timeline Backups ensures that your customers' data is protected and easily recoverable. With its automated backup system, Timeline Backups takes regular snapshots of your customers' cloud servers, safeguarding their websites, databases, and files against potential data loss due to hardware failures, software glitches, or human errors.
Flexible Restoration Points:
By offering Timeline Backups, your customers can enjoy the flexibility of choosing from multiple restoration points. They can easily roll back their cloud servers to a specific date and time, allowing them to recover from issues such as data corruption, security breaches, or other unforeseen events.
Increased Customer Satisfaction:
Providing a reliable and easy-to-use backup solution like Timeline Backups increases customer satisfaction and trust in your services. Your customers will appreciate the added security and peace of mind that comes with knowing their data is secure and readily available in case of emergencies.
Competitive Advantage:
Offering Timeline Backups as part of your service portfolio sets you apart from competitors who may not provide comprehensive backup solutions. This added value can help you attract new customers and retain existing ones, ultimately contributing to the growth of your business.
Simple Integration with HostShop:
Timeline Backups is seamlessly integrated with the HostShop billing platform, making it easy for you to manage, bill, and provision the service for your customers. This streamlined process allows you to focus on your core business while offering a valuable service that enhances your customers' experience.
Austin B.Cloud server bandwidth and disk space pricing in HostShop
If you decide to offer AWS and Google Cloud services through your HostShop platform, it's essential to understand the pricing structures associated with these providers, particularly in regards to pay-per-usage bandwidth costs and additional disk space pricing. These costs can impact both your profit margins and your customers' satisfaction with your services.
AWS and Google Cloud employ a pay-per-usage model for bandwidth, charging based on the amount of data transferred in and out of their cloud servers. This model can lead to variable costs for your customers depending on their usage patterns. Additionally, both providers have pricing structures for extra disk space, which may be required by users who need more storage capacity for their applications and data.
As a HostShop reseller, you have the flexibility to manage the pricing for AWS and Google Cloud services according to your business strategy. When a StackCP User orders a cloud server, you can choose to:
- Markup the bandwidth cost: By adding a markup on the bandwidth cost, you can increase your profit margins while covering the variable costs associated with the pay-per-usage model. However, this approach may result in higher prices for your customers, which could impact their satisfaction and your competitiveness in the market.
- Pass on the wholesale price: Alternatively, you can choose to pass on the wholesale price of the bandwidth to your customers. This approach keeps the pricing transparent and can help maintain customer trust while allowing them to better manage their expenses. However, this method may yield lower profit margins for your business.
You can also set pricing on a per-instance basis, customizing the charges according to the server size or specifications. For example, you may decide to apply a higher markup on bandwidth costs for larger instance types, which are typically used by customers with higher resource demands and may be willing to pay a premium for the additional resources.
When determining your pricing strategy for AWS and Google Cloud services through HostShop, it's important to balance your profit goals with the need to remain competitive and attractive to your target audience. By carefully considering the costs associated with these providers, as well as your customers' needs and preferences, you can develop a pricing model that supports both your business growth and customer satisfaction.
Austin B.Cloud server category description in HostShop
The cloud server category description is a crucial element in the cloud server product section of your HostShop online store. This description provides an overview of the cloud server offerings available to your customers, enabling them to make informed decisions when browsing your products. By customizing this description, you can tailor the information to cater to the specific needs and preferences of your target market, thereby increasing the likelihood of attracting and retaining customers.
When crafting the cloud server category description, consider these points to create a compelling and informative text:
- Emphasize key features: Highlight the most important features of your cloud server products, such as scalability, flexibility, security, and performance. This helps potential customers quickly understand the benefits of choosing your services.
- Target audience: Identify your target market and tailor the description to address their needs, pain points, or preferences. For instance, if your target audience consists of small businesses, emphasize affordability, ease of use, and the ability to grow as their businesses expand.
- Use clear and concise language: Write the description in a straightforward manner, using simple language to ensure that it is easily understood by a broad audience. Avoid using overly technical jargon or buzzwords that may confuse or alienate potential customers.
- Showcase unique selling points: Explain what sets your cloud server products apart from competitors in the market. Whether it's your exceptional customer service, competitive pricing, or innovative features, make sure your description reflects the unique value your offerings provide.
By carefully crafting a cloud server category description that is tailored to your target audience and highlights the unique features and benefits of your products, you can effectively promote your offerings, engage potential customers, and drive sales in your HostShop online store.
Austin B.Do I get free email with Managed Cloud Servers?
With our Managed Cloud Servers, you can take full advantage of our high-end clustered email platform. Email is stored and processed separately from your cloud hosting, so it won't eat into your hosting resources.
Reudiger DalchowHow does Managed Cloud Server billing work?
At 20i we want to give customers simple, transparent, and predictable pricing. You can choose from three different Managed Cloud Server providers: 20iCloud, Amazon Web Services (AWS) and Google Cloud. We've kept billing as straightforward as possible so there's no nasty surprises!
Austin B.Change your Laravel .ENV file configuration through the control panel

The Laravel .env file is a configuration file that contains environmental variables for your Laravel application. These variables are used to store sensitive data such as database credentials, API keys, and other important configuration settings that your application needs to run properly.
The .env file is located in the root directory of your Laravel project and is loaded automatically by Laravel when the application boots up. This file contains a list of key-value pairs, where the keys are the names of the environmental variables, and the values are their corresponding values.
Using the ENV Configuration Tool
If you've deployed a Laravel-optimised Managed Cloud Server then you can quickly and easily add or change existing Laravel environment variables using the ENV Configuration tool within the 20i control panel.
To use the ENV Configuration tool:
- Head to your Hosting Packages and select Options > Manage on the package you need to manage
- Select ENV Configuration from the Laravel Tools section
If you've just deployed a new application then you'll see all the default environment variables pre-populated in the table view. If you want to adjust any variables, for example 'APP_DEBUG', then you can simply edit the right-hand side column with the option you want and the proceed to select Update ENV Configuration to save your changes.
If you want to edit the ENV file directly through File Manager, then there's a quick link to take you directly to the file at the top-right of the page, select View in File Manager to go directly to the source file which is usully found within your applications home directory.
You can also add new variables to your file by inputting the variable you want to add in the text field at the bottom-left of the table, then inputting the variable in the text field to the right. Then Update ENV Configuration will add the new variable to the table/file.
Austin B.Checking your Laravel error logs through the control panel

Like any software, Laravel applications may encounter errors during their operation. Laravel error logs are a record of these errors, which are generated by Laravel's built-in error handling system.
When an error occurs in a Laravel application, the error is logged to a file in the application's storage directory. By default, Laravel uses the Monolog library for logging, which allows for flexible logging configurations and can log to multiple destinations, including files, email, databases, and more.
Laravel error logs contain information about the type of error, the location in the code where the error occurred, and any other relevant details, such as the values of variables at the time of the error. This information can be invaluable for troubleshooting and resolving issues in a Laravel application.
Developers can view Laravel error logs by accessing the log files directly, or by using a tool like the Laravel Logs, which provides a web interface for viewing and searching log files.
There are many types of errors that can be logged in Laravel, depending on the nature of the application and the code that is running. Here are some examples of common errors that might appear in Laravel error logs:
- Syntax errors: these occur when there is an error in the syntax of the PHP code, such as a missing semicolon or a typo in a variable name
- Database errors: when there is an error with the database connection or a problem with the SQL queries being executed, such as a table that doesn't exist or a query that has invalid syntax
- Server errors: when there is an issue with the server environment, such as a misconfigured web server or insufficient server resources
- Application logic errors: when there is a problem with the logic of the application code, such as a function that is not returning the expected result or a conditional statement that is not behaving as expected
- Security errors: when there is a security vulnerability in the application, such as a cross-site scripting (XSS) or SQL injection attack, or when there is an attempt to access a resource that the user is not authorized to access
Laravel error logs can help developers identify and resolve these types of errors, improving the stability and security of their applications.
Austin B.How to Install .NET Core on your Cloud Server
Ordering Your .NET Core Optimized Server
Navigate to the Build Server Page: Start by logging into My20i and head to locate the Build your Cloud Server page.
Austin B.Setting Up Managed Cloud Server In HostShop
Before starting, you’ll need to ensure that you have one of the following Payment Gateways configured and enabled:
Open up the Cloud Servers page and enable the sale of Cloud Servers using the toggle switch in the top-right corner.
You’ll see a list of our current cloud server providers, which at present are 20iCloud, AWS, Google Cloud Platform, and your own custom-branded cloud server based on the 20iCloud platform.

Next to each server provider you can edit the instance pricing, the available regions, and whether or not servers from that provider are available for purchase by your clients.
Edit Instance Pricing
After opening the instance pricing window for a server provider, you’ll be able to edit the pricing for each server specification available within each region.
For example, with the 20iCloud provider, you can edit the pricing of the Micro, Small, Medium, and Large servers (among others) and this can be set per region, which in this case would be the UK, USA or Singapore regions.
An example of this is shown in the image below.

Here, we’ve set the global markup rate to 15%, meaning the price at which your clients will be buying the servers is 15% higher than the price you’ll be paying for them.
Please note that we’ve only selected for 3 of our servers to use the global markup rate in this case. The other servers will use the price that’s been set next to the server itself. For example, the Small server would be £19.99 in this case, which is a £2 markup over the original Reseller price.
At the bottom of this window, you can also set the cost of any additional bandwidth usage and disk space, if applicable to the server provider in question.
The last thing to note is that we’ve enabled Annual Pricing in the top-right corner, which allows your clients to pay for 12 months up-front in full. The annual price is simply the monthly price multiplied by 12.
Edit Regions
Here you can select the regions to make available for a particular cloud server provider. The available regions are different for each provider.

Cloud Server Optimisations
Below the Server Configuration section, you will find the Server Optimisations section. From here you can choose which optimisations you would like to make available for purchase.
The current optimisation options include:
- PHP
- WordPress with Redis
- Magento with ElasticSearch
- WooCommerce with Redis & ElasticSearch
- Laravel with NGINX
- Joomla! with Redis
- .NET Core

Cloud Server Addons
The final section allows you to enable and configure pricing for the server add-ons, which currently includes the Timeline Backups Pro service. The price can be set as a percentage-based markup over the wholesale Reseller price.
Joshua RosatoHow do I use the API with my Cloud Hosting?
It’s possible to set up your new Cloud Hosting using the Reseller API – doing so can allow you to automate functionality such as creating packages, activating services or resetting your cloud profiles. A full list of available endpoints, as well as full code examples for each is available within our API Documentation.
require_once "vendor/autoload.php"; //We specify the API wrapper location. $bearer_token = "YOUR API KEY"; //Your 20i API key. $services_api = new \TwentyI\API\Services($bearer_token); $response = $services_api→getWithFields("/cloud_server");Result:
The response will contain details on your Cloud Server with an array, including the ID. Make note of that ID, as you’ll need it to make requests to that specific Cloud setup, such as for creating a package. For example:
Array
(
[0] => stdClass Object
(
[configuration] => stdClass Object
(
[CpuCores] => 1
[RamMb] => 1024
[OsDiskSizeGb] => 25
[DataDiskSizeGb] => 0
[Provider] => 20i
[Zone] => 20i
[Country] => GB
[VpsOsId] => 1
[spec] => micro
)
[externalId] => 1111
[location] => dc_location-uk
[name] => vps-123456.mvps.stackcp.net
[productSpec] => cloud-20i
[count] => INF
[cpanel] =>
[cpanelInfo] =>
[cpanelRebuilding] =>
[id] => 1111
[isCloud] => 1
[isManaged] => 1
[packageIds] => Array
(
)
[profileId] => 1
[timelineService] => normal
)
)How do I create a package on my Cloud Server using the API?
Now that we have our ID, we can now make use of it to create our first package. We can do this using the following endpoint:
POST /cloud_server/cloudServerId/addWeb
The below code is how we’d call for that endpoint using PHP:
PHP
Request:
<?php
require_once "vendor/autoload.php"; //We specify the API wrapper location.
$bearer_token = "YOUR API KEY"; //Your 20i API key.
$services_api = new \TwentyI\API\Services($bearer_token);
$domain = "myclouddomain.com"; //The primary domain we wish to assign to our new package.
$extra_domain_names = []; // Any extra domains we wish to assign to the package as an array.
$addPackage = ["domain_name" => $domain, "extra_domain_names" => $extra_domain_names];
// The constructed payload for the endpoint, containing the domains and extra domains for the package.
$response = $services_api->postWithFields("/cloud_server/4838/addWeb", $addPackage);Result:
The response will contain the ID of your newly created package on your Cloud Server, returned as an object:
stdClass Object
(
[result] => 1234567
)And your new package should show in the Manage Cloud Hosting area of My20i, ready to use.
Further endpoints and code examples are available within the API Documentation available in My20i for your perusal, and the above should help you with getting started with this approach to Cloud Server hosting and provisioning – happy coding!
Ruth TurnerHow To Host Your Live Laravel Application with 20iCloud

Contents
- Introduction
- Prerequisites
- Step 1 - Create an Empty Hosting Package
- Step 2 - Connect your GitHub Account
- Step 3 - Select and Clone your Repository
- Step 4 - Getting your Laravel Application Live
- Step 5 - SSL, DNS, Email & More
Introduction
Laravel is an open-source PHP framework that provides a set of tools and resources to build modern PHP applications, and not coincidentally, it's also the most starred PHP framework on GitHub! Laravel has been crafted by a collaborative community to provide a seamless and elegant developer experience, and so, it deserves a hosting experience to match!
APP_ENV=production APP_KEY=base64:... APP_DEBUG=false APP_URL=https://yourdomain.com DB_CONNECTION=mysql DB_HOST=127.0.0.1 DB_PORT=3306 DB_DATABASE=your_database DB_USERNAME=your_username DB_PASSWORD=your_password CACHE_DRIVER=redis QUEUE_CONNECTION=database SESSION_DRIVER=file SESSION_LIFETIME=120
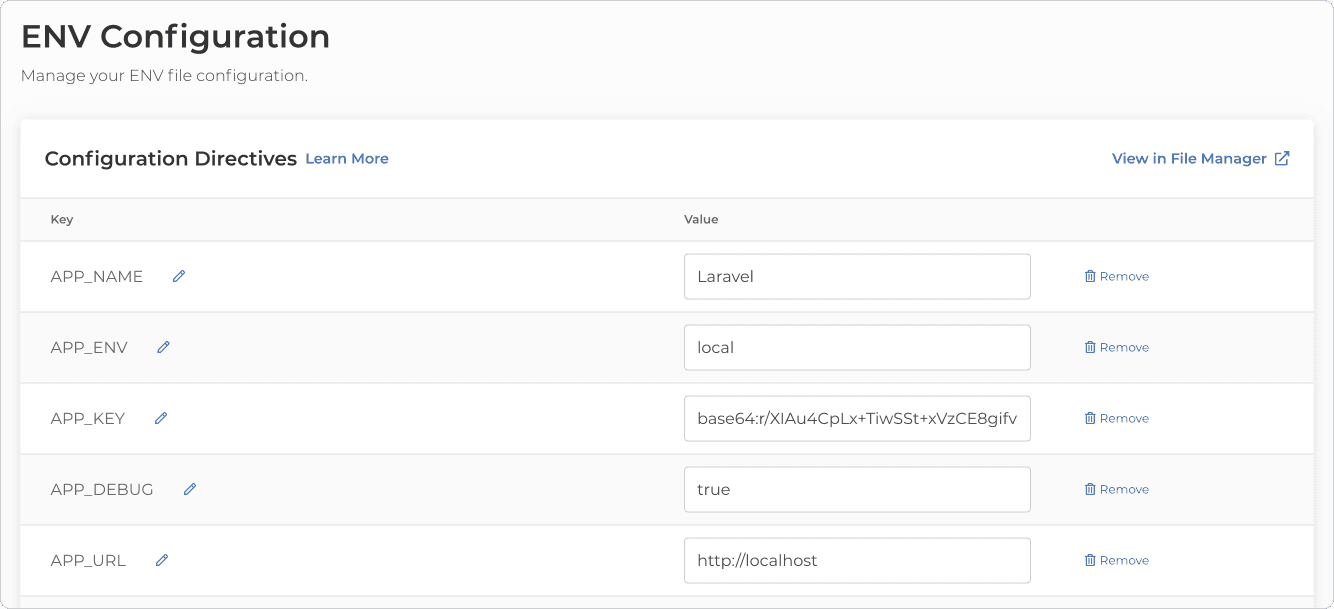
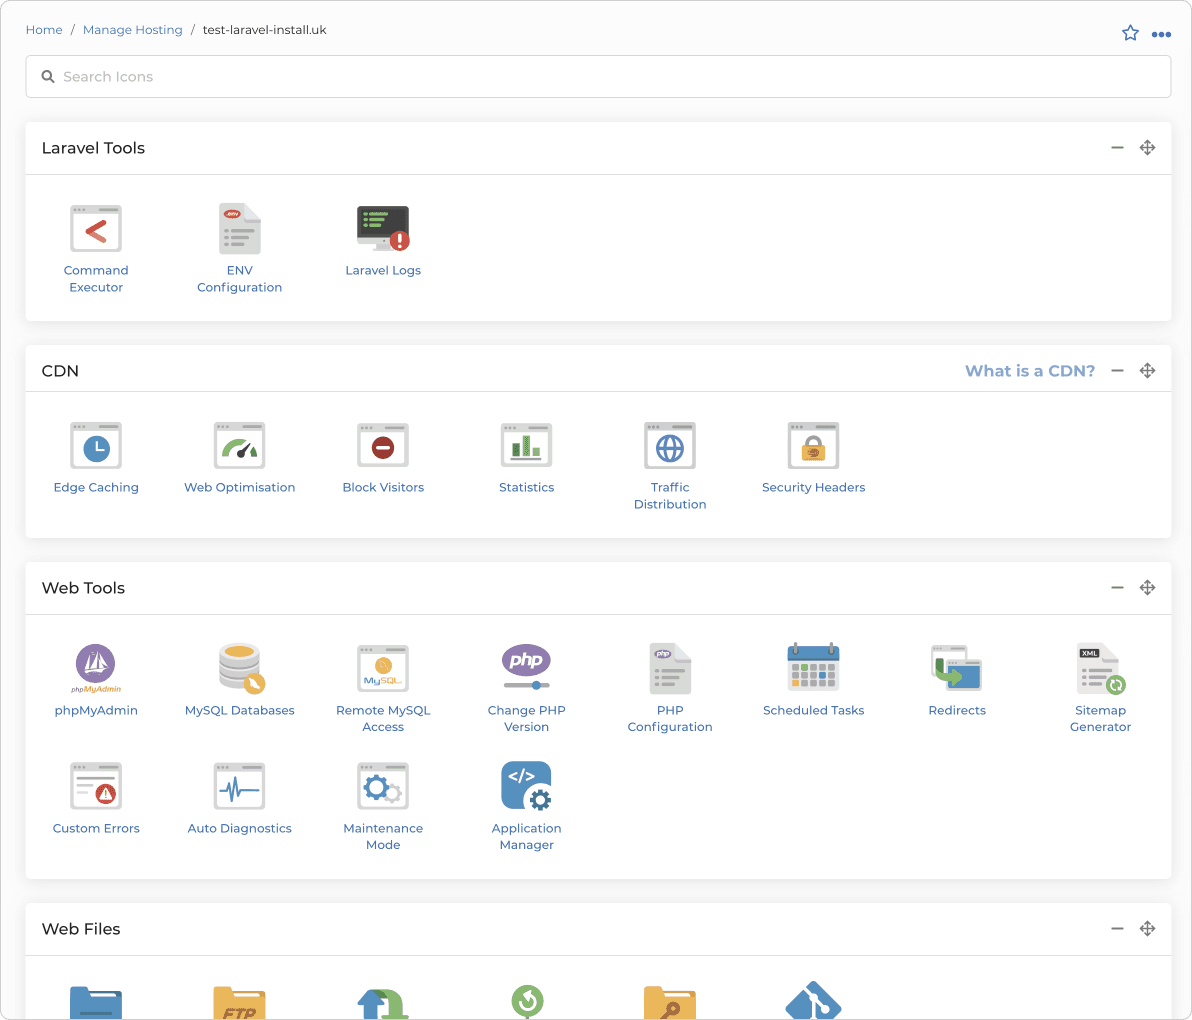
To generate a .env file using the command executor in the 20i Laravel tools, you can run the following command:
cp .env.example .envYou can then use the 20i Env Configuration to update the .env file to set appropriate values for your environment.

2. Install Dependencies
Once your environment variables are set, use the 20i Command Executor (or SSH into your server) and run the following command to install all required PHP dependencies:
composer install --no-dev --optimize-autoloaderThis ensures that only production dependencies are installed, and the autoloader is optimized for faster performance.
3. Build Assets for Production
If your application uses frontend assets like JavaScript or CSS, you need to compile and minify them for production. This is usually done using tools like Laravel Mix:
npm ci
npm run productionThese commands install the necessary Node.js dependencies and compile the assets.
4. Cache Configuration Files
To boost your application's performance, cache the configuration and route files:
php artisan config:cache
php artisan route:cache
php artisan view:cacheThese commands compile your configuration, routes, and views into single files to reduce the number of file system accesses.
5. Run Database Migrations
Ensure your database is up to date with the latest schema by running the migrations:
php artisan migrate --forceThe --force flag is necessary to run migrations in a production environment.
6. Restart Services
Finally, restart the necessary services to apply the changes:
php artisan queue:restartBy following these steps, your Laravel application should be well-configured for a production environment on your 20iCloud server.
Step 5 - SSL, DNS, Email & More
20iCloud Servers are perfect for hosting your live Laravel applications and come with all the tools you need to make your live application.

1. Apply the Free SSL
Head to the SSL/TLS Certificates section and select Enable to install a free Wildcard Let's Encrypt SSL.
2. Ensure DNS is Correct
You can manage your DNS through the Manage DNS section. The A Records are already configured to serve traffic to your application, ensure your nameservers are pointing to 20i's nameservers.
3. Set Up Email Accounts
20iCloud Servers come with Unlimited 10GB Mailboxes. Head to Email Accounts and add any mailboxes that you need.
How to Install a Node.js App on a Cloud Server
Deploying a Node.js application to the cloud can seem complex, but with the right steps, it becomes a straightforward process. This guide will walk you through the process of installing and running a Node.js app on your cloud server. Let’s dive in!
apps: [ { name: 'your-domain-app-name', // Replace with your domain or app name cwd: '/home/virtual/vps-12345/1/a1b2c3d4/public_html', // Path to your app script: 'npm', args: 'start', env: { NODE_ENV: 'production', }, exp_backoff_restart_delay: 100, }, ], };Key Fields to Update:
- name: Use your domain name or a unique identifier for the app.
- cwd: Set this to the absolute path of your application’s directory.
- script: Typically
npm, but adjust if your app uses a different runtime. - args: Usually
start, but modify this if your app requires a custom start command.
Save the file after making these changes.
Moreover, the start command for the application must be noted within package.json.
The command must start the application, depending on the framework being used.
Step 4: Deploy the Application
Navigate back to the package overview page, and click the "Discover Applications" button in the right-hand sidebar.

After a few seconds, the app should be discovered.
Once the app discovery is successful, the app will be started automatically.
Step 5: Access Your Site
Open a web browser and navigate to your domain. If everything is configured correctly, your Node.js app should now be live and accessible online.
Troubleshooting Tips
- Port Conflicts: Ensure the port specified in the
.envfile isn’t already being used by another service. - Permissions: Double-check file and directory permissions to ensure the app can access necessary resources.
- Logs: Use PM2’s logging features to debug issues.
- Log out and login again: If logged in before running the app discovery, log out and login again to fix this.
By following these steps, you can successfully deploy a Node.js application to the cloud. Whether you’re managing a personal project or handling client requests, this guide ensures a smooth and professional deployment process. Happy coding!
Joshua Rosato
Jordan Graves
Matthew Wright
Corey Seymour