Managed VPS Questions
Managed VPS support articles: our Managed Virtual Private Servers are easy to use, but here's some advice should you have any issues.
Should I choose a Managed Hosting on a VPS or shared cloud hosting?
Whilst our WordPress and Linux cloud hosting is rock-solid and suitable for most needs, if you’re looking for a hosting solution that dedicates resources to your sites and lets you lean on our expert 24/7 Support Team, then Managed Hosting would be for you.
If you’re a developer, a Managed VPS will give you more freedom to install extra apps.
 Austin B.
Do I get SSL certificates with a Managed Hosting?
 Austin B.
What level of support is provided with Managed Hosting?
With any 20i Managed Hosting you get full access to the UK-based 20i Technical Support Team. Universally-praised for their speed and clarity of responses, you’ll always get expert support. They're available 24x7x365 through live chat or support ticket from within My20i.
 Austin B.
How do I migrate from an Unmanaged VPS to Managed Hosting on a VPS?
With any Managed Hosting package you'll get full access to the Migration Centre. It gives you a few easy migration options.
Unmanaged VPS with cPanel ➡ Managed Hosting on a VPS
- Log in to My20i
- Select Start a Migration.
- Choose WHM/cPanel from the list and click Next.
- Enter the required credentials: hostname, username and the password for cPanel/WHM, and click Next.
- You can then choose your Managed VPS from the Service Target dropdown menu and Package Bundle Type.
- Go to Migrations Overview in My20i at any time to see the status of your migration. You’ll be notified when it’s successfully completed.
Unmanaged VPS with WordPress➡ Managed Hosting on a VPS
The best way to migrate a WordPress site from unmanged VPS is by using a WordPress migration plugin. We'd recommend using All-in-One WP Migration
https://en-gb.wordpress.org/plugins/all-in-one-wp-migration/
Unmanaged VPS with a Custom Site ➡ Managed Hosting on a VPS
To migrate a custom site when you don't have a control panel or isn't WordPress would be a manual migration.
 Austin B.
How to give a StackCP User access to a site on Managed Hosting
If you want to give your StackCP Users (customers) access to a site hosted on a Managed Hosting you set this up through My20i.
First ensure that you've created a StackCP User for this customer: https://my.20i.com/reseller/stack-users
Once you've created your StackCP User, you can delegate the User access to a site on the Managed VPS:
- Head to StackCP Users > Options > Manage/Edit
- Locate the Access & Contracts and from the dropdown menu. Select the hosting package on the Managed VPS
- Select Add Access
Your customer will now be able to log in through stackcp.com or your customer login page (configured via Reseller Customisations) and manage their website on the Managed VPS.
 Austin B.
Can I upgrade from an Unmanaged VPS to a Managed VPS?
Unmanaged VPS and Managed Hosting on a VPS are different services. So it isn't possible to simply upgrade from Unmanaged to Managed through our dashboard.
You may be able to migrate from one to the other. For more information we'd recommend viewing: How do I migrate from an Unmanaged VPS to a Managed VPS?
 Austin B.
How do I install Ruby on Rails on my Managed Hosting?
Ruby on Rails is a popular web application framework. 20i Managed Hosting allows the easy installation of Ruby on Rails as standard.
Why might you install Ruby on Rails? As a framework, Rails helps you build websites, making the process easier.
Once you've bought a Managed VPS, to enable Rails, you'll need to:
- Log in to your 20i account
- After logging in, head to the Manage VPS section of the control panel
- After selecting 'Manage', a list of applications and software should be presented on the right-hand side of the page under VPS Software
- From this point, select the slider to install Ruby on Rails (installation may take a minute or two).
 Andrew Porter
How do I install .NET Core on my Managed Hosting?
.NET Core is a cross-platform version of .NET. Specifically, when it comes to our Managed VPS platform, it means that you'll be able to develop .NET applications for use within a Linux environment - thanks to our handy one-click installer.
To enable .NET Core, you'll need to:
- Log in to your 20i account
- After logging in, head on over to the Manage VPS section of the control panel
- After selecting Manage, a list of applications and software should be presented on the right-hand side of the page under VPS Software
- Select the slider to install .NET Core. (installation may take a minute or two)
 Andrew Porter
How do I install Django on my Managed Hosting?
Django is a high-level Python framework that promotes the rapid development of websites.
It speeds up the web development process so you can concentrate solely on writing your application, or the creation of complex, database-driven websites.
To begin the process, you will of course need to ensure you have purchased Managed Hosting on a VPS.
To enable Django, you'll need to:
- Log in to your 20i account
- After logging in, head on over to the Manage VPS section of the control panel
- After selecting Manage (for the VPS you wish to manage), a list of applications and software should be presented on the right-hand side of the page under VPS Software
- Select the slider to install Django (installation may take a minute or two).
Once the UI states that Django has been installed, you should then be able to connect to the Managed VPS (via SSH) to confirm that this is the case.
The binary can be found at the following location:
/usr/local/bin/django-admin
The above can then be use as follows:
-bash-4.2$ django-admin startproject mytestwebsite
The above, syntactically, will run the django-admin binary with a view to creating a base project within a directory named mytestwebsite (from within the directory you're running the binary).
You can check if this has worked by then browsing to the project directory specified.
 Andrew Porter
How do I install NodeJS on my Managed VPS?
NodeJS is a server-side Javascript runtime environment which aims to assist in the building of light websites, but most importantly, scalable. For example, you may wish to use NodeJS to build real-time, high-traffic applications.
At 20i, it's available as a one-click install for those with Managed Hosting.
To enable NodeJS you'll need to:
- Login to your 20i account.
- After logging in, go to the Manage VPS section of the control panel.
- After selecting 'Manage', a list of applications and software will be on the right-hand side of the page under VPS Software.
- From this point, select the slider to install .NodeJS (installation may take a minute or two).
 Andrew Porter
How do I deploy a .NET Core application on a Managed VPS?
Deploying a .NET Core application through the Application Manager is quick and easy. Before you start, you’ll need to make sure your .NET Core application files are located on the Managed VPS accessible through a directory with file permissions of 755.
Note: Ensure .Net Core is installed on the Managed VPS through the one-click installer.
Then create your application using the Application Manager which is accessible through any hosting package on your Managed VPS via Manage Hosting > Options > Manage > Application Manager.
You’ll need to create a new application to point to your .NET Core files.
- Select Create new application
- Give your application a name. This can be anything and is just for reference/display purposes.
- Select .NET Core as the Application Type
- Select the domain you’d like the application to be accessible on
- Enter the path to your application's source code directory, relative to the home directory of the package
- Enter the primary script file, for .NET Core this could be Program.cs, but may differ based on your own application. This may also be your application name, so something like ApplicationName. This really depends on how your application is set up as to which file/directory will be your primary script.
Note: If your application is configured as a reverse proxy your startup script maybe your RProxy.dll file.
- You'll need to make sure you’ve added the following code to your Program.cs file for your application to work on the Managed VPS:
public static IHostBuilder CreateHostBuilder(string[] args) =>
Host.CreateDefaultBuilder(args)
.ConfigureWebHostDefaults(webBuilder =>
{
webBuilder
.UseKestrel(options => { options.ListenUnixSocket(args[0]); })
.UseStartup
});
- Development and Production modes won’t have any impact for a .NET Core application, so you can leave this option set to Development mode.
- Select Create App.
Note: Development mode will usually send any application errors to the browser, whereas Production mode will suppress browser console errors and only log exceptions through the server error logs. This does not apply to .NET Core applications.
Your application should now be running on the domain name you’ve chosen in the application manager.
 Austin B.
What is the PHP memory_limit?
The PHP memory_limit is the maximum amount of server memory that each PHP script can use.
The official PHP documentation explains this in greater detail.
“This sets the maximum amount of memory in bytes that a script is allowed to allocate. This helps prevent poorly written scripts from eating up all available memory on a server.”
PHP memory usage is typically managed by the PHP interpreter and the web server running PHP scripts. PHP has a default memory limit setting, which restricts the amount of memory a script can use.
The default value for PHP memory is 128M. This can be raised if an application or website needs more memory.
It's important to note that allocating too much memory to PHP can also have negative consequences, such as slowing down the application or causing other performance issues. This may be due to a specific PHP process using far too much memory than what is available.
When a script exceeds the memory limit that's been set for the server an error similiar to the following will be logged.
Fatal error: Allowed memory size of x bytes exhausted (tried to allocate x bytes) in /example/php/script PHP Fatal error: Out of memory (allocated x) (tried to allocate x bytes) in /example/php/script
You can update the PHP memory limit for your site through My20i or StackCP.
Be aware that if you're on a Managed VPS then your server has a physical memory limit. You should optimize your code if the memory_limit parameter is already set to its maximum.
 Austin B.
How do I move a hosting package to a Managed Hosting on a VPS?
Moving a hosting package from 20i to Managed Hosting on a VPS couldn’t be easier. There’s no manual migration of data needed, and can be done at just the click of a button.
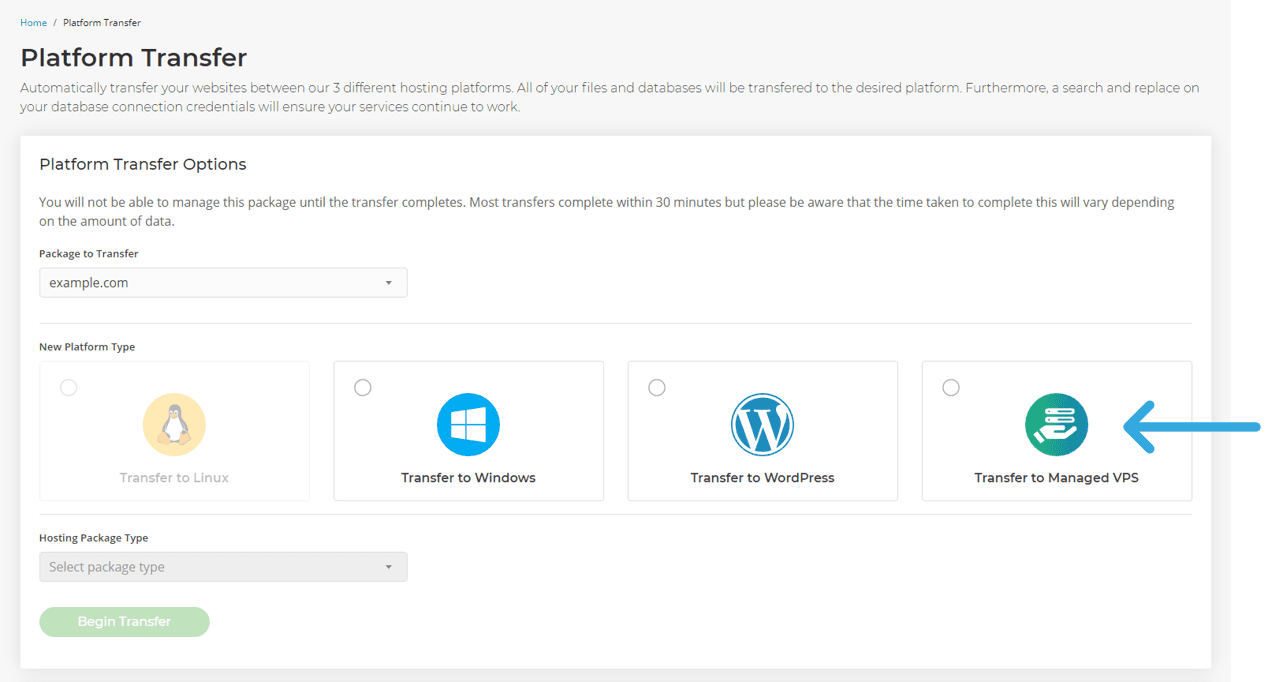
- Go to Platform Transfer
- Select the website you want to move
- Select your Managed VPS
- Select Begin Transfer
Your transfer will complete in about 5-10 minutes. Your hosting package will be set up on your Managed VPS! Those moving from other providers can use our automatic Migration Centre.
What's moved to the Managed VPS?
When using the one-click transfer all site files and databases are moved to the Managed VPS infrastructure. Mail continues to use the robust clustered 20i mail platform, so email won't affect your VPS resource quota. Databases are moved to dedicated Cloud MySQL instances and site files are moved to super-fast local SSD storage.
 Austin B.
Is your hosting environmentally-friendly?
Yes, we're committed to reducing our carbon footprint, both in our data centres and workplace.
We achieve this through efficient power systems, renewable energy, a modern hosting platform and green company policies. You can find full details at Green Hosting, and you check whether your website is hosted using green energy at the Green Web Foundation.
Our commitment to sustainable hosting.
All our data centres are powered with 100% renewable energy. Our data centres use the best technology for fast hosting performance and energy efficiency.
Our proprietary autoscaling technology, not only gives you the power of a true ‘elastic cloud’ to react to the demand of processing power, bandwidth and memory your website needs at any given time, it also scales down when the demand is lover and therefore reduces the energy consumption.
Not just green hosting – but a green company
Our efforts to be a sustainable business are not only applied to our hosting. Our office runs on solar power. We run a paperless office, recycle waste and even our cleaning products are chosen for their environmentally friendliness.
 Chris Wright
How many websites can I host on Managed Hosting?
With any Managed Hosting package, you can host as many websites as you like. You're in control of how many websites are assigned to the VPS and how resources are allocated to those sites.
How can I monitor my VPS resources usage?
You can check that your site(s) are getting the resources they need.
Head to My20i > Manage VPS > Options / Manage
From here you'll see your Managed VPS usage including SSD Disk Space, CPU and RAM.
 Austin B.
How do I get started on Managed Hosting?
Unlike an unmanaged virtual private server (VPS) setup, our Managed Hosting platform is integrated into the My20i platform to make managing your new VPS and the sites on it as simple as possible.
Everything can be handled from our control panel, from the installation of new software using our one-click installers to adding new websites to the setup. You can get started right away – there’s no need to go about connecting via SSH or setting up software using guides online, meaning you can focus on what you’d actually like to do with your hosting instead.
Installing software
Firstly, before you add any sites to your Managed VPS, you may want to add some specific software. Django, NodeJS, Ruby on Rails and Redis are just a few of the one-click installations available to our customers via the Manage VPS area. You can even tweak the VPS itself to be optimised for Magento or WordPress sites.
To do this:
- After logging in, head to the Manage VPS section of the control panel
- After selecting 'Manage', a list of applications and software will be presented on the right-hand side of the page under VPS Software
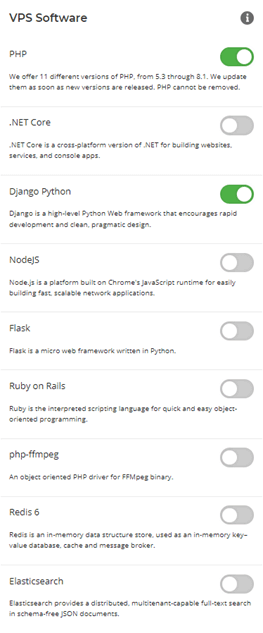
- From this point, use the toggles to choose which software you’d like to install
Note: To optimise your Managed Hosting for WordPress or Magento, the VPS cannot have any sites currently on it
Adding a new site
Once that’s done, you can add your first site to your Managed Hosting. Doing so is the same as adding a package on all of our hosting:
- Go to Add Hosting Package, and then fill out the domain field. When selecting a Platform Type, you’ll see that one of the available options is for Managed VPS
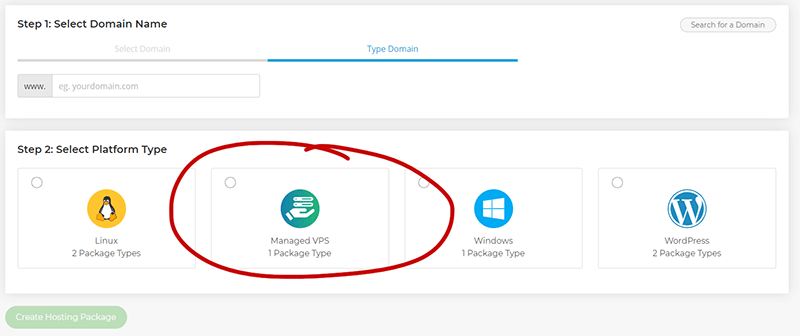
- If you have more than one Managed VPS, choose which one to have the hosting on from the drop-down box presented
- Fill out the rest of the details, and then select Create Hosting Package
This will create a brand new package directly on your Managed Hosting on a VPS, where you can manage your website.
Moving an existing site
If you have a pre-existing website on our shared hosting that you’d like to move across to your new Managed Hosting instead, you can do this from the Platform Transfer area.
More details on how to do this are available here: Move a Hosting Package to Managed Hosting.
The complete guide
If you'd like more information about Managed Hosting, we have a full guide available in My20i: Getting Started: Managed Hosting (PDF).
Do I get email with Managed VPS?
Yes. With 20i Managed VPS you can take full advantage of our high-end clustered email platform. Email is stored and processed separately from your virtual machine, so it won't eat-in to your website hosting resources.
You’ll be able to create mailboxes, auto-responders, forwarders and more, all from the My20i control panel.
 Austin B.
How do I use Git version control in My20i?
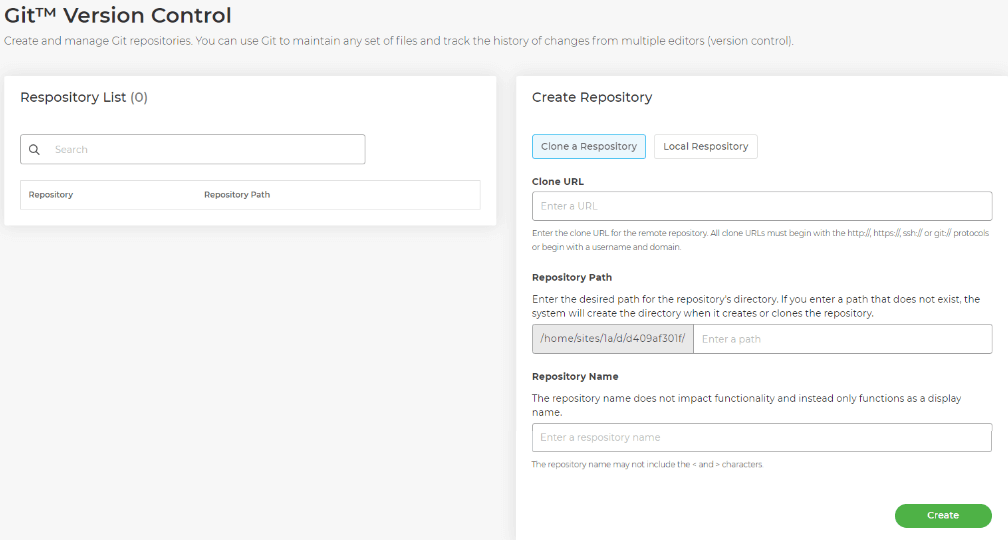
My20i includes a graphical user interface to manage Git™ version control.
You can clone, manage and deploy Git repositories directly. You're able to manage multiple repositories in one package, allowing you to keep track of version changes and deploy your sites as and when you’d like - at the click of a button.
To access this tool:
- Log into My20i and head to your Manage Hosting area.
- Select Options > Manage on the hosting package you’d wish to edit.
- Under the Web Files area you should see the option for GitTM Version Control – select this option.

- You’ll be prompted for a name and email – set these to be the name and email you’d like to show when deploying using Git, and select Enable.
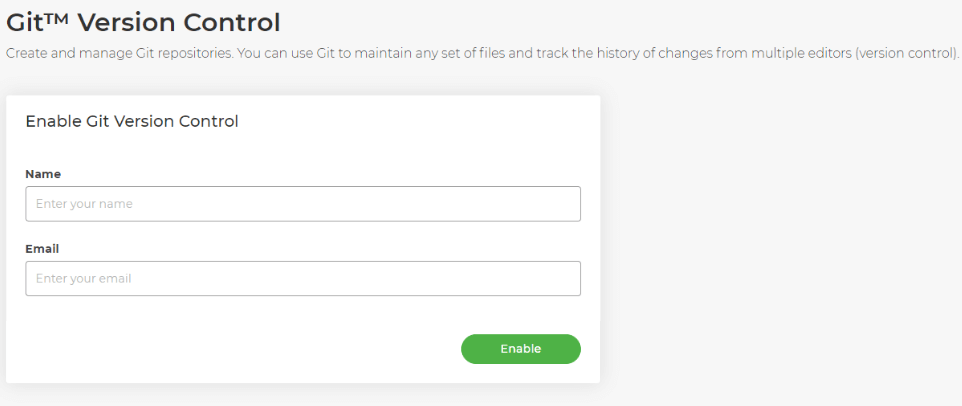
You'll then see your current repository list, and see options to set up your first repository.
Cloning a Git repository
Cloning a repository via the tool requires you to first create a remote repository using GitHub, following the steps highlighted in their documentation.
Once done, head to the repository and copy the URL by selecting Code, then copying the URL provided without the SSH protocol included.
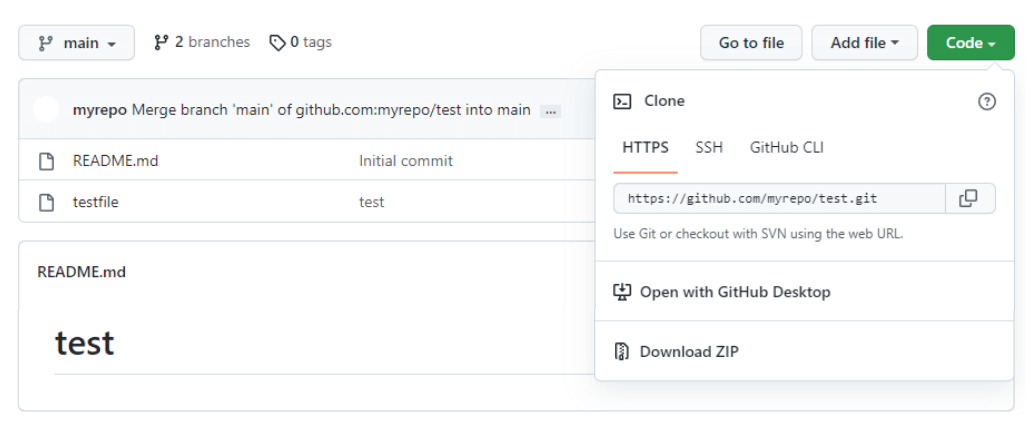
Note: For private repositories, you'll need to set up a public/private key pair and use the SSH URL provided instead.
Once you have the URL above, paste it into the Clone URL area, then set the file path of where you want your repository to set up. Lastly, set up a Repository Name - this is purely a display name for the UI itself.
Then, hit Create. Once done, your repo should show in the list like this:
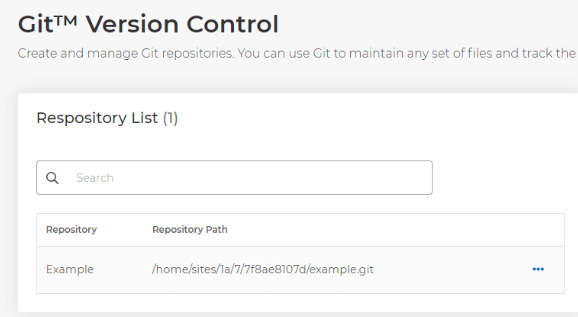
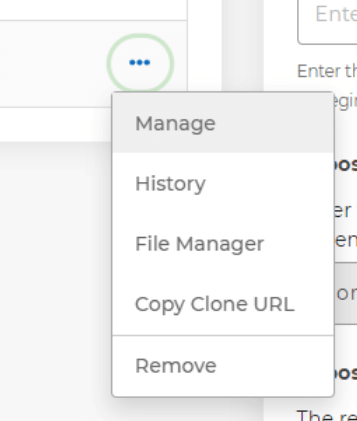
You can then use the three dots to manage the repository, check the history, go to the files directly via File Manager, copy the URL or remove the repository from the list.
Managing a repository
Managing a repository allows you to check and update information about the repo itself. You can do so via the Basic Information tab:
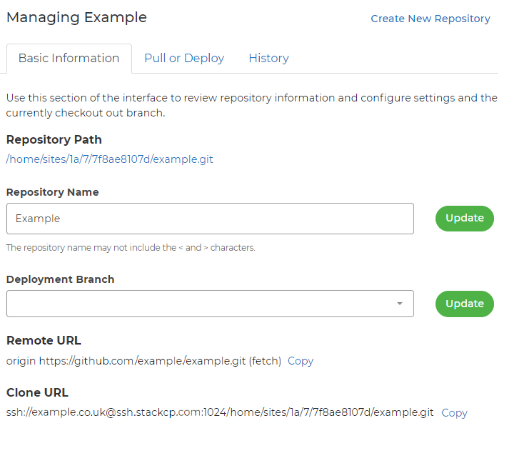
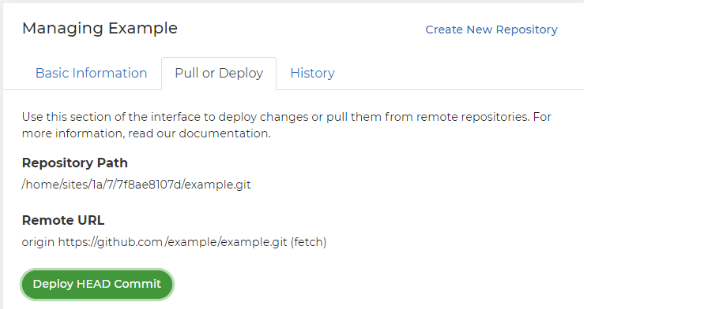
You can also pull or deploy changes to the repo using the Pull or Deploy tab. Select Deploy HEAD Commit to deploy the changes you've made to your repository directly.
You can use the History tab to see what changes have been deployed in the history of the Git setup.
Creating a local repository
If you don't want to deploy to a remote repository, and instead simply use a local one in your package’s file space, you can set this up via the UI too. To do so, select Create New Repository and then hit the Local Repository tab.
.png)
You can then fill out the fields to choose the folder you'd like the repository to be in, the name, as well as selecting the Deployment Type and Deployment Branch.
The type defines whether or not you want automatically to deploy changes, or if you want to only deploy your changes when manually selecting the Deploy button.
The branch is what Git branch you want to deploy these changes to. You can have multiple branches of development to work from if you want to make tweaks to the code without affecting your repository's main codebase.
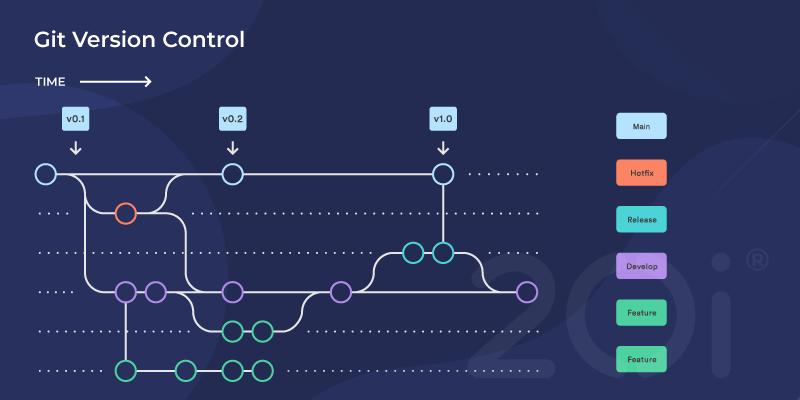
More information on branches is available here: Using Git Branches.
Can I choose another operating system when I`m using Manage Hosting on a VPS?
All Managed Hosting comes with the bespoke My20i control panel which runs on CentOS 7. No other operating systems can be installed.
If you need a different OS you can use a Self-Managed VPS.
 Austin B.
Why am I getting a 'Too Many Redirects' error?
'Too Many Redirects' errors are caused by sites stuck in a loop of redirects.
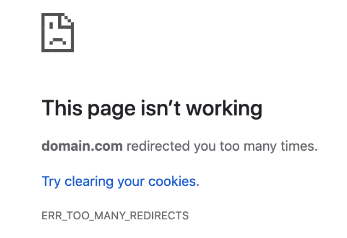
What is the ERR_TOO_MANY_REDIRECTS?
One or multiple redirections point to themselves, resulting in the site being unable to load as it will continuously redirect until either the browser stops it early or the site goes down.
Most commonly, ERR_TOO_MANY_REDIRECTS are caused by incorrect or poorly-defined redirect rules in your .htaccess file, or a plugin forcing a redirect over and over.
Common causes of ERR_TOO_MANY_REDIRECTS
Below are some common causes - 'always true' rules, mixed content and caching. We'll explain what they mean and show you how to fix them.
Always true rules
Redirect rules set in the .htaccess file have conditions. These conditions decide when a redirect rule should redirect a site, so that the site doesn’t always redirect. If these conditions aren’t set correctly however, they can always be ‘true’, meaning that the redirect will always occur and as a result the site will loop.
For example, we have a site domain.com and we try to redirect this to our subdomain my.domain.com
One way we could do this is via the following:
RewriteCond "%{HTTP_HOST}" "domain.com$"
RewriteCond "%{REQUEST_URI}" "^/"
RewriteRule ".*" "https://my.domain.com/" [L,R=301]
In the above example, we have our condition:
RewriteCond "%{HTTP_HOST}" "domain.com$"Which states that, if the URL contains ‘domain.com’, redirect the site. However, this will lead to a loop, as our subdomain also contains ‘domain.com’, resulting in the too many redirects error.
A much better way to do this redirect would be instead to use:
RewriteCond %{HTTP_HOST} !^my\.domain\.com [NC]
RewriteRule ^(.*)$ http://my\.domain\.com/$1 [R=301,L]
Which instead uses the condition:
RewriteCond %{HTTP_HOST} !^my\.domain\.com [NC]This checks to see if the URL is not the subdomain, and redirects the site if it’s not.
It’s worth looking through your rules and making sure this type of logical loop doesn’t occur.
If you’re unsure, try renaming your .htaccess file. If the error stops when doing so, something in that file is causing the loop itself.
Mixed Content
The term ‘Mixed Content’ refers to when parts of a website on HTTPS try to load content over HTTP. In more uncommon cases, this can result in a site correcting itself to HTTP, then redirecting to HTTPS, resulting in a loop between the two which causes the ERR_TOO_MANY_REDIRECTS.
In cases such as this, it’s best to temporarily remove any rules that may be enforcing HTTPS, and then updating all of your site’s URLs to ensure they’re either all on HTTP or all on HTTPS.
We have a full guide on finding and fixing mixed content here.
Force HTTPS Scripts
Some Content Management Systems (CMS) such as Joomla have options that can force HTTPS connections to your site as a part of the integration. Enabling these makes tweaks to the code to enforce this – however, if you’ve already included your own scripts to force HTTPS or are using 20i’s option to do so in the SSL/TLS area, then this could potentially conflict and lead to a loop.
Check your current CMS setup to see if any options to force HTTPS connections are enabled. If they are, disable or remove any other scripts or options that will be enforcing this to remove any conflicts.
Caching
Caching can also cause a redirect loop as site and server caching can store redirects, resulting in a rule that has been removed to continue to be used.
The quickest way to check to see if this is the case is to visit the site with a query string at the end, for example:
https://mydomain.com/?nocache
Anything after the '?' is ignored, so you can write anything. Doing so will bypass the cache on the site and force the site to load directly.
If the site then loads fine without the redirect error, you can confirm that caching is what's causing the redirect.
Check your site for any cache folders and clear them, and then clear the edge cache from within your package:
- Log into My20i and head to your Manage Hosting area
- Select Options > Manage on the hosting package you’d wish to edit
- Select Edge Caching from under the CDN section of the package

At the bottom of the Edge Caching page, select Purge Everything. The server cache will be cleared within a few minutes.
Now you should be free of the 'too many redirects' error. Get in touch with our support team if you need further help.