Managed Cloud Hosting Questions
Timeline Backups Pro pricing in HostShop
Timeline Backups is a powerful and reliable backup solution designed specifically for cloud servers. Offering Timeline Backups as part of your HostShop services provides numerous benefits for both you and your customers. By default the price of Timeline Backups is 15% of the value of the server. You can choose to increase this if you want to make a higher markup on backups.
Benefits of Timeline Backups:
Enhanced Data Protection:
Timeline Backups ensures that your customers' data is protected and easily recoverable. With its automated backup system, Timeline Backups takes regular snapshots of your customers' cloud servers, safeguarding their websites, databases, and files against potential data loss due to hardware failures, software glitches, or human errors.
Flexible Restoration Points:
By offering Timeline Backups, your customers can enjoy the flexibility of choosing from multiple restoration points. They can easily roll back their cloud servers to a specific date and time, allowing them to recover from issues such as data corruption, security breaches, or other unforeseen events.
Increased Customer Satisfaction:
Providing a reliable and easy-to-use backup solution like Timeline Backups increases customer satisfaction and trust in your services. Your customers will appreciate the added security and peace of mind that comes with knowing their data is secure and readily available in case of emergencies.
Competitive Advantage:
Offering Timeline Backups as part of your service portfolio sets you apart from competitors who may not provide comprehensive backup solutions. This added value can help you attract new customers and retain existing ones, ultimately contributing to the growth of your business.
Simple Integration with HostShop:
Timeline Backups is seamlessly integrated with the HostShop billing platform, making it easy for you to manage, bill, and provision the service for your customers. This streamlined process allows you to focus on your core business while offering a valuable service that enhances your customers' experience.
 Austin B.
Setting your own cloud server brand in HostShop
Setting up your own cloud server brand on top of the 20iCloud infrastructure offers several advantages, especially when it comes to distinguishing your business in a competitive market. By creating your own brand with a unique name and logo, you can leverage the existing capabilities of major cloud infrastructure providers like 20iCloud, AWS, and Google Cloud, while adding a personal touch to your services.
There are several reasons why you may want to add your own brand to help your cloud server stand out in the market:
- Brand Identity: Creating your own brand allows you to establish a distinct identity that customers can easily recognize and associate with your business. A unique brand name and logo can help create a memorable impression, which is critical in a crowded market.
- Customization: By having your own brand, you can tailor your cloud server offerings to cater to specific customer needs and preferences. This may include custom features, pricing plans, and support services, enabling you to differentiate your brand from competitors.
- Market Perception: With your own brand, you can position your cloud server as an independent and innovative solution, rather than just another reseller of existing services. This can help to build trust and credibility among customers, who may perceive your brand as more committed to their success.
- Marketing and Promotion: Having a unique brand enables you to create and execute targeted marketing strategies that showcase the benefits and features of your cloud server offerings. This can help attract potential customers and generate more leads for your business.
- Customer Loyalty: A strong brand can foster customer loyalty, as clients are more likely to stick with a service that they trust and identify with. By providing a personalized and consistent experience, you can build lasting relationships with your customers and encourage repeat business.
Adding your own brand to a cloud server built on top of the 20iCloud infrastructure can significantly enhance your market presence and visibility. It allows you to create a unique identity, customize your offerings, and execute targeted marketing strategies, ultimately helping you stand out from competitors and build lasting relationships with customers.
Steps to set up your own branded cloud server
To begin with, you will need to ensure that you have at least one card payment gateway setup before creating this branded cloud server. We recommend Stripe, as a payment gateway. You can learn how to set up Stripe as a payment gateway here.
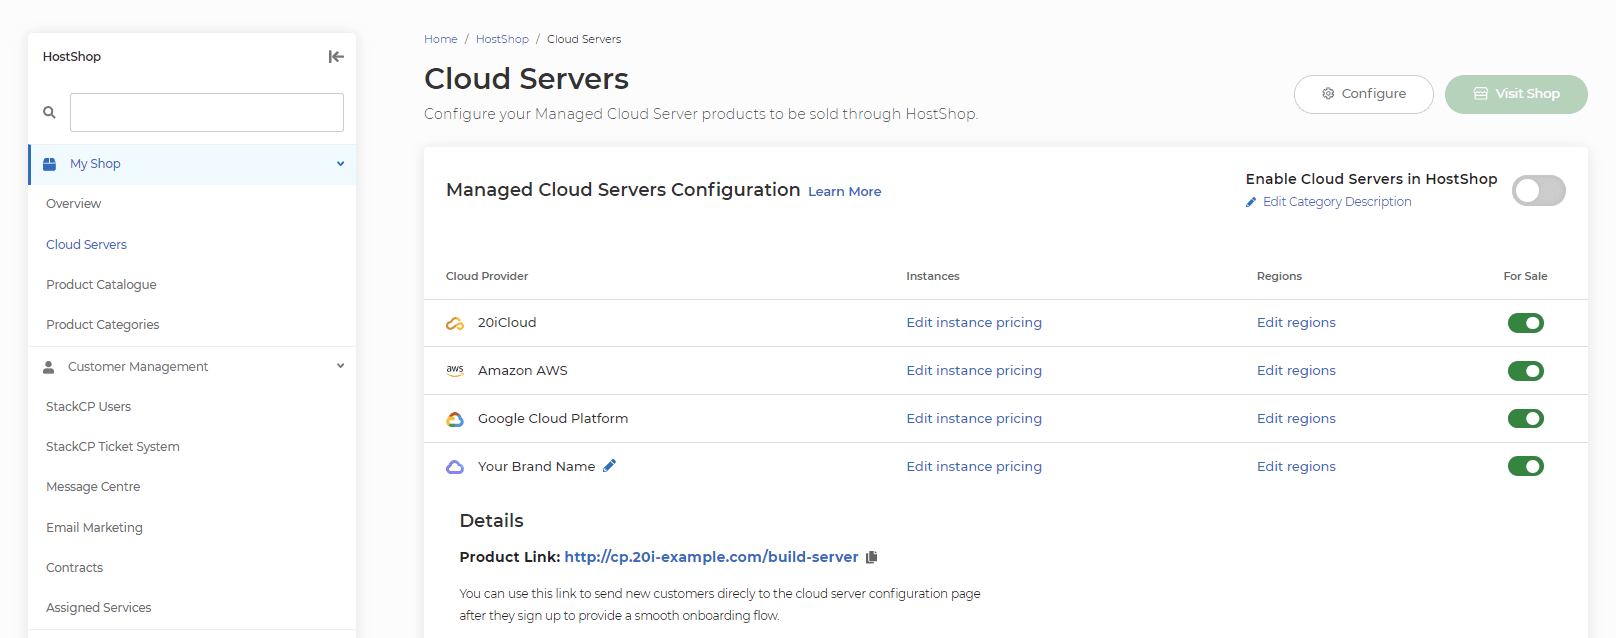
From the Cloud Servers section of Hostshop, you can customise the branded name of your cloud server, alongside the different pricing instances and what regions are available. The product is not for sale by default, but that can be toggled on the righthand side.
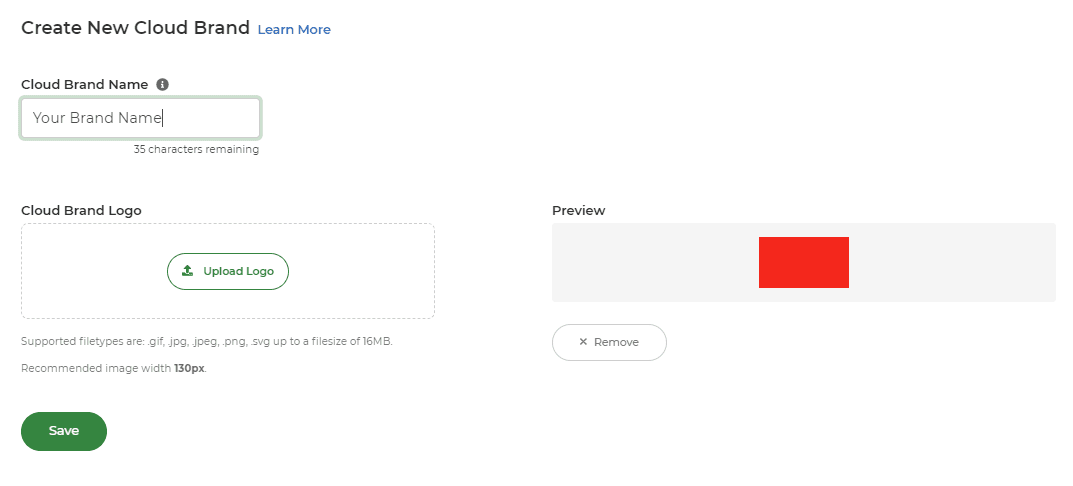
In addition, you can also customise the Cloud Brand Logo. This logo will be displayed next to your Cloud Server product for potential customers to see.
This is what your customers will see upon navigating to the Cloud Server section of your online shop.
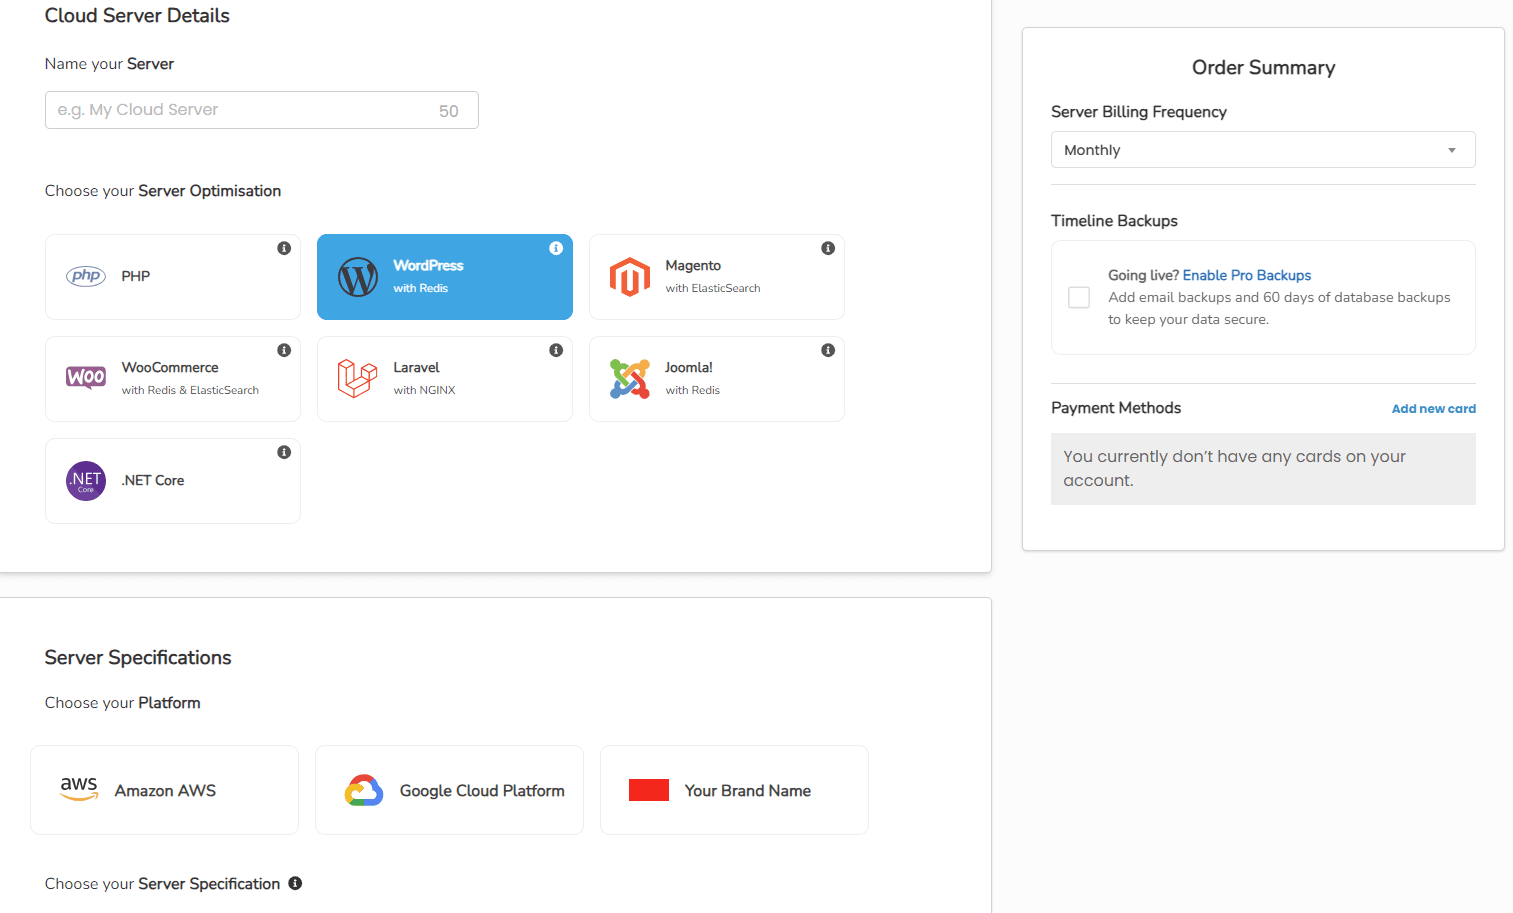
You now have a branded, white-label cloud server to sell to your own customer base.
 Austin B.
Cloud server bandwidth and disk space pricing in HostShop
If you decide to offer AWS and Google Cloud services through your HostShop platform, it's essential to understand the pricing structures associated with these providers, particularly in regards to pay-per-usage bandwidth costs and additional disk space pricing. These costs can impact both your profit margins and your customers' satisfaction with your services.
AWS and Google Cloud employ a pay-per-usage model for bandwidth, charging based on the amount of data transferred in and out of their cloud servers. This model can lead to variable costs for your customers depending on their usage patterns. Additionally, both providers have pricing structures for extra disk space, which may be required by users who need more storage capacity for their applications and data.
As a HostShop reseller, you have the flexibility to manage the pricing for AWS and Google Cloud services according to your business strategy. When a StackCP User orders a cloud server, you can choose to:
- Markup the bandwidth cost: By adding a markup on the bandwidth cost, you can increase your profit margins while covering the variable costs associated with the pay-per-usage model. However, this approach may result in higher prices for your customers, which could impact their satisfaction and your competitiveness in the market.
- Pass on the wholesale price: Alternatively, you can choose to pass on the wholesale price of the bandwidth to your customers. This approach keeps the pricing transparent and can help maintain customer trust while allowing them to better manage their expenses. However, this method may yield lower profit margins for your business.
You can also set pricing on a per-instance basis, customizing the charges according to the server size or specifications. For example, you may decide to apply a higher markup on bandwidth costs for larger instance types, which are typically used by customers with higher resource demands and may be willing to pay a premium for the additional resources.
When determining your pricing strategy for AWS and Google Cloud services through HostShop, it's important to balance your profit goals with the need to remain competitive and attractive to your target audience. By carefully considering the costs associated with these providers, as well as your customers' needs and preferences, you can develop a pricing model that supports both your business growth and customer satisfaction.
 Austin B.
Cloud server category description in HostShop
The cloud server category description is a crucial element in the cloud server product section of your HostShop online store. This description provides an overview of the cloud server offerings available to your customers, enabling them to make informed decisions when browsing your products. By customizing this description, you can tailor the information to cater to the specific needs and preferences of your target market, thereby increasing the likelihood of attracting and retaining customers.
When crafting the cloud server category description, consider these points to create a compelling and informative text:
- Emphasize key features: Highlight the most important features of your cloud server products, such as scalability, flexibility, security, and performance. This helps potential customers quickly understand the benefits of choosing your services.
- Target audience: Identify your target market and tailor the description to address their needs, pain points, or preferences. For instance, if your target audience consists of small businesses, emphasize affordability, ease of use, and the ability to grow as their businesses expand.
- Use clear and concise language: Write the description in a straightforward manner, using simple language to ensure that it is easily understood by a broad audience. Avoid using overly technical jargon or buzzwords that may confuse or alienate potential customers.
- Showcase unique selling points: Explain what sets your cloud server products apart from competitors in the market. Whether it's your exceptional customer service, competitive pricing, or innovative features, make sure your description reflects the unique value your offerings provide.
By carefully crafting a cloud server category description that is tailored to your target audience and highlights the unique features and benefits of your products, you can effectively promote your offerings, engage potential customers, and drive sales in your HostShop online store.
 Austin B.
Do I get free email with Managed Hosting?
With our Managed Hosting packages you can take full advantage of our high-end clustered email platform. Email is stored and processed separately from your cloud hosting, so it won't eat-in to your hosting resources.
Does free email come with all Managed Hosting packages?
Yes, it does not matter if you chose our 20iCloud, AWS or GCP as your managed hosting platform. You always get the same free email features on all platforms and with all plans.
What email features do I get for free with Managed Hosting?
You get free and unlimited 10GB mailboxes. The free email you get with our Managed Hosting also includes:
- Catch-All Address Support
- Email Forwarders
- Autoresponders
- Webmail
- Antivirus and Antispam Protection
- Mailbox Autodiscover Support
- DKIM Email Authentication
- Email Subaddressing
All email is encrypted in transit using TLS for security and privacy. We use three layers of inbound spam and virus scanning: network-level, virus scanning and content-based scans.
 Reudiger Dalchow
How does Managed Cloud Hosting billing work?
At 20i we want to give customers simple, transparent, and predictable pricing. You can choose from three different Managed Cloud Hosting providers: 20iCloud, Amazon Web Services (AWS) and Google Cloud. We've kept billing as straightforward as possible so there's no nasty surprises!
20iCloud Billing
If you host your server on the 20iCloud platform you're charged a flat monthly cost for your server and bandwidth regardless of how high the traffic is to your servers. You'll always have the flat monthly cost so it's simple and predictable.
AWS Billing
We've simplified billing for AWS Cloud Hosting too. You'll pay a flat monthly cost for the server each month, regardless of how resource-intensive the server is. AWS charges separately for bandwidth on a Pay As You Go basis (in GB). We manage this for you and pass through the AWS charge each month along with the server cost. For example, if your server uses 100GB of bandwidth in the month, you will be charged $2 (100GB x $0.02).
You can scale your server resources at any time, including adding extra disk space should it be required. These upgrades will be added to the server cost occurring each month.
Google Cloud Billing
We've made Google Cloud billing simple. If you use the Google Cloud platform you'll pay a flat monthly cost for the server. Again, it doesn't matter how resource-intensive your server is. Google Cloud charges separately for bandwidth on a Pay As You Go basis (in GB), like AWS. We manage this for you and pass through the Google Cloud bandwidth charge each month along with the server cost. For example, if your server uses 100GB of bandwidth in the month, you will be charged $2 (100GB x $0.02).
You can scale your server resources at any time, including adding extra disk space should it be required. These upgrades will simply be added to the server cost occurring each month.
If you need any help then please feel free to contact us via the Contact Customer Services section in your account and we’ll be happy to help with any queries!
 Austin B.
What Cloud Server regions are available?
Our Cloud Servers are located across 60+ data centres, powered by 20iCloud, AWS and GCP.
Europe
- London, UK
- Dublin, Ireland
- Paris, France
- Frankfurt, Germany
- Milan, Italy
- Zurich, Switzerland
- Stockholm, Sweden
- Warsaw, Poland
- Hamina, Finland
- Madrid, Spain
- Saint-Ghislain, Belgium
- Eemshaven, Netherlands
North America
- North Virginia, USA
- Ohio, USA
- North California, USA
- Iowa, USA
- South Carolina, USA
- Virginia, USA
- Texas, USA
- Oregon, USA
- California, USA
- Utah, USA
- Nevada, USA
- Dallas TX, USA
- Canada (Central)
- Montreal, Quebec
- Toronto, Ontario
Asia & Oceania
- Mumbai, India
- Delhi, India
- Hong Kong, Asia-Pacific
- Taiwan, Asia-Pacific
- Seoul, South Korea
- Tokyo, Japan
- Osaka, Japan
- Singapore, Asia-Pacific
- Jakarta, Indonesia
- Sydney, Australia
- Melbourne, Australia
Middle East
- Bahrain, Middle East
- United Arab Emirates
- Tel Aviv, Israel
South America
- São Paulo, Brazil
- Santiago, Chile
Africa
- Cape Town, SA
For a full list of Cloud Server regions please see: https://www.20i.com/managed-hosting
 Austin B.
Change your Laravel .ENV file configuration through the control panel

The Laravel .env file is a configuration file that contains environmental variables for your Laravel application. These variables are used to store sensitive data such as database credentials, API keys, and other important configuration settings that your application needs to run properly.
The .env file is located in the root directory of your Laravel project and is loaded automatically by Laravel when the application boots up. This file contains a list of key-value pairs, where the keys are the names of the environmental variables, and the values are their corresponding values.
Using the ENV Configuration Tool
If you've deployed a Laravel-optimised Managed Cloud Server then you can quickly and easily add or change existing Laravel environment variables using the ENV Configuration tool within the 20i control panel.
To use the ENV Configuration tool:
- Head to your Hosting Packages and select Options > Manage on the package you need to manage
- Select ENV Configuration from the Laravel Tools section
If you've just deployed a new application then you'll see all the default environment variables pre-populated in the table view. If you want to adjust any variables, for example 'APP_DEBUG', then you can simply edit the right-hand side column with the option you want and the proceed to select Update ENV Configuration to save your changes.
If you want to edit the ENV file directly through File Manager, then there's a quick link to take you directly to the file at the top-right of the page, select View in File Manager to go directly to the source file which is usully found within your applications home directory.
You can also add new variables to your file by inputting the variable you want to add in the text field at the bottom-left of the table, then inputting the variable in the text field to the right. Then Update ENV Configuration will add the new variable to the table/file.
 Austin B.
Using the 20i Laravel Command Executor

The 20i Laravel Command Executor is a feature available when you provision a Laravel-optimised Managed Cloud Server. The command executor allows you to run custom commands on your server directly from the 20i control panel without needing to connect via SSH.
Using the command executor, you can perform a wide range of site management tasks, such as installing modules, configuring services, running database migrations, and more.
The Command Executor currently only supports the following types of command: PHP, Artisan, ENV, NPM and Node commands.
Here are some examples of what you can run using the 20i Laravel Command Executor.
1. Run database migrations: In Laravel, you can run database migrations using the command executor. For example, to run Laravel's database migrations, you can run:
php artisan migrate2. Clear Cache: Another popular PHP artisan command is the clear cache command. This command clears the internal cache of your application. You can run it directly in the command executor like so:
php artisan cache:clear4. Install node modules: You can also use the command executor to install your node modules if your server has Node installed. For example, to install the dotenv package, you can run:
npm i dotenvThese are just a few examples of the many commands you can run using the 20i Laravel Command Executor. You can run any Artisan , PHP , or Node command that you would typically run in a command line interface straight from the UI without the need to connect via SSH.
 Austin B.
Checking your Laravel error logs through the control panel

Like any software, Laravel applications may encounter errors during their operation. Laravel error logs are a record of these errors, which are generated by Laravel's built-in error handling system.
When an error occurs in a Laravel application, the error is logged to a file in the application's storage directory. By default, Laravel uses the Monolog library for logging, which allows for flexible logging configurations and can log to multiple destinations, including files, email, databases, and more.
Laravel error logs contain information about the type of error, the location in the code where the error occurred, and any other relevant details, such as the values of variables at the time of the error. This information can be invaluable for troubleshooting and resolving issues in a Laravel application.
Developers can view Laravel error logs by accessing the log files directly, or by using a tool like the Laravel Logs, which provides a web interface for viewing and searching log files.
There are many types of errors that can be logged in Laravel, depending on the nature of the application and the code that is running. Here are some examples of common errors that might appear in Laravel error logs:
- Syntax errors: these occur when there is an error in the syntax of the PHP code, such as a missing semicolon or a typo in a variable name
- Database errors: when there is an error with the database connection or a problem with the SQL queries being executed, such as a table that doesn't exist or a query that has invalid syntax
- Server errors: when there is an issue with the server environment, such as a misconfigured web server or insufficient server resources
- Application logic errors: when there is a problem with the logic of the application code, such as a function that is not returning the expected result or a conditional statement that is not behaving as expected
- Security errors: when there is a security vulnerability in the application, such as a cross-site scripting (XSS) or SQL injection attack, or when there is an attempt to access a resource that the user is not authorized to access
Laravel error logs can help developers identify and resolve these types of errors, improving the stability and security of their applications.
 Austin B.
Complete guide to the 20i File Manager
In this guide we’ll go through the features of the 20i File Manager to show how you can use it to manage the files within your hosting.
What is the file manager?
The file manager is a GUI that lets you manage the files in your control panel without the inconvenience of using FTP. You can quick and easy upload, move, create or delete files just to name a few of the actions you can take.
How to access the file manager
To access the File Manager, you’ll first need to Manage a hosting package and find the File Manager option, under Web Files.

Here you can see the files and directories within the root of the hosting package. To navigate into a folder, you need to double click: that will open the folder and show its content.
How to navigate the file manager
The Home button in the top left will take you back to the root of the hosting, making it easier to get back should you need to. The next icon to the right is Refresh which will refresh the current folder so you can make sure it is up to date with any changes you make. On the top right is a hamburger menu which hides a few more tools. When expanded it will look like this:
How to use the file manager:
All of these tools will help manage the files and these are explained below:
- Close – The X button will close the menu so these icons no longer show
- Cut – After selecting a file or folder you can click this to cut the file and allow you to paste it elsewhere while also removing it from its current location
- Copy – After selecting, this will allow you to copy a folder or file, then paste it elsewhere within the hosting package
- Paste – Allows you to add the cut/copied file or folder into the current folder you are in
- Clear Clipboard – Allows you to remove any cut/copied file or folder from the clipboard so it can’t be pasted, unless cut/copied again
- New File – Allows you to create a new file. This brings up a field where you can name the file and once named, to either Create or Create & Open the file.

- New Folder – Creates a new Folder. This brings up a field where you can name the folder and once named, to either Create or Create & Open the file.
- Upload – Drag and drop files from your local computer or select files from your computer to be uploaded to the hosting.
Once you have added something to upload, a list will appear at the bottom of the page. You can add multiple files to this list. Start the upload by clicking the upload button in the top right.
- Search – Search the hosting for either a file or folder by name. Once the search is complete you will have the option to go directly to where that file is located.

- Open in New Window – Opens the File Manager in a new window separate from your current browser.
- List view – Changes the view for File Manager to show the files and folders in a list going from top to bottom.
- Grid view - Changes the view for File Manager to show the files and folders in a grid format.
There are also other tools that show when right clicking (control + click on a Mac). The options differ depending if you select a file, folder or in empty space.
A few of the options are a repeat of the tools in the hamburger menu and serve as a context-based way to manage the content.
There are a few new features here that will be listed below:
- Code Editor/Rich Text Editor – When right clicking a file you have the option to edit within Code Editor or a Rich Text Editor. By default, you can also double click a file to edit it in the Code Editor.
- Delete – This will remove the file/folder you right clicked but will ask for confirmation to ensure this is correct before removing the data
- Download/Download as ZIP – Allows you to download a copy of a file/folder to your local device. If a folder is selected it will first create a zip of the folder and contents which will then download locally.
- Compress – Allows you to select a folder or multiple files to compress into a zip file. When selected this will open a field so you can name the zip file:
- Rename – Allows you to rename a file or folder. This will bring up a field where you can edit the name.
- Permissions – Allows you to check and edit the permissions that are set on the files or folder. This shows with the Read, Write and Execute permissions for you to select. These permissions are also shown in alphabetical and numerical notation.
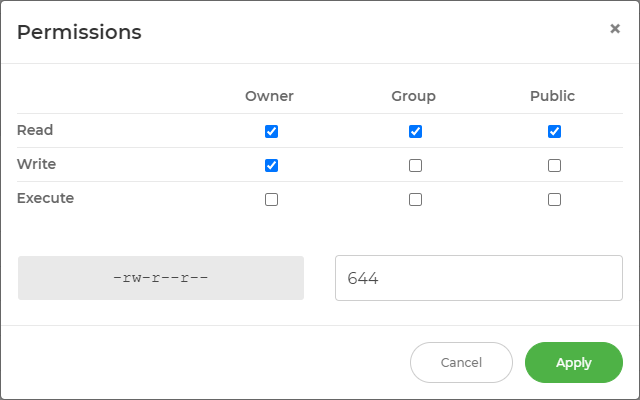
If you make changes to these permissions, we’d recommend using our File Permissions Checker to ensure that access isn’t compromised.
- File Info/Folder Info – Shows information about a file or folder such as the name, path, size, permissions and modified date
- Get Disk Usage –You can right click either on a folder or empty space to get this option. Once selected, a disk usage report will open under the File Manager. This will take a moment to populate. Once complete, you can select the folder icon to see a report:

The report includes information on the largest files and folders with charts to show where the most space is being used:
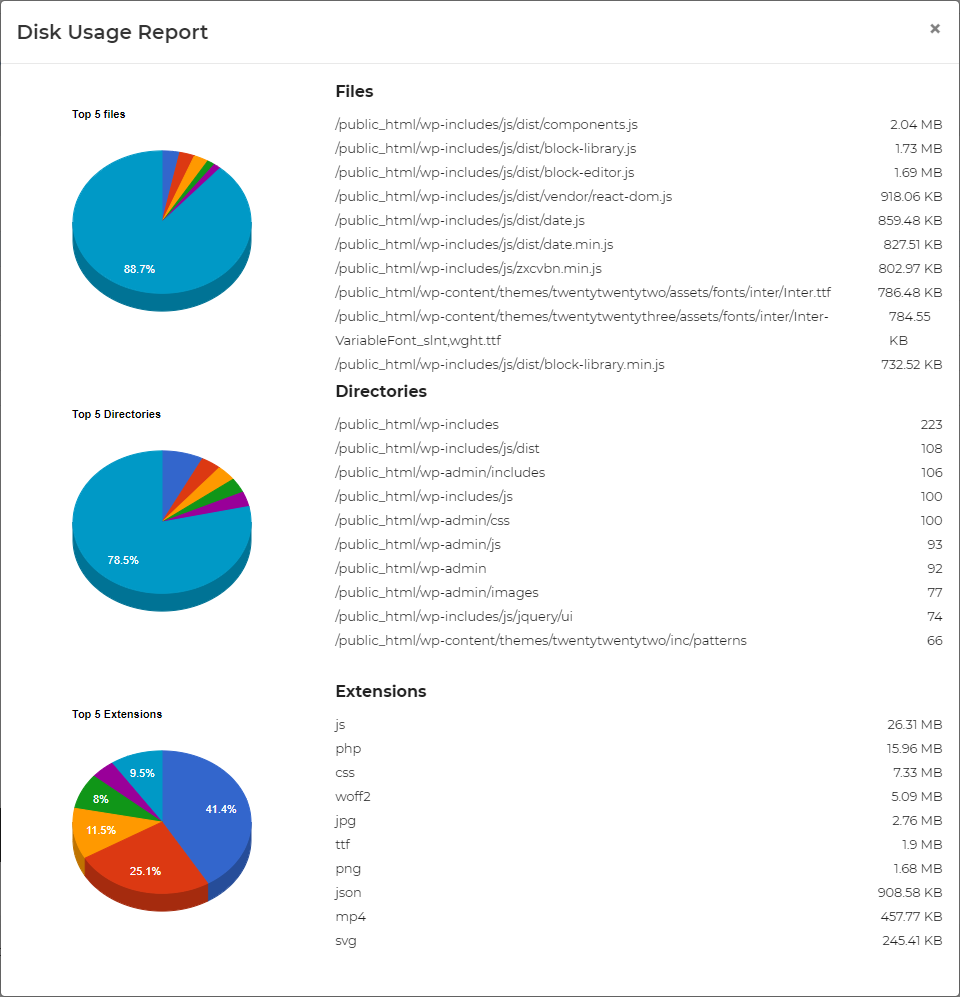
Once closed, disk usage reports can be brought up again, using the menu in the bottom left, but will not persist after leaving the File Manager page.
Last of all there is a Malware scanner option on the bottom right. This is linked to our Malware Scanner. If any scan shows the package being infected, it will also show here.
Once selected, it will show a list of infected files and you’ll have the option to go directly to the folder where the files are located. The files will also show with an icon beside the name to show that these have been flagged as infected.
The My20i File Manager is a powerful and convenient way to manage your website files. It helps you manage your website files, and offers a powerful way to as well as being able to see more information about the content of your website.
 Reudiger Dalchow
Getting started with a Laravel Managed Cloud Server
Laravel on 20iCloud, AWS or Google Cloud
With a 20i Managed Cloud Server you can deploy Laravel applications on an optimised cloud server stack complete with easy setup, production ready PHP and full environment control. Deploy unlimited Laravel apps across 20iCloud, AWS and GCP, and easily manage everything through the My20i control panel, no server admin required.
You get built in dev tools like Git Version Control, FTP/SFTP access, scheduled tasks, SSH and 20i's Laravel Command Executor, all on top of the industry's best hosting platform with expert customer support. Did we mention you get free backups and free SSL as standard?
To get started head to Managed Cloud Hosting and choose your server spec!
Here's a breakdown of some of the features you'll get with 20i:
| Built-in performance | Built-in dev tools | Built-in security |
|---|---|---|
| ✔️ Multi-platform Cloud Hosting | ✔️ Git Version Control | ✔️ Free SSL Certificates |
| ✔️ My20i Control Panel | ✔️ Unlimited FTP/SFTP Access | ✔️ Free Daily Backup & Restore |
| ✔️ Free CDN & Edge Caching | ✔️ SSH & SFTP Login Control | ✔️ PCI Compliant Hosting |
| ✔️ 100% Renewable Energy | ✔️ Redis Cache | ✔️ Two-Factor Authentication |
| ✔️ IPv6 and HTTP/2 Enabled | ✔️ ElasticSearch | ✔️ Advanced DDoS Protection |
| ✔️ 80+ One-Click Apps Inc. Laravel | ✔️ Cron Job Manager | ✔️ Error & Access logs |
Deploying Your Laravel Cloud Server
1. Head to 'Build your Cloud Server' and choose Laravel from the server optimisations.
2. Choose what cloud platform you want to use: 20iCloud, AWS or GCP and the size of server you need.
3. Select Deploy Cloud Server and your server will be built within just a few minutes.
Installing Laravel on your Cloud Server
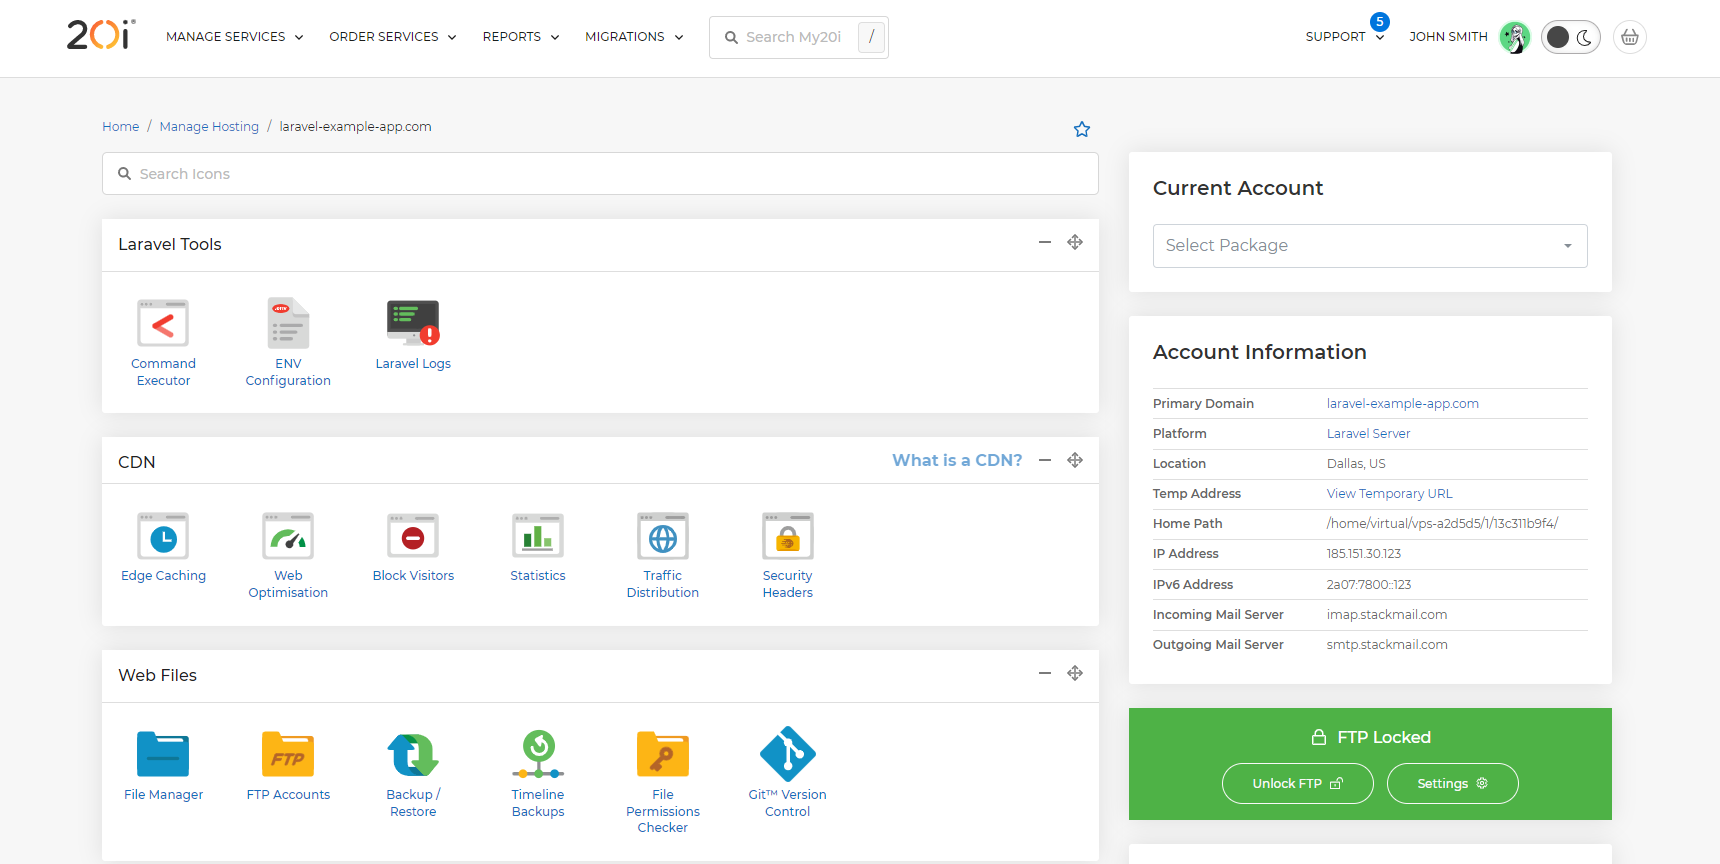
1. Head to your cloud server list and select Options > Add Package.
2. Give your site/app a name and then select Options > Manage.
3. Laravel will install automatically and you'll be able to start work on your app straight away.
 Austin B.
Managed Magento Hosting requirement for ecommerce sites
As an ecommerce platform Magento is one of the best known solutions to manage online stores of all sizes. But Magento is resource hungry software, and requires at least 4GB Ram to run smoothly.
This makes a managed cloud solution perfect for hosting Magento sites. Our Managed Magento hosting offers all you need to run your ecommerce site, using 20iCloud, AWS or Google Cloud.
What are the hosting requirement for a Magento website?
When it comes to hosting a Magento ecommerce site, there are several specifications that you should consider to ensure your site runs smoothly and efficiently.
CPU: Magento is a resource-intensive platform, so it's important to choose a server with a powerful CPU. We offer a plan with 2 core processors that is easy to upgrade if 4 or more processors are needed at any point.
RAM: Magento requires a lot of RAM to run without any problems. We recommend 4 GB of RAM as the minimum, but ideally, 8 GB or more would be better.
Storage: Magento also requires a lot of storage space, so it's important to choose a server with plenty of disk space. Look for servers with at least 50 GB of storage, but ideally with 100 GB or more . With our 20iCloud Managed Magento hosting, you have at least 80GB of SSD storage and our recommended 4 core plan includes 160 GD of super-fast SSD space.
Bandwidth: Ecommerce sites can generate a lot of traffic, so it's important to choose a hosting provider that offers sufficient bandwidth to handle this traffic. An average ecommerce store should plan with a bandwidth usage of at least 500 GB. Our AWS and GCP plans include 2GB free bandwidth and additional usage is pay as you go, charged at £0.01 / $0.01 per GB. 20iCloud Magento Hosting starts with 4 TB of free bandwidth.
If you have any question about what hosting solution is the best for your Magento sites, our support team is always happy to help.
 Reudiger Dalchow
Selling Managed Cloud Servers through HostShop
Offering the best products and services to your clients is crucial for the success of your reseller hosting business. Our Managed Cloud Servers product allows you to expand your portfolio and increase your revenue with higher mark-up products. We'll look at how HostShop can help you sell Managed Cloud Servers from 20iCloud, AWS, and GCP, all managed through the My20i control panel. We will also explore how you can create your own cloud provider brand, and the benefits of offering global data center locations.
Earn More with Higher Mark-Up Products
Managed Cloud Servers offer you the opportunity to increase your profits due to the high demand for reliable and scalable cloud services. With HostShop, you can easily add these services to your existing product offerings, and set your own prices with higher mark-ups, which can lead to a significant boost in revenue. By offering Managed Cloud Servers, you can meet the needs of a wider range of clients, from startups to large enterprises.
Sell 20iCloud, AWS, and GCP Managed Cloud Servers through My20i
HostShop's integration with My20i, our powerful control panel, allows you to manage multiple cloud server providers like 20iCloud, AWS, and GCP from one centralized interface. This simplifies the management process for you and your clients, enabling them to access and manage their cloud servers with ease. With HostShop and My20i, you can provide a seamless user experience that encourages customer loyalty and repeat business.
Create Your Own Cloud Provider Brand
HostShop enables you to create a unique brand identity by customizing the appearance of your reseller storefront and control panel. This allows you to replace the 20iCloud branding with your own, ensuring that your clients associate the high-quality Managed Cloud Hosting with your brand. By establishing a strong brand presence, you can attract more clients and foster long-term relationships built on trust and professionalism.
Offer Global Data Center Locations to Reach Customers Worldwide
To serve your clients better and meet their diverse needs, 20i's cloud server offering provides access to a wide range of global data center locations. With data centers spread across various regions, you can ensure that your clients' websites and applications have minimal latency and optimal performance, regardless of where their users are located. By offering a global infrastructure, you can attract clients from around the world, expanding your market reach and increasing your potential revenue.
Conclusion
HostShop's Managed Cloud Servers product, combined with our web hosting billing and automation platform, provides an ideal solution for web hosting resellers looking to grow their business and revenue. By selling Managed Cloud Servers from 20iCloud, AWS, and GCP, creating a unique brand identity, and offering global data center locations, you can meet the needs of a diverse clientele.
 Austin B.
How to join the 20i Refer a Friend program
Our Refer-a-Friend program is designed to reward our loyal customers for recommending us to new ones. With this program, you and your friends can both earn £25/$25 in hosting credit when they become 20i customers and meet the eligibility criteria listed below.
You can refer as many people as you want and we don't place any limits on how much you can earn. You're free to use the credit to purchase new products or towards renewing any of your services with us.
How It Works
Accessing Your Referral Links
To get started, log in to your 20i account and navigate to My20i > Accounts > Refer a Friend.
You'll find three referral links that can take your referrals to different pages on the 20i website: the homepage, the Reseller Hosting page, and the Managed Hosting page.
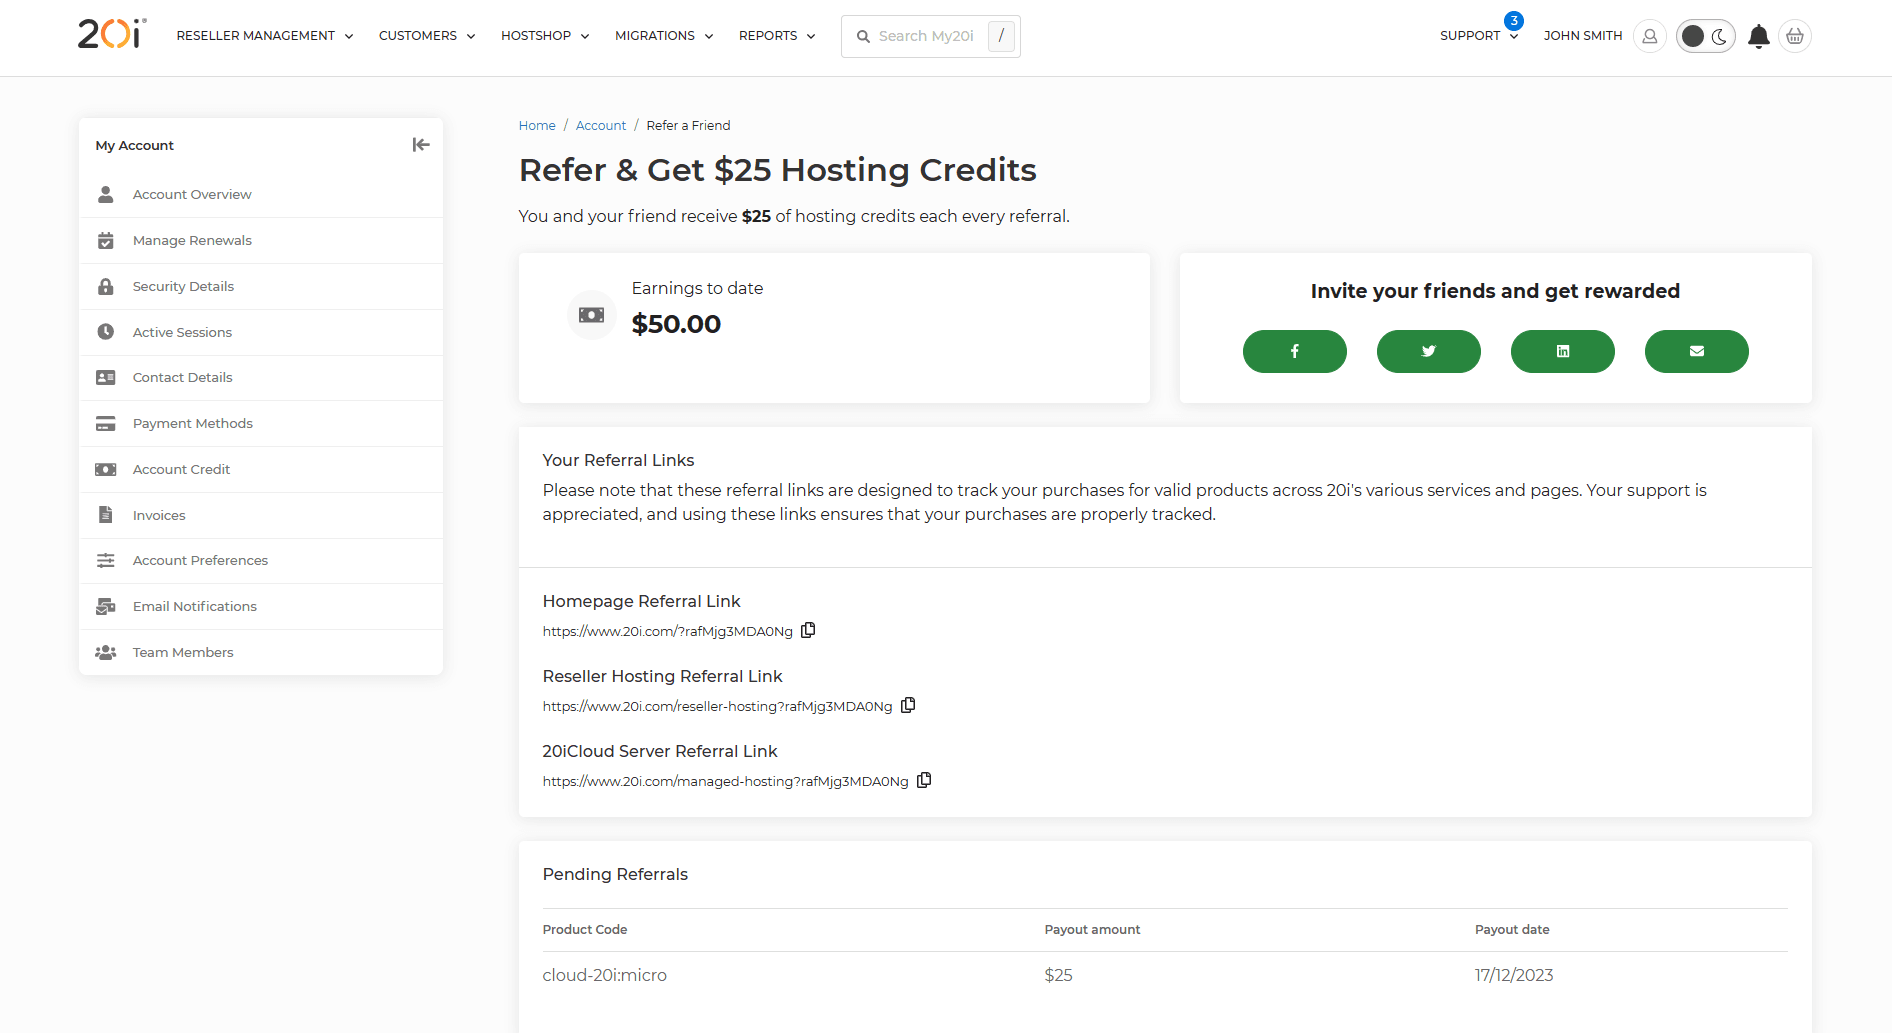
ℹ️ Note: Every link tracks all Reseller Hosting and 20iCloud Server purchases.
Share Your Referral Link
Share your unique referral link with your friends, connections, family or anyone who might be interested in our services.

Tracking the Purchase
When someone follows your referral link, their purchase will be tracked.
Both you (the referrer) and your referred friend can earn £25/$25 in hosting credit after they make a purchase.
We’ll send an email to both you and the referred customer when a purchase is made, letting you both know the 45 day countdown has started.
We’ll also send an email and a My20i notification when the £25/$25 of balance is paid out on day 45.
Payout and Notification
After the referred customer has been with 20i for 45 days following their purchase, we will initiate the payout of hosting credit to both accounts immediately.
Eligibility
To be eligible for the referral reward, the referred customer must meet the following conditions:
- Applies to Reseller Hosting and 20iCloud Managed Hosting.
- The purchase must be made through your referral link.
- The referred customer must remain with 20i for 45 days after their purchase.
- The referred customer must be new to 20i.
Our Refer-a-Friend program is a fantastic way to share the benefits of our Reseller Hosting and 20iCloud products with your network, all while earning hosting credits.
If you have any questions or need further assistance, please don't hesitate to contact our support team.
 Austin B.
How to Install .NET Core on your Cloud Server
Ordering Your .NET Core Optimized Server
Navigate to the Build Server Page: Start by logging into My20i and head to locate the Build your Cloud Server page.
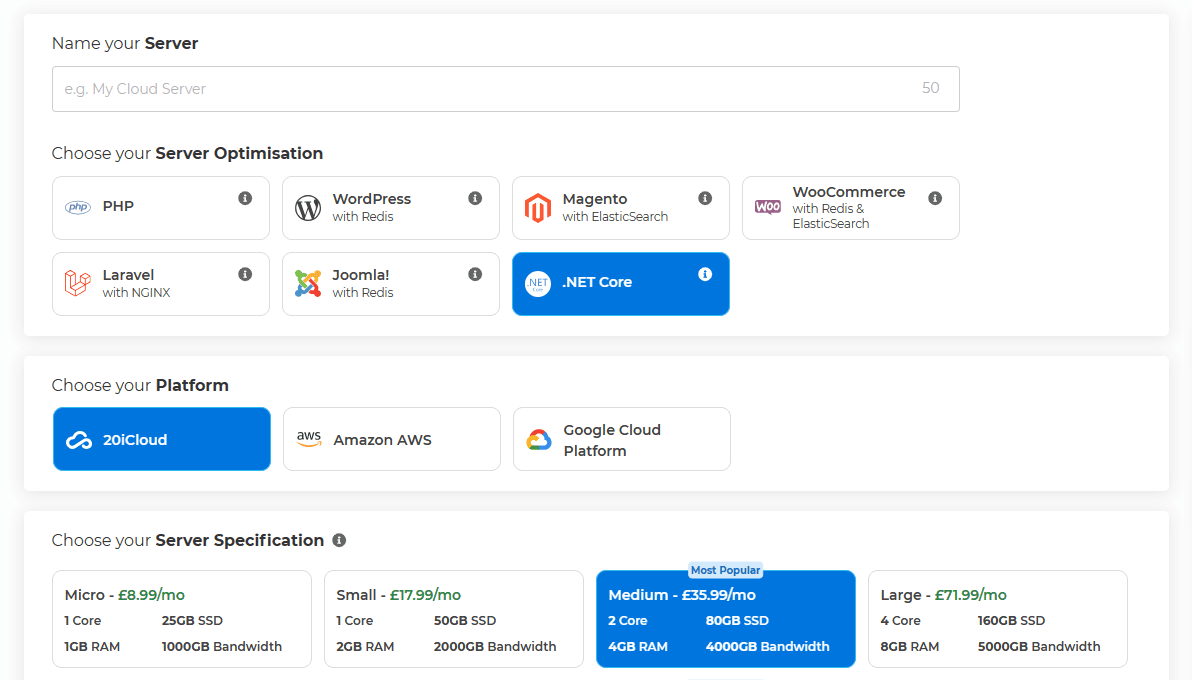
Select .NET Core Optimization: Under the Choose your Server Optimisation section, click on the .NET Core option to ensure your server is configured for .NET Core applications.
- Choose Your Platform: Select where you want your server to be hosted: 20iCloud, AWS, or Google Cloud Platform.
- Specify Your Server: Decide on your server specifications according to your needs, ranging from Micro to 8X Large.
- Select Server Location: Choose a server location that best suits your target audience or requirements, such as London, England for European-based services or Dallas, US.
- Backup Options: Consider enabling Pro Backups for added security.
- Deploy Your Server: Click on 'Deploy Cloud Server' to initiate the setup process.
When you purchase a .NET Core optimized Cloud Server through 20iCloud, AWS, or Google Cloud, setting up your .NET application is streamlined with our installer wizard. Below are the steps and options available during the installation process:
Accessing the .NET Core Installer
Follow the steps below once your Cloud Server has provisioned.
- Head to Manage Hosting and Select Add Hosting.
- Create a new hosting package on the newly created cloud server.
- When your new package has been created head to Manage Hosting and select (Options) > Manage
- The .NET Core installer will then show.
Installation Options
The installer provides three distinct setup choices for your .NET Core application:
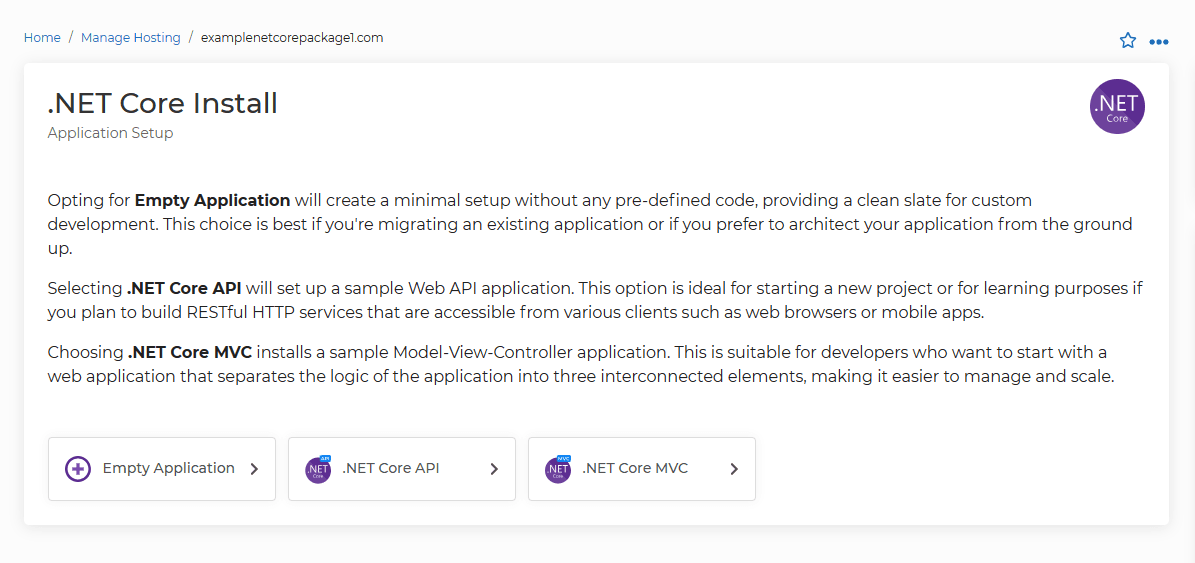
1. Empty Application
- Use Case: Best for those who are migrating an existing application or who prefer to build their application from scratch.
- What It Does: Creates a minimal setup without any pre-defined code, allowing you to architect your application with complete freedom.
2. .NET Core API
- Use Case: Ideal for starting a new project or for learning purposes, especially if you aim to build RESTful HTTP services.
- What It Does: Sets up a sample Web API application template, which is accessible from various clients such as web browsers or mobile apps.
3. .NET Core MVC
- Use Case: Suitable for developers who want to begin with a web application that employs the Model-View-Controller architecture.
- What It Does: Installs a sample MVC application, which helps in organizing the logic of the application into three interconnected elements: Model, View, and Controller. This separation enhances manageability and scalability.
 Austin B.
Getting Started with your Agency Hub
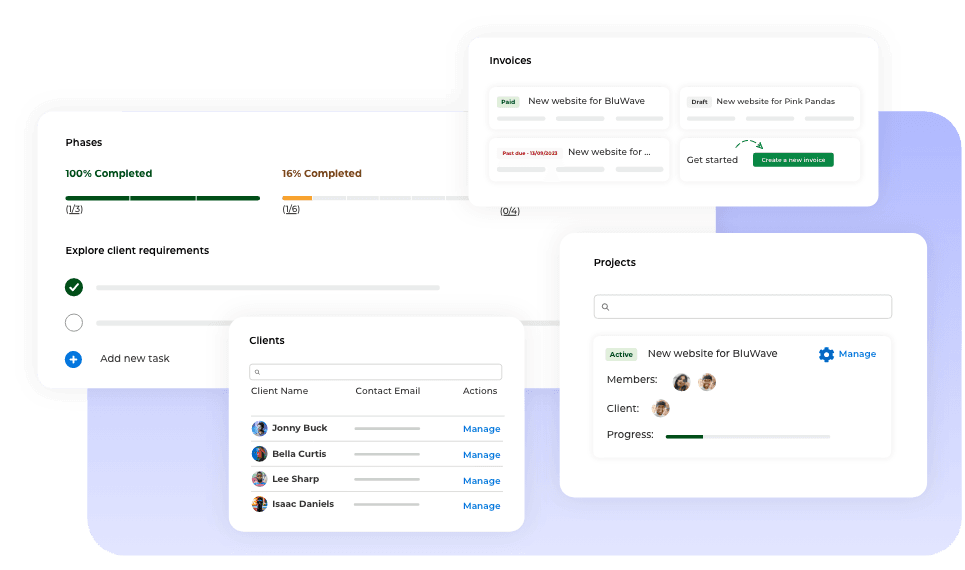
20i Agency Hub is a powerful interface for Agencies to manage billing, cloud servers, clients and projects all from a single, intuitive dashboard. The experience is tailored for the needs of web designers and developers to help manage workflows and deliver better results for your clients.
Agency Hub is built around 3 core concepts:
- Billing & Invoicing. We’ve partnered with Stripe to enable you to connect your Stripe account using the Stripe API to integrate your existing billing process.
- Cloud Servers & Websites. Leverage 20i’s Cloud Server infrastructure to quickly host your customers websites or applications.
- Clients & Projects. Integrated project management makes it easier to keep track of client communications and deliver work on time.
Did we mention Agency Hub is completely free? Agency Hub sits on top of 20i’s world class managed hosting platform, read more about the 20i managed cloud hosting platform and the benefits here.
Setting up Agency Hub
You’ll need to have a Stripe account to use Agency Hub as we leverage their powerful billing platform to make client invoicing a breeze.
To set up Agency Hub:
- Log into the My20i control panel.
- Head to Agency Hub in the top navigation bar and select Get Started.
- You’ll be prompted to enter your Stripe API Keys which you’ll find from within your Stripe Dashboard.
You’ll then be redirected to the Agency Hub Overview page.
Your Agency Hub Overview
From the Overview page you can easily see an overview of key stats, such as your daily, monthly and yearly revenue, as well as the new clients you’ve onboarded.
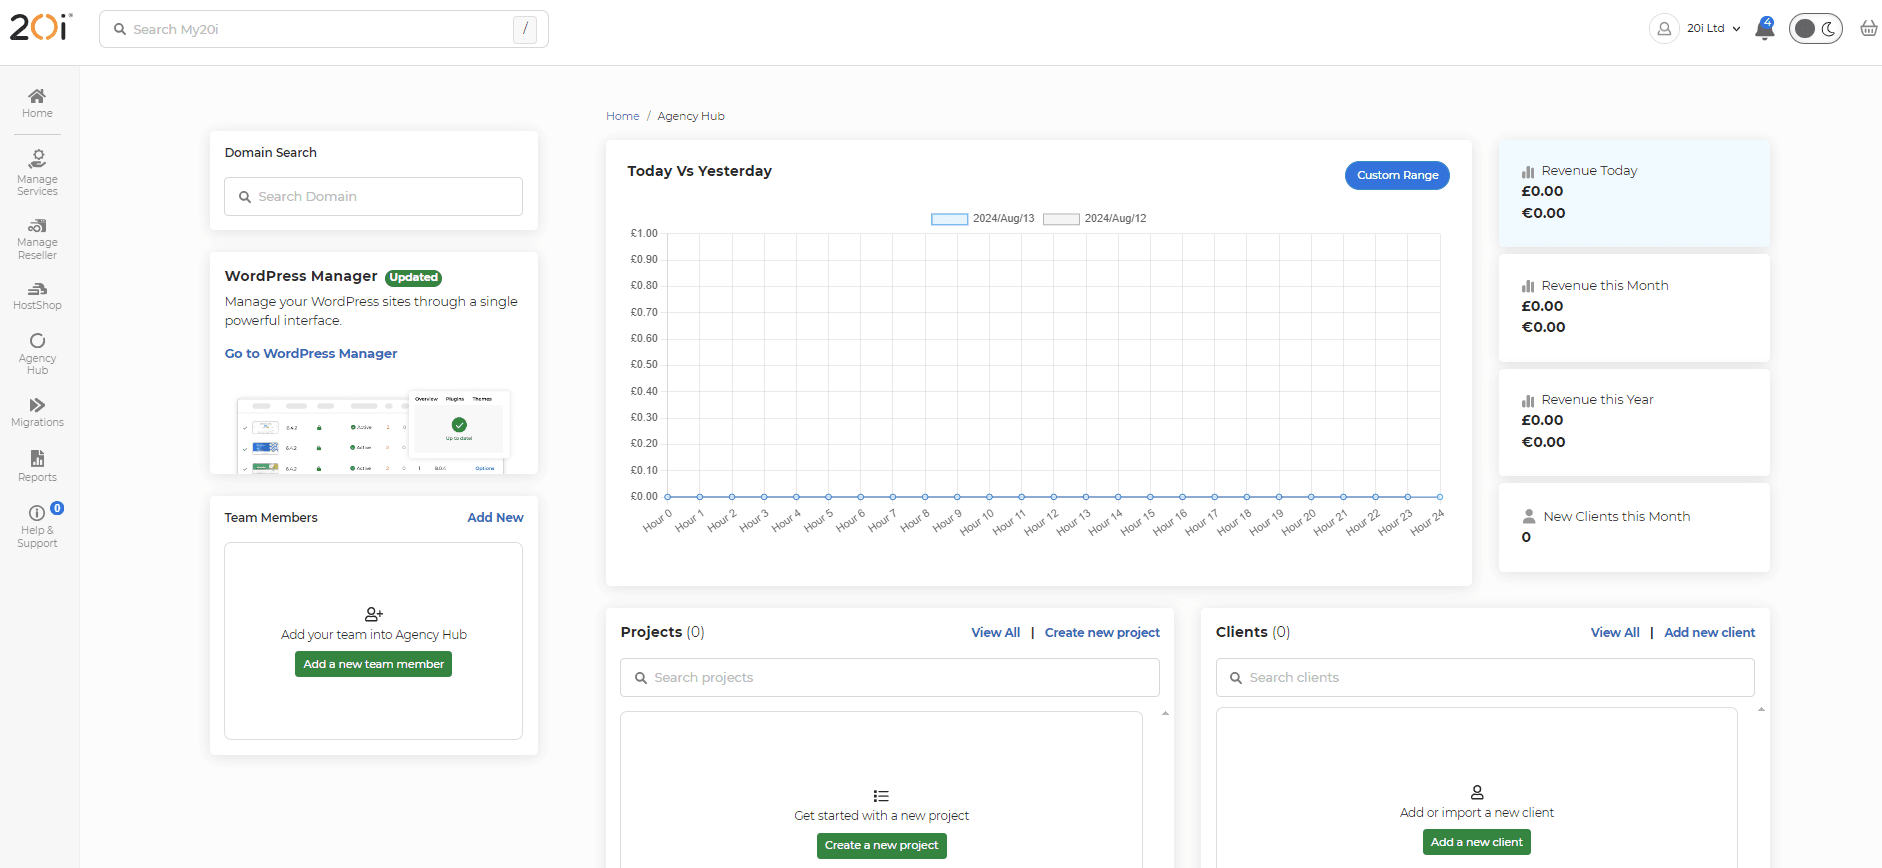
The predefined stats (such as Revenue Today, Revenue this Month and Revenue this Year) are automatically compared with the previous time period, so you'll see yesterday's revenue if you select Revenue Today allowing you to compare time periods. You can also select a custom range, for example if you want to compare the current week (Monday to Friday) to the same week last year you can use the Custom Range option. Simply select the time period you want to see, and then select 'Same period last year' and press Show - the graph will update to show you the updated data.
You can also easily access your Projects, Clients, Team Members, Websites and Cloud Servers all from the overview.
Agency Hub Clients & Projects
Setting up clients
Agency Hub clients are your customers and are mapped to the customers you have set up in Stripe to keep billing information in sync. If you’re setting up Agency Hub from scratch you won’t have any clients set up, so you can either:
- Import from Stripe. Because you’ve connected your Stripe account you can simply select which customers you want to add into Agency Hub.
- Add new Clients. You can add brand new clients directly from Agency Hub, this will also add the client into Stripe so they can be billed seamlessly when you’re ready.
Please note, if you add a client that already exists in Stripe, we’ll simply map the customer in Agency Hub to the existing Stripe customer, you won’t have duplicate customers appear in Stripe.
Please note, when you delete a client from Agency Hub, we don’t delete the customer from within Stripe.
Using projects
Agency Hub Projects are an integrated way to manage your workflow. To get started, head to Projects and choose Create Project.
A brand-new project will be created for you. You can then update the project details such as the name, description, the client this project is for and the cloud server being used for this project to keep your work organized.
Phases
Phases are a stage in your projects life cycle that involves a set of activities that must be completed before moving onto the next phase. The number of phases can very depending on your own project, but many web development projects follow a similar structure, here’s an example:
- Information gathering: This phase involves gathering information about the project’s goals, target audience, and requirements.
- Planning: In this phase, the project team creates a plan that outlines the project’s scope, timeline, and budget.
- Design: During this phase, the project team creates a design for the website, including the layout, color scheme, and typography.
- Content creation: In this phase, the project team creates content for the website, such as text, images, and videos.
- Development: This phase involves building the website using programming languages such as HTML, CSS, and JavaScript.
- Testing: During this phase, the project team tests the website to ensure that it is functioning correctly and meets the project’s requirements.
- Deployment: In this final phase, the website is launched and made available to the public.
You can set deadlines for each project to help keep your project on track.
Team Members
You can add Team Members to your main 20i account, allow you to delegate access to projects for your staff or colleagues.
To do this, you’ll need to add a Team Member.

Once you’ve done this they’ll have their own login details allowing them to login into My20i. You’ll need to delegate them access to the projects you want them to have access to, which you can do by:
- Heading to the project you want to give them access to.
- Selecting Add Team Member and choosing the member you want to give access to.

You can remove access at any time. For more information about Team Members and their permissions please see the article here.
Invoices
If you’ve assigned a client to your project, you’ll see any invoices you’ve send to the customer at the bottom of the project overview page, so you always know what they’ve paid and if there are any outstanding invoices.

Cloud Servers & Websites
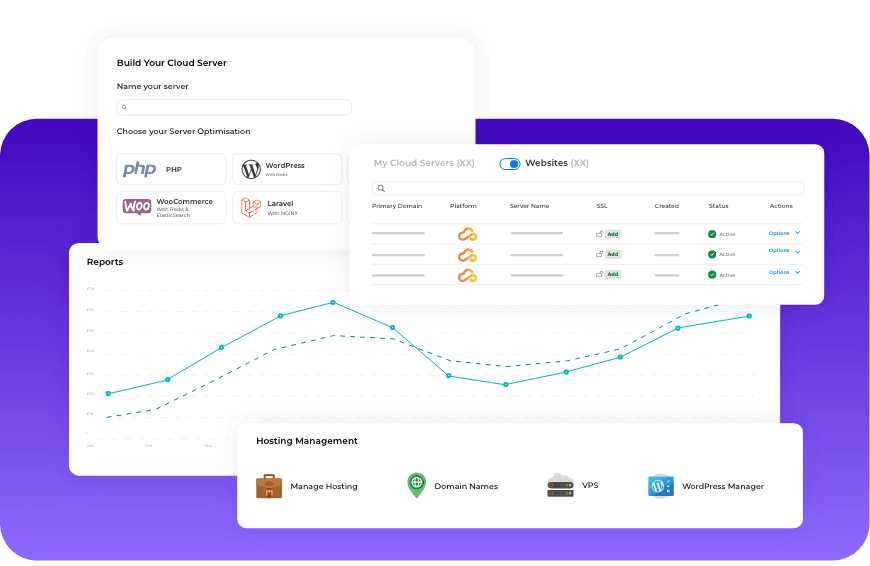
Agency Hub is designed to work in parallel with 20i’s industry leading Managed Cloud Servers. Deploying sites on cloud servers at 20i’s couldn’t be easier, and you get the choice of infrastructure provider, you can choose between 20iCloud, AWS or GCP (or a combination of them all based on client requirements).
To deploy a new cloud server:
- Head to Add Cloud Server.
- Configure the server based on your clients' requirements.
- Select Deploy Cloud Server.
Tip: Reach out to our sales team if you have any questions, you can even book in a call.
To add a new site to your cloud server:
- Head to Agency Hub Overview
- Toggle to Hosting Packages on the Cloud Servers section.
- Select Add Hosting and type or choose the domain.
You can then manage your website or application by selecting Manage.
Billing & Invoicing
Invoicing is at the heart of Agency Hub and because we’ve partnered with Stripe it’s easier than ever to get paid. You can either create invoices through Agency Hub, or if through Stripe – because Agency Hub is directly connected with your Stripe account invoices will stay in sync.
To create a new invoice through Agency Hub:
- Head to Invoices.
- Select Add New Invoice.
- Enter the details of your invoice and select either Schedule Invoice or Autocharge Customer.
- Now select Review Invoice.
You’ll be taken to the final step to review the invoice you’ve created, you can then either send the invoice to the customer, or autocharge a payment method you have on file.
 Austin B.
Setting Up Managed Cloud Hosting In HostShop
Before starting, you’ll need to ensure that you have one of the following Payment Gateways configured and enabled:
- Stripe
- Sage Pay
- Square
- Verifone (2Checkout)
Open up the Cloud Servers page and enable the sale of Cloud Servers using the toggle switch in the top-right corner.
You’ll see a list of our current cloud server providers, which at present are 20iCloud, AWS, Google Cloud Platform, and your own custom-branded cloud server based on the 20iCloud platform.

Next to each server provider you can edit the instance pricing, the available regions, and whether or not servers from that provider are available for purchase by your clients.
Edit Instance Pricing
After opening the instance pricing window for a server provider, you’ll be able to edit the pricing for each server specification available within each region.
For example, with the 20iCloud provider, you can edit the pricing of the Micro, Small, Medium, and Large servers (among others) and this can be set per region, which in this case would be the UK and USA regions.
An example of this is shown in the image below.
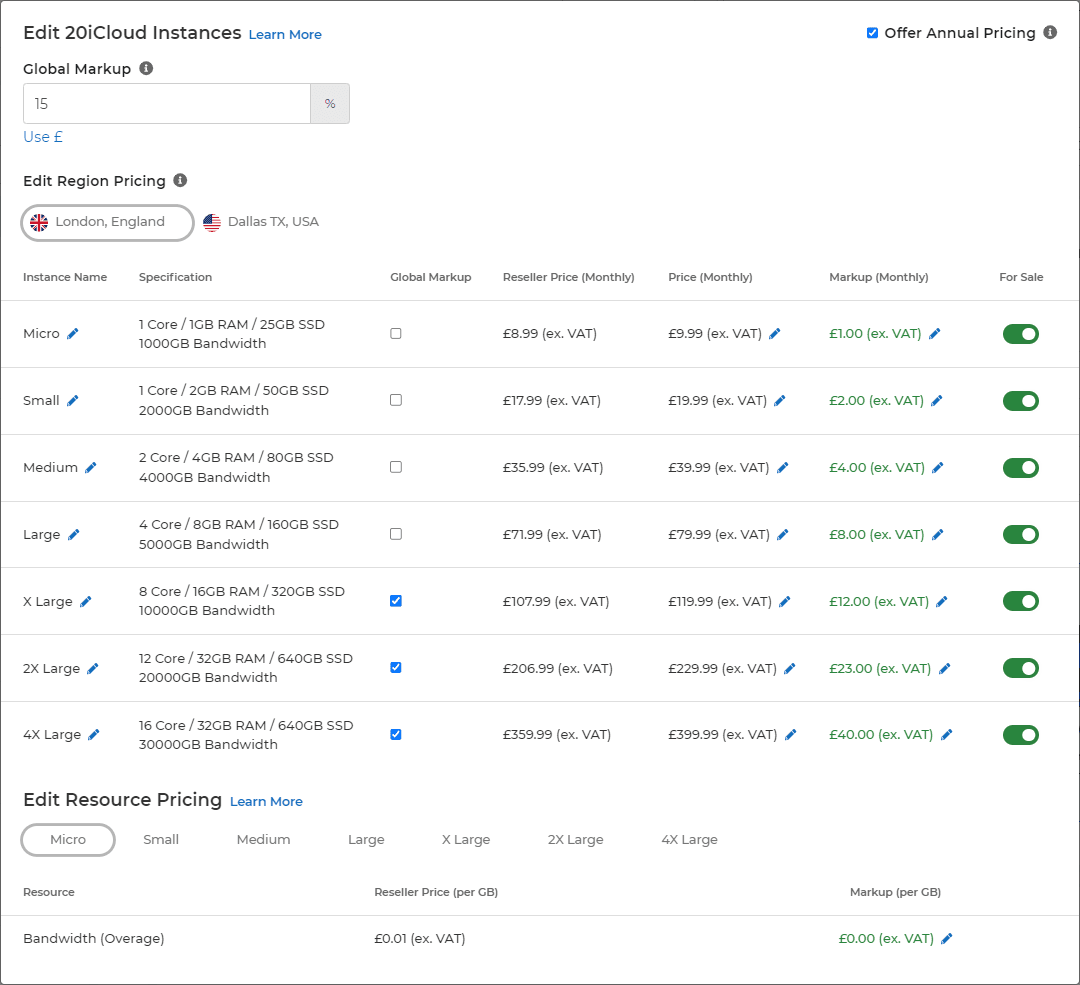
Here, we’ve set the global markup rate to 15%, meaning the price at which your clients will be buying the servers is 15% higher than the price you’ll be paying for them.
Please note that we’ve only selected for 3 of our servers to use the global markup rate in this case. The other servers will use the price that’s been set next to the server itself. For example, the Small server would be £19.99 in this case, which is a £2 markup over the original Reseller price.
At the bottom of this window, you can also set the cost of any additional bandwidth usage and disk space, if applicable to the server provider in question.
The last thing to note is that we’ve enabled Annual Pricing in the top-right corner, which allows your clients to pay for 12 months up-front in full. The annual price is simply the monthly price multiplied by 12.
Edit Regions
Here you can select the regions to make available for a particular cloud server provider. The available regions are different for each provider.

Cloud Server Optimisations
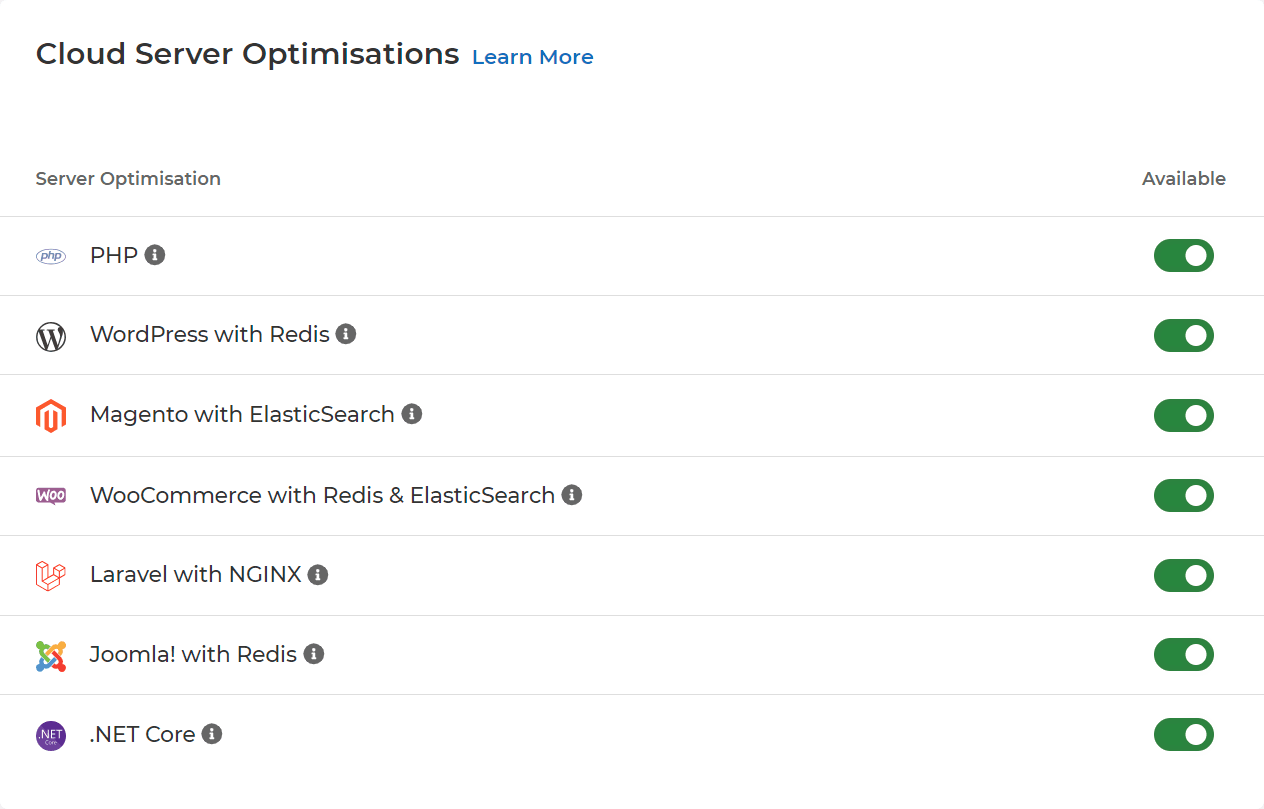
Below the Server Configuration section, you will find the Server Optimisations section. From here you can choose which optimisations you would like to make available for purchase.
The current optimisation options include:
- PHP
- WordPress with Redis
- Magento with ElasticSearch
- WooCommerce with Redis & ElasticSearch
- Laravel with NGINX
- Joomla! with Redis
- .NET Core
Cloud Server Addons
The final section allows you to enable and configure pricing for the server add-ons, which currently includes the Timeline Backups Pro service. The price can be set as a percentage-based markup over the wholesale Reseller price.
 Joshua Rosato
How to create a hosting package on Managed Cloud Hosting
Hosting packages are where all site files, databases and emails are housed for a particular website.
To add a new hosting package on your Managed Cloud Server, head to your home-page and find the server you wish to add the hosting package to and select Options >> Add Package.
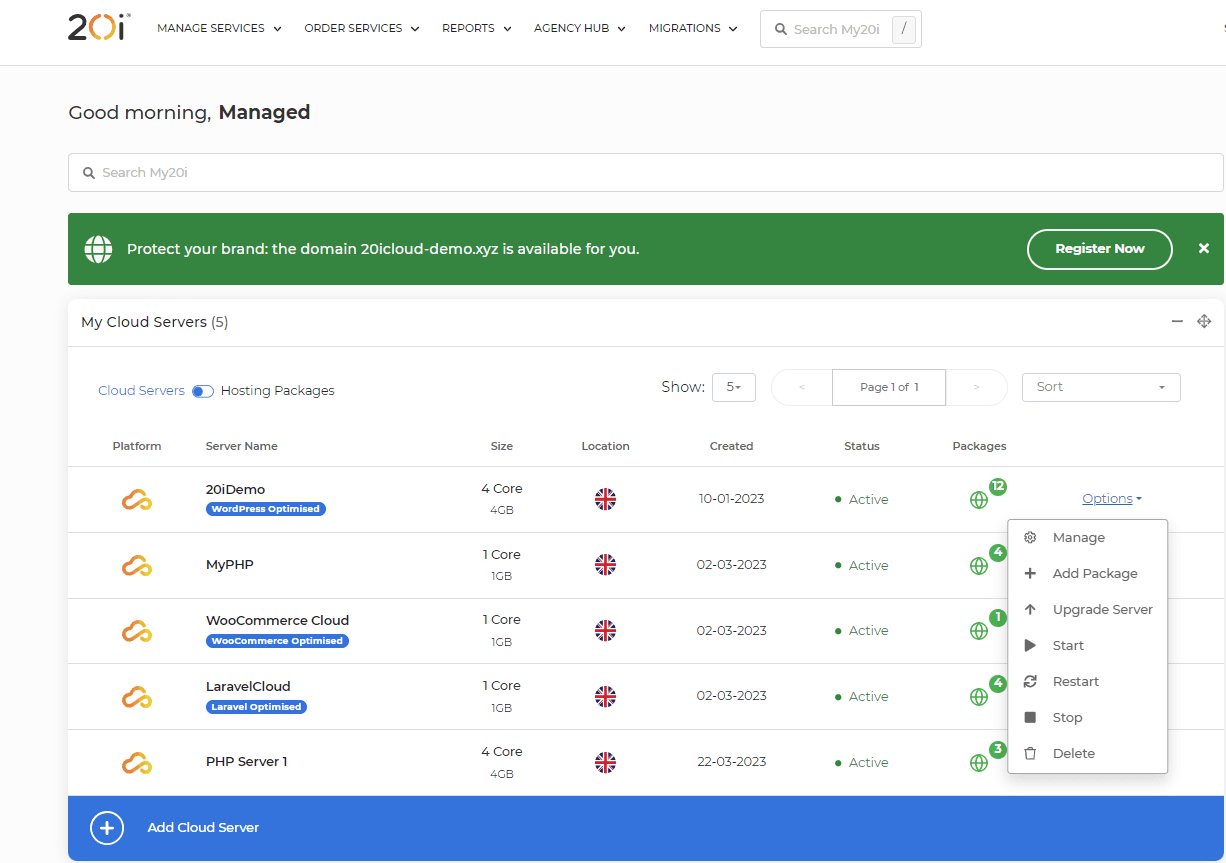
Once selected, you'll be prompted to select the server where the package will reside on, as well as the domain name for the package. The domain name doesn't have to be a domain in your account, it can be a domain reference.
When the hosting package has been created, you will then be able to manage the hosting package.
To manage the hosting package locate the Managed Cloud Server and then Options >> Manage and you will see the server overview.
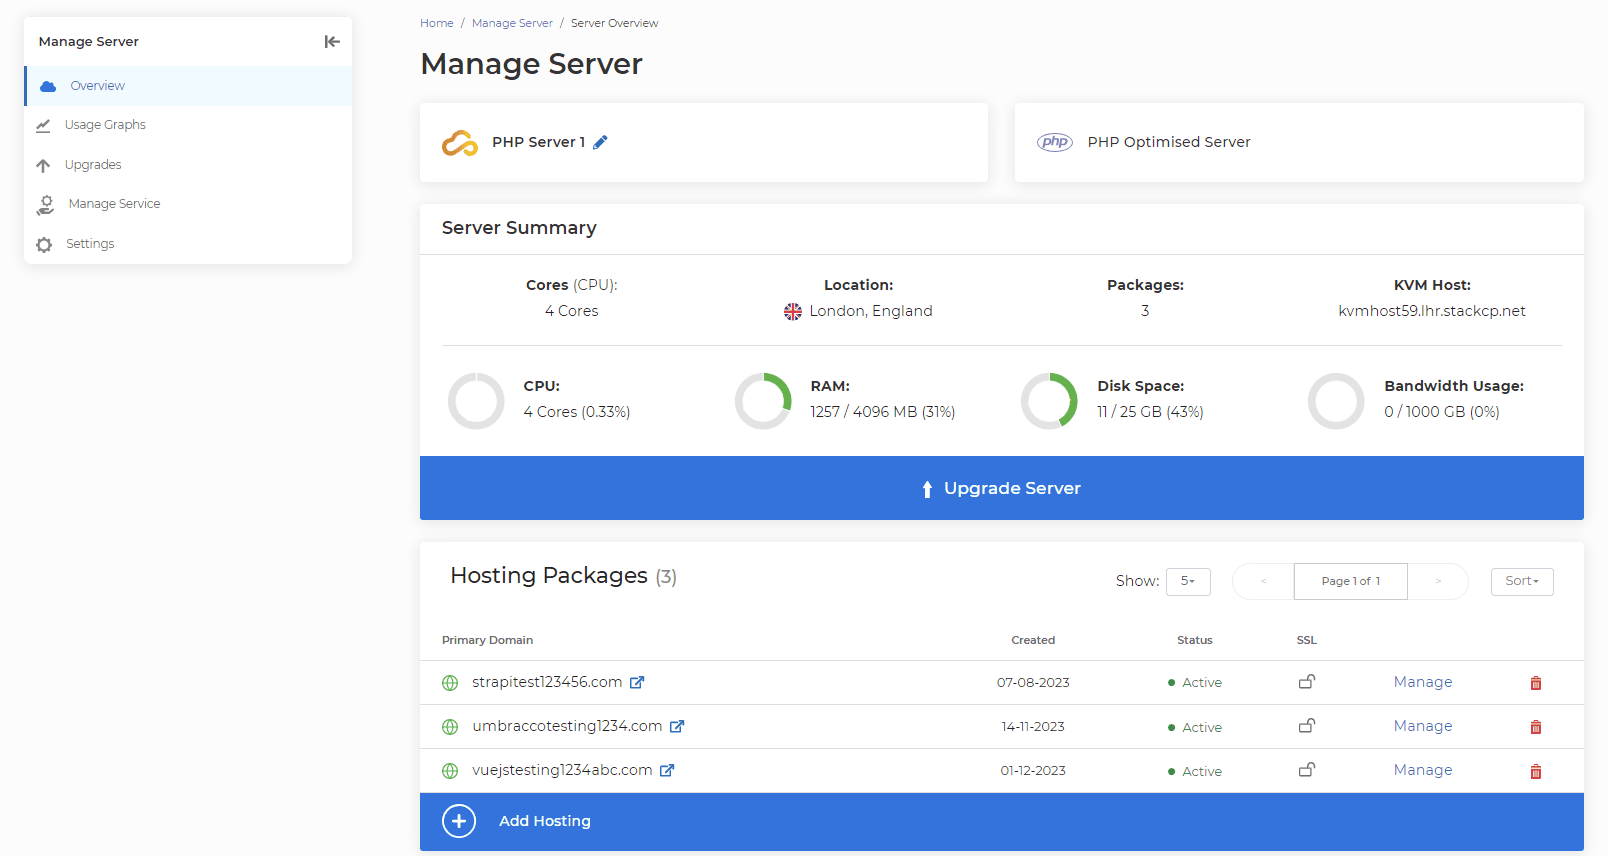
Select the hosting package you just created and then click Manage.
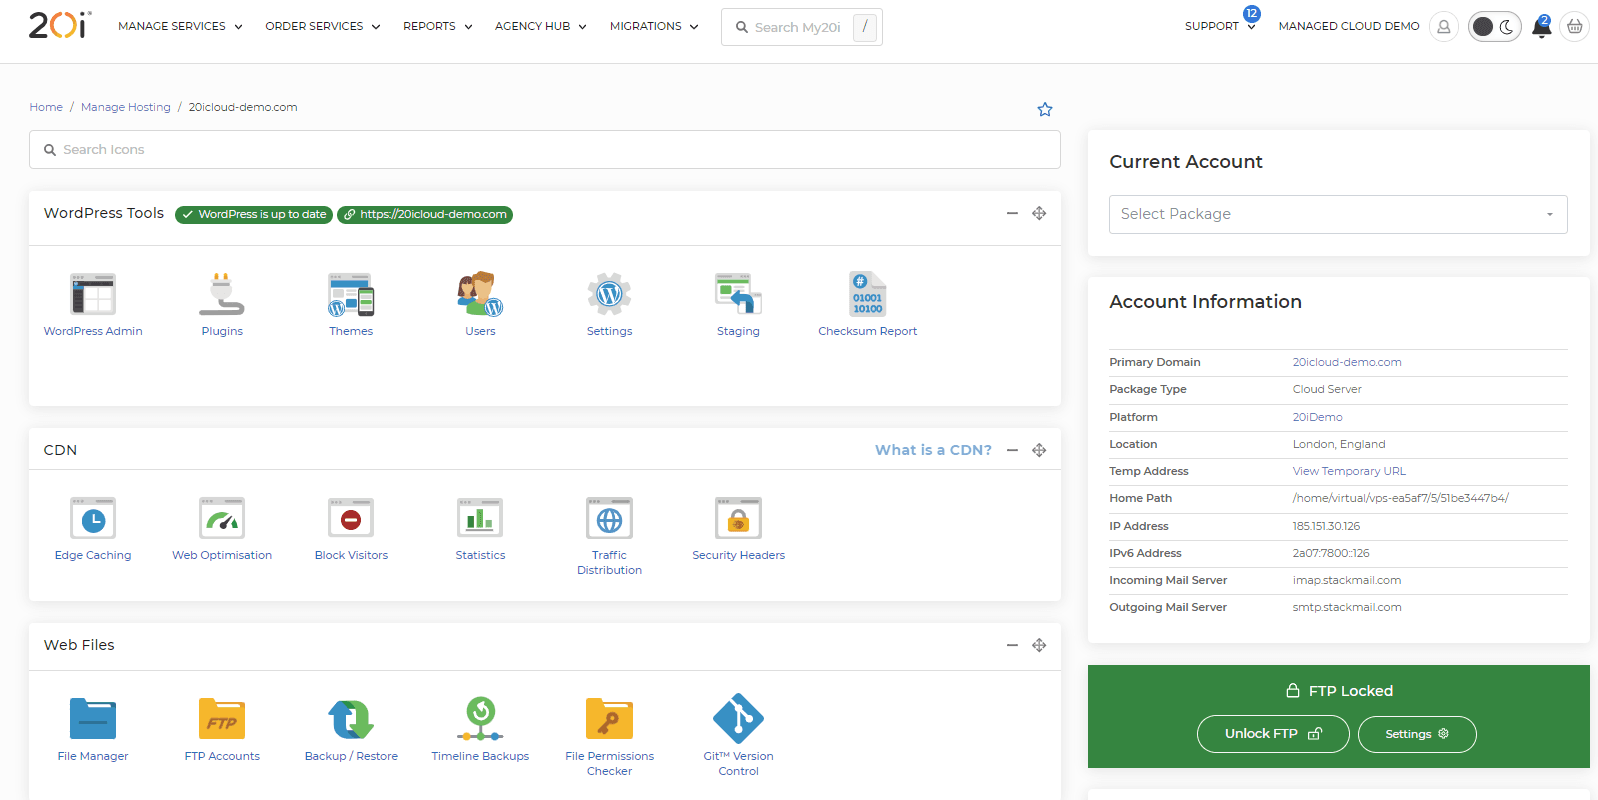
Everything manageable with your hosting package can be found here.
 Jordan Graves
How do I use the API with my Cloud Hosting?
It’s possible to set up your new Cloud Hosting using the Reseller API – doing so can allow you to automate functionality such as creating packages, activating services or resetting your cloud profiles. A full list of available endpoints, as well as full code examples for each is available within our API Documentation.
Below is a couple of examples using PHP to call and utilise the Reseller API. All of these are using our PHP API Wrapper, which can be downloaded here.
Once downloaded, use Composer to download the necessary vendor files with composer update, and then you should be set to start making use of the API. Requirements for the API Wrapper are included in the Read Me file.
Note: Reseller Hosting is required in order to access and utilise the API.
How do I fetch the ID of my Cloud Server using the API?
First off, we want to use the API to check the details of our Cloud Server(s). We can do this using the following endpoint:
GET /cloud_server
The below code is how we’d call for the endpoint using PHP:
PHP
Request:
<?php
require_once "vendor/autoload.php"; //We specify the API wrapper location.
$bearer_token = "YOUR API KEY"; //Your 20i API key.
$services_api = new \TwentyI\API\Services($bearer_token);
$response = $services_api→getWithFields("/cloud_server");
Result:
The response will contain details on your Cloud Server with an array, including the ID. Make note of that ID, as you’ll need it to make requests to that specific Cloud setup, such as for creating a package. For example:
Array
(
[0] => stdClass Object
(
[configuration] => stdClass Object
(
[CpuCores] => 1
[RamMb] => 1024
[OsDiskSizeGb] => 25
[DataDiskSizeGb] => 0
[Provider] => 20i
[Zone] => 20i
[Country] => GB
[VpsOsId] => 1
[spec] => micro
)
[externalId] => 1111
[location] => dc_location-uk
[name] => vps-123456.mvps.stackcp.net
[productSpec] => cloud-20i
[count] => INF
[cpanel] =>
[cpanelInfo] =>
[cpanelRebuilding] =>
[id] => 1111
[isCloud] => 1
[isManaged] => 1
[packageIds] => Array
(
)
[profileId] => 1
[timelineService] => normal
)
)
How do I create a package on my Cloud Server using the API?
Now that we have our ID, we can now make use of it to create our first package. We can do this using the following endpoint:
POST /cloud_server/cloudServerId/addWeb
The below code is how we’d call for that endpoint using PHP:
PHP
Request:
<?php
require_once "vendor/autoload.php"; //We specify the API wrapper location.
$bearer_token = "YOUR API KEY"; //Your 20i API key.
$services_api = new \TwentyI\API\Services($bearer_token);
$domain = "myclouddomain.com"; //The primary domain we wish to assign to our new package.
$extra_domain_names = []; // Any extra domains we wish to assign to the package as an array.
$addPackage = ["domain_name" => $domain, "extra_domain_names" => $extra_domain_names];
// The constructed payload for the endpoint, containing the domains and extra domains for the package.
$response = $services_api->postWithFields("/cloud_server/4838/addWeb", $addPackage);
Result:
The response will contain the ID of your newly created package on your Cloud Server, returned as an object:
stdClass Object
(
[result] => 1234567
)
And your new package should show in the Manage Cloud Hosting area of My20i, ready to use.
Further endpoints and code examples are available within the API Documentation available in My20i for your perusal, and the above should help you with getting started with this approach to Cloud Server hosting and provisioning – happy coding!
 Ruth Turner
How To Host Your Live Laravel Application with 20iCloud

Contents
- Introduction
- Prerequisites
- Step 1 - Create an Empty Hosting Package
- Step 2 - Connect your GitHub Account
- Step 3 - Select and Clone your Repository
- Step 4 - Getting your Laravel Application Live
- Step 5 - SSL, DNS, Email & More
Introduction
Laravel is an open-source PHP framework that provides a set of tools and resources to build modern PHP applications, and not coincidentally it's also the most starred PHP framework on GitHub! Laravel has been crafted by a collaborative community to provide a seamless and elegant developer experience, and so, deserves a hosting experience to match!
20iCloud is a Managed Cloud Server environment that's been built from the ground up to host a wide range of applications, and can be provisioned with a technical profile designed specifically for hosting Laravel applications.
Laravel Technical Profile Details
| Service | Details |
| MariaDB | Faster query speeds and can handle a higher number of concurrent connections efficiently. |
| NGINX | High-Performance Web Server for faster static file serving over Apache2. |
| PHP-FPM | Pre-configured PHP-FPM to manage PHP processes. Its main advantage is that it can handle a high volume of queries, making it especially useful for sites with heavy traffic or complex web applications. |
| Redis 6 | Caches data in-memory, Redis allows for rapid retrieval of frequently accessed data like product details and user sessions, significantly reducing database load. |
In this guide we'll walk you through the process of hosting your Laravel application with 20iCloud.
Prerequisites
- A GitHub repository with your Laravel application.
- A 20iCloud Server with the Laravel profile.
Step 1 - Create an Empty Hosting Package
Before you can clone your Laravel application from your GitHub account you need to create a hosting package. This will contain your applications files, databases and emails if necessary.
- Head to Managed Cloud Hosting.
- Select Hosting Packages and then Add Hosting Package.
- Select your Cloud Server and enter a Domain Name (this can be changed later).
- Now select Create Hosting Package.

Your hosting package will be provisioned on your 20iCloud Server ready for your Laravel application. You'll be able to manage DNS, apply the Free SSL, add email accounts and much more alongside the running of your application.
Step 2 - Connect your GitHub Account
You'll now be able to connect your GitHub account to enable you to select and clone the repository containing your Laravel application.
Head to Git Version Control icon.
![]()
Select Sign in with GitHub. You can also use Manual Setup if you'd like to enter the details of your Git repository manually.

3. Select Install & Authorize to allow the 20i Git Manager application to access your selected repositories.
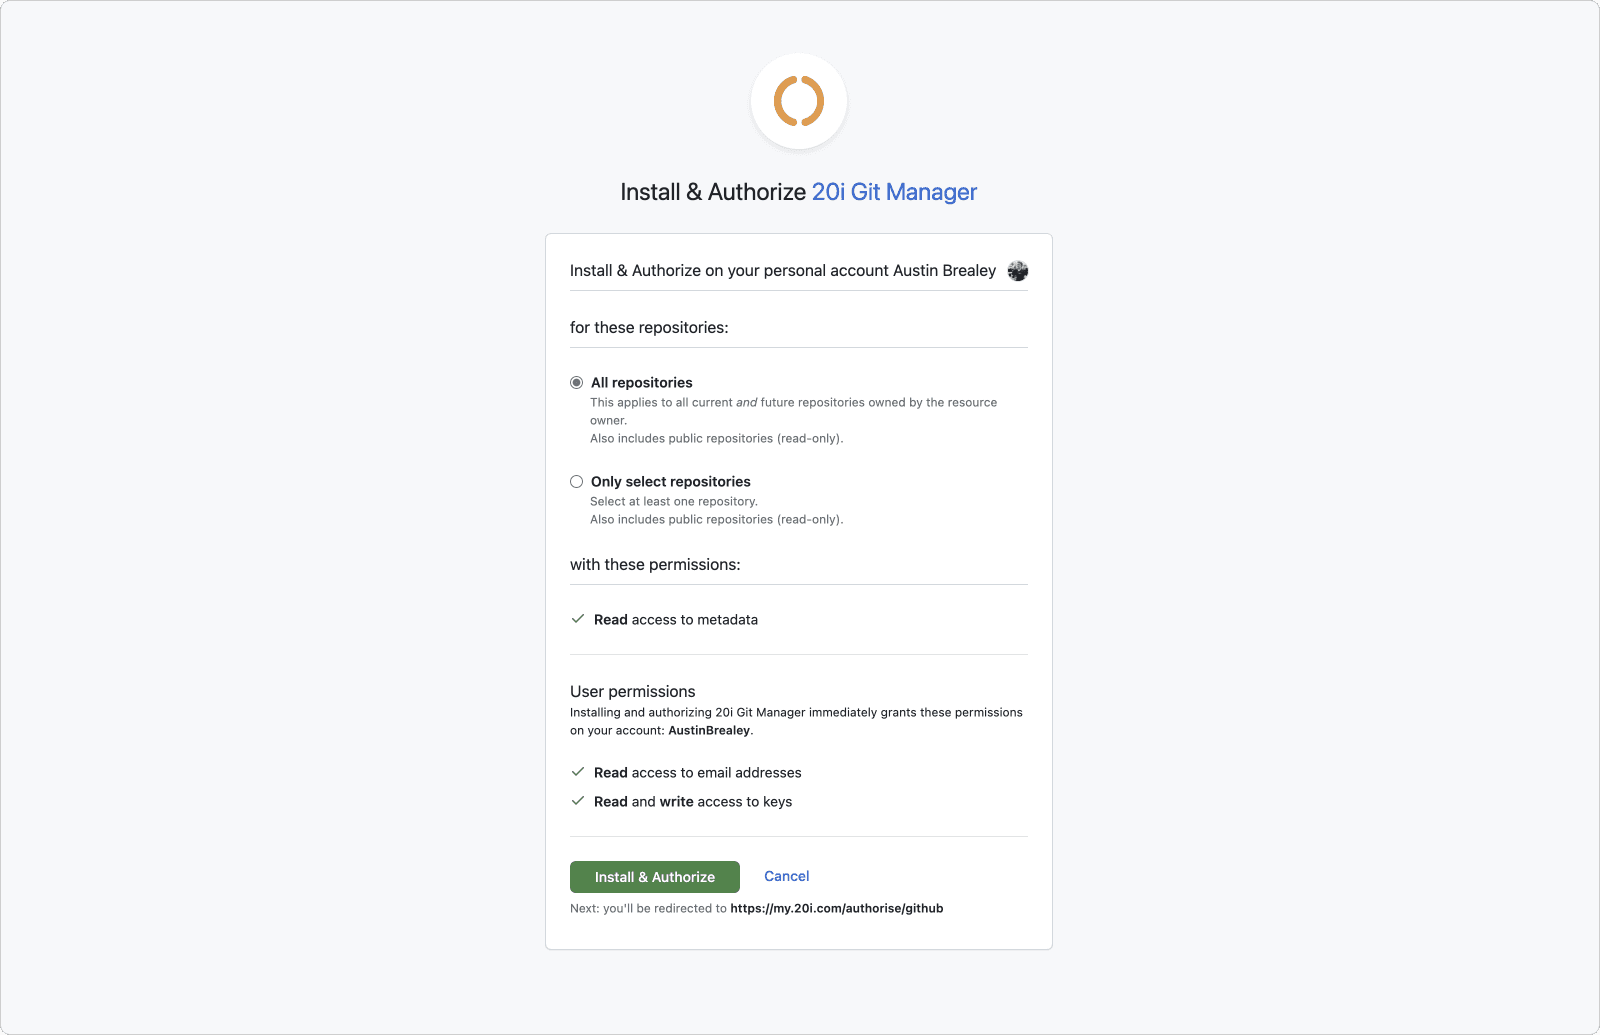
20i Git Manager will then be install and initiated as a GitHub Application with the permissions and access specified during the install. You can manage the application settings from within GitHub Applications. You can also Sign Out of GitHub from the Git Version Control page in My20i.
Step 3 - Select and Clone your Repository
Now you've connected your GitHub Account you'll be able to see and manage your repositories from the dropdown menu. You can now go about choosing a repository that you want to clone from, to do this:
1. Find and select the repository that you want to clone from.
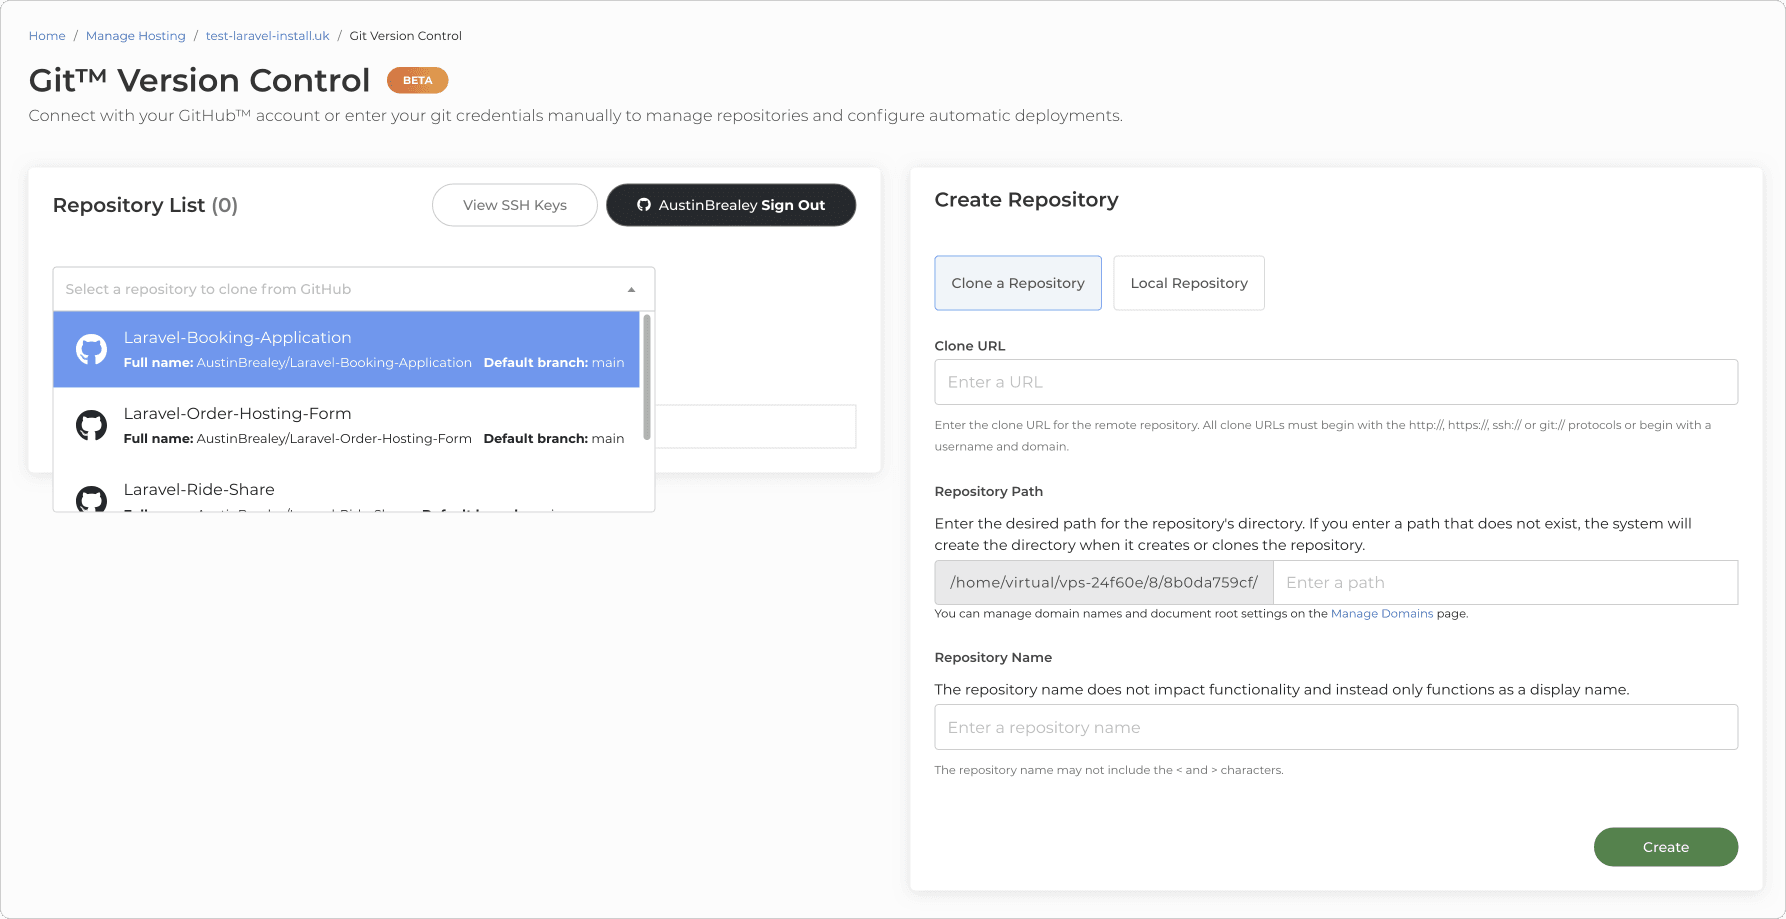
2. Once selected you'll see the Clone a Repository section pre-filled with the repository information needed, select Create at the bottom to clone the repository into the path selected.
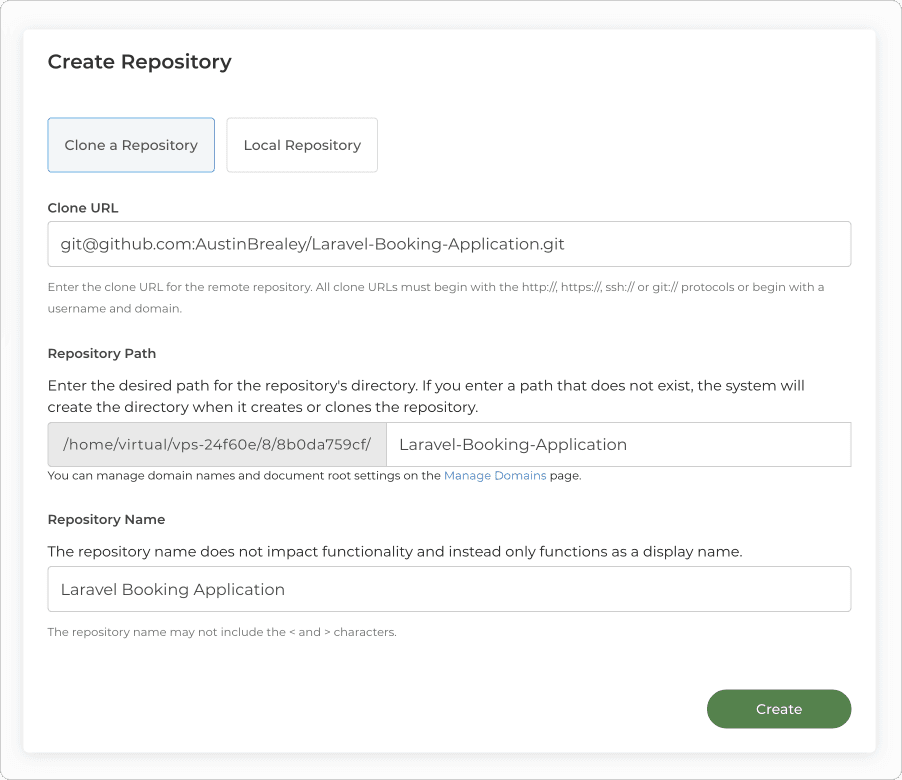
3. Your application will be cloned onto your 20i hosting package on your Cloud Server.
Step 4 - Configure Laravel for Production
Now that your application has been cloned onto your 20i hosting package, it's time to configure and deploy your Laravel application. This involves several key steps to ensure your application is optimised for a production environment.
1. Create a .env File and Set Environment Variables
Use the 20i Command Executor (or SSH) to create a .env file. This file is crucial as it holds all the environment-specific settings for your application, such as database credentials, cache settings, and more. Ensure you do not commit this file to your source control to avoid exposing sensitive information.
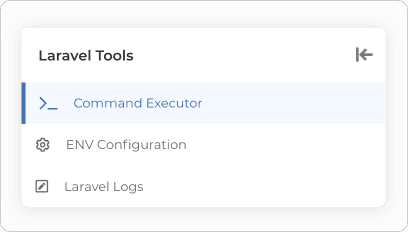
Example .env content:
APP_NAME=Laravel
APP_ENV=production
APP_KEY=base64:...
APP_DEBUG=false
APP_URL=https://yourdomain.com
DB_CONNECTION=mysql
DB_HOST=127.0.0.1
DB_PORT=3306
DB_DATABASE=your_database
DB_USERNAME=your_username
DB_PASSWORD=your_password
CACHE_DRIVER=redis
QUEUE_CONNECTION=database
SESSION_DRIVER=file
SESSION_LIFETIME=120
To generate a .env file using the command executor in the 20i Laravel tools, you can run the following command:
cp .env.example .envYou can then use the 20i Env Configuration to update the .env file to set appropriate values for your environment.
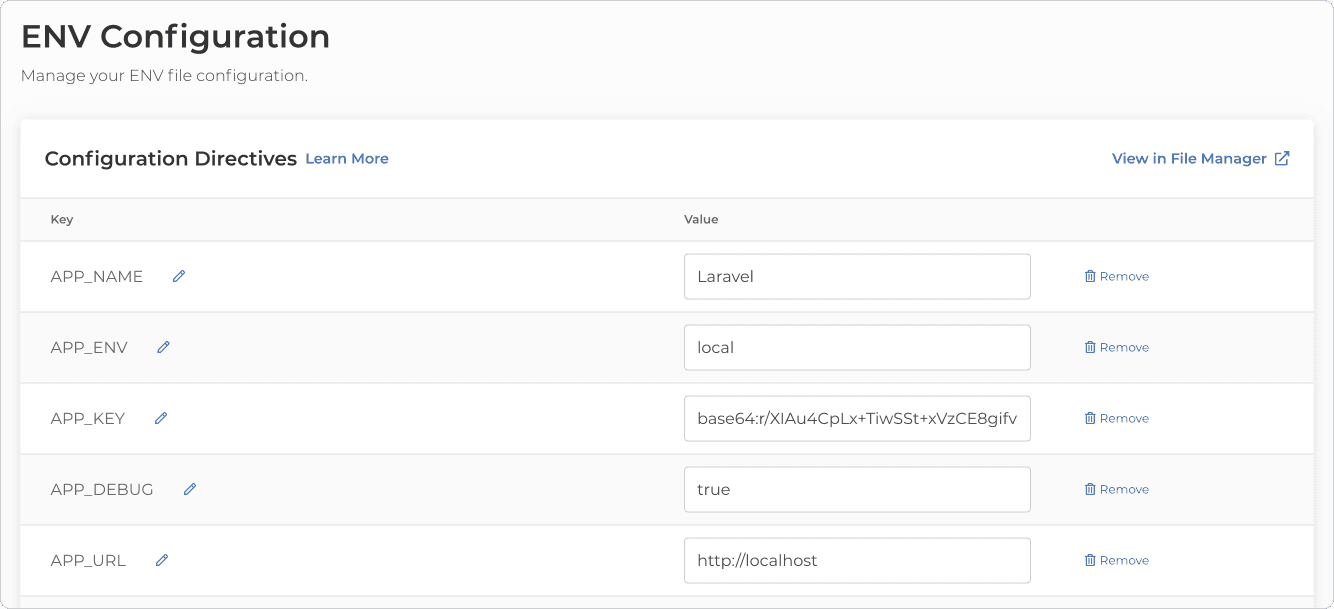
2. Install Dependencies
Once your environment variables are set, use the 20i Command Executor (or SSH into your server) and run the following command to install all required PHP dependencies:
composer install --no-dev --optimize-autoloaderThis ensures that only production dependencies are installed, and the autoloader is optimized for faster performance.
3. Build Assets for Production
If your application uses frontend assets like JavaScript or CSS, you need to compile and minify them for production. This is usually done using tools like Laravel Mix:
npm ci
npm run production
These commands install the necessary Node.js dependencies and compile the assets.
4. Cache Configuration Files
To boost your application's performance, cache the configuration and route files:
php artisan config:cache
php artisan route:cache
php artisan view:cache
These commands compile your configuration, routes, and views into single files to reduce the number of file system accesses.
5. Run Database Migrations
Ensure your database is up to date with the latest schema by running the migrations:
php artisan migrate --forceThe --force flag is necessary to run migrations in a production environment.
6. Restart Services
Finally, restart the necessary services to apply the changes:
php artisan queue:restartBy following these steps, your Laravel application should be well-configured for a production environment on your 20iCloud server.
Step 5 - SSL, DNS, Email & More
20iCloud Servers are perfect for hosting your live Laravel applications and come with all the tools you need to make your live application.
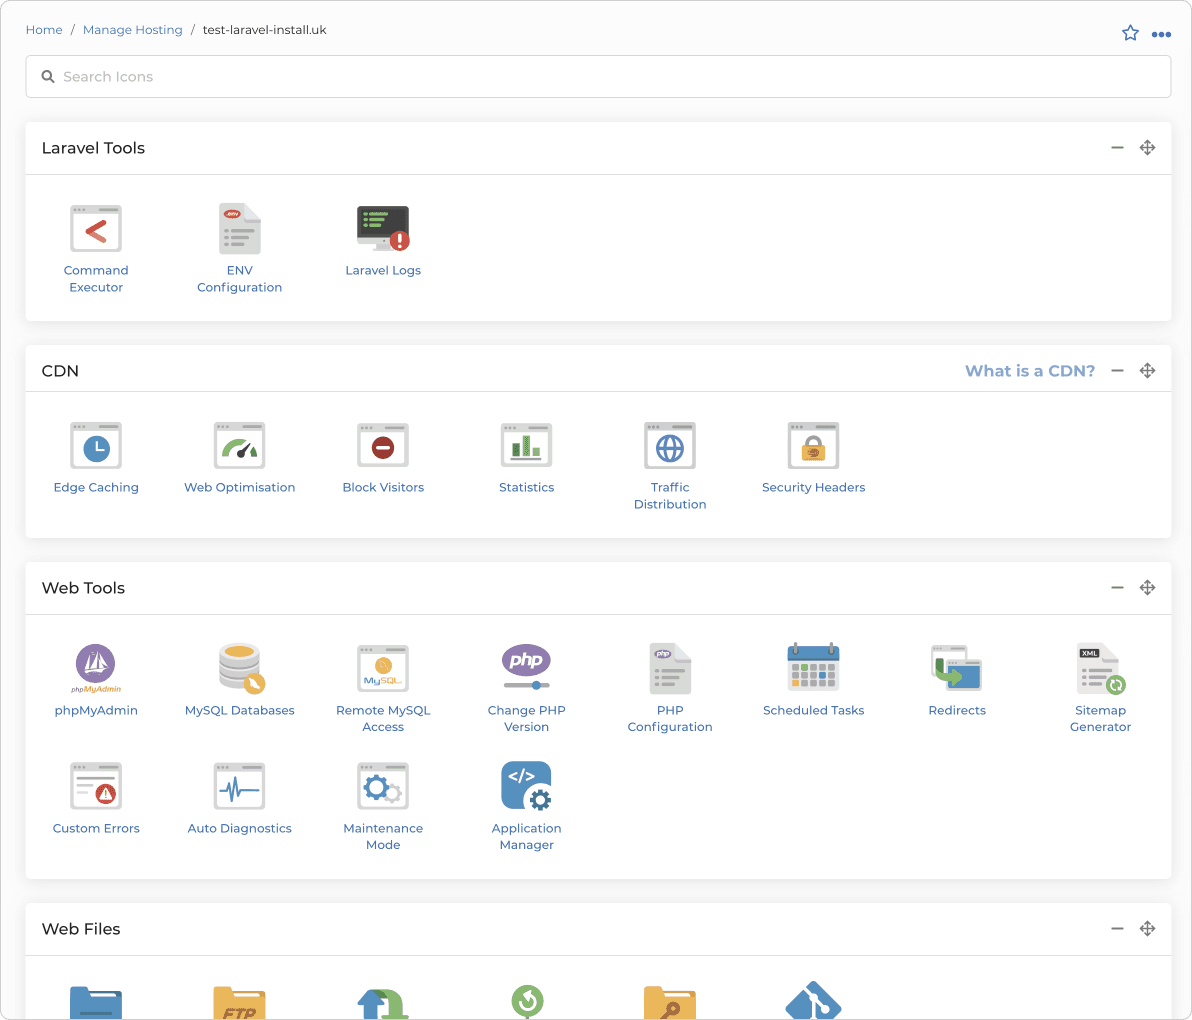
1. Apply the Free SSL
Head to the SSL/TLS Certificates section and select Enable to install a free Wildcard Let's Encrypt SSL.
2. Ensure DNS is Correct
You can manage your DNS through the Manage DNS section. The A Records are already configured to serve traffic to your application, ensure your nameservers are pointing to 20i's nameservers.
3. Set Up Email Accounts
20iCloud Servers come with Unlimited 10GB Mailboxes. Head to Email Accounts and add any mailboxes that you need.
How to use the Customer Handoff feature in My20i
With your website’s design, development, and deployment complete, you can now effortlessly transfer control of web hosting to your client, including billing, using our new ‘Handoff’ feature.
Advantages of Using Handoff
- Instantly transfers ownership of a hosting package to your client’s 20i account with no downtime or data loss.
- Avoids the hassle of manual data transfer, FTP, MySQL databases, ZIP files, or DNS changes.
- Earn a £25/$25 commission when a service you hand off is renewed.
Note: Your client will need an existing 20i account or will need to create a free My20i account. Ensure they provide you with the email address used to create the account.
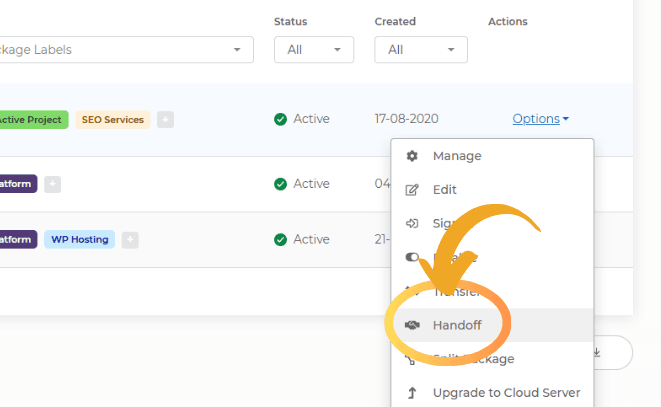
Step-by-Step Instructions
1. Access the Handoff Feature:
- Log in to My20i.
- Click Manage under the Manage Hosting icon.
- Navigate to the package you want to transfer and click Options.
2. Initiate the Handoff Process:
- Select Handoff and follow the on-screen instructions.
3. Configure the Managed Cloud Server:
Choose the specifications and optimisations for your client’s Managed Cloud Server:
- Cloud platform: 20iCloud, AWS, or GCP
- Server specifications/size
- Data centre location
- Server optimisation: PHP, WordPress, Laravel, etc.
- Timeline Backups Pro

4. Submit the Configuration:
- Review the settings you have chosen.
- Once satisfied, click Submit.
5. Client Completes the Process:
- Your client will receive an email from 20i with instructions.
- They will need to log in to their 20i account and complete the purchase (the server will already be in their account’s basket).
6. Final Steps:
- The Cloud Server is built.
- The hosting package is handed off to your client.
- Enjoy the simplicity and efficiency of the Handoff feature!
This process ensures a smooth transition of control to your client, allowing them to manage their hosting with ease and without interruption.
Please note: The above steps should only be used where you're looking to handoff your customers website to a Managed Cloud Hosting product, if you're looking to transfer a website to another 20i Reseller or an existing customer with a shared-hosting package then these steps should be followed instead.
 Matthew Wright
How to manage your 20i Cloud Server
If you have purchased a Cloud server at 20i, you’ll have access to manage the cloud server itself where you can check things like usage statistics as well as make changes to the services installed on the server.
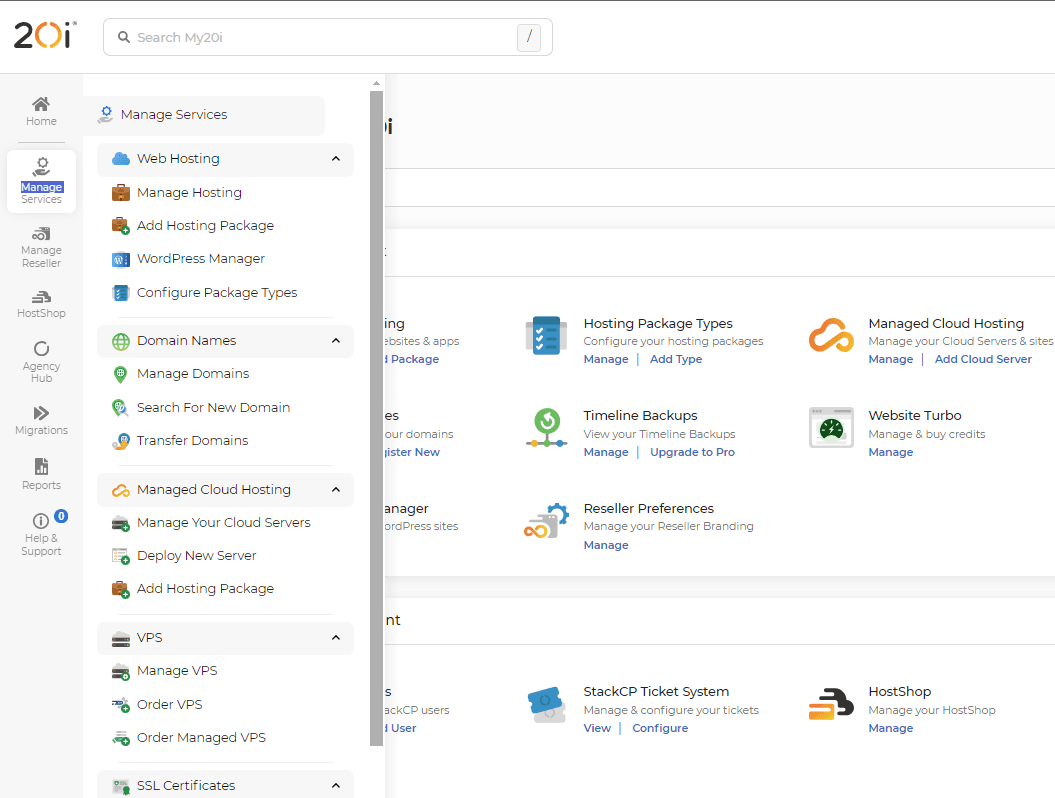
To manage the cloud server you can either click on the Manage link in the Managed Cloud Hosting section after logging into my20i or select the Managed Cloud Hosting option on the reseller management drop down in the header of the control panel:
After you have clicked on one of the manage links, this will show a page that will list all of the Managed Cloud Servers you own. From here you can manage the server or also select to show all the hosting packages that you have on all your Cloud Servers in the top left:
If you click on the options link next to a cloud server, that will give you a few options:
- Manage: This will lead to the server overview page.
- Add Package: This will allow you to add a hosting package to the Cloud Server
- Upgrade Server: This will allow you to upgrade the Cloud server to a higher specification.
- Start: This will start the server if it has been previously turned off.
- Restart: This will restart the server
- Stop: This will turn off the server.
- Transfer: This will allow you to transfer the Cloud server to another 20i customer which we have more information about here
- Delete: This will completely delete and cancel the Cloud server from your account
This guide is focused on the Manage option and explaining the server overview page. Once you have clicked on the Manage option you will be shown the Server Summary page with links to other pages showing on the left hand side.
This page will show the specification of the server along with usage stats so you can see how the server is currently performing. There is also a section that shows the current hosting packages on the server and a section to upgrade timeline backups to timeline backups pro for that cloud server.
On the Usage graphs page you will again be able to see the server specifications and usage stats however there are also more in depth usage graphs that will show information on the usage of the server.
There are graphs showing disk space usage, load averages and Disk I/O as well as CPU, Memory and Network usage. You’ll be able to change the graphs to show different timeframes such as Live, the last 24 hours, the last 30 days or the last year.
The upgrade page is where you can go to upgrade your cloud server to a higher specification
This page will show your current specification and allow you to choose a new one while showing you the new pricing. Once you have selected the new specification and click upgrade server the upgrade will begin.
You will also have access to the Manage Service page.
This is where you can see what services are running on the server and where you will have options to Start, stop, restart or reload these services as well as being able to enable or disable them.
The settings page is only available for PHP optimised cloud servers and shows like this:
This page allows you to install additional server software to the cloud server such as NodeJS, Redis and others. All you would need to do is select the switch next to the software you wish to install and that will begin to install on the Cloud server.
 Corey Seymour
How to Install a Node.js App on a Cloud Server
Deploying a Node.js application to the cloud can seem complex, but with the right steps, it becomes a straightforward process. This guide will walk you through the process of installing and running a Node.js app on your cloud server. Let’s dive in!
Please note: These steps require a Node.js Optimised Cloud Server, it's not possible to deploy Node.js apps using other server optimisation profiles.
Step 1: Connect to Your Server and Navigate to the Document Root
The first step is to connect to your Node.js Optimised Cloud Server using SSH.
Navigate to the document root of the domain. This is typically the public_html directory. For example:
cd ~/public_htmlStep 2: Create the .env File
Node.js applications often rely on environment variables for configuration. In the document root, create a .env file that specifies the port and environment settings for your app. A typical .env file looks like this:
PORT=8080- PORT: The port number your app will use for connections. If the port isn’t specified in the app’s files, confirm it with the customer or developer.
Step 3: Configure the Application with ecosystem.config.js
Return to the domain’s document root directory and check if an ecosystem.config.js file exists. This file contains the configuration for your app. If it doesn’t exist, create it by running:
pm2 ecosystemEdit the generated file to match your app’s specific details. Below is a sample configuration template:
module.exports = {
  apps: [
    {
      name: 'your-domain-app-name', // Replace with your domain or app name
      cwd: '/home/virtual/vps-12345/1/a1b2c3d4/public_html', // Path to your app
      script: 'npm',
      args: 'start',
      env: {
        NODE_ENV: 'production',
      },
      exp_backoff_restart_delay: 100,
    },
  ],
};
Key Fields to Update:
- name: Use your domain name or a unique identifier for the app.
- cwd: Set this to the absolute path of your application’s directory.
- script: Typically
npm, but adjust if your app uses a different runtime. - args: Usually
start, but modify this if your app requires a custom start command.
Save the file after making these changes.
Moreover, the start command for the application must be noted within package.json.
The command must start the application, depending on the framework being used.
Step 4: Deploy the Application
Navigate back to the package overview page, and click the "Discover Applications" button in the right-hand sidebar.
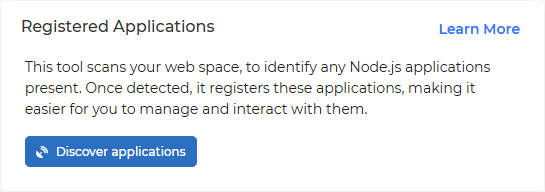
After a few seconds, the app should be discovered.
Once the app discovery is successful, the app will be started automatically.
Step 5: Access Your Site
Open a web browser and navigate to your domain. If everything is configured correctly, your Node.js app should now be live and accessible online.
Troubleshooting Tips
- Port Conflicts: Ensure the port specified in the
.envfile isn’t already being used by another service. - Permissions: Double-check file and directory permissions to ensure the app can access necessary resources.
- Logs: Use PM2’s logging features to debug issues.
- Log out and login again: If logged in before running the app discovery, log out and login again to fix this.
By following these steps, you can successfully deploy a Node.js application to the cloud. Whether you’re managing a personal project or handling client requests, this guide ensures a smooth and professional deployment process. Happy coding!
 Joshua Rosato
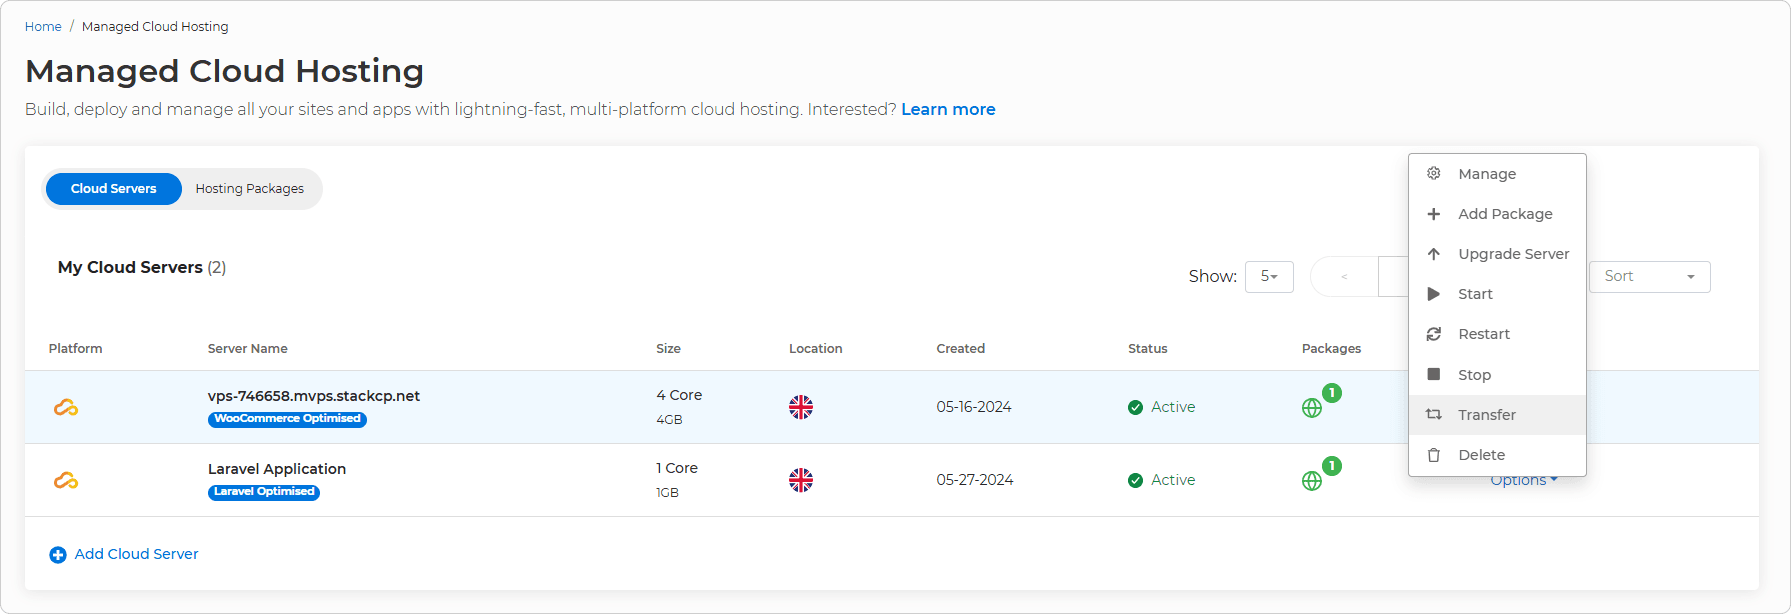 The receiving customer will receive a notification in their My20i account to accept the transfer. An active card is needed in the receiving My20i account in order for the services to renew correctly.