API Questions
How do I provision a mailbox via the API?
What is the 20i Reseller Hosting API?
The 20i Reseller API gives you access to all the features and functionality of StackCP, allowing you to create a hosting control panel from scratch or integrate external services such as WHMCS.
This is for advanced web hosting resellers and the support we provide for the Reseller API is service-based only.
How to provision a mailbox via the API?
This endpoint permits the creation of mail objects, for example, mailboxes, and email forwarders.
The example below details an example payload for the creation of a mailbox.
PHP examples use our API wrapper, which can be downloaded here: https://my.20i.com/reseller/api
PHP
Request:
require_once "vendor/autoload.php";

$bearer_token = "INSERT API KEY"; //Your 20i API key.

$services_api = new \TwentyI\API\Services($bearer_token);

$packageId = "32025"; //The ID of the 20i package you wish to provision a mail object to.

$domain = "20isupport.com"; //The intended domain.

$prefix = "info"; //The prefix for the mailbox/mail object.

$password = "Password123"; //In this example, this is the password you wish to set for the mailbox.

$newMailbox = ["new" => ["mailbox" => ["local" => $prefix, "send" => "true", "receive" => "true", "password" => $password ] ] ];

$response = json_encode($services_api->postWithFields("/package/$packageId/email/$domain", $newMailbox), JSON_PRETTY_PRINT);

print_r($response);
Response:
{
    "result": {
        "result": [
            {
                "type": "mailbox",
                "id": "info",
                "generatedId": null,
                "password": "Password123"
            }
        ],
        "name": "20isupport.com"
    }
}
The response indicates that a mailbox object has been created with the details we specified in our payload. The mailbox can then be accessed as usual via the 20i control panel.
 Andrew Porter
How do I retrieve a list of StackCP Users using the API?
What is the 20i Reseller Hosting API?
The 20i Reseller API gives you access to all the features and functionality of StackCP, allowing you to create a hosting control panel from scratch or integrate external services such as WHMCS.
This is for advanced reseller hosting users and the support we provide for the Reseller API is service-based only.
How to retrieve a list of StackCP users using the API?
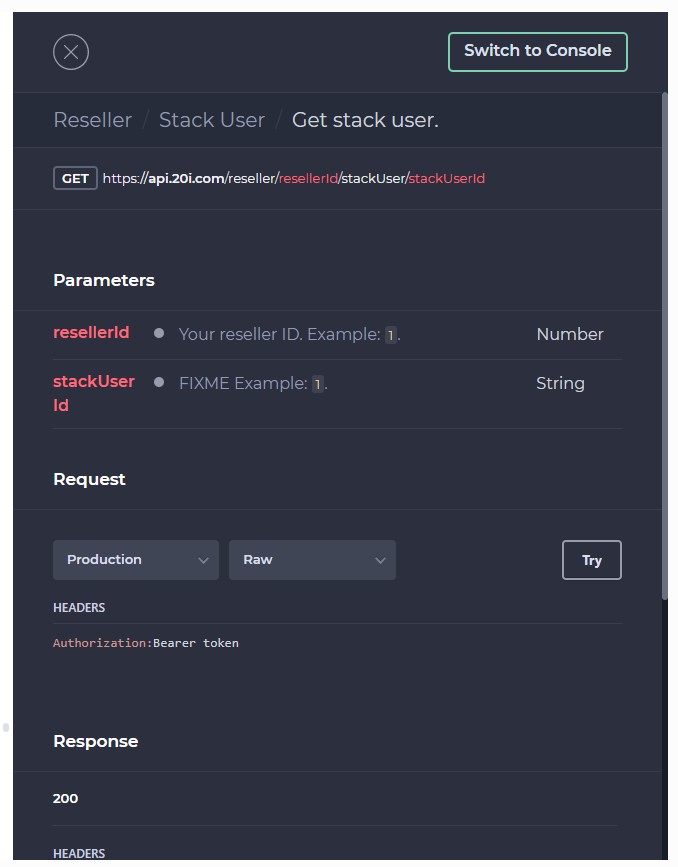
This endpoint can be used to get information about StackCP Users within a 20i account. Specifically, the response will contain an array of objects detailing the contact(s) assigned to the StackCP User(s), and a grant map of services the StackCP User has been assigned to.
PHP examples use our API wrapper, which can be downloaded here: https://my.20i.com/reseller/api
PHP
Request:
Result:
{
    "contact": {
        "stack-user:808833": {
            "address": "Hawthorn House\nSouthwell Road West\n",
            "avatarUrl": "",
            "cc": "GBR",
            "ccAlpha2": "GB",
            "ccAlpha3": "GBR",
            "city": "Rainworth, Mansfield",
            "company_name": "",
            "company_number": "",
            "createdAt": "2019-08-20T19:55:56+00:00",
            "email": "supportteam@example.com",
            "ext_billing_ref": null,
            "nominet_contact_type": "IND",
            "notes": "",
            "pc": "NG21 0HJ",
            "person_name": "20i Ltd",
            "sp": "Nottinghamshire",
            "trading_name": "",
            "voice": "+44.800000000",
            "firstName": "20i",
            "lastName": "Ltd"
        }
    },
    "grant_map": {
        "stack-user:74562": {
            "package:2680": 1,
            "package:208423": 1,
            "package:6463": 1,
            "package:593453": 1,
            "package:593459": 1,
            "domain:6535": 1,
            "package:32025": 1,
            "vps:2301": 1,
            "package:93517": 1,
            "package:797247": 1
        },
If an object needs to be accessed specifically, we can specify this as follows:
$sUsers->contact
This would then have the effect of only showing the contact object.
 Andrew Porter
How do I provision a hosting package via the API?
What is the 20i Reseller Hosting API?
The 20i Reseller API gives you access to all the features and functionality of StackCP, allowing you to create a hosting control panel from scratch or integrate external services such as WHMCS.
This is for advanced reseller hosting users and the support we provide for the Reseller API is service-based only.
How to provision a hosting package via the API?
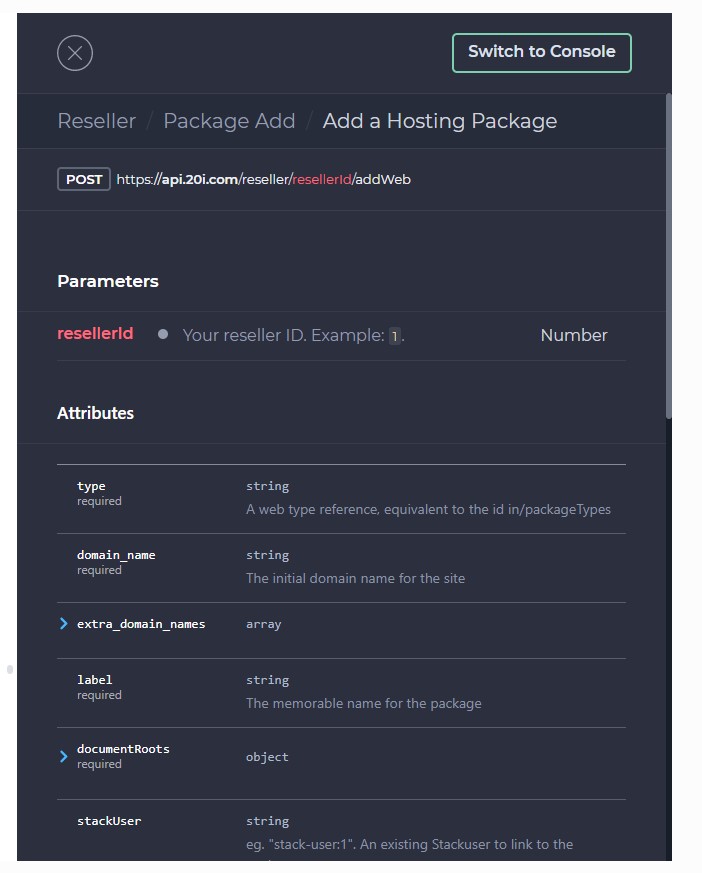
The /reseller/{id}/addWeb endpoint permits the creation of hosting packages.
PHP examples use our API wrapper, which can be downloaded here: https://my.20i.com/reseller/api
PHP
Request:
Result:
{
    "result": 866239
}
The response will contain the ID of the newly created package.
Supported arguments
| "type" | string |
A web type reference, equivalent to the id in /packageTypes |
| "domain_name" | string |
The initial domain name for the site |
| "extra_domain_names" | string[] |
Array of zero or more extra domain names |
| "label" | string |
The memorable name for the package |
| "documentRoots" | object |
A map of domain names to intended document roots |
| "stackUser" | string|null |
eg. "stack-user:1". An existing Stack user to link to the package. |
 Andrew Porter
Guide to the 20i API Documentation
The 20i Reseller API is a powerful and flexible tool designed to provide you with comprehensive access to all the features and functionality of StackCP, our cutting-edge hosting control panel. By leveraging the extensive capabilities of our API, you can either create a customised hosting control panel from the ground up or seamlessly integrate external services to extend the capabilities of your existing system.
As a valuable asset for advanced web hosting resellers, the 20i API allows you to streamline the management of your hosting environment, automate repetitive tasks, and improve the overall efficiency of your operations.
Here at 20i, our API documentation is powered by Apiary. Apiary is a user-friendly platform designed to streamline the process of creating, managing, and sharing API documentation. As an end user, you'll find that Apiary's interactive console provides a seamless and intuitive way to explore and interact with the 20i Reseller API. In this brief guide, we'll walk you through the basics of navigating and utilising the Apiary console to make the most of your API experience.
Accessing the Console:
To get started, you'll first need to access the 20i API documentation on Apiary. To access 20i's API documentation, log in to your My20i account and head to Reseller Preferences > API > View Documentation.
Overview and Navigation:
Once you've accessed the Apiary console, you'll be greeted with an overview of the 20i Reseller API. This includes a brief introduction, authentication information, and a list of available endpoints.
On the left-hand side, you'll find a navigation panel that allows you to easily jump between sections of the documentation, making it simple to find the information you need. Each section available within the navigation panel covers a different service that we provide, e.g. sections covering endpoints for domain, VPS, and hosting package endpoints.
Interactive Endpoints:
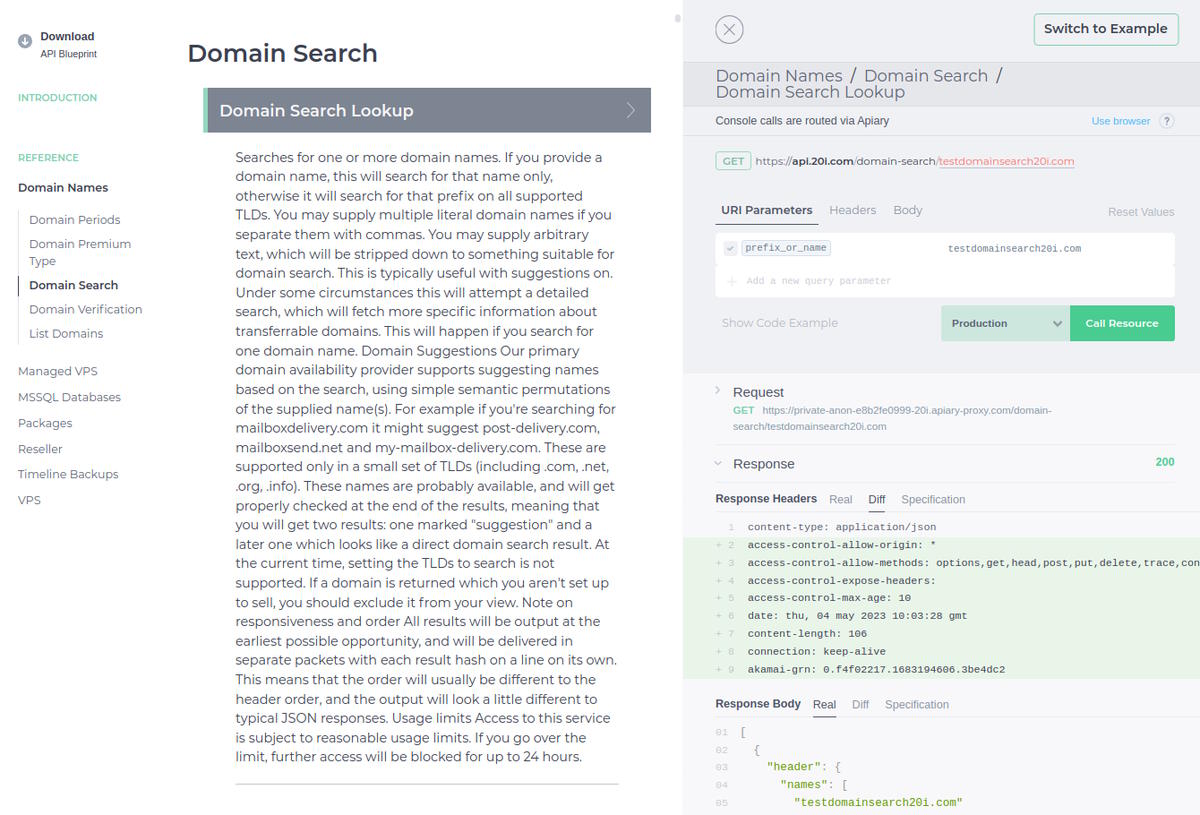
Apiary's console provides a unique, interactive way to explore and test the API's endpoints. Each endpoint is presented with its respective HTTP method (GET, POST, PUT, DELETE), a brief description, and the necessary parameters.
To test an endpoint, simply click on the "Try" button next to it. This will open up a customizable request form where you can input any required parameters and view the corresponding response in real-time.
Customising Requests:
When testing an endpoint, you can input your own parameters or modify the provided examples to suit your specific use case. Simply edit the fields in the request form and click "Call Resource" to see how the API responds to your query. This is a powerful way to understand how the API works and experiment with different scenarios.
Understanding Responses:
After making a request, the console will display the API's response in a structured format. You can view the HTTP status code, response headers, and the response body, which typically contains the requested data in JSON format. This helps you understand how to interpret the API's responses and incorporate them into your own applications.
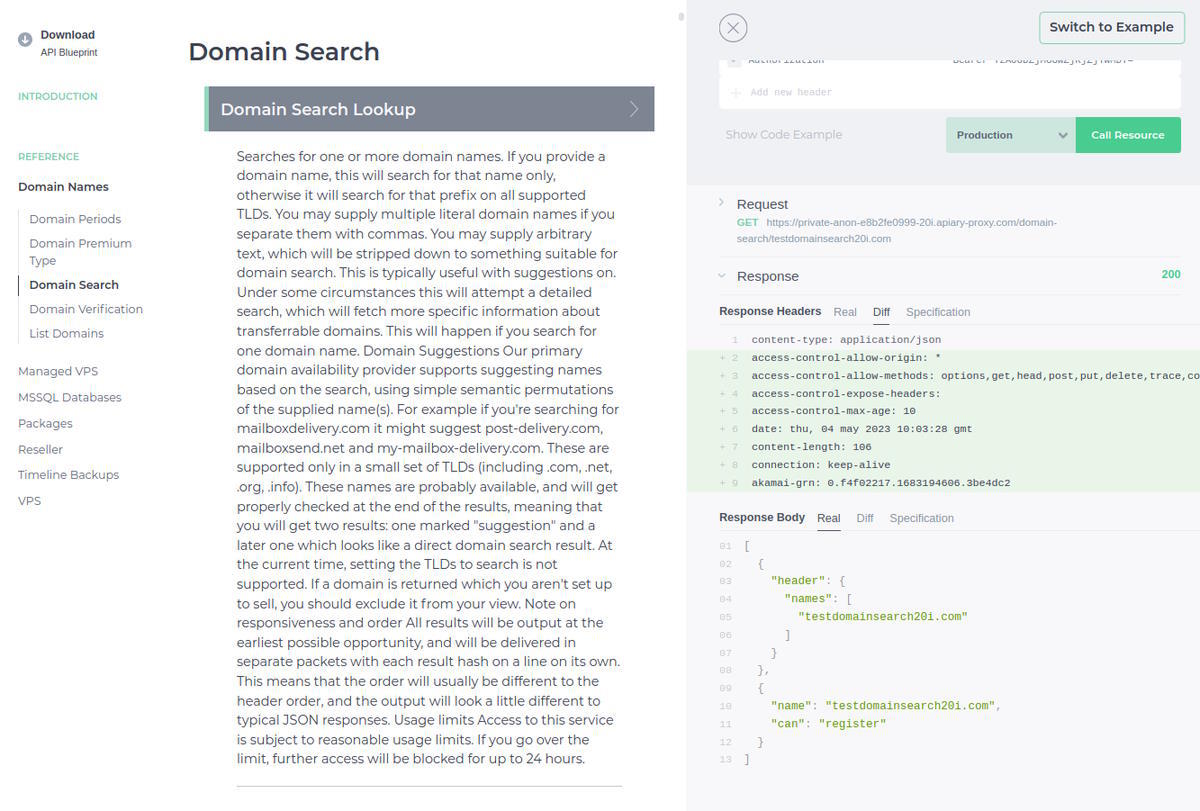
The following is an example of using the console to make a query to the domain search endpoint:
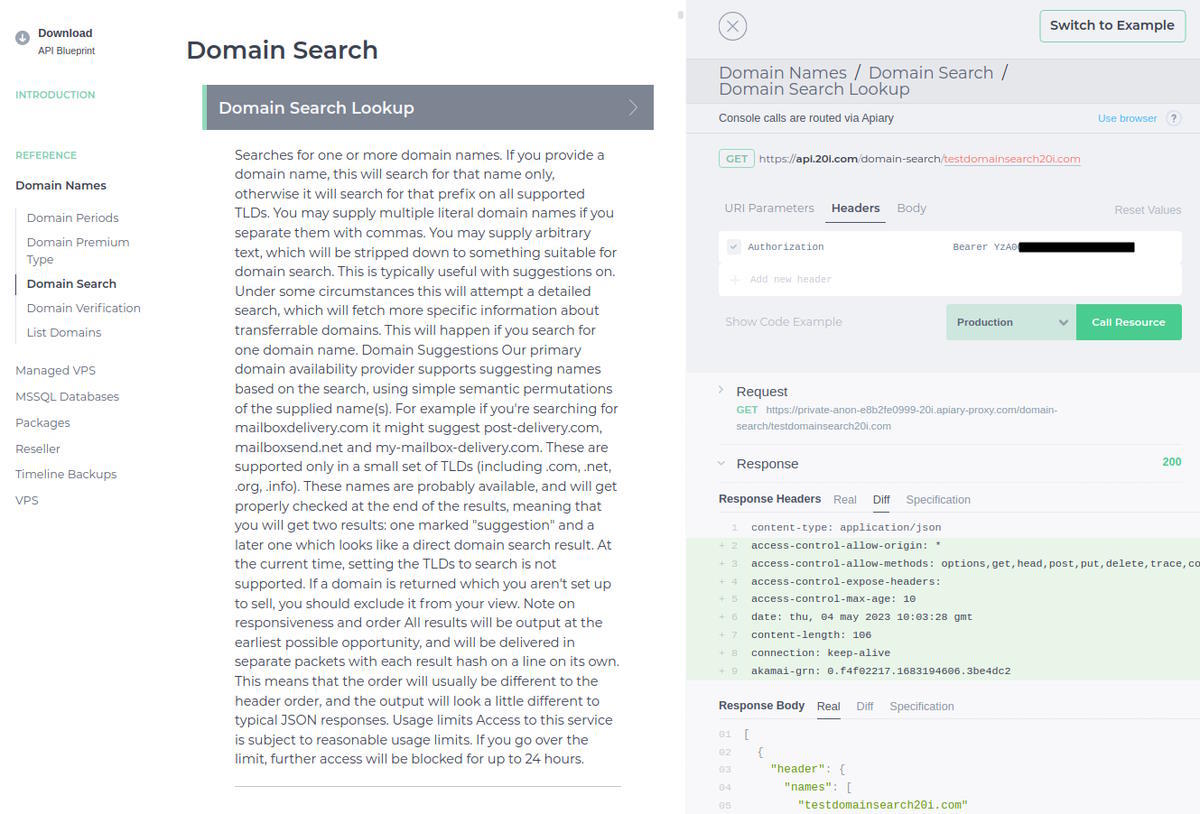
It’s extremely important to note that when making requests, your bearer token should be a base64 encoded version of your general API key. Your general API key can be found, and generated via https://my.20i.com/reseller/api.
Regardless of whether the request is successful or not, you’ll be able to see the response made by our API in the response body of the console. If the API request is unsuccessful, the error code/reasoning will be denoted. If the request is successful, as it is in our example, it should look something like the following:
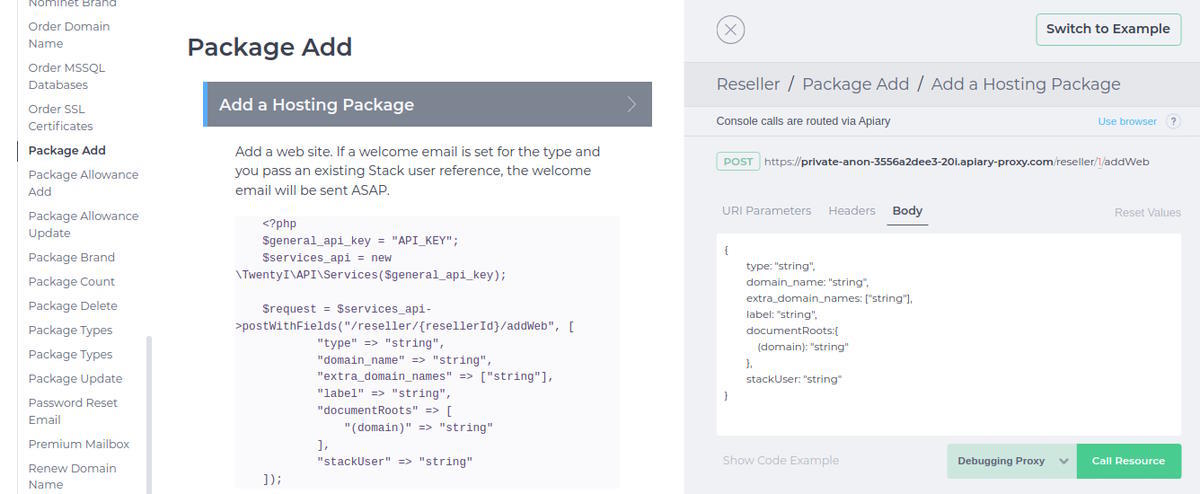
The process detailed above denotes the procedure for a GET request. The procedure for a POST request using the console is materially the same, albeit with the only difference being the use of the “Body” field. An example of making a POST request would, for example, be the creation of a hosting package. In this case, the URI parameters and headers would remain the same; the only difference is that “Body” elements need to be provided in order to send off the payload/request, as denoted below.
 Austin B.
How do I retrieve a list of packages via the API?
What is the 20i Reseller Hosting API?
The 20i Reseller API gives you access to all the features and functionality of StackCP, allowing you to create a hosting control panel from scratch or integrate external services such as WHMCS.
This is for advanced hosting resellers and the support we provide for the Reseller API is service-based only.
How to retrieve a list of packages via the API?
An array of objects will be returned, the objects pertaining to current hosting packages held within the 20i account.
PHP examples use our API wrapper, which can be downloaded here: https://my.20i.com/reseller/api
PHP
Request:
Result:
[
    {
        "id": 797701,
        "created": "2020-01-15T16:30:30+00:00",
        "enabled": true,
        "name": "20i-wp.com",
        "names": [
            "20i-wp.com"
        ],
        "packageTypeName": "Linux Unlimited",
        "productSpec": null,
        "stackUsers": [
            "stack-user:989901"
        ],
        "typeRef": 811,
        "packageLabels": []
    },
    {
        "id": 527649,
        "created": "2019-03-14T18:43:17+00:00",
        "enabled": true,
        "name": "20iclone.com",
        "names": [
            "20iclone.com"
        ],
        "packageTypeName": "Unlimited Hosting",
        "productSpec": null,
        "stackUsers": [
            "stack-user:612771"
        ],
        "typeRef": 814,
        "packageLabels": []
    },
    {
        "id": 32025,
        "created": "2017-04-10T09:41:44+00:00",
        "enabled": true,
        "name": "20isupport.com",
        "names": [
            "20isupport.com",
            "tools.20isupport.com"
        ],
        "packageTypeName": "Linux Unlimited",
        "productSpec": null,
        "stackUsers": [
            "stack-user:33487"
        ],
        "typeRef": 811,
        "packageLabels": []
    }
The response, shows a list of hosting packages and various other details about each package instance. For example, in the response, we can see the name and id of packages, the name of the package type the package is assigned-to, as well as any StackUsers assigned to those packages.
 Andrew Porter
How do I use the API with my Cloud Hosting?
It’s possible to set up your new Cloud Hosting using the Reseller API – doing so can allow you to automate functionality such as creating packages, activating services or resetting your cloud profiles. A full list of available endpoints, as well as full code examples for each is available within our API Documentation.
Below is a couple of examples using PHP to call and utilise the Reseller API. All of these are using our PHP API Wrapper, which can be downloaded here.
Once downloaded, use Composer to download the necessary vendor files with composer update, and then you should be set to start making use of the API. Requirements for the API Wrapper are included in the Read Me file.
Note: Reseller Hosting is required in order to access and utilise the API.
How do I fetch the ID of my Cloud Server using the API?
First off, we want to use the API to check the details of our Cloud Server(s). We can do this using the following endpoint:
GET /cloud_server
The below code is how we’d call for the endpoint using PHP:
PHP
Request:
<?php
require_once "vendor/autoload.php"; //We specify the API wrapper location.
$bearer_token = "YOUR API KEY"; //Your 20i API key.
$services_api = new \TwentyI\API\Services($bearer_token);
$response = $services_api→getWithFields("/cloud_server");
Result:
The response will contain details on your Cloud Server with an array, including the ID. Make note of that ID, as you’ll need it to make requests to that specific Cloud setup, such as for creating a package. For example:
Array
(
[0] => stdClass Object
(
[configuration] => stdClass Object
(
[CpuCores] => 1
[RamMb] => 1024
[OsDiskSizeGb] => 25
[DataDiskSizeGb] => 0
[Provider] => 20i
[Zone] => 20i
[Country] => GB
[VpsOsId] => 1
[spec] => micro
)
[externalId] => 1111
[location] => dc_location-uk
[name] => vps-123456.mvps.stackcp.net
[productSpec] => cloud-20i
[count] => INF
[cpanel] =>
[cpanelInfo] =>
[cpanelRebuilding] =>
[id] => 1111
[isCloud] => 1
[isManaged] => 1
[packageIds] => Array
(
)
[profileId] => 1
[timelineService] => normal
)
)
How do I create a package on my Cloud Server using the API?
Now that we have our ID, we can now make use of it to create our first package. We can do this using the following endpoint:
POST /cloud_server/cloudServerId/addWeb
The below code is how we’d call for that endpoint using PHP:
PHP
Request:
<?php
require_once "vendor/autoload.php"; //We specify the API wrapper location.
$bearer_token = "YOUR API KEY"; //Your 20i API key.
$services_api = new \TwentyI\API\Services($bearer_token);
$domain = "myclouddomain.com"; //The primary domain we wish to assign to our new package.
$extra_domain_names = []; // Any extra domains we wish to assign to the package as an array.
$addPackage = ["domain_name" => $domain, "extra_domain_names" => $extra_domain_names];
// The constructed payload for the endpoint, containing the domains and extra domains for the package.
$response = $services_api->postWithFields("/cloud_server/4838/addWeb", $addPackage);
Result:
The response will contain the ID of your newly created package on your Cloud Server, returned as an object:
stdClass Object
(
[result] => 1234567
)
And your new package should show in the Manage Cloud Hosting area of My20i, ready to use.
Further endpoints and code examples are available within the API Documentation available in My20i for your perusal, and the above should help you with getting started with this approach to Cloud Server hosting and provisioning – happy coding!
 Ruth Turner
Using the Browser Console to view API calls in 20i API
The 20i Reseller API is a powerful tool that will allow you to take advantage of all the features and functionality of StackCP, allowing for the creation of your own customised hosting control panel from the ground up or the possibility to seamlessly integrate external services to build upon your existing systems. Making use of the API can also make the management of your Reseller hosting more efficient by allowing you to automate repetitive tasks
We do provide in-depth API documentation. You can access the API documentation directly from your account by navigating to Manage Reseller > API > View Documentation.
Our documentation covers the functions which we deem the most critical and those most commonly used to allow you to manage your Reseller hosting. However, there are certain functions and use cases, where the API documentation will not provide all the information you require. In these cases it is possible to reverse engineer these API calls to be able to implement these yourself.
Making use of the browser console to view API Calls.
Almost every action on our platform has an associated API call, and whilst our documentation does not cover all of these you can figure out these API calls yourself using the browser console.
On Windows, you can access the browser console by pressing F12, and we are specifically looking for the Network tab. This tab will record all requests and their responses that happen while it is open. We can use the information in the Network tab to figure out the API endpoint, as well as the payload used in certain actions. Let us take adding an email forwarder as an example. If you navigate to a package, and go to the Email Forwarder section. With the Network tab open, if you then add a forwarder, you should see a response appear that is titled yourdomain.com. If you click on this request you should see then see the Headers of the request.
From the headers section, you will want to make note of the Request URL as part of this will be used as the endpoint. This example, it is specifically the package/2706442/email/20itesting.com section. To get the full API Endpoint, you will want to add that section to the URL https://api.20i.com/. You can use this to get a general endpoint which would be something along the lines of https://api.20i.com/package/$packageID/email/$domainName.
Now that we have the endpoint for a given request, we need to retrieve the payload. If you click on the Payload tab, just next to the header one you will see something similar to the following.
In this case, the raw payload is: {"new":{"forward":{"local":"enquiries","remote":"testing@20i.com"}}}.
From this, we can get a general payload of {"new":{"forward":{"local":"$mailboxToForward","remote":"$destinationAddress"}}}. Another common way of writing this would be:
["new" =>
	["forward" =>
		["local" => "$mailboxToForward",
		 "remote" => "$destinationAddress"
		]
	]
]
The process of retrieving the API end-point and payload is the same across the board and you can use it to figure out the API calls for those actions and functions that are not covered in our API documentation.
 Josh Sargent
Managed Cloud Hosting API Guide
Contents
- addCloudServer Endpoint
- Payload Parameters
- Cloud Server Specifications
- Cloud Server Locations
- Setting your Brand Name and Cloud Server Logo
- Provisioning Cloud Servers under your Own Brand
addCloudServer Endpoint
The primary endpoint you'll need to provision Cloud Servers is the addCloudServer endpoint shown below.
https://api.20i.com/reseller/resellerId/addCloudServerThe endpoint enables you to request the priviosioning of a Cloud Server from a specified provider.
Payload Parameters
The request payload should include the following parameters:
configuration: An object containing the configuration details for the Cloud Server, including:
- provider: The Cloud Server provider. (e.g.,
20icloud,awsorgcp) - mvpsName: The name of the Cloud Server. A default hostname will be used if this parameter is left blank.
- optimisation: The type of optimisation for the Cloud Server. (e.g.,
default,wordpress,woocommerce,magento,joomla,laravel,nodejsandnetcore.) - spec: The specification name of the Cloud Server.
- zone: The cloud server zone, referring to the data center location (e.g.,
us-west-1). Please see further down this guide for a full list of zones/locations for each cloud provider. - bandwidth: The allocated bandwidth for the cloud server, this is only used for AWS and GCP servers.
- disk: The storage capacity of the cloud server, this is only used for AWS and GCP servers.
Additional Options
- options: Additional options for the Cloud Server order.
- periodMonths: The duration of the Cloud Server contract, in months. (e.g.,
1) - type: The type or category of the Cloud Server (e.g.,
cloud-aws,cloud-gcpandcloud-20i). You can usecloud-20ifor your branded Cloud Server as this is never displayed. - forUser: (Optional) Specifies the stack user tuple (e.g., 'stack-user:113') to whom the Cloud Server will be assigned.
When you call this API endpoint, the appropriate fee for the cloud server is deducted from your 20i account balance. If the account balance does not have sufficient funds, the operation will fail.
The API response returns a string representing the server ID if a contract is successfully created. If no contract is created, the response will be null.
<?php
$general_api_key = "API_KEY";
$services_api = new \TwentyI\API\Services($general_api_key);

$request = $services_api->postWithFields("/reseller/{resellerId}/addCloudServer", [
    "configuration" => [
        "spec" => "string",
        "zone" => "string",
        "bandwidth" => "string",
        "disk" => "string",
        "provider" => "string",
        "mvpsName" => "string",
    ],
    "periodMonths" => "string",
    "type" => "string",
    "forUser" => "string",
]);
Cloud Server Specifications
20iCloud/Reseller Branded Specifications:
| Spec | CPU | RAM | Disk | Bandwidth |
| micro | 1 | 1 | 25 | 1000 |
| small | 1 | 2 | 50 | 2000 |
| medium | 2 | 4 | 80 | 4000 |
| large | 4 | 8 | 160 | 5000 |
| x-large | 8 | 16 | 320 | 10000 |
| 2x-large | 12 | 32 | 640 | 20000 |
| 4x-large | 16 | 32 | 640 | 30000 |
| 8x-large | 24 | 64 | 1280 | 40000 |
| 16x-large | 32 | 96 | 1440 | 40000 |
| 32x-large | 48 | 128 | 1920 | 40000 |
AWS Specifications:
| Spec | CPU | RAM | Disk | Bandwidth |
| micro | 2 | 1 | 20 | 2 |
| small | 2 | 2 | 20 | 2 |
| medium | 2 | 4 | 20 | 2 |
| large | 2 | 8 | 20 | 2 |
| x-large | 4 | 16 | 20 | 2 |
| 2x-large | 8 | 32 | 20 | 2 |
| 4x-large | 16 | 64 | 20 | 2 |
| 8x-large | 32 | 128 | 20 | 2 |
Disk space
GCP Specifications:
| Spec | CPU | RAM | Disk | Bandwidth |
| micro | 1 | 3.75 | 20 | 2 |
| small | 2 | 8 | 20 | 2 |
| medium | 4 | 16 | 20 | 2 |
| large | 8 | 32 | 20 | 2 |
| x-large | 16 | 64 | 20 | 2 |
| 2x-large | 32 | 128 | 20 | 2 |
| 4x-large | 48 | 192 | 20 | 2 |
| 8x-large | 64 | 256 | 20 | 2 |
Cloud Server Locations
20iCloud Locations:
- London, England (dc_location-uk)
- Dallas TX, USA (dc_location-usa)
AWS Locations:
- North Virginia, USA (us-east-1)
- Ohio, USA (us-east-2)
- North California, USA (us-west-1)
- Oregon, USA (us-west-2)
- Mumbai, India (ap-south-1)
- Hyderabad, India (ap-south-2)
- Tokyo, Japan (ap-northeast-1)
- Seoul, South Korea (ap-northeast-2)
- Osaka, Japan (ap-northeast-3)
- Singapore, Asia (ap-southeast-1)
- Sydney, Australia (ap-southeast-2)
- Canada (Central) (ca-central-1)
- Frankfurt, Germany (eu-central-1)
- Dublin, Ireland (eu-west-1)
- London, UK (eu-west-2)
- Paris, France (eu-west-3)
- Stockholm, Sweden (eu-north-1)
- São Paulo, Brazil (sa-east-1)
- Hong Kong, Asia (ap-east-1)
- Cape Town, SA (af-south-1)
- Jakarta, Indonesia (ap-southeast-3)
- Melbourne, Australia (ap-southeast-4)
- Milan, Italy (eu-south-1)
- Zaragoza, Spain (eu-south-2)
- Zurich, Switzerland (eu-central-2)
- Bahrain (me-south-1)
- UAE (me-central-1)
GCP Locations:
- Changhua, Taiwan (asia-east1)
- Hong Kong, Asia (asia-east2)
- Tokyo, Japan (asia-northeast1)
- Osaka, Japan (asia-northeast2)
- Seoul, South Korea (asia-northeast3)
- Mumbai, India (asia-south1)
- Delhi, India (asia-south2)
- Singapore, Asia (asia-southeast1)
- Jakarta, Indonesia (asia-southeast2)
- Sydney, Australia (australia-southeast1)
- Melbourne, Australia (australia-southeast2)
- Warsaw, Poland (europe-central2)
- Hamina, Finland (europe-north1)
- Madrid, Spain (europe-southwest1)
- St. Ghislain, Belgium (europe-west1)
- Turin, Italy (europe-west12)
- London, England (europe-west2)
- Frankfurt, Germany (europe-west3)
- Eemshaven, Netherlands (europe-west4)
- Zurich, Switzerland (europe-west6)
- Milan, Italy (europe-west8)
- Paris, France (europe-west9)
- Tel Aviv, Israel (me-west1)
- Montréal, Québec (northamerica-northeast1)
- Toronto, Ontario (northamerica-northeast2)
- São Paulo, Brazil (southamerica-east1)
- Santiago, Chile (southamerica-west1)
- Iowa, USA (us-central1)
- South Carolina, USA (us-east1)
- Virginia, USA (us-east4)
- Ohio, USA (us-east5)
- Texas, USA (us-south1)
- Oregon, USA (us-west1)
- California, USA (us-west2)
- Utah, USA (us-west3)
- Nevada, USA (us-west4)
Setting your Brand Name and Cloud Server Logo
If you want to sell Cloud Servers (20iCloud) under your own brand you need to set your brand name and logo from Your Brand in My20i. These will be returned in the response headers when querying the Cloud Server ID, and returned within the StackCP management interface.
Provisioning Cloud Servers under your Own Brand
To use your brand name and logo to replace the 20iCloud text and logo, you can can set the resellerCloudBranded parameter in the configuration to true:
<?php
$general_api_key = "API_KEY";
$services_api = new \TwentyI\API\Services($general_api_key);

$request = $services_api->postWithFields("/reseller/{resellerId}/addCloudServer", [
    "configuration" => [
        "spec" => "string",
        "zone" => "string",
        "bandwidth" => "string",
        "disk" => "string",
        "provider" => "string",
        "mvpsName" => "string",
        "resellerCloudBranded" => true
    ],
    "periodMonths" => "string",
    "type" => "string",
    "forUser" => "string",
]);
 Austin B.
How do I add a MSSQL database as a product?
If you provide Windows hosting as a service, you may wish to also provide Microsoft SQL databases to customers via HostShop.
To set an MSSQL database up, you’ll need to:
Log in to My20i
Head to Hostshop > Product Catalogue
- Select Add New > Product
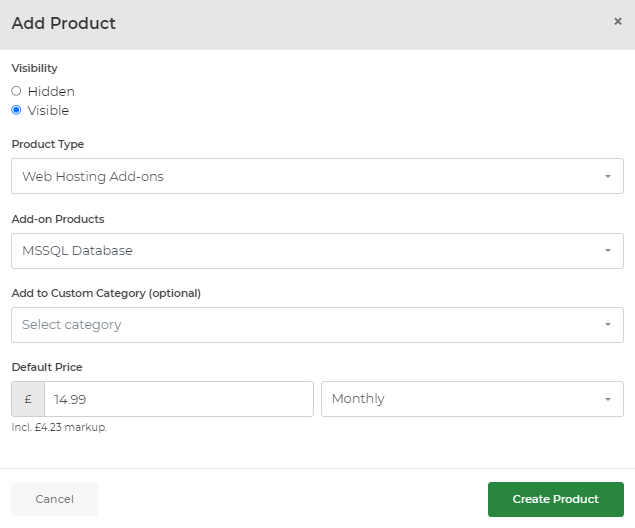
Change Product Type to Web Hosting Add-ons
Change Add-on Products to MSSQL Database
We suggest a recommended price of £14.99, giving you a markup of £4.99. The original £10 price of an MSSQL database is the price of the licence provided directly by Microsoft. Select Create Product.
Next we’ll add an annual renewal option by clicking the Product Pricing tab and checking the text box under Annually from the menu. We’re going to offer a £2.00 per month discount if you pay yearly, so we’ll add the price £155.88 to the field and select Save.
If you now head to your shop, and then select to head to the Client Area, you’ll see the ability to order an MSSQL database.
Note: In order for a customer to order an MSSQL database they will need to have already purchased Windows hosting so the database can be assigned to the hosting package.
 Dominic Elford