Web Hosting Questions
Web hosting support articles: search our database to find answers to any questions you might have about 20i's Linux web hosting.
What is Pre-Cache?
Pre-caching involves proactively caching resources on the CDN network so that they are readily available for users before they visit a web page or use an app. This technology streamlines the loading process, allowing users to access what they need quickly and eliminating the need for the first cache HIT.
The Benefits of Pre-Caching
Pre-caching comes with numerous benefits, including:
- Improved Load Times: Pages and applications can load significantly faster by storing resources in advance.
- Enhanced User Experience: Faster load times and smoother interactions improve user experience.
- Efficient Bandwidth Use: Pre-caching can reduce unnecessary bandwidth usage by minimising the need to fetch the same resources from the server repeatedly.
- Reduced Server Load: Pre-caching aids in distributing the load across servers.
In My20i, you can access a Cache Report that shows you the pages we've identified, whether they are cacheable, and if they are not, the reasons why.
Using the Cache Report
Precaching allows for your websites to be pre-fetched by all of our CDN locations around the globe, for faster response times from anywhere in the world.
In My20i, you'll receive access to a new Cache Report that will display what pages are and are not cacheable on your sites.
If a page is found to be unable to be cached, you’ll be informed of the reasons why, providing a very easy way of identify and resolve caching issues across your website to give it the absolute maximum performance.
Pre-caching ensures a much higher cache hit rate for all users regardless of location and thus a faster experience for your visitors.
How does Precaching work?
To pre-cache your site, our 20i web crawler navigates each URL on your site and caches it. The cache report displays the URLs that were crawled and whether they were successfully cached.
Pre-caching has a limit of 1,000 URLS; however, you can control which URLS get crawled by creating a blocklist. To exclude specific URLs from being crawled, you need to make a .crawlrc file in your website's root directory.
By default, if you do not have a .crawlrc file, we exclude the following paths:
/nonce /basket /share
/wishlist /cart
/yith /wcanThe .crawlrc file contains a list of the paths you want to exclude from crawling. It must be a valid JSON file formatted as follows:
{
"SKIP_REGEX": "/basket|contact|cart/"
}
The only key should be SKIP_REGEX, and the value should be a combination of paths to be excluded from your site. You can use regex, where the `|` symbol separates multiple paths. In the example above, we excluded /basket, /contact, and /cart from being crawled.
With the .crawlrc file, you have greater control over what URLs get crawled on your site.
Joshua MinerDo you disallow any WordPress plugins on your WordPress platform?
Our WordPress platform was designed and built exclusively for WordPress.
Lloyd CobbWhat’s the difference between 20i’s Managed Cloud Hosting and Managed Cloud Servers?
With the introduction of our Managed Cloud Hosting Platform, it may be confusing to understand how it differs from our Managed Cloud Server plans and which one is best suited for your use case. While both provide high performance and reliability, they are designed for different types of projects and customers.
Joshua MinerProviding Access Logs to a Third-Party provider
Some third-party providers may request access logs for investigation (i.e. Google AdWords). You can access these logs from within your My20i account.
- Head to Manage Hosting > Options > Manage
- Select Access/Error Logs
- Select Download Log Files.
This will download all your access and error logs as a .ZIP file which contains all the logs we have for this site.
You can select which logs that you'd like to give to your third-party provider. These logs contain information such as IP addresses and which web pages they've accessed.
Austin B.How do I specify a custom index page?
By default, the following are seen as default index pages on our Linux Web Hosting platform:
- index.php
- index.html
- index.htm
- index.cgi
- index.rb
- index.py
Should you wish to specify a different/specific filename as your index page, you can do this with DirectoryIndex.
Add the following in the .htaccess file, within the directory you are serving/intend to serve site content from:
DirectoryIndex file.php
file.php should be replaced with the name of the file you wish to make default.
Andrew PorterHow to use the Schema Generator
Our Schema Generator creates the full markup code in JSON-LD for you.
Unlike other schema generators that are available, ours lets you include markup for the entities that your content is about. This will help you build a content hierarchy by defining a parent page for your content.
We will walk you step by step through the use of the schema markup generator and how to add entities and site hierarchy to your schema code.
While the code might appear a bit complicated, that’s why we’ve come up with this generator. It will make it quick and easy for you to get complex structured data for your webpages.
As an example, here we use the schema markup for an FAQ page but everything we explain is easily transferable to the other applications.
Choose what schema you want to generate
This is pretty self-explanatory and the same as with any other schema generator you might have used before. Just chose the kind of schema markup you want to create and click on it.

Define the hierarchy with schema for the parent page
One of the unique features of our generator is that we enable you to implement a clear hierarchy to your content by defining a parent page for each content page you mark up.
To learn more about why you should add a hierarchy structure to your website via schema markup, we recommend the article: Schema markup for your website hierarchy
First you have to put in the name of the webpage you want to define as the parent page and then the URL of this page in the second field.

Here the parent page is defined in the first code snippet and the defined page is already integrated in the main snippet of the schema code with "isPartOf": {"@id": "https://www.example.com#webpage"} to indicate that the main content is part of the defined parent page.
Basic input fields for FAQ schema
Input the base data for the FAQ page you want to mark up (use equivalent data if you apply this to any other page than a FAQ page).
All fields should be self-explanatory. Please make sure you use the correct language code. You can find a list of BCP 47 language codes under the input field if need some help to find the right language code.

Input your FAQ Question and Answers
This should need no long explanation as it is the same as with every other schema generator for FAQs. Just input the questions and answers for your FAQs. If you are marking up a HowTo page, then you input the steps the user should follow in your how to guide - simple as that.
20i Schema Generator for entities
This is the second unique feature this Schema Generator offers you. You can use structured data to mark up the entities your content is regarding. The schema property "about" lets you clarify which the main entity of your content is and what high authority website (in a lot of cases this will be Wikipedia) validates the entity.
It is strongly recommended to use only the main focus entity for this markup.
With "mentions" you can go a bit wilder. As it says if you mention something in your content that has some relevance and is a recognised entity – put it in your structured data.

For more information about how this kind of entity is useful for your website, please read the article: FAQ schema markup – and the trick you didn’t know
Copy the generated schema code and validate it
The structured data will be generated on-the-fly as you input the variables. You can make changes at any time, and they will be transferred to the generated code.
Once you have all the information put in the fields you can use the green ‘copy’ button you find on top and at the end of the structured data field, to copy the whole code to your clipboard.
We recommend to always validate the code with either the Rich Results Test tool by Google or the validator tool by Schema.org.
Paste the code into you content page and validate again to make sure that everything is fine.
Where to put the schema code on you page?
There is always the question where to put the schema code? In the header, the footer or the html body?
Actually it doesn’t really matter. A lot of CMSs will provide a plugin or add-on to place schema code on your pages. But you can just paste the generated JSON-LD in the source code of your page. Just make sure it does not break up any other code and is easy to find.
I prefer to paste the schema code at the end of the header or the start of the html body.
The difference to other schema generators
There are other tools to generate structured data for you, true.
But this is the first that will let you define a hierarchical structure for your website and mark up the entities you focus on with schema code.
Both are essential when you want to improve you semantic SEO. With this tool you can clearly define the topic and building clusters that lead to the main pages you want the focus to be on.
Go to the Schema Generator.
Reudiger DalchowIs ionCube PHP Loader installed?
The ionCube Loader is a PHP extension often used by setups such as WHMCS - it decodes PHP scripts that have been encoded by the ionCube PHP Encoder. Without this, the scripts cannot be read and so the sites that use them cannot run, so it’s important to know what areas of our hosting have this included.
Lloyd Cobb403 Response on POST Request
As part of our Web Application Firewall we occasionally filter invalid POST requests when we detect malicious traffic towards our network.
Austin B.How do I take my temporary test site / StackStaging site live?
There are two possible variations on how to approach this, dependent on whether the site in development is hosted elsewhere or whether you're creating a WordPress site on 20i:
Developing your site at 20i but it is hosted elsewhere:
You may be using the temporary URL within StackCP whilst you develop your site. To take the site live you'll need to do either of the following:
1. You can either point the domain to our nameservers which are:
ns1.stackdns.com
ns2.stackdns.com
ns3.stackdns.com
ns4.stackdns.com
2. Point the domain to the A Record that is located within StackCP > Manage DNS.
WordPress Sites:
If you are using the temporary URL within StackCP and you have a WordPress site, you may need to do either, or both of the following:
Update the temporary URL within WordPress Admin:
- Log in to the WordPress admin.
- Click on Settings on the left hand side.
- Change the WordPress Address (URL) to your actual domain name.
- Change the Site Address (URL) to your actual domain name.
- Update the database.
- Backup your database and save the copy off-site.
And/or:
- Log in to phpMyAdmin.
- Select the link to your database and choose the one that is your WordPress database.
- All the tables in your database will appear on the screen. You will then see all the tables in your database, locate wp_options and select Browse.
- A screen will open with a list of the fields within the wp_options table. Under the field option_name, locate 'siteurl'.
- Click the Edit Field icon which usually is found at the far left at the beginning of the row.
- The Edit Field window will appear.
- In the input box for option_value, change the URL information to the new site address.
- Verify this is correct and click Go to save the information. You should be returned to your wp_options table.
- Look for the home field in the table and click Edit Field. Note: there are several pages of tables inside wp_options. Look for the > symbol to page through them.
- In the input box for option_value, carefully change the URL information to the new address.
- Verify this is correct and select 'Go' to save the information.
There is further information about this from WordPress.org: Changing the Site URL.
Austin B.What are your default index pages?
On our Linux platform and Managed Cloud Hosting, the following are currently set as default index pages (in order of priority):
Andrew PorterHow do I use the free 20i Website Malware Scanner?
One of the major problems with malware is its persistence. This is why 20i’s free Website Malware Scanner makes daily scans of all the sites within your hosting account. It uses a combination of commercial and in-house tools to provide reports detailing malicious content and its location within your site files.
When malware is located on a site, PHP mail and cron jobs are automatically disabled. We do this to preserve sender reputation across the platform and ensure that any sites that are compromised do not send large volumes of spam emails.
We run daily malware scans on all sites on our system – we will only scan files that the system has detected changes on. If no change has been detected, we won't run a new malware scan on these files.
As a Reseller, you can offer this service to your customers free of charge by simply adding it to your Package Types, so they can use this feature in StackCP.
Note: when we refer to “signatures” in this guide, this is referring to the names given to each item of malicious code detected in a file.
1. Best practices when dealing with malware and infected files
- Check the Malware Report produced by the malware scanner to identify if there are any infected files
- Clean and remove the infected files from your webspace
- Identify any vulnerabilities within the site and secure them
Taking regular backups means that you'll always have a restore point if you do find your site has compromised files. You can do this in My20i or automate the process with Timeline Backups.
Checking the Malware Report
The Malware Scanner shows you a full list of sites that are currently infected within your account. If you’re a 20i Reseller, you can access this list by:
- Logging in to My20i
- Selecting Malware Report
- If any of your sites are currently infected, they will be listed here
The scanner shows details on the package where the infection has been found, the time of the last scan and the number of infected files. To show a more detailed report, select View Report. You will now see the full list of infected files on the site.
You can also access the Malware Scanner on a per-package basis:
- Log into My20i and head to your Manage Hosting area
- Select Options > Manage on the hosting package you wish to scan
- Under Security, select Malware Scan
From here, you can initiate a fresh scan for the site, view the scan history for the package and view a list of any flagged files that have been detected as potentially harmful.
Should the scan return clean without any issues, you’ll see the following:

If the scanner finds any potentially harmful files or signs of a malware infection, however, you’ll instead see the following:

Should any infected files be found on the package, we’ll also add a warning to the package itself to notify you of this. This is visible at the top of the hosting package screen.

Any files that are detected as malware will also show in the File Manager so that you can easily access and review the flagged files.

Note: Infections found marked in red indicate that the file could be a risk to the site.
We also have a yellow ‘warning’ state which shows that the signatures found are unlikely to pose a high risk to the site. For example log files, SQL files and .zip backups files. Essentially, a yellow warning state is for information only and won’t impact the sending of mail.
You can ensure that you're notified of any newly discovered malware by checking the Receive Daily Email Alerts? box. An email will be sent to your primary 20i email address when new malware is found. You can also add additional email accounts to receive malware alerts through your Account Preferences. You may wish to create a dedicated mailbox to receive malware alerts.
Cleaning and removing infected files
In most cases, the best way to resolve an issue with malicious content is to remove the compromised files and replace them with versions from a known clean download. That is, download the software again and replace just the files that have been infected from the initial install.
If the files are not needed, then you could also just delete the files completely.
Sometimes an infected file will just have the attackers script 'injected' in the first or last line of a specific file. Sometimes this can be very obvious, in which case you could look to simply remove the malicious script.
You should do this for all the files that have been found by the Malware Scanner.
Further actions you can take
Remove unnecessary or unused plugins and applications from the site. Doing this will not only reduce the number of potential vulnerabilities but also make general site 'housekeeping' simpler.
You should also make sure that any plugins you're using are always kept fully updated. Outdated software versions are much more likely to have security vulnerabilities - leading to compromised sites.
It may also be worthwhile to change passwords such as your database password and FTP password.
Note: Don’t forget to update any configuration files such as wp-config.php after making the changes.
Rescanning the site
You can re-scan the site on demand. Once you believe you’ve removed the malware, head back to the Malware Scanner and select Scan again.
If all infected files are removed, then PHP mail and cron jobs will be re-enabled automatically and there will be no infected files displayed. The scanner will continue to take daily scans of all your websites to ensure you’re always aware of any sites that have been compromised.
Reudiger DalchowHow do I create a website builder package type?
To give your customers access to 20i's Website Builder you can select the Web Builder Platform when creating a hosting package.
Dominic ElfordHow to modify your hosts file for Windows, macOS and Linux.
Your machine's local hosts file allows you to override DNS for a particular domain or subdomain name.
Chris WrightWhat do I do if I believe a site is in breach of 20i's policies?
20i imposes a strict Acceptable Use Policy and Terms of Service which customers must adhere to. These cover illegal activities, prohibit certain content hosted through us and includes a zero-tolerance spam policy.
Chris WrightCan I enable HSTS?
The HTTP Strict-Transport-Security response header (often abbreviated as HSTS) lets a website tell browsers that it should only be accessed using HTTPS, instead of using HTTP.
You can enable this by adding the following to your .htaccess file:
Header set Strict-Transport-Security "max-age=5184000; includeSubDomains; preload"
The 'max-age' is the time in days you want the warning to be cached for, the above would set that to a default of 60 days.
Be aware that if you set this header, the site will only ever load over HTTPS.
For instance, while people can usually click through a browser warning about a name mismatch or expired certificate, browsers do not allow such a click through for hostnames with an active HSTS header. It also means that if they ever move the site to a web hosting provider that doesn't support HSTS or if they wish to remove the certificate, they cannot do so and their site will be unavailable.
Austin B.Can I add SPF records for my domain name?
Sender Policy Framework (SPF) records help reduce the chance of your domain being spoofed in spam messages. It can also increase the deliverability of e-mail to external providers such as Gmail and Outlook.
Lloyd CobbHow do I show custom error pages?
Having a custom error page can have many advantages.
If you wish to customise or brand the default error pages that are shown on your sites it is quick and easy when you web hosting is with us.
Head to Manage Hosting and the package you wish to add the custom error for.
Under ‘Web Tools’ Select the Custom Errors icon.

From here you can configure what action occurs when a particular status code is encountered on the site.

How to set a custom error page
It is really simple to set a custom error page. Select the status (error) code you wish to configure action for, then select the type of action that you want to happen and the final value of the action which will either be a redirect to a page you created for this purpose, external URL or plain text.
For WordPress hosted websites, that means no extra plugin is needed to show a custom error page.
Why set a custom error page?
There are multiple reasons why having a custom error page is beneficial for your website.
- Improved user experience: Customised error pages can provide a better user experience by providing your website visitors with helpful and informative messages instead of generic and unhelpful error messages. A custom error page can include instructions on how to resolve the issue, direct to other helpful pages on the website or provide your contact information.
- Branding and personalization: Individualised error pages can be designed to match the website's branding and style, providing a consistent look and feel. This can help reinforce the website's brand and create a personalized experience for users.
- Reduced bounce rates: A well-designed error page can encourage users to stay on the website and continue browsing, rather than leaving the website due to a frustrating error message. This can help reduce bounce rates and increase user engagement.
- If you are a hosting reseller or a digital agency you can provide this as a service for your customers. They don’t have to worry about error pages when you provide a customised solution for them.
- Error tracking and analysis: Custom error pages can be used to track and analyse errors on the website. This can help website owners identify and resolve recurring errors, improving the overall reliability and performance of the website.
What error code can a custom page be set up for:
You can quick an easy set a custom error page for all 4xx and 5xx error codes.
In detail the error codes are:
|
4xx Client Error |
5xx Server Error |
|
400 Bad Request |
500 Internal Server Error |
|
401 Unauthorized |
501 Not Implemented |
|
402 Payment Required |
502 Bad Gateway |
|
403 Forbidden |
503 Service Unavailable |
|
404 Not Found |
504 Gateway Timeout |
|
405 Method Not Allowed |
505 HTTP Version Not Supported |
|
406 Not Acceptable |
506 Variant Also Negotiates |
|
407 Proxy Authentication Required |
507 Insufficient Storage |
|
408 Request Timeout |
508 Loop Detected |
|
409 Conflict |
510 Not Extended |
|
410 Gone |
511 Network Authentication Required |
|
411 Length Required |
|
|
412 Precondition Failed |
|
|
413 Payload Too Large |
|
|
414 URI Too Long |
|
|
415 Unsupported Media Type |
|
|
416 Range Not Satisfiable |
|
|
417 Expectation Failed |
|
|
418 I'm a teapot |
|
|
421 Misdirected Request |
|
|
422 Unprocessable Entity |
|
|
423 Locked |
|
|
424 Failed Dependency |
|
|
425 Too Early |
|
|
426 Upgrade Required |
|
|
428 Precondition Required |
|
|
431 Request Header Fields Too Large |
|
|
451 Unavailable For Legal Reasons |
|
As an example how a custom error page can look, here is the one we use at 20i

Austin B.How do I fix a 4XX error?
4XX errors cover a range of HTML errors that usually occur when a file that is attempting to be accessed cannot be found, has incorrect permissions or is inaccessible by the person loading it.
The causes can range from a simple typo in the URL to security rules restricting users from entering certain areas. Identifying the specific type of 4XX error can help you to understand the cause, who is impacted, and how to fix the error.
Types of 4XX Error
4XX errors have four main types that are commonly encountered, each with their own sub-header that explains what the specific problem is – these can be as follows:
Below, we’ll break down each error and some of the most common causes so you can get your site or page back online and working again as quickly as possible.
400 Bad Request
400 Bad Request errors are usually caused by the request that has been sent to the server either being corrupt or in a format that the server cannot recognise. This can be down to either the data that the browser is sending to the site, or something on the site corrupting the data.
If you’re experiencing this error, you’ll first want to try clearing your browser’s cookies and cache, as the browser may be trying to use an invalid or expired cookie to navigate and log into the site. This then results in the server responding that it does not understand the request. The cookie that your browser has cached may also be corrupt, which could lead to the same result.
If the issue persists after clearing your cache and cookies, it may be something on the website itself. It’s worth disabling any non-critical site plugins or extensions to rule these out, and note any recent changes made prior to the 400 errors cropping up. If the changes were substantial, it may be worth restoring to a backup of the site prior to these changes to see if this reverts the error.
401 Unauthorized
401 Unauthorized occurs when you try to access an area of a site that is being protected by either password encryption or a security rule. Usually, you’ll experience this error if you either try to access an area without providing the necessary login information, or our server’s security blocks the request.
Most commonly, this is due to a site being protected by password requirements set within a .htaccess and .htpasswd file combination. These state that a folder of a site is protected by a specific username and password combination, and any requests made to the site that lack these details will be denied. If you’re experiencing this error, check your site’s .htaccess files to ensure that there’s no set security rules or password protection that could be blocking the request.
Alternatively, the requests could be hitting our StackProtect bot protection. This tool actively filters your site against potentially harmful or suspicious requests, providing a 401 for any request that fails the checks it runs.
However, sometimes these connections can be filtered incorrectly, which is known as a false positive. In cases where your site request is being filtered by StackProtect, you’ll see a message prior to the 401 error stating that the connection is being checked. If this is the case, you should reach out to our Support Team, who can look to get the connection checked and see if we can prevent this being filtered on a case-by-case basis.
403 Forbidden
A 403 Forbidden error indicates that user trying to access the site does not have the necessary permissions to do so. This can be due to security policies set by the site itself, either through plugins or rules in a .htaccess file, or it can be because the permissions of the site files aren’t set correctly.
If you’re experiencing a 403 error consistently when visiting a website, check the site to make sure that there aren’t any security plugins or addons that could be blocking access to your browser or IP. Also ensure that your site’s .htaccess file doesn’t have any rules that deny access to specific IPs or types of file. If you do, you’ll need to disable or remove these to get the site to be accessible again.
If there aren’t any problems with security rules, then the 403 is most likely being caused by incorrectly set file permissions. File permissions define who can and cannot access certain files, and what services can be used to access them. We have an inbuilt File Permissions Checker that can be used to scan and fix incorrectly-set permissions.
The File Permission Checker is available for all hosting packages via the My20i control panel.
To access this tool:
- Log into My20i and head to your Manage Hosting area
- Select Options > Manage on the hosting package you’d wish to edit
- Head to the Web Files section and select File Permissions Checker
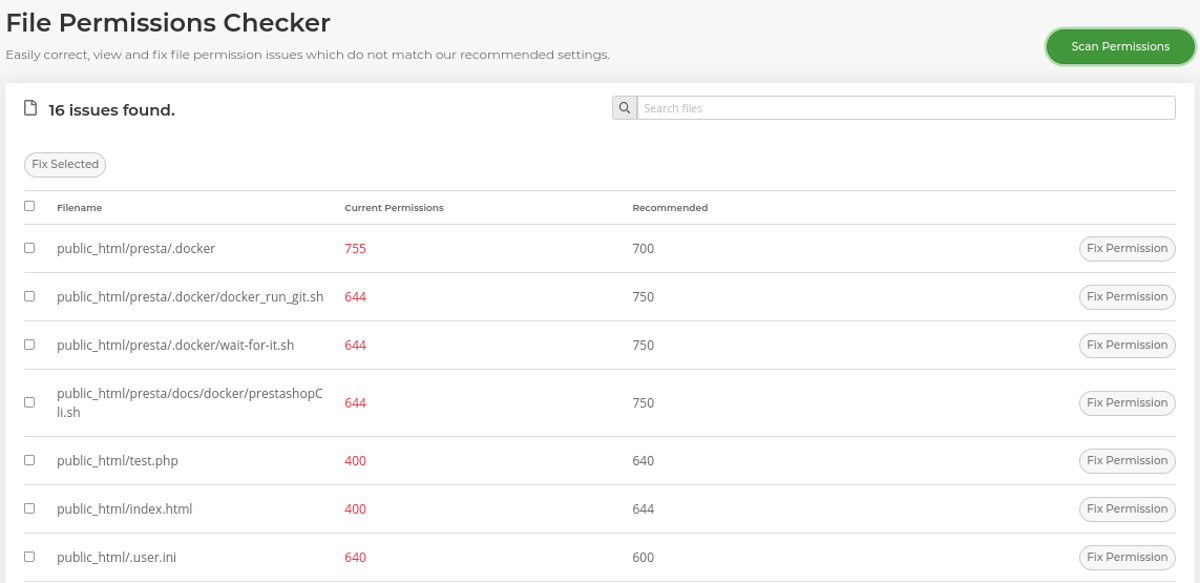
Select Scan File Permissions
Once the scan finishes, check the boxes of any files that are detected to have the wrong permissions, and select Fix Selected to resolve the error.
404 Not Found
A 404 Not Found error is caused by the requested page, file or site not being locatable by the server. Usually this is due to the file or page simply not existing on the server itself, or it’s under a different name than the given query. This can often be down to a typo in the URL, which results in the incorrect page or file to be searched for. If you’re experiencing this on your site, it’s worth double-checking to make sure you haven’t made any mistakes when trying to access the page in question.
If it’s not the case, it’s worth checking to see if the requested file does exist on your site. Check your site files: if the file simply isn’t there, you’ll need to upload a copy of the missing file in order to allow it to be accessible once more. Certain Content Management Systems (CMS) such as WordPress use permalinks instead of files per page. These are URLs generated by the site that display a post or page live, rather than storing it locally as a standalone file or folder. If a page within a WordPress site is throwing a 404 but your main site page isn’t, there may be a problem with the generated permalinks, and you’ll need to regenerate them to fix the error.
To do so:
- Sign into wp-admin on your site and head to Settings > Permalinks.
- In the main permalinks area, make sure that the correct value for the URLs is set, and then hit Save Changes. This will force WordPress to fully regenerate the permalink structure and should bring the pages back online once more.
As you can see, 4XX errors come in a wide variety of types and forms, and fixing them can depend on the specific error. If you’re encountering these types of error on your site, it’s worth noting down the specific error code and how you’re accessing the site to get the error. Doing so can help you narrow down and isolate the cause, so you can get your site back online as swiftly as possible.
Reudiger DalchowHow do I use traceroute (tracert)?
Traceroute, or tracet, is a tool used for diagnosing network-related issues. It does this by displaying the route to the destination specified - a domain name or an IP address - and records how long it takes packets to reach that destination. Occasionally your Web Hosting Provider may ask you to perform a traceroute.
Lloyd CobbHow do I check 20i server status?
You or your customers can check the status of the 20i platform on the Stack Status page: https://www.stackstatus.com/.
How do I set a custom directory index?
By default, our web servers will look for the index.html file in order to know what to display when any given directory is accessed, such as public_html.
You can change which index file is looked-for if you don’t wish to use – or can’t use – the default index.html file. Rules are added within the root .htaccess file to make this work.
To make this easier you can use the 20i tool to set the default directory index:
- Head to Manage Hosting and select the package you wish to update the default directory index for.
- Select the Directory Indexing icon.
- Various common index files are pre-filled. You may wish to add your own or simply select Enable Directory Indexing – we’ll then generate the .htaccess rule and add it to the correct location in your site files to set the desired behaviour.
Austin B.Web Builder Pro licence
After installing the web builder to a hosting package you may see a ‘Upgrade to PRO’ option when editing the website using the website builder.
Austin B.How do I restore mailbox backups with Timeline Backups Pro?
You can restore lost mailbox data using the Timeline Backups Pro tool, which can be ordered through your My20i account. With Timeline Backups Pro, you will receive 30 days of snapshots of all the email accounts on your account.
- Firstly, you’ll need to head to the Timeline Backups Manager tool. In My20i, if you're a Reseller, this can be found under Hosting Management. If you're not a Reseller, it will be under Manage Hosting > Web Files
- Now, find the hosting package that the email account is assigned to from the list. Once you've found the relevant package, select Manage Cog.
- You'll see a list of different webspace, database and mailbox snapshots. From this list, find the name of the mailbox that you’d like to restore a snapshot for and select View Snapshots.

- Select the snapshot date from the calendar view, and then select a timestamp of the snapshot that you'd like to restore to the mailbox.

Note: By default, the restore to temporary mailbox option is selected. What this does is create a new mailbox and restore the snapshot to the new temporary mailbox instead of the original mailbox. We strongly recommend restoring to a temporary mailbox first and then using the Email Migration tool to sync the temporary mailbox to the live mailbox. By doing this, you will have a chance to check and verify that the temporary mailbox has the email contents you expect before overwriting your current live mailbox.
- Select Restore Snapshot
To then view the temporary mailbox, please navigate to Receive-Only Email Accounts within your hosting package. Once you have reviewed the contents of the temporary mailbox, and you are happy to proceed, you will need to sync the temporary mailbox to the live mailbox. You will need to set a password for the temporary mailbox, which will be required for the next step.
- Head to the Email Migration section of the hosting package and enter the relevant credentials, and the select Sync.
- Hostname - This will be imap.stackmail.com.
- Username - This will be the temporary mailbox that you are syncing.
- Password - This will be the password for the temporary mailbox you have just set.
Note: If the live mailbox has been deleted, you'll need to set up the mailbox within 20i first using the same password as currently used by the temporary mailbox.
Below, under the Current Email Migrations section, you can view the status of the migration.
Chris WrightDoes your Windows hosting support .NET Core?
Windows hosting doesn't support the .NET Core framework. However, if you would like to run a .NET Core application, we offer .NET Core as a server optimisation on a Managed Cloud Server. You can find out more information here.
Austin B.My www.domain.com doesn't work, but domain.com works fine (or vice-versa) - what's up?
If you get this behaviour after a recent update to your website or a newly-created package, you're almost certainly experiencing a DNS propagation delay.
It will resolve itself in a matter of hours.
The assumption is that when you previously visited your website you visited using www.domain.com and not domain.com (without the www). Thus, your DNS resolvers have the lookup of www.domain.com stored in their cache. When you try to view www.domain.com again, you get your DNS resolvers' cached value which is the old IP address. However, when you checked the domain with just "domain.com" (no www) your DNS resolvers didn't have an answer in their cache so fetched the new (correct) IP address for the domain. Hence "domain.com" works for you but "www.domain.com" doesn't.
The only solution here is to wait for the cache to expire on your resolver, and then when you visit the domain again a fresh lookup with be made and the new IP will be stored.
If you're using the StackDNS nameservers, this should take no longer than 1 hour. If you've recently changed your nameservers, or would like to read more about DNS propagation, please see What is DNS Propagation?
Lloyd CobbWhich PHP functions are disabled on your WordPress platform?
Our WordPress platform has been specifically designed to offer the best security, performance and reliability for WordPress.
Lloyd CobbHosting shortcuts: favourite and recent hosting packages
In this guide we’ll learn how about the recent packages list and how to ‘favourite’ packages. By using these features, you can save navigating to hosting package’s Service Overview page. Shortcuts from the My20i homepage are created.
You’ll find both lists on the My20i home page on the right-hand side. Once you have managed a few packages from the Manage Hosting page or favourited any, you’ll be able to see something like this:

Clicking on any of the domains will take you to the Service Overview page for that package.
To ‘favourite’ any packages, you’ll first need to manage the hosting package from the Manage Hosting page. Once on the Service Overview page you’ll see a star icon the top above the search bar:

Once you click the star icon it will turn blue. When you go back to the My20i homepage you’ll see it under the Favourite Packages list.
Utilising these features makes managing packages quicker and easier since you can do it in just one click. This will save time when you manage multiple hosting packages as a reseller or an agency.
Reudiger DalchowIs mod_rewrite enabled?
Yes! As standard, mod_rewrite is available and installed on our WordPress Hosting and Linux Web Hosting servers.
Apache-style rewrite rules are also usable on our Windows platform too.
Andrew PorterHow do I use Git version control in My20i?
My20i includes a graphical user interface to manage Git™ version control.
How do I use hosting Package Labels?
Package labels can help organise your hosting packages. You can add any kind of label - it's just a text string that you decide. For example, if you wanted to categorise packages that are in development, you might apply a 'Development' tag to them.
Then, on the Manage Hosting page, you can filter by label to find them easily.
To add a hosting Package Label:
- Login to your My20i control panel.
- Head to Manage Hosting -> [select package].
- Down the right hand side, you’ll find the Package Labels section.
- To add a Label, type in the Label field (e.g. Testing) and select Add.
Now when you head back to the Manage Hosting page, you’ll see the drop-down menu allowing you to filter packages by Label (you may need to refresh the page if you've used the 'back' button).
Also, by clicking on a Label you can select all packages with that Label applied.

Here are some examples of Labels you may use:
- Testing
- New Website
- In Development
- Ready for Launch
- Awaiting Client Approval
- Subject to Change
- On Hold
- High Priority
- Low Priority
- Rework
- Personal
- Requires Review
Austin B.Can I run daemons on the shared hosting platform?
It's important to note that daemons such as Elastic Search and Redis cannot be run on our shared hosting environment due to it's shared nature, as well as certain technical limitations related to load balancing and autoscaling.
Chris WrightWhat is the difference between Linux Hosting and WordPress Hosting?
There are numerous different choices of Hosting Package Types, however, when creating a WordPress website specifically, which is better for performance and features: Linux Hosting or WordPress Hosting?
Jordan GravesWhich IP ranges should be whitelisted in Stripe?
It is strongly recommended that IP address restrictions be implemented to secure your API key, rather than having the gateway open to all IP addresses.
API key: *your API key* Recommended IP addresses: 45.8.227.175 Adding IP address restrictions prevents your key from being used outside specific addresses. This protects your account if the key is accidentally exposed.Due to the distributed nature of our network, outbound connections will not originate from the IP address assigned to your hosting package that you see under "Account Information" on the package overview. They will instead originate from a different IP address, typically 45.8.227.175 - however, this is subject to change. This is because the public IP address for your hosting package is one of our load balancer's IP addresses, which is only used for incoming web traffic via our CDN.
To be best covered, we recommend whitelisting the following IP ranges:
- 185.146.165.0/24
- 185.151.28.0/24
- 45.8.225.0/24
- 45.8.227.0/24
You can read more about our external connection IP addresses, including platform-specific information, here.
Jordan Graves
Ruth Turner
Ben Gayson
Corey Seymour
Matthew Wright
Josh Sargent