HostShop Questions
HostShop support articles: guide to how to set up and manage 20i's reseller hosting online store and marketing tools.
How do I add and sell VPS Backups?
If you’ve set up and configured VPS services to be sold in HostShop, you may want to add an extra potential revenue stream with VPS backups. You can add backups as an add-on product to the VPS services which your customers can then also buy.
To set these up, you’ll need to:
Log in to My20i
Head to HostShop > Product Catalogue
Select Add New > Product
Select VPS Add-ons from Product Type
In our example, we’re going to add the backup service for a 1 GB VPS that we’ve already configured to sell. We’ll simply select VPS Backups (1 GB VPS) from the Add-on Products drop down.

A default recommend price has already been added based on the price of 20i reseller price for these types of backup which is £2.99. So the price of £3.75 has been added giving you a £0.76 per month markup. You can adjust your Default Price and Renewal Period at this stage.
 Dominic Elford
Can I add discount codes in HostShop?
Yes, you can add various discount codes in HostShop by going to the Discount Codes page.
To create a new discount code you click the button labelled + New Discount Code.
When creating a code you need to fill in the required fields marked with an asterisk (*). These are, the discount code name, description, start date, discount amount and the products the code can be applied to. If one of these fields is not filled out you will not be able to save the code.
There are a number of additional options available to add to a discount code. These can be found under the Advanced Options drop down.
Once discount codes have been created they can be edited and deleted from the Discount Codes page.
 Dominic Elford
Cloud server bandwidth and disk space pricing in HostShop
If you decide to offer AWS and Google Cloud services through your HostShop platform, it's essential to understand the pricing structures associated with these providers, particularly in regards to pay-per-usage bandwidth costs and additional disk space pricing. These costs can impact both your profit margins and your customers' satisfaction with your services.
AWS and Google Cloud employ a pay-per-usage model for bandwidth, charging based on the amount of data transferred in and out of their cloud servers. This model can lead to variable costs for your customers depending on their usage patterns. Additionally, both providers have pricing structures for extra disk space, which may be required by users who need more storage capacity for their applications and data.
As a HostShop reseller, you have the flexibility to manage the pricing for AWS and Google Cloud services according to your business strategy. When a StackCP User orders a cloud server, you can choose to:
- Markup the bandwidth cost: By adding a markup on the bandwidth cost, you can increase your profit margins while covering the variable costs associated with the pay-per-usage model. However, this approach may result in higher prices for your customers, which could impact their satisfaction and your competitiveness in the market.
- Pass on the wholesale price: Alternatively, you can choose to pass on the wholesale price of the bandwidth to your customers. This approach keeps the pricing transparent and can help maintain customer trust while allowing them to better manage their expenses. However, this method may yield lower profit margins for your business.
You can also set pricing on a per-instance basis, customizing the charges according to the server size or specifications. For example, you may decide to apply a higher markup on bandwidth costs for larger instance types, which are typically used by customers with higher resource demands and may be willing to pay a premium for the additional resources.
When determining your pricing strategy for AWS and Google Cloud services through HostShop, it's important to balance your profit goals with the need to remain competitive and attractive to your target audience. By carefully considering the costs associated with these providers, as well as your customers' needs and preferences, you can develop a pricing model that supports both your business growth and customer satisfaction.
 Austin B.
Set up webhook notifications in Slack, Discord or Zapier
My20i Webhook Notifications are a simple way for 20i Resellers to receive alerts about StackCP User actions in Slack, Discord and Zapier.
For help connecting the service, you should refer to the documentation of the app you're wanting to connect.
- Microsoft Teams - https://docs.microsoft.com/en-us/microsoftteams/platform/webhooks-and-connectors/how-to/add-incoming-webhook
- Slack - https://api.slack.com/messaging/webhooks
- Discord - https://support.discord.com/hc/en-us/articles/228383668-Intro-to-Webhooks
- Zapier - https://zapier.com/help/create/code-webhooks/trigger-zaps-from-webhooks
In our example, we've connected Slack to My20i Webhook Notifications.
To post messages to Slack using My20i webhooks, you'll need to create a new app within Slack, add Incoming Webhooks as its function and make sure they're enabled.
After creating a new app within Slack, select Incoming Webhooks.
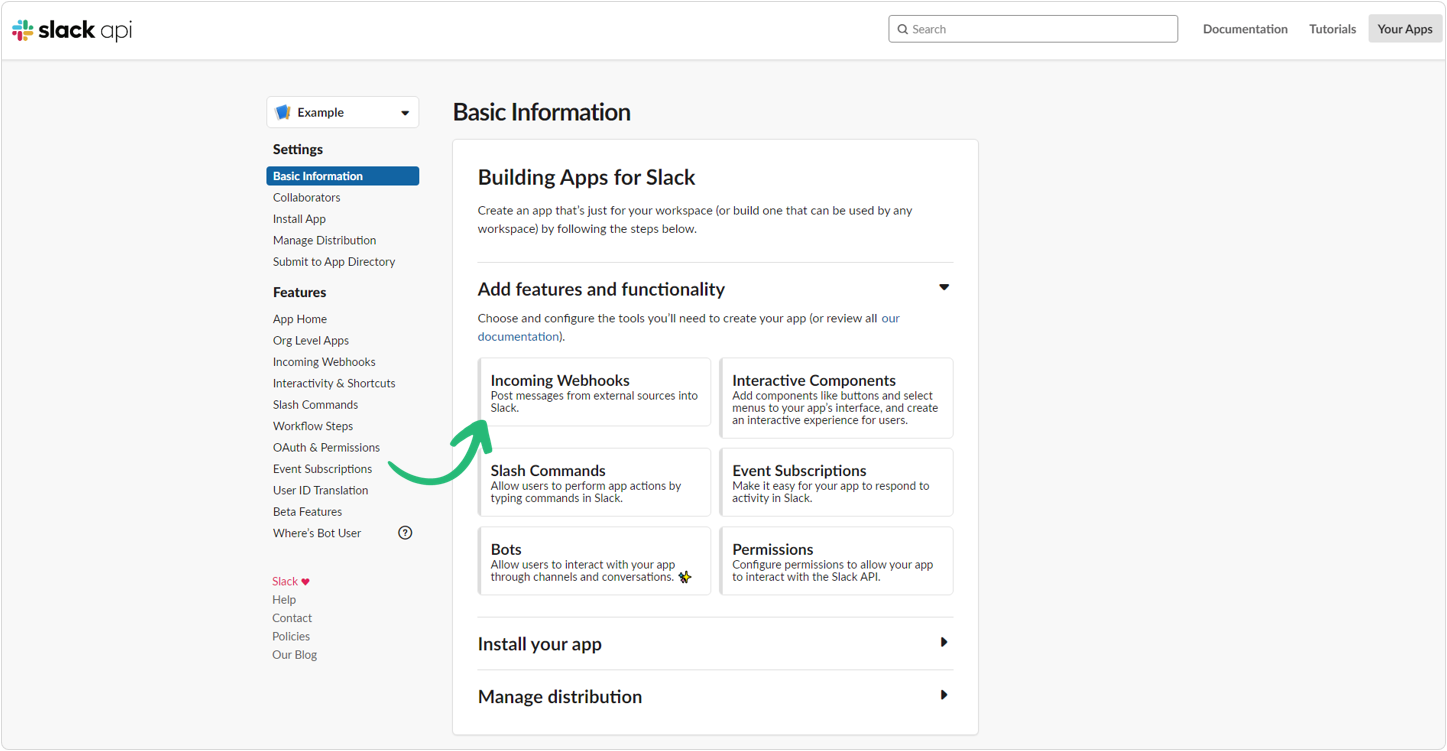
Select Add New Webhook to Workspace.
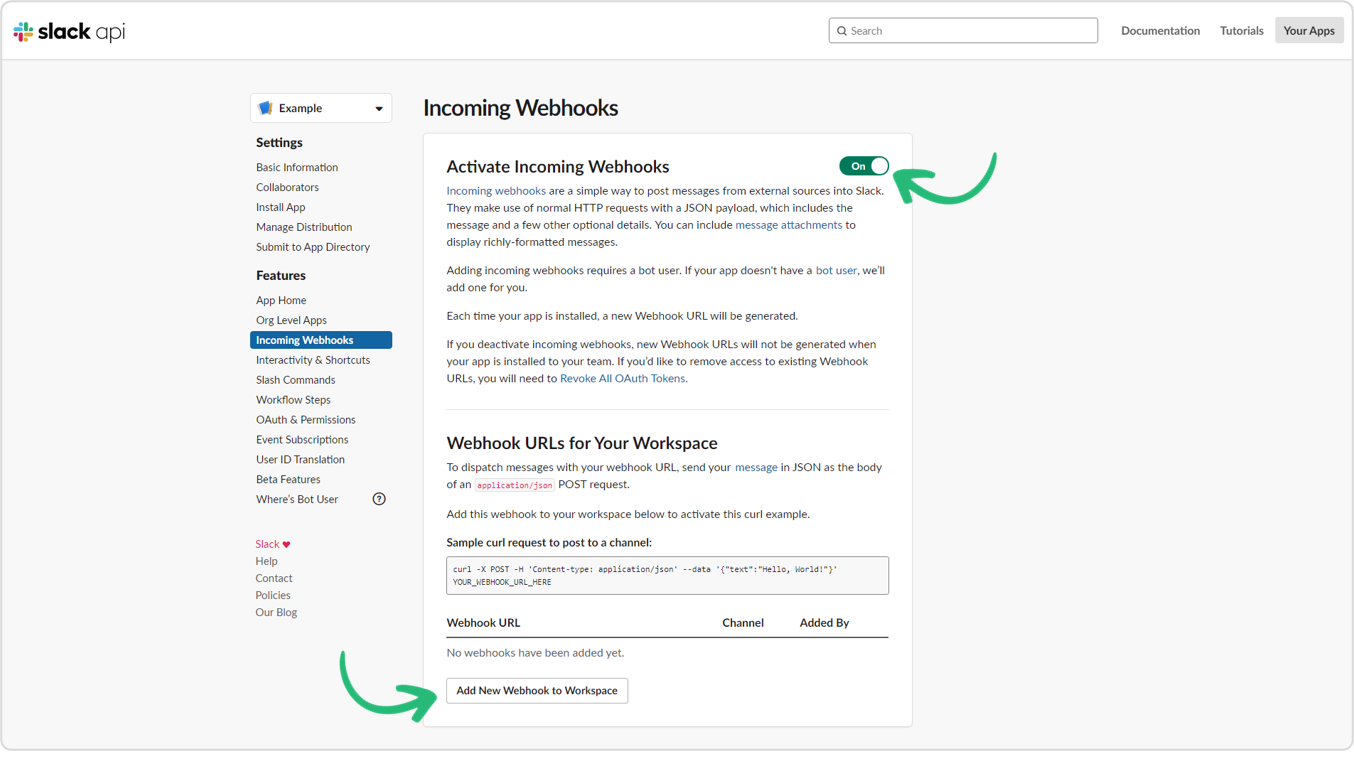
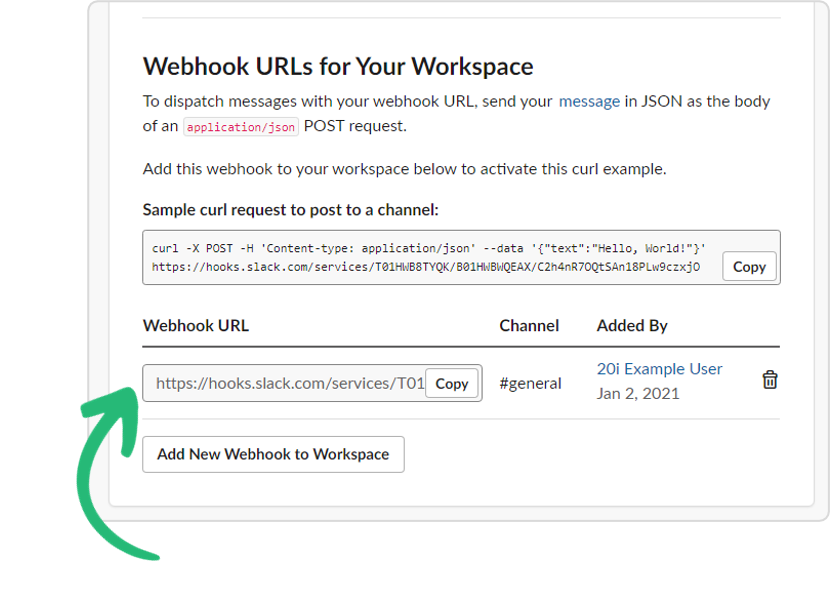
Select to allow Slack permission to access your workspace and the Slack channel you wish your My20i notifications to be posted to. You'll then see the Webhook URL Slack automatically generates for you to use.
Your Webhook URL must then be entered at Webhook Notifications in My20i. You can also configure what notifications you'd like to be posted to Slack, for example when a new customer signs up, or if you receive a response via the StackCP Help Desk. Note: This information can be updated later.
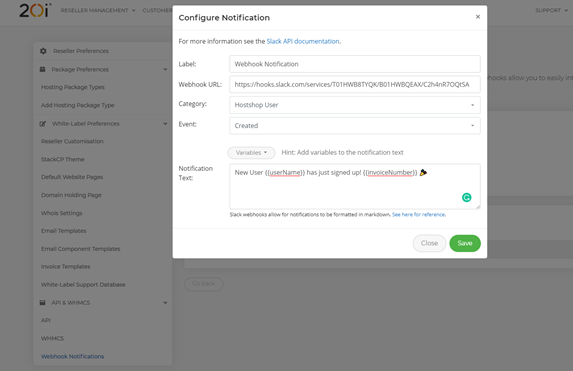
Select Save and your webhook notifications should be live immediately. If you've added a webhook for the category HostShop User, and event Created, you can test your webhook by adding a new StackCP User.
You can also view a list of the notifications that have been by selecting View Logs.
Microsoft Teams
We have dedicated instructions for MS Teams webhook notifications here.
 Dominic Elford
How do I integrate HostShop with my current website?
HostShop is designed so that you can easily add the shop your current sales site. You do this by linking to the relevant HostShop URL from your live sales site.
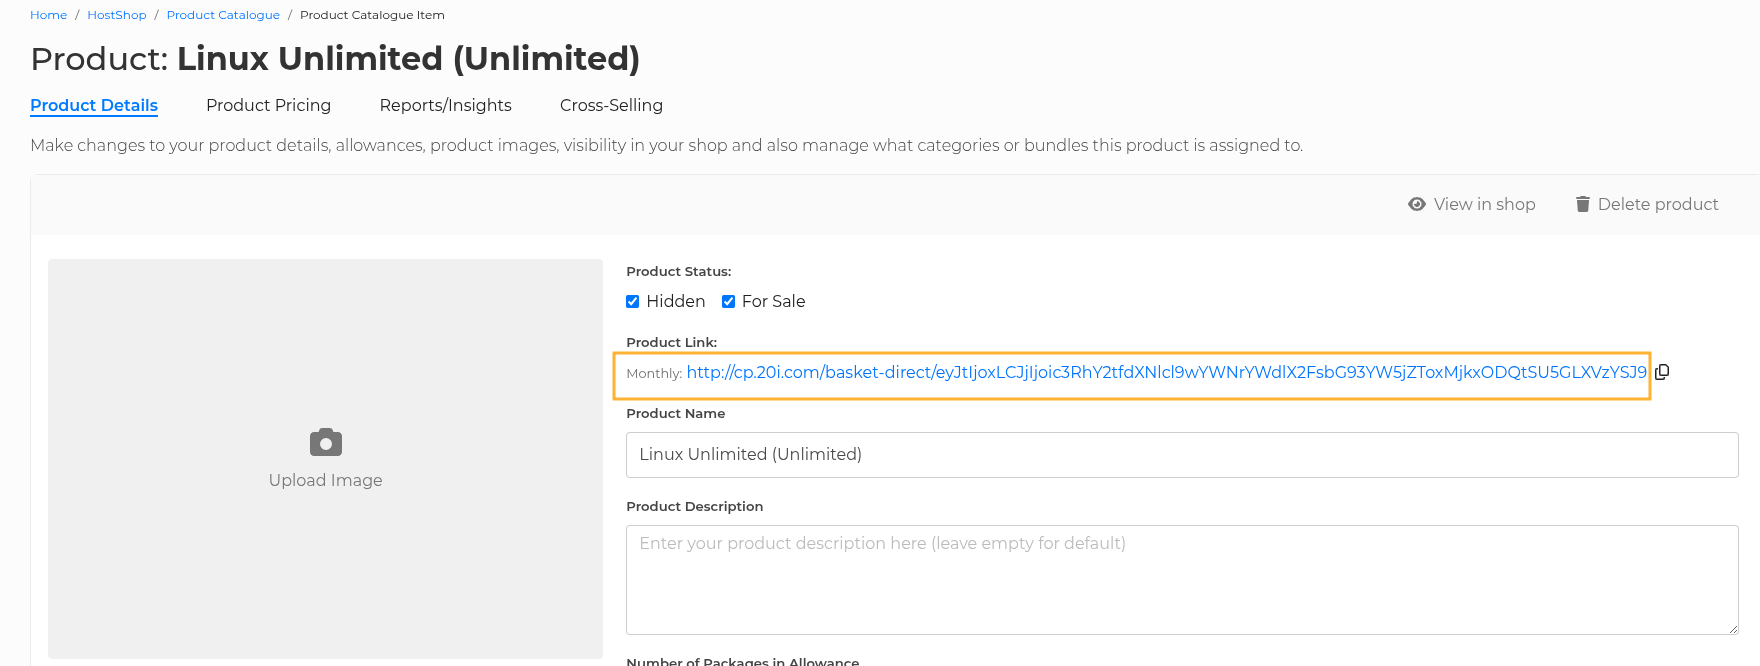
We display the URLs you’d need to link-to on the Product Catalogue page.
For each product, there’s a Product Link. When linked-to from an ‘Order Now’ or ‘Buy Now’-style button on your site, it will get the customer to the right page to complete their order.
Integrating a domain availability checker
If you have a domain availability checker already embedded on your website, you can link this to automatically search the HostShop one by:
- Change the form action URL to: https://cp.example.com/domain-search?domain=mydomainsearch
- Change the request type to GET (if possible)
Then the domain availability checker will link to your HostShop availability checker. It will be pre-filled with the domain that's already been searched for.
 Dominic Elford
How do I set domain name prices?
With HostShop, you can resell domain names with your 20i Reseller account domain discount. Some of these domain prices are at wholesale price, giving you the opportunity to make as much profit margin as possible. To set the prices for the domain names you wish to sell, you’ll need to:
Log in to My20i
Hover over Hostshop on the left and head to the Product Catalogue section
In the Domain Names Category, select Edit Category.
From here you can add and set the prices for the Top Level Domains (TLDs). In our example, we’re going to select the Add Top TLDs (10) button which will automatically add: .biz, .co, .co.uk, .com, .info, .me.uk, .net, .org, .org.uk and .uk TLDs to our list.
You’ll notice right away that the prices have already been set. This is because we have the Guideline Pricing checkbox enabled next to each TLD, so we’ve pre-populated the price for registration/renewal and the price for a transfer to be our recommended price.
If you'd like to customise a specific price, uncheck the Guideline Pricing checkbox. You’ll then be able to add your own custom price.
If you then head to your shop and select the Domain Names section, you can search for any of the TLDs you’ve made available. Customers will then be able to register domain names with these TLDs.
Note: For domains you've sold through HostShop, or have assigned to customers, you may wish to set those domains to not auto-renew within your My20i account. This way, if the customer doesn't pay for the renewal of their domain it won't be renewed in My20i. There is a preference to prevent new registrations from being set to auto-renew via the Account Preferences page here: https://my.20i.com/account/preferences
 Dominic Elford
How do I view StackCP Users that don't have an assigned contract?
If you’re using HostShop you’ll want to ensure your StackCP Users have an assigned service and have a contract assigned to that service. It's to make sure that you’re paid for the service you’re providing.
It’s easy to identify which StackCP Users don’t have a contract using the Assigned Services report.
To find this, head to Hostshop > Assigned Services
You’ll be shown a list of all your StackCP Users that have assigned services, but who don’t have a contract associated with those services. You can then add the relevant contract to the service and StackCP User.
- Select Add Contract
- Select the StackCP User the contract will be assigned-to
- Choose the relevant contract you want to add (configured from your Product Catalogue)
- Choose the expiry date. Select today's date to start the billing right away.
- Select Add Contract
The StackCP User will now have a contract assigned aginst their service.
 Austin B.
HostShop Setup Guide

HostShop is an all-in-one automated platform to manage reseller hosting clients, commerce, billing, payments, service provision, communication and support. It includes an online shop that you can integrate with your website, or you can use one of our ready-made hosting website templates.
You can enable it by going to Hostshop > Hostshop Overview from within your My20i account. The guide below shows how you can quickly setup HostShop from start to finish.
What's in this guide?
- Add your HostShop name and brand URLs
- Getting Started
- Appearance (Optional)
- Payment Gateways
- Connect Stripe to HostShop
- Connect PayPal to HostShop
- Connect GoCardless to HostShop
- Open Shop
- Add your Products for Sale
- Set up Domains
- Set up Hosting
- Set up VPS
- Add 20i Credit
- Link an Existing Sales Website to HostShop
- What's next?
Add your HostShop name and Brand URLs
Configuring and setting up HostShop is quick and easy through the 20i control panel. You’ll first want to ensure you have a domain name with 20i that you want to use for HostShop, usually, this is your sales website.
To set up your HostShop URLs:
- Head to Hostshop > Your Brand
Type your Brand Name in the first text field and select Save.
- Select your Brand Domain from the Control Panel URLs section
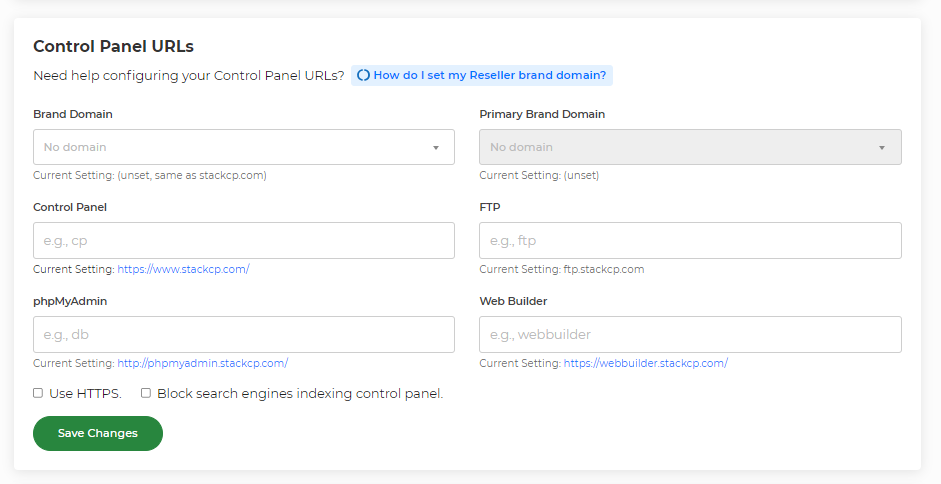
Add a subdomain in the Control Panel field. Some examples may be cp, my, shop, panel or access
- Select Save.
All you’ll now need to do is ensure HostShop is Open from HostShop Configuration and select 'Visit' to view your HostShop installation.
Getting Started
Once you have your branded domain and name set up and ready, select the Set Up HostShop button. You’ll be presented with a form to get started with creating your HostShop - any settings available here will be available to edit at a later date, so don’t worry if you’re not completely decided on your branding just yet.
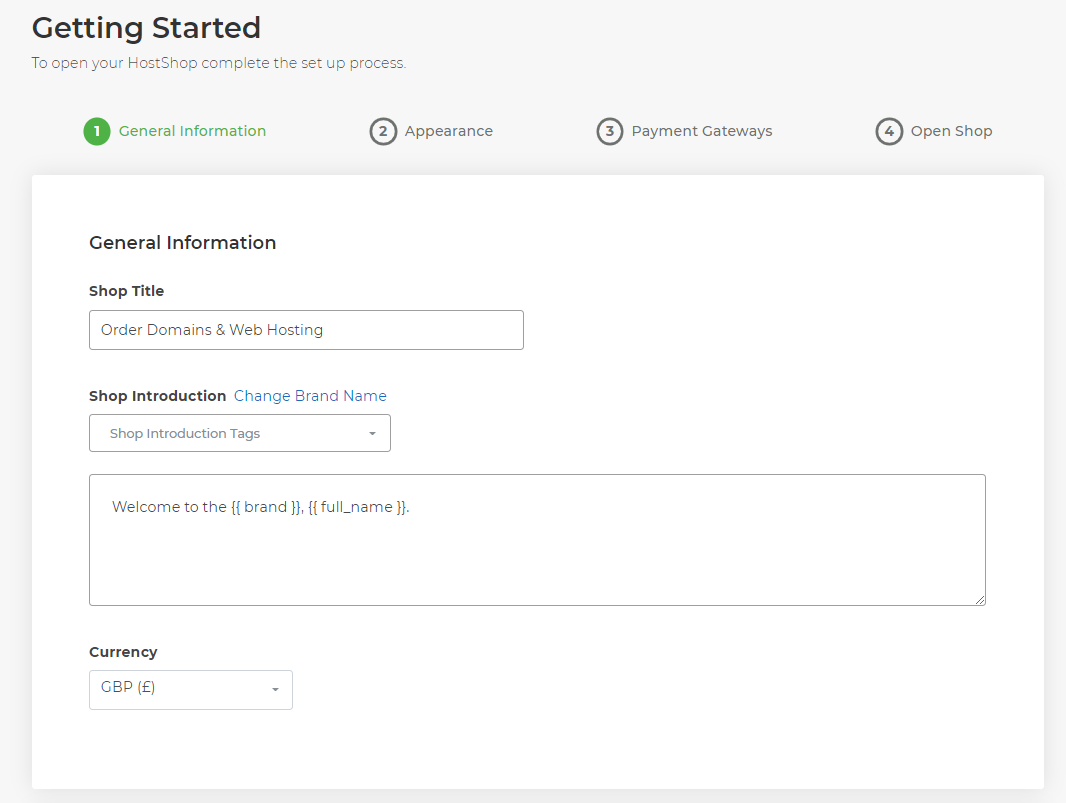
Using the fields available, set up your Shop Title, and write an introduction to your shop – pre-filled tags are available using the Shop Introduction Tags dropdown which will automatically fill to your branded domain and brand name set in the Reseller Customisation area. You can also select your main currency (Multiple currencies can be set later in the Currencies area) and set a Home URL where your HostShop’s home button will send clients to.
Appearance (Optional)
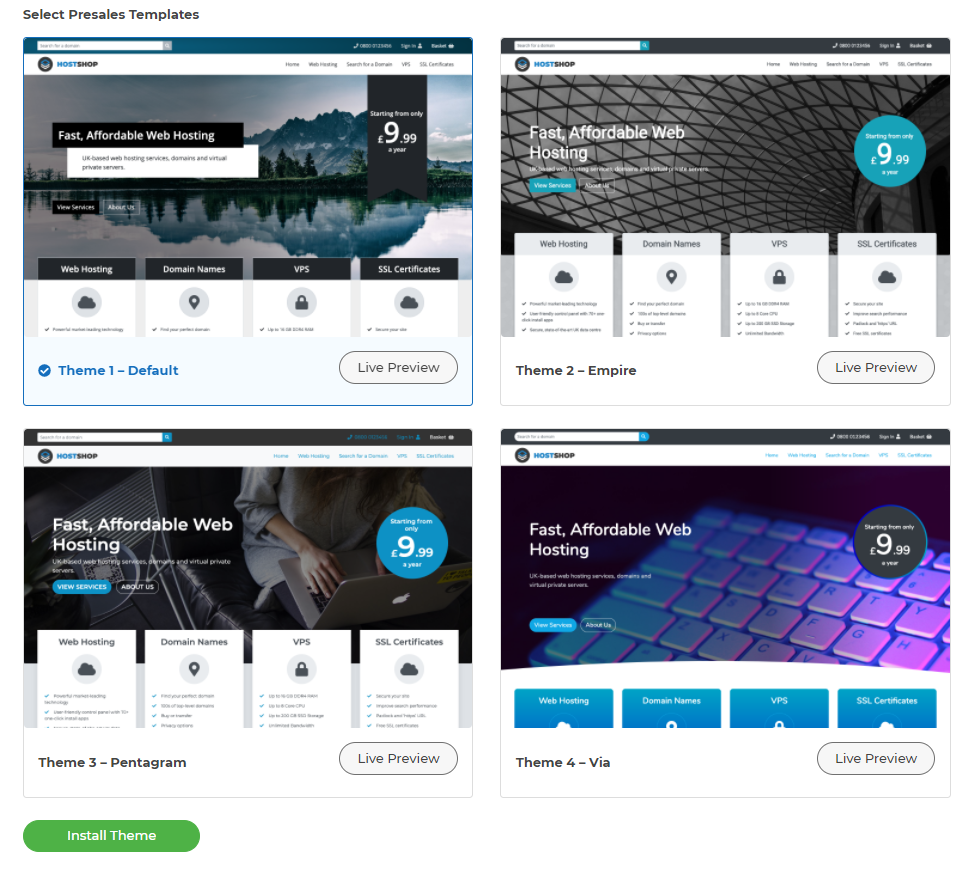
You can use this page to select the theme of your HostShop setup, as well as install a pre-sales template onto your branded domain for you to begin building your frontend sales site.

If you wish to do this, simply select the template you wish to install, and the install location you wish to add the theme, then hit Install at the bottom of the page.
Please note, this step is optional - if you already have a sales website, you can link that so your customers are taken from your existing site through to HostShop to make their purchase, please see the next section in this guide to set that up: Install presales template
Payment Gateways
To collect payment from your customers you'll need to use a payment gateway. We offer various popular gateways including PayPal, Stripe, Mail-In Payments/Bank Transfer, WorldPay, GoCardless, SagePay, Paystack, Paddle and Square.
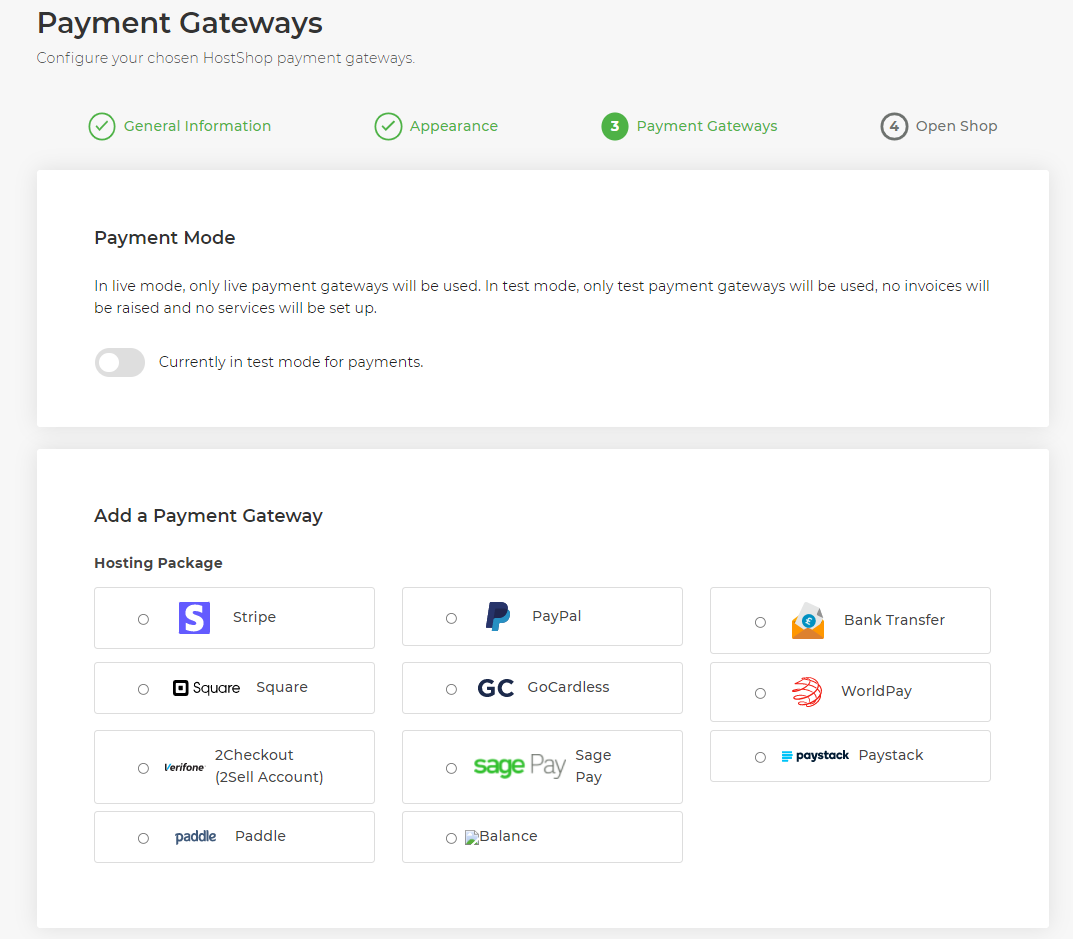
Below are some guides that highlight the steps on how to set up these gateways as needed.
Open Shop
On the next page, simply select Open Shop.
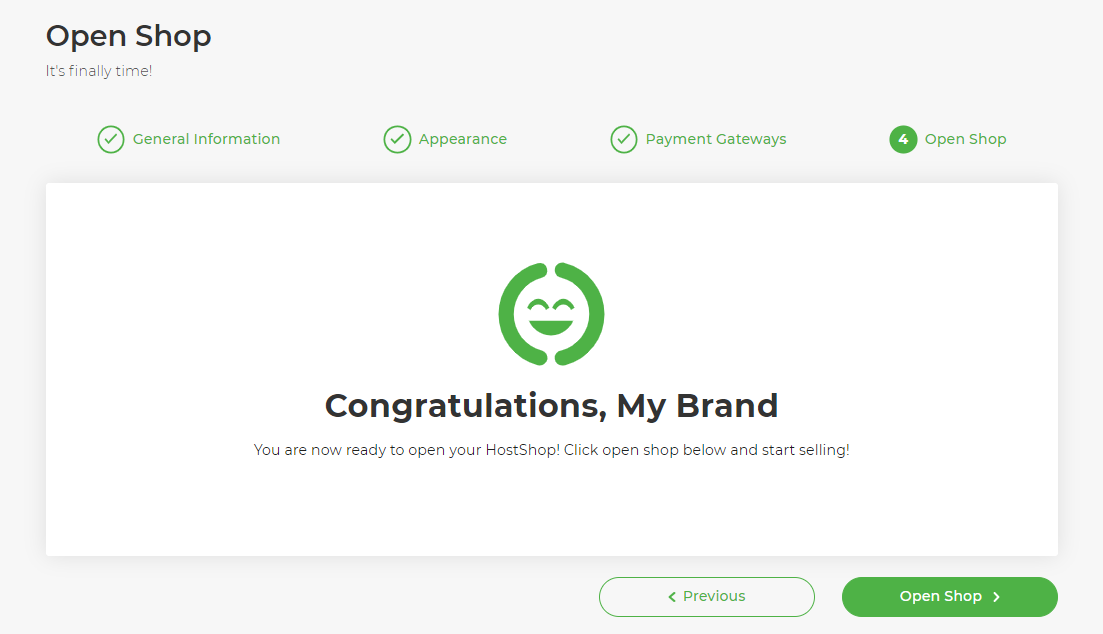
Customers will now be able to visit your shop and buy services from you, we'll make sure whatever they choose to buy is provisioned automatically for you. HostShop is continually being developed and added to, so we'd love to hear your feedback about it via our Feedback Form.
Once you’ve gone through the above and set up your branding, your theme and your gateway, you’re ready to open your HostShop and begin setting up your products.
Add your Products for Sale
The Product Catalogue section within HostShop is where you'll add and configure all of the products you want to sell through HostShop. It's where you'll add your pricing, renewal periods and more details about the products you're wanting customers to purchase from you.
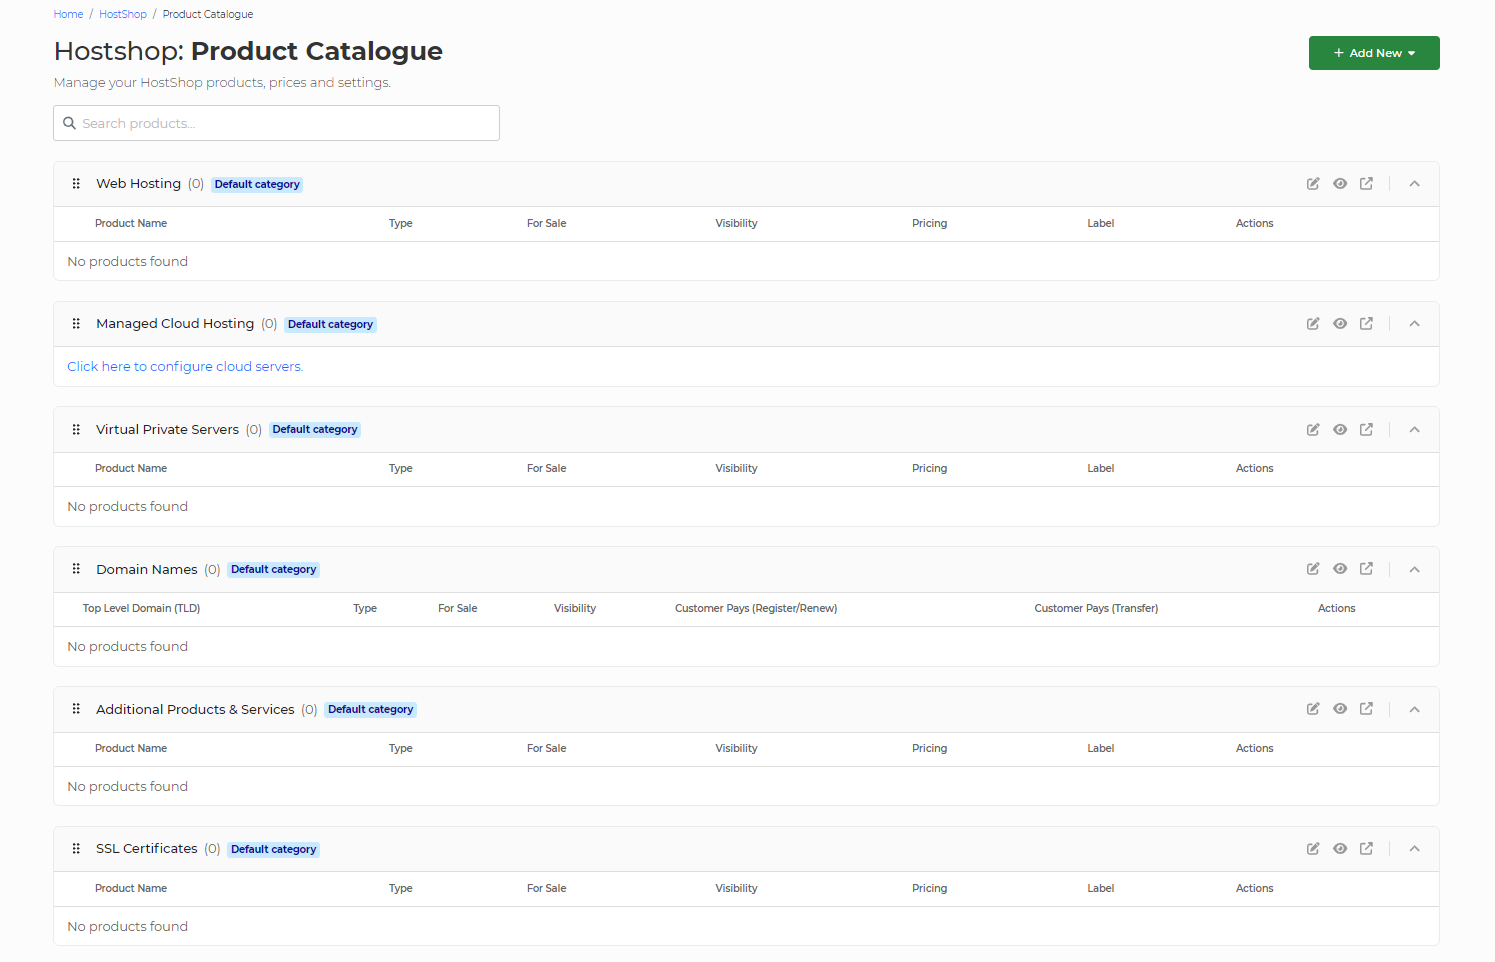
You can choose what products you'd like to be able to sell, and you can even create custom products if you're also looking to provide web design, SEO marketing or any other service. We'd recommend starting by setting up your domains, hosting and VPS, but feel free to add anything else you'd like to be included in your shop.
Note: For domains you've sold through HostShop, or have assigned to customers, you may wish to set those domains to not auto-renew within your My20i account. This way, if the customer doesn't pay for the renewal of their domain, it won't be renewed in My20i. There is a preference to prevent new registrations from being set to auto-renew via Account Preferences.
Add 20i Credit
You’ll need account credit on your 20i account to take orders through HostShop. When a client orders services like domains, we’ll use account credit to pay for the domain so it can be provisioned automatically. To do this:
- Head to the Account Credit section in your 20i account
- Select the amount of credit you’d like to add from the drop-down menu
- Select whether you want to add credit using a card or PayPal
- Select Add Credit
Link an Existing Sales Website to HostShop
HostShop is designed so that you can easily add the shop your current sales site. You do this by linking to the relevant HostShop URL from your live sales site.
We display the URLs you’d need to link-to on the Product Catalogue page.
For each product, there’s a Product Link - you'll use this link on your sales websites to direct the users through to HostShop. If you have buttons such as Buy Now, Order or View Plans, you'll use the links form the Product Catalogue to get your customers to the right page in HostShop.
What’s next?
The next steps are up to you - If you're starting something new then you may be beginning to market your business and onboard your first few customers. If you're an existing business then you can start adding your customers to HostShop and assigning them billing contracts to take the hassle out of managing the billing for them.
 Dominic Elford
How do I send notifications to Microsoft Teams using a webhook?
My20i Webhook Notifications are a simple way for 20i Resellers to receive alerts directly through a Microsoft Teams channel.
To add an Incoming Webhook to a Teams channel, follow these steps:
- Open the channel in which you want to add the webhook and select More options from the top navigation bar
- Select Connectors from the dropdown menu
- Search for Incoming Webhook and select Add
- Select Configure, provide a name, and upload an image for your webhook if necessary
- Copy and save the unique webhook URL present in the dialog window. The URL maps to the channel and you can use it to send information to Teams. Select Done.
- Head to Webhook Notifications in My20i and select Teams.
- Enter a Label for your webhook notification and then add the webhook URL you’ve copied from your Teams channel
- Configure the type of webhook you want to send a select Save
Your webhook notifications should be live immediately. When the action that the webhook notification has been configured-for is enacted you’ll receive a notification directly through Microsoft Teams.
You can also use webhooks in a similar way in Slack, Discord and Zapier.
How to sign up a customer manually in HostShop
One of the many benefits to 20i HostShop is the ability for your customers to sign up automatically without needing your manual intervention.
However, there may be times when your potential customer can’t sign up themselves online. So to avoid a missed opportunity you can sign them up manually.
To do this, head to:
Manage Reseller -> Manage StackCP Users
You’ll need to add a new StackCP User which will represent your customer.
To do so just select Add StackCP User. Enter their full details as accurately as possible. It’s important this information is valid because these details will be used for fraud prevention, and also so you can register domain names easily for this customer.
That’s all there is to it! You can now provide them with the email address and password for this user and they can use those details to log in to your custom control panel URL. (Forgotten what that is? Head to Your Brand and check under the Control Panel URLs section to find out).
 Austin B.
How do I offer hidden products, purchasable only via a direct link?
If you wish to make a product purchasable only via a direct link rather than being publicly accessible via the shop, you can set a product to Hidden. This will prevent it from showing on your HostShop order page when users and customers view your shop. The generated link provided in your Product Catalogue will still work as normal, allowing you to still offer these products directly to specific clients as required.
To make a product hidden, head to your Product Catalogue within My20i by going to Customers > Product Catalogue. On the product or service you wish to hide, select the Hidden checkbox, but make sure the For Sale checkbox is selected as normal.
When selected, this product now will no longer appear in your HostShop, but you will be able to send customers the Product Link to buy the product directly.
 Dominic Elford
How do I add and sell SSL certificates?
Adding SSL certificate options to your reseller hosting services offers more choice for your customers, matching their specific needs, which leads to happier customers and a healthier bottom line.
We provide a free SSL certificate, which you can pass on for free to your customers or put your on price own it to make some extra profit. This one's supported by Let's Encrypt, giving a leg up to your clients' Google ranking and site security. It covers subdomains too, but bear in mind, it needs our nameservers to work properly.
For some customers, particularly those running ecommerce sites, they might be after a bit more. That's where our Simple SSL certificates step in. These SSL are backed by GeoTrust They don't need our nameservers, and they come with a $10,000 warranty. Please note, the Simple SSL only covers the primary domain (and www.), so if the site you want to secure has multiple subdomains you should look at the Wildcard SSL below.
For sites and applications that have multiple subdomains then the Wildcard SSL from GeoTrust will ensure all of those subdomains are secure as standard.
But then, some customers want the full Monty, and that's when you can roll out the Extended SSL certificate. This one costs a bit more, but it has the most rigorous checks, a hefty underwritten warranty of $1.5 million, and an Extended Validation (EV) Certificate.
Please remember that while the term 'SSL Certificate' is widely used, all of our certificates utilize the more modern Transport Layer Security (TLS) protocol version 1.3.
How to add an SSL as a product
With HostShop you can easy add chargeable SSL certificates to your product lineup. This means you can resell the Simple and Extended Validation certificates.
To set these up, you’ll need to:
- Log in to My20i
- Head to the Product Catalogue section.
- Select Add New > Product
Under Product Type, choose SSL Certificates.

There are three types of SSL available to resell: the SSL Simple, Extended SSL and Wildcard SSL. You can read about the differences between those SSLs here.
In our example we’re going to set up the Simple SSL. Select this under SSL Type.
This product can only be renewed on an annual basis. You’ll see we’ve added our recommended price of £49.99 to this product, giving you a £15.00 markup from the 20i Reseller discounted price of £34.99.
Select Create Product. Then head to your shop and select the SSL Certificates category and you’ll see your Simple SSL for sale and ready to be purchased by your customers.
 Chris Wright
Cloud server category description in HostShop
The cloud server category description is a crucial element in the cloud server product section of your HostShop online store. This description provides an overview of the cloud server offerings available to your customers, enabling them to make informed decisions when browsing your products. By customizing this description, you can tailor the information to cater to the specific needs and preferences of your target market, thereby increasing the likelihood of attracting and retaining customers.
When crafting the cloud server category description, consider these points to create a compelling and informative text:
- Emphasize key features: Highlight the most important features of your cloud server products, such as scalability, flexibility, security, and performance. This helps potential customers quickly understand the benefits of choosing your services.
- Target audience: Identify your target market and tailor the description to address their needs, pain points, or preferences. For instance, if your target audience consists of small businesses, emphasize affordability, ease of use, and the ability to grow as their businesses expand.
- Use clear and concise language: Write the description in a straightforward manner, using simple language to ensure that it is easily understood by a broad audience. Avoid using overly technical jargon or buzzwords that may confuse or alienate potential customers.
- Showcase unique selling points: Explain what sets your cloud server products apart from competitors in the market. Whether it's your exceptional customer service, competitive pricing, or innovative features, make sure your description reflects the unique value your offerings provide.
By carefully crafting a cloud server category description that is tailored to your target audience and highlights the unique features and benefits of your products, you can effectively promote your offerings, engage potential customers, and drive sales in your HostShop online store.
 Austin B.
How do I use the 20i Invoice Designer?
If you're using HostShop and are sending invoices to customers you can use 20i's in-house Invoice Designer.
It allows the creation of create bespoke, branded invoices for your web hosting business. You can use dynamic tags to display content specific to your customers and customise every element of the invoice.
To access the invoice designer, head to Hostshop> Invoices > Invoice Designer.
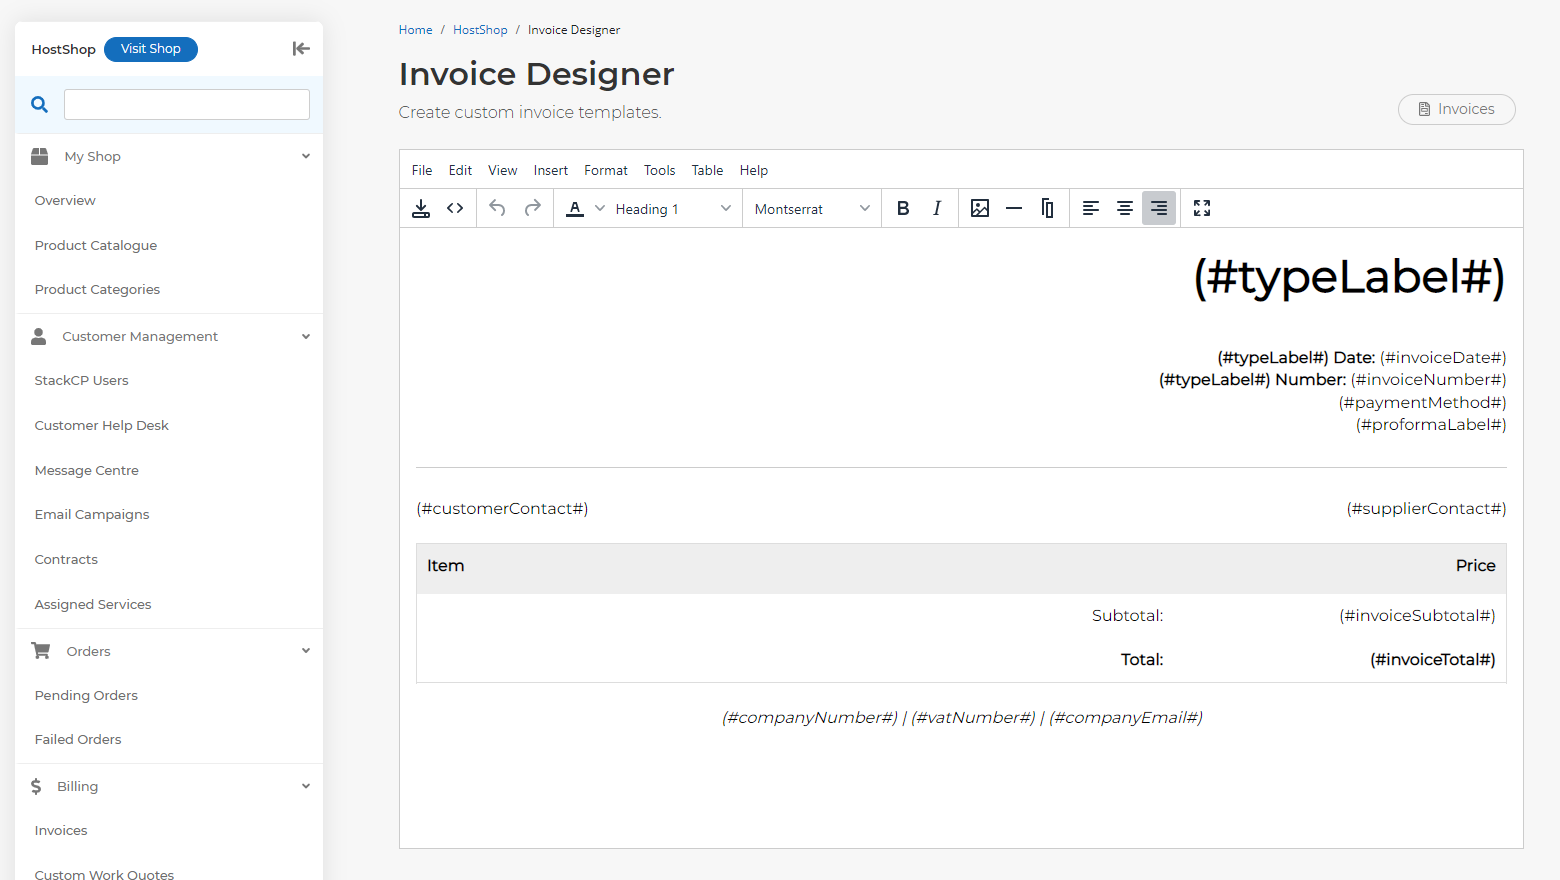
You can view the available dynamic tags by selecting the Help menu.
Every element of the invoices is customisable. So when you're done editing, select the Save icon to ensure your design is used.
 Dominic Elford
How do I add my own custom products and services?
HostShop is extremely flexible. Not only does it allow you to resell 20i’s hosting products and services easily, but you can also add and bill customers for your own services, such as web design, SEO, themes or advertising.
To set a custom product up, you’ll need to:
- Login to My20i.
- Head to HostShop-> Product Catalogue.
- Select Add New > Product
In our example we’re going to add web design as a service, for a small website and/or blog.
For Product Type, select Other Products & Services
In Custom Category field, you can optionally attach the product to one of the categories you've already created.
The next step is to choose your Product Name, for example, we'll choose "Web Design Service"
You will then need to enter the Default Price that you will charge for the product, along with the Renewal Period.
We’re going to select One-off from the Renewal Period dropdown and input a price of £199.99, then select Create Product.
Now, when we head to our shop, when a customer selects to view the Other Products & Services category, they’ll see our web design service as a purchasable product. If you have added the product to a custom category, the product will also be listed there.
 Chris Wright
How to add custom categories to HostShop?
By default your HostShop will have six product categories. These are:
- Web Hosting
- Managed Cloud Hosting
- Domain Names
- Additional Products & Services
- SSL Certificates
- Virtual Private Servers
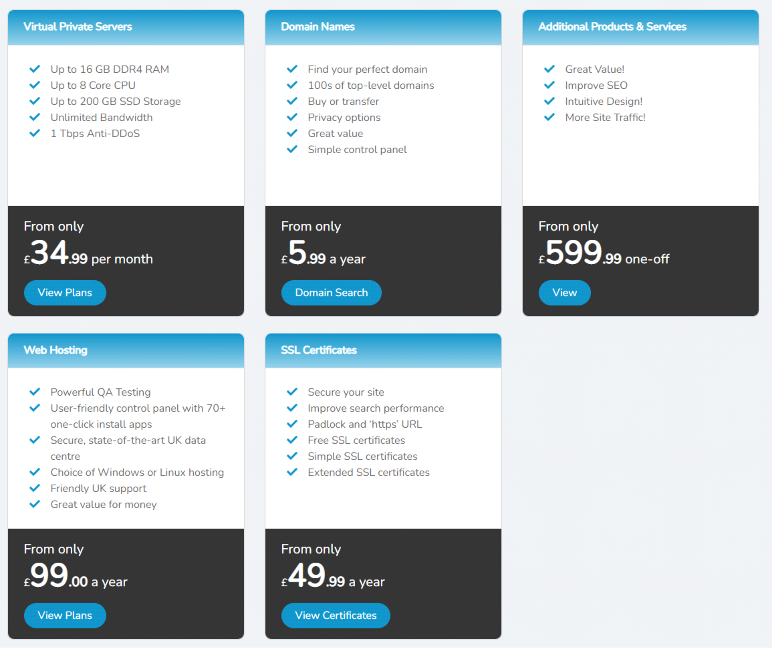
As well as these categories, HostShop gives you the full flexibility to create custom categories, to better suit your business' product range.
To add a new category:
- Go to My20i > HostShop
- Visit Product Catalogue
- Click Add New > Category
When adding a category you need to configure the following:
Visible - This determines whether the category shows in your shop. Normally, you would want to ensure this is visable.
Category Name - the name the category will be known by
Description - the description of the category shown in the shop
Products - The products that are to be in the category.
Link Text - this is the text shown on the button users click to go to the category
Sidebar Icon - here you can set a FontAwesome class to be used as an icon for the category. You can find a list of available icons here.

 Chris Wright
How do I create custom work quotes?
In HostShop you can send your customers Custom Work Quotes for 'one-off' payments or quotes for services you’re providing. They might be used for services that you don't want as a selectable product in your shop, but you do want your customer to make payment for using HostShop.
You can add a Custom Work Quote for an individual StackCP User by going to:
Manage Reseller > Manage StackCP Users > Options > Manage
Available towards the bottom of the StackCP User’s card is a subsection labelled Custom Work Quotes.

Select Create Quote. You’ll then be presented with a form to fill out with the information for the custom work, including a Mail Label and Line Descriptions for additional information which the client will see at their checkout. Once all the details are filled out, select Create Draft. The expiry date is the date at which the custom work quote will no longer be able to be purchased by the StackCP User.
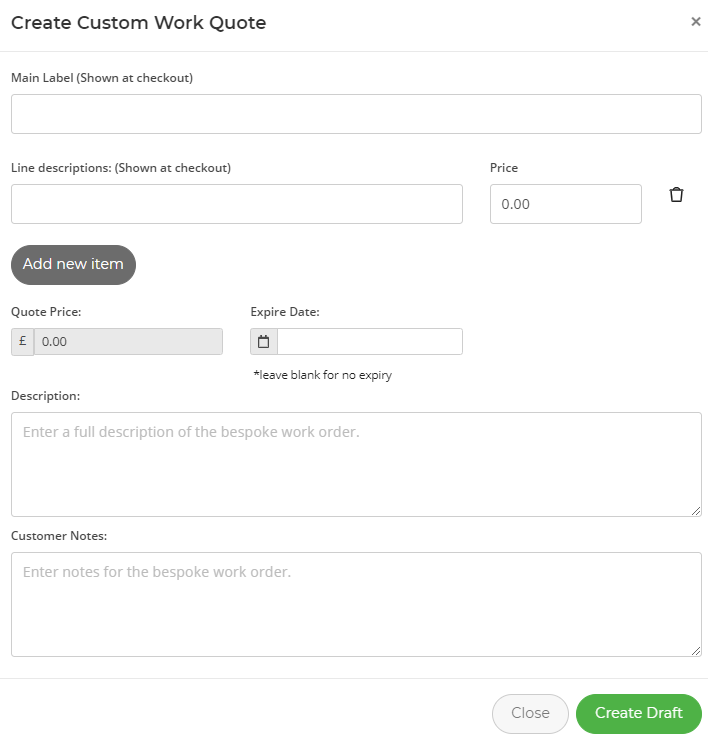
Once you've created the draft quote, you'll be able to select Options > Edit. From here you then select Send Quote. This will send the quote to the StackCP User's email address. They'll then be able to select View Quote and Checkout directly from the email which will take them to their control panel.
The email that is sent is the email template called: HostShop: Custom Work Quote - customer. This can be modified in Email Templates.
Note: If you haven't already done so, you'll need to change the From Address of the template above to be the email address of your choice, select Options > Edit on the template above to change the From Address.
The customer will also receive a pop-up notification when they log into their control panel with a link to their custom work quotes.
 Dominic Elford
How do I resend a customer's email address verification email?
If a customer is trying to sign up and claims they haven't received an email verification notification then you can resend it for them.
You'll need to log in as the StackCP User, so head to:
Manage Reseller > Manage StackCP Users
Locate the customer trying to sign up by their email address and select:
Options > Sign in
You should then be prompted with the Not got the email? Resend. Select this and the email address verification email will be resent to them.
The email is sent from the email address you’ve specified in your email address email template setup via the Email Templates page.
 Dominic Elford
How does a StackCP User request to withdraw their balance?
A StackCP User can request the withdrawal of the balance they’ve earned through affiliate referrals when the amount reaches the Minimum Payout Amount you set through Hostshop > Settings > Configuration > Affiliate System.
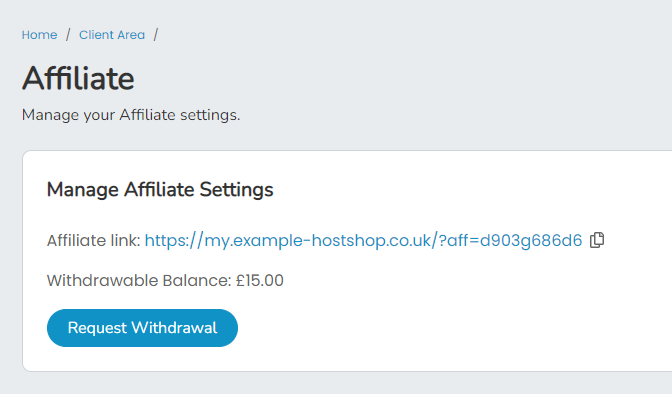
Your StackCP User can head to Client Area > Affiliate and then select Request Withdrawal. This will create a ticket via the StackCP Help Desk with the subject ‘Withdrawal Request’.
 Austin B.
What are StackCP Users in HostShop?
A StackCP User is the account you create to give your customers access to manage their hosting and via StackCP - your customer's control panel.
Creating a StackCP User creates a username and password that you casn give your customer. This will enable them to log in to stackcp.com to manage their services. There is a guide on how to create a StackCP User here.
In the context of HostShop, they could be your paying customers who are receiving a service from you. When a new lead signs up from your shop, they’ll become your customer and a StackCP User will be created automatically and added to the list on the StackCP Users page.
 Austin B.
How do I change the HostShop tax (VAT) rate?
If your business is not based in the EU then we don’t know what your tax (VAT) rules are, however you can manually add your own VAT rate by:
- Logging into My20i.
- Head to Hostshop > Tax Settings.
From here, you can adjust your VAT to the rate that’s applicable to your country.
 Dominic Elford
How do I add a MSSQL database as a product?
If you provide Windows hosting as a service, you may wish to also provide Microsoft SQL databases to customers via HostShop.
To set an MSSQL database up, you’ll need to:
Log in to My20i
Head to Hostshop > Product Catalogue
- Select Add New > Product
Change Product Type to Web Hosting Add-ons
Change Add-on Products to MSSQL Database
We suggest a recommended price of £14.99, giving you a markup of £4.99. The original £10 price of an MSSQL database is the price of the licence provided directly by Microsoft. Select Create Product.
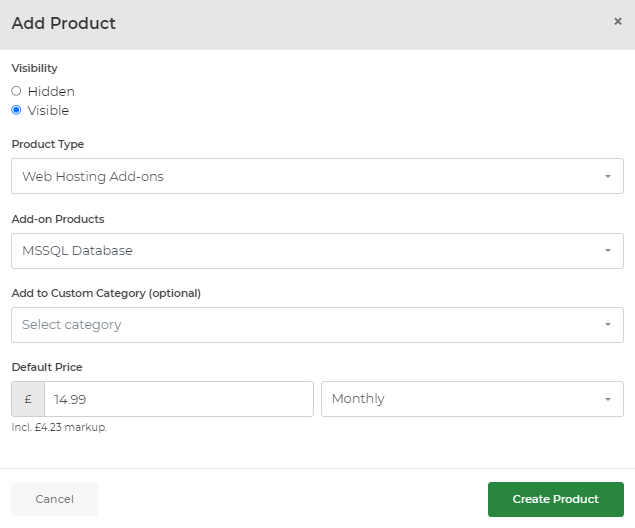
Next we’ll add an annual renewal option by clicking the Product Pricing tab and checking the text box under Annually from the menu. We’re going to offer a £2.00 per month discount if you pay yearly, so we’ll add the price £155.88 to the field and select Save.
If you now head to your shop, and then select to head to the Client Area, you’ll see the ability to order an MSSQL database.
Note: In order for a customer to order an MSSQL database they will need to have already purchased Windows hosting so the database can be assigned to the hosting package.
 Dominic Elford
How can I add and sell balance products in HostShop?
In HostShop you can allow customers to add balance to their accounts with you. This balance can then be used to purchase products within HostShop.
Balance can be added in two ways:
- Via the affiliate system as commission. You can read more about the affiliate system here.
- By paying for balance as a product, which is what we will go through here.
To add balance as a product that users can purchase you need to go to Product Catalogue > Add New > Change Product Type to Balance.
Here you can add the amounts of balance you want your StackCP Users to be able to purchase. To do that you need to enter an Amount, and click Create Product. In our example we're adding a product for £10 of balance.
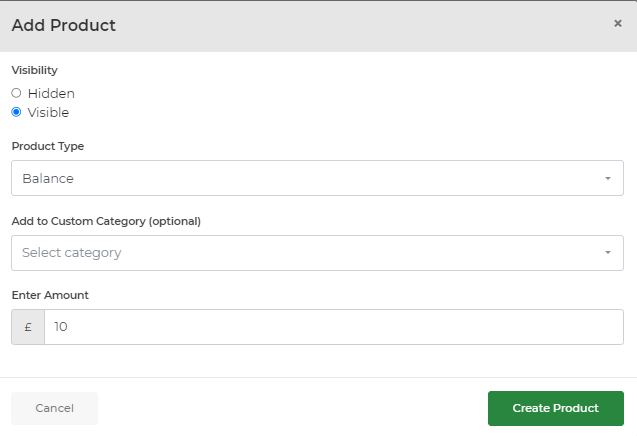
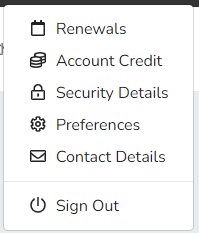
Once you have Balance products set up in your HostShop your StackCP Users will be able to buy them. To do this, they need to go to their account, access the dropdown menu in the top right under their name and select Account Credit.
This will then take them to their Account Credit page where they can add credit in any amounts you have set and see their Current Balance.
 Dominic Elford
HostShop and VAT
If you're a UK business and are Value-Added Tax (VAT) registered, then you can enter your VAT number on the Tax Settings page. This will ensure we add VAT to the HostShop basket when your customers add products.

If you are not VAT-registered, then please be aware that the prices of the domains listed do not include VAT.
This means that the markup suggested does not include the VAT we charge you on the domain.
We show these prices excluding VAT because generally you’ll be a VAT-registered business and it’s standard business-to-business pricing practice to not include VAT (as it can be claimed back if you’re VAT registered).
 Dominic Elford
How do I add a Malware Scanning as a product?
At 20i we provide a free, on-demand malware scanner. This is a product that's often charged for by other hosting companies.
With HostShop, you can offer this service to your customers for a price, giving you chance to make 100% mark-up. To set up malware scanning as a product, you’ll need to:
Log in to My20i
Head to Hostshop > Product Catalogue
Select Add New > Product.
Scroll down to Product Type > Select Web Hosting Add-ons.
Select the Add-on Product dropdown menu and choose Malware Scanning.
As malware scanning comes at no extra cost to you as a Reseller, you can price the service at any price you think is suitable. In our example, we’re going to add a monthly price of £4.99.
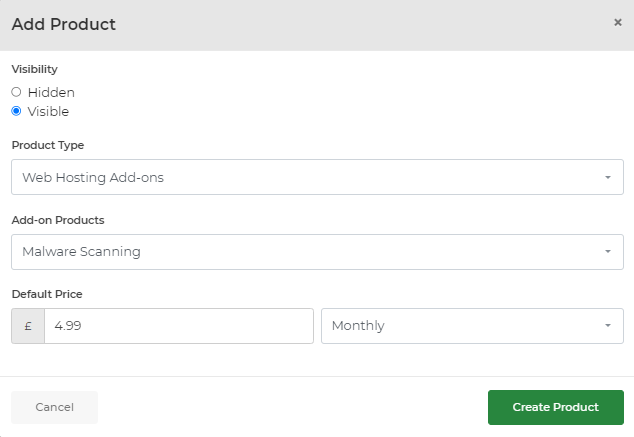
Now, when you head to your shop you’ll be able to go to the Client Area and see Order Malware Scanning as an option.
Customers can then select this and purchase it straight from your shop.
Note: Your customers will need to have ordered hosting with you in order to assign malware scanning to a hosting package.
 Dominic Elford
Timeline Backups Pro pricing in HostShop
Timeline Backups is a powerful and reliable backup solution designed specifically for cloud servers. Offering Timeline Backups as part of your HostShop services provides numerous benefits for both you and your customers. By default the price of Timeline Backups is 15% of the value of the server. You can choose to increase this if you want to make a higher markup on backups.
Benefits of Timeline Backups:
Enhanced Data Protection:
Timeline Backups ensures that your customers' data is protected and easily recoverable. With its automated backup system, Timeline Backups takes regular snapshots of your customers' cloud servers, safeguarding their websites, databases, and files against potential data loss due to hardware failures, software glitches, or human errors.
Flexible Restoration Points:
By offering Timeline Backups, your customers can enjoy the flexibility of choosing from multiple restoration points. They can easily roll back their cloud servers to a specific date and time, allowing them to recover from issues such as data corruption, security breaches, or other unforeseen events.
Increased Customer Satisfaction:
Providing a reliable and easy-to-use backup solution like Timeline Backups increases customer satisfaction and trust in your services. Your customers will appreciate the added security and peace of mind that comes with knowing their data is secure and readily available in case of emergencies.
Competitive Advantage:
Offering Timeline Backups as part of your service portfolio sets you apart from competitors who may not provide comprehensive backup solutions. This added value can help you attract new customers and retain existing ones, ultimately contributing to the growth of your business.
Simple Integration with HostShop:
Timeline Backups is seamlessly integrated with the HostShop billing platform, making it easy for you to manage, bill, and provision the service for your customers. This streamlined process allows you to focus on your core business while offering a valuable service that enhances your customers' experience.
 Austin B.
How do I use the HostShop affiliate system?
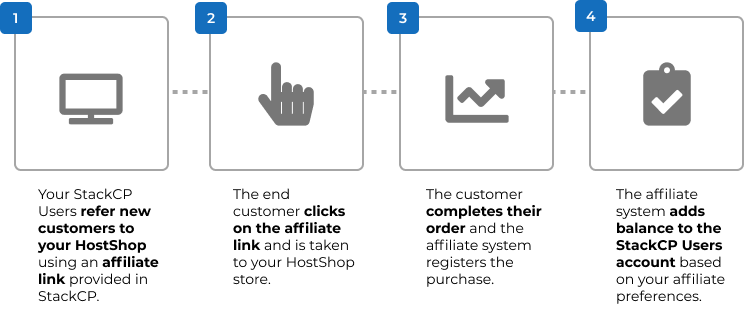
The HostShop affiliate system allows your StackCP Users (affiliates) to refer new customers to your HostShop, to generate more revenue and build your customer base.
Your StackCP Users can use an affiliate link to refer new customers which will result in a commission payout to their balance in exchange for the referral.
Enable the HostShop affiliate system
To enable the HostShop affiliate system, you'll first need to go to your Hostshop category on the side-navigation bar and then down to settings >> configuration at the bottom of the page.
In this section, you can enable the affiliate system and set various options.
The available options are:
- Default Affiliate Commission % - this determines what percentage of payments, made by those referred by affiliates is paid in commission to the affiliate
- Minimum Payout Amount - this sets the amount of commission an affiliate needs to earn before they are paid
- Affiliate Commission Delay (days) - this sets how long an affiliate has to wait, after a referred customer has made a payment, until the affiliate receives the commission on that payment
- Affiliate Cookie Duration (days) - this sets how long a cookie will stay in a referred customers browser after following the affiliate link.
You can also enable/disable whether affiliates also receive commission on a referred customers renewals using the 'Enable/disable affiliate commission on renewal' toggle.
Once you have set the available options as you wish and have enabled the affiliate system via the toggle your StackCP Users will then be able to opt into being an affiliate within their HostShop account.
StackCP User Affiliate Access
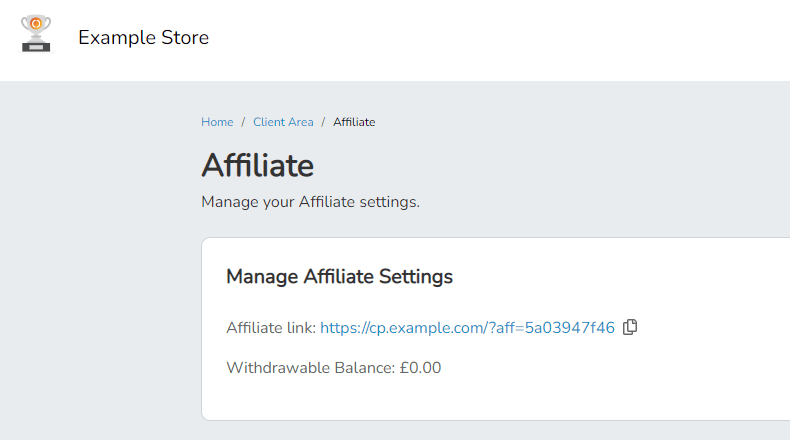
A StackCP User can do this by going to their account, clicking their name in the top right and then selecting Affiliate. Once on the affiliate page they'll need to click Become an affiliate. This will give them an affiliate link they can give to others. Anybody who makes a purchase from your HostShop using the link will provide the affiliate with commission based on the options you set previously.
 Dominic Elford
How do I set up HostShop URLs?
To set up the main HostShop URLs you need to decide on two things - what your brand domain will be, and what subdomain you’d like your HostShop to appear on.
Your brand domain will generally be where your sales or front-end website is, for example: example-hosting.com
The HostShop subdomain will be where your customers can buy and checkout with products, as well as manage their current packages and services - for example: my.example-hosting.com
You can set these two options in Reseller Customisation using the Control Panel URLs area. The Brand Domain will be the main branded domain of your site, and the Control Panel / Hostshop subsection will define what subdomain your HostShop displays on.

Note: After setting your brand name and HostShop subdomain you’ll want to make sure you add a payment gateway so you can open your shop.
 Dominic Elford
How do I manage my customers?
A core part of your business when using 20i HostShop will be managing new and existing customers.
When your customers sign up to your service from your control panel they’re automatically created as StackCP Users. This allows you to manage all aspects of their experience and service from within My20i.
To manage your customers head to My20i > Manage Reseller > Manage StackCP Users
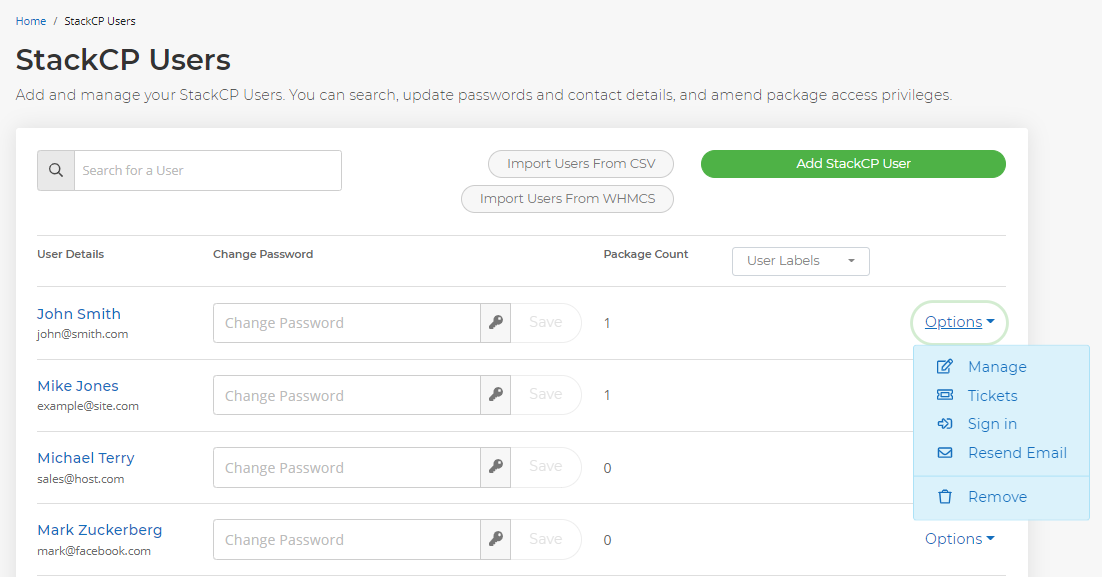
Here you’ll see a list of all your current customers with their name and email address. You can search for a specific user using the search bar or add a new user manually by selecting Add StackCP User.
To manage the customer, select Options > Manage and you’ll be taken to the StackCP User Card that contains information about your customer. You’ll find a range of options for you to manage:
Contact Details
These contact details are what your customer has set from within the Contact Details section of their account. It’s important that these details are accurate - so if they look invalid then it’s reasonable to request the customer ensures they’re accurate.
You have the option to Edit User Details should you need to update them on behalf of your customer.
Security
If your customer is using 2FA for their account login then their authentication device will be shown here.
Should your customer lose their authentication device (meaning they can’t access their account), we’d recommend asking them their security questions and then removing the device by selecting Delete next to the device in question. This will then allow the customer to log in using only their username and password as normal.
Access & Contracts
You’ll be shown a list of the services your customer has purchased from you. This could include hosting packages, domain names, SSL certificates, malware scanning or any other service you offer. On the right, you can Manage, Add Service to Plan or Remove Access. More information about adding contracts can be found here: Adding Contracts to Services.
If you'd like to assign an existing hosting package or domain name to the customer then you can select the service from the drop-down menu and select Add Access.
Payment Methods
Here you’ll see any payment methods your customer has added such as cards and direct debits.
Balance and Affiliate
Here you can see any balance the user has in their HostShop account with you.
Invoices and Custom Work Quotes
Here you can create custom work quotes. These allow you to charge the customer for work or one off items that aren't products available in the shop. For more information on this please see: Custom Work Quotes.
Here you can also see any invoices your customer has received
Tickets & Email Notifications
Here you’ll see all support tickets between you and your customers. You can quickly jump to the StackCP Help Desk by selecting View Ticket.
Master FTP Access
Master FTP allows the user to connect to all their hosting packages using a single FTP login, rather than individual ones for each hosting package. More information about Master FTP can be found here: How do I use Master FTP.
 Dominic Elford
How do I transfer my StackCP User their affiliate earned balance?
A StackCP User can request to withdraw their balance through StackCP, or by contacting you directly.
To pay out the balance we’d recommend doing a bank transfer or using a method such as PayPal to securely pay their commission.
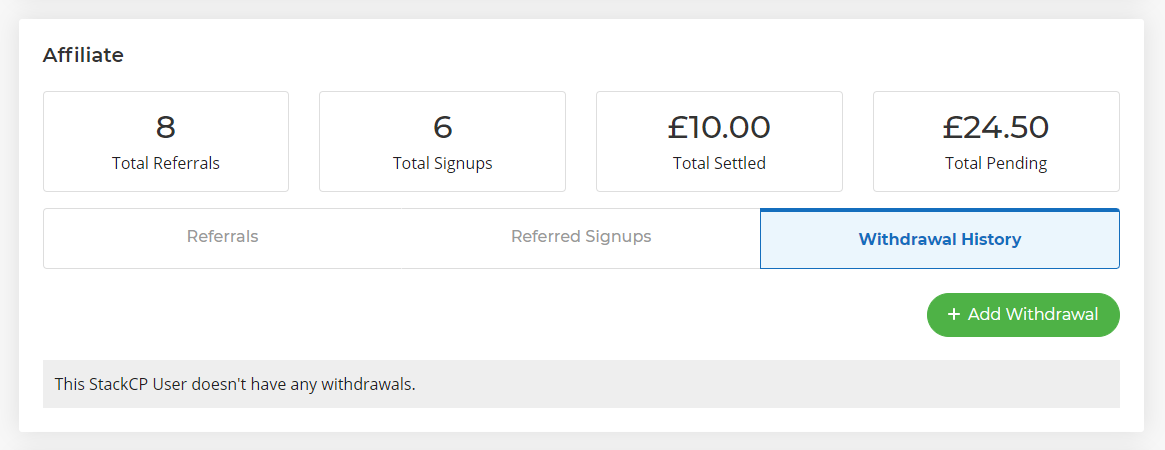
Once complete, you can head to the StackCP User management area (StackCP Users > Options > Manage) and select Add Withdrawal to clear the StackCP User's payable balance and log the payout.
 Austin B.
When do my customers get billed?
You’re in total control! You can set how and when you’d like your customers to be billed for the services you’re providing. You can view all currently active billing and contracts from the Customer Contracts page.
There are two main scenarios that could occur:
1. Your customer signs up automatically from your control panel.
If this is the case, then the date at which the customer would be billed is the date of purchase, then subsequently at the date of the renewal period which they’ve selected (i.e. monthly, yearly etc.).
2. You want to assign a billing contract to an existing customer.
If you have an existing customer and you need to assign them a billing contract, then you can set this up manually for them (to then bill the customer automatically).
To do so, head to:
Manage Reseller > StackCP Users
You’ll need to have your customer set up as a StackCP User. Create the customer manually if you need-to. Once they’ve been created, make sure you assign them their services by going to:
Manage Reseller > StackCP Users > Options > Manage
Under the Access & Contracts section, select + Add Access and add the hosting package, domain or VPS you want this customer to be able to manage. Once the service has been added (with the exception of Hosting Packages), select:
Add Service To A Plan
You will the see a drop-down menu allowing you to select the Price/Payment plan for the service. This is pulled directly from what you have setup in your Product Catalogue.
Select the Price/Payment plan you want to assign, then select when you want the service to expire and require renewal. If you want the service to renew 'today' then simply select today's date and the customer will be billed today. However, you’ll most likely want to set up billing to match the arrangement you currently have with your customer.
For hosting packages you'll need to add them to a plan. If you don't already have a plan you will need to first click on Add Plan at the bottom of the Access & Contracts section. Select the plan you wish to add.
Then on the plan select Manage > Manage Packages. You can then select the packages you wish to add to the plan.
 Austin B.
HostShop domain renewals
Best practice when it comes to domain names in HostShop is to have your customers' domains set to not auto-renew within My20i, via the Renewals section.
This means that if your customer doesn't pay or have a valid payment method, you won't be charged by us until the customer makes a successful payment to you. At the bottom of the Account Preferences page, you'll note the option to automatically disable auto-renew on 'new' domain purchases.
We'd suggest doing this, so that if customers buy domains from you through HostShop, their default status is to not auto-renew in your 20i account. So that the toggle should be 'off' - disabled.
It ensures that they renew the domain on time, and you're not charged for domains they don't want.
 Dominic Elford
How do I set up PayPal as a payment gateway?
As a hosting reseller, you need to be able to receive money from your customers. To do this you’ll need to set up a payment gateway. PayPal is the most commonly-used payment gateway, so if you’re looking to get started then we’d recommend adding PayPal first.
To setup PayPal as a HostShop payment gateway:
Log in to My20i
Select Payment Gateways from the navigation menu on the left-hand side.
From the Add a Payment Gateway section, select PayPal.
Note: Your PayPal account must be Business Account. It’s simple to upgrade if you need to, please refer to the guide here.
To get these details:
Log in to the PayPal Developer area with your normal PayPal login details.
Head to the PayPal Apps & Credential section if you're not already taken there.
Make sure you're in the Live section as this is required to configure a live payment gateway.
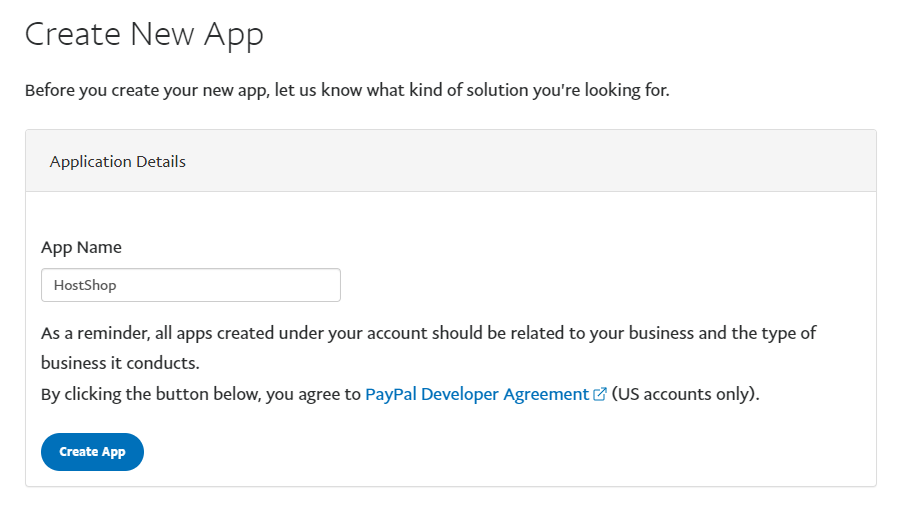
Select Create App.
Give your app a name. In our example we've called ours HostShop.
Select Create App.
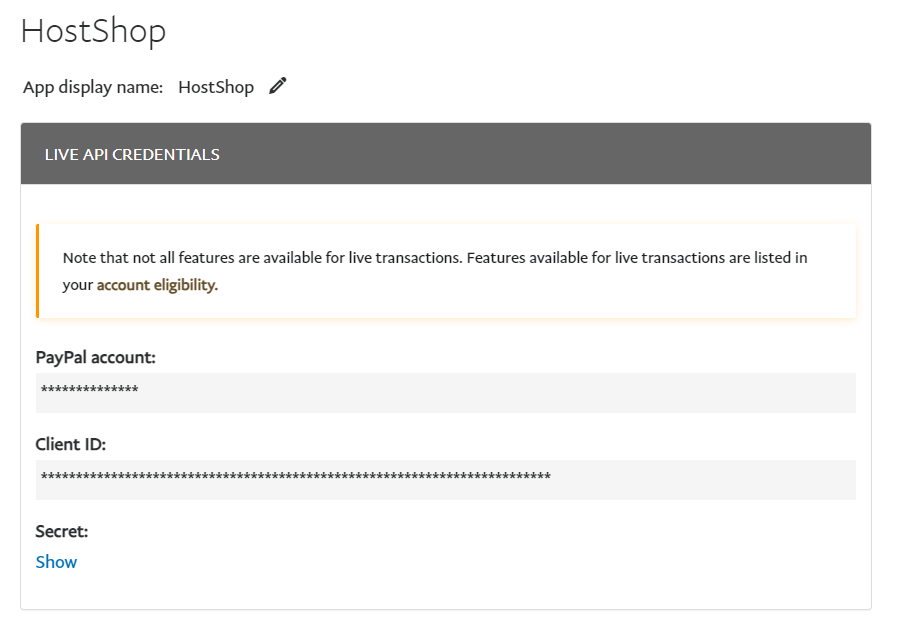
You'll now see your Client ID and the Secret required to set up the payment gateway. Select Show to Secret Key.
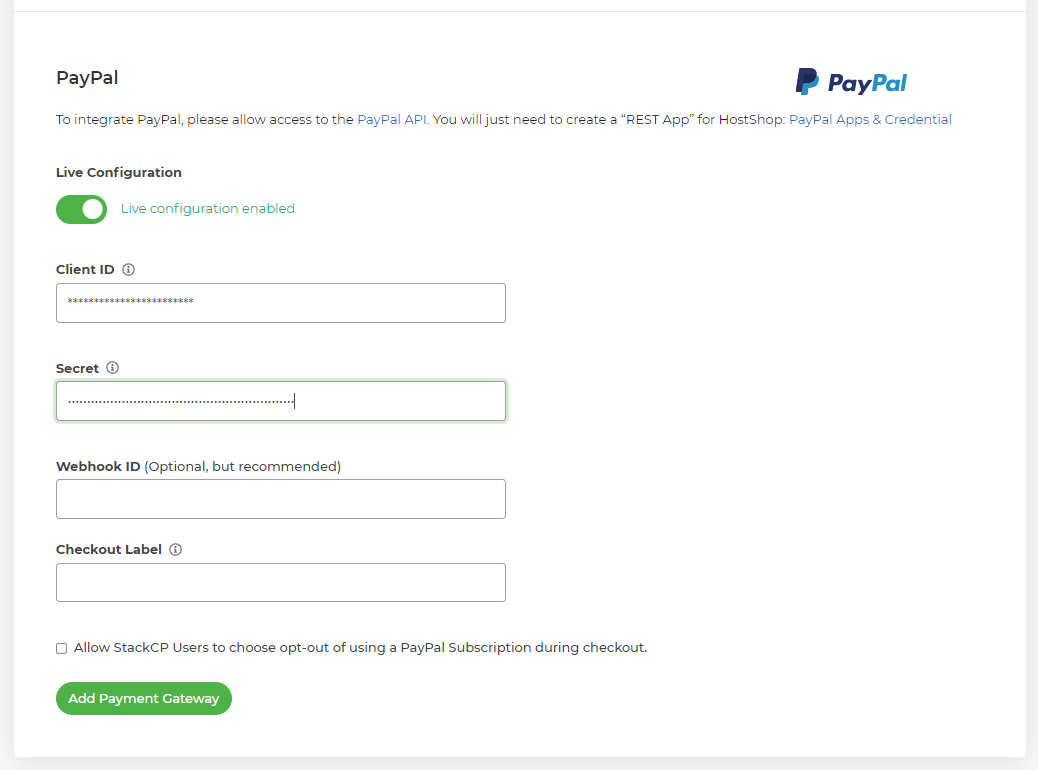
Copy the Client ID and Secret into their respective fields within 20i.
Select Add Payment Gateway.
PayPal will now be set up and enabled. This means that when customers head to your shop, they'll be able to select PayPal as a payment method from the basket to pay for your services.
 Dominic Elford
How do I add a billing contract to a service?
You can manually assign a billing contract for a current hosting service to a StackCP User. This is so you can bill them automatically for a set price and set renewal period.
To do this:
Log in to My20i.
Head to Customers > StackCP Users.
Select Options > Manage on the StackCP User who has the service you want to add the billing contract to.

Under the Access & Contracts section, you can add a contract to a service (with the exception of a package), by selecting Manage > Add Contract to Service.

With packages, rather than adding a contract to the service you need to add the package to a Plan. There are two ways you can do this. You can either add a plan to the StackCP User and then assign the package to the Plan or you can directly convert the package to a Plan.
- To do the former you need to click on Add Plan at the top of the Access & Contracts section and select the plan you wish to add before committing with the Add Contract button.

Then on the Plan select Manage Packages.

You can then select the packages you wish to add to the Plan.

Alternatively, you can select Add Service to a Plan and this will let you add the package to a new Plan.

 Arron C
How do I add analytics code to HostShop?
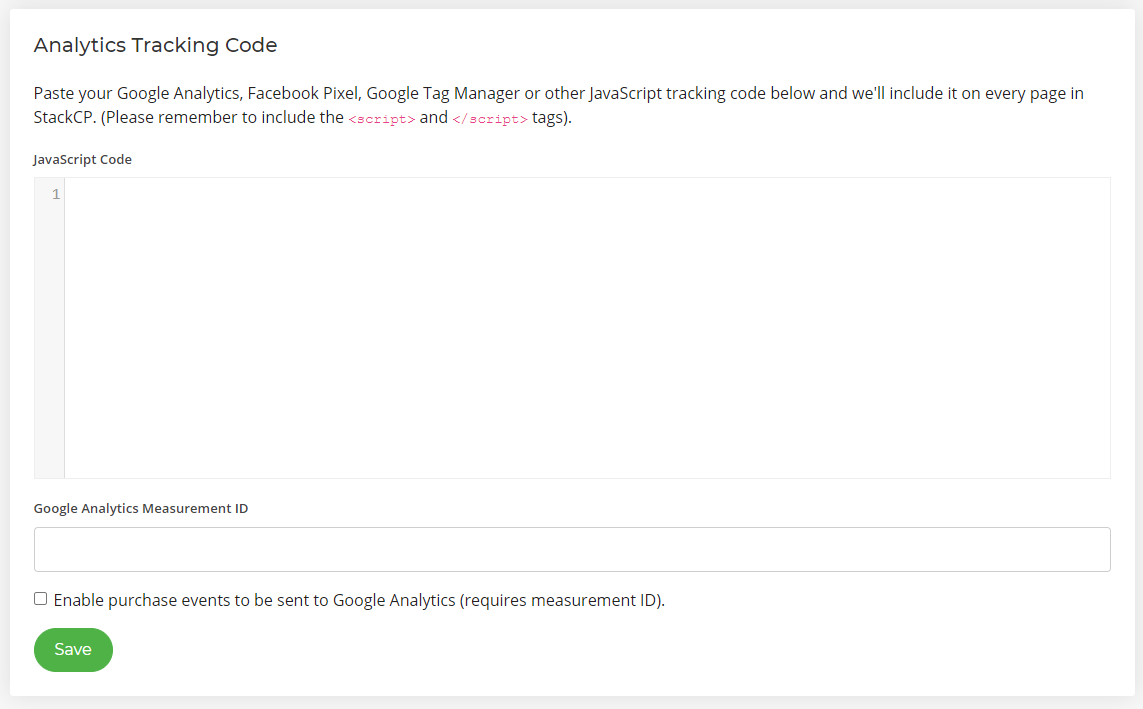
You can include your Google Analytics, Facebook Pixel or Google Tag Manager or other Javascript analytics code on every page within your HostShop and StackCP setup.
You can set this up by heading to Manage Reseller > Reseller Customisation > StackCP Settings
At the bottom of the page, there will be a section labelled Analytics Tracking Code.
Here, you should be able to paste in the JavaScript code for your analytics, as well as your Google Analytics Measurement ID if required. Once done, the system will automatically include these analytics on every page of your HostShop and StackCP setup.
 Dominic Elford
How do I add domain privacy as a service?
With HostShop you can resell Domain Privacy as an add-on to the purchase of domain names themselves.
To set up Domain Privacy, you’ll need to:
Log in to My20i
Head to Customers > Product Catalogue
Select Edit catagory under the Domain Names tab

Select Category Products and scroll down to the Domain Privacy section.
From here you can give your Domain Privacy product a name and a price.

The option to purchase the Domain Privacy add-on will then show for your customers to purchase for their existing domains when managing them within StackCP.
 Arron C
How does the Renewal Sequence work?
On the Renewal Sequence page you can manage the automated emails and actions that are triggered on renewal/expiry day of a service and the following days and weeks after the expiry. A default sequence is already in place for all services, but this is where you can make changes.
You can access the Renewal Sequence by going to My20i > Hostshop > Renewal Sequence
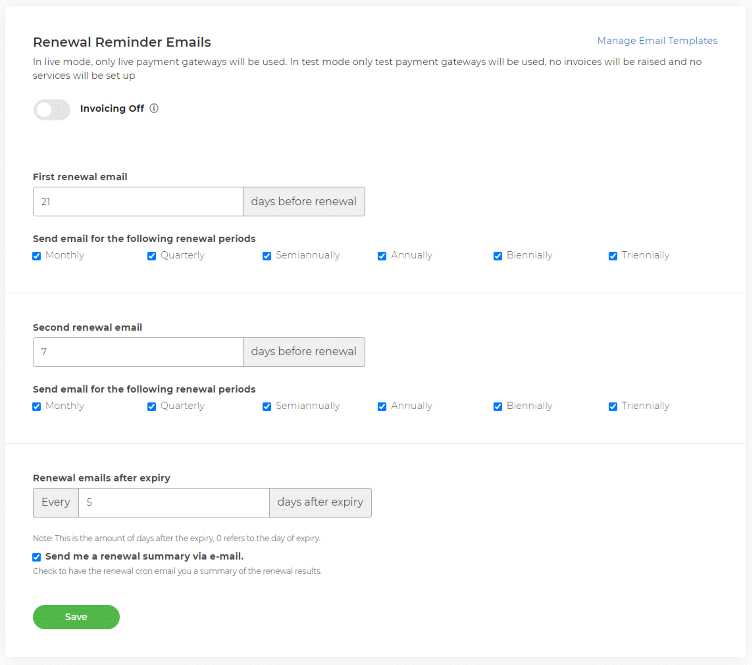
Renewal Reminder Emails
This the first section of the Renewal Sequence. Here you can set how many days before a renewal is due that a reminder is sent to the customer by email. There are two renewal reminder emails that are sent by default before each renewal. You can edit the content of these emails in the email templates section of My20i here.
At the top of this section you can also use the Invoicing On/Off toggle to control whether a payable invoice is sent to your customers at the same time as their renewal reminder emails allowing them to pay their renewal early.
Expiry Actions
The rest of the page is used to set what happens on the day of expiry for a service and in the following days, assuming the service is not renewed.
In this section you can set the actions taken for services and what emails are sent to your customers. There are default days preset here but if you scroll down to the bottom you can add add actions and email reminders to anything up to 60 days after the expiry of a service.
To do this, scroll down to the Add a Renewal Day to Schedule section, select a day from the dropdown and then select Add Day to Schedule.
When selecting what happens after the expiry of a service you can first select what types of services you want the following actions to effect.
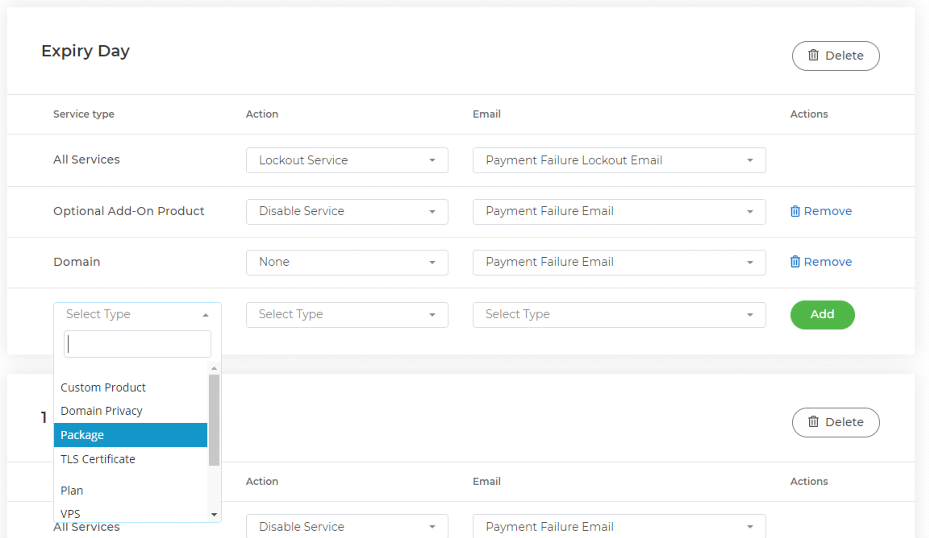
Then you can select what actions you wish to be taken.
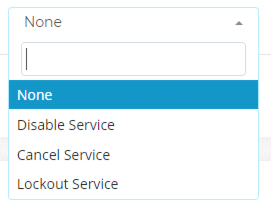
The options as you can see above are:
Disable Service - this will disable the overdue service
Cancel Service - this will cancel the overdue service
Lockout Service - this will lock the user out from their HostShop account until the overdue service is paid for.
Lastly you can select what emails you want to send. The emails' content can be edited in the Email Templates section of My20i.
 Dominic Elford
How do I add account credit to my 20i account?
You’ll need account credit on your 20i Reseller account to take orders through HostShop. When a client orders services like domains, we’ll use account credit to pay for the domain so it can be provisioned automatically. To do this:
- Head to the Account Credit section in your 20i account.
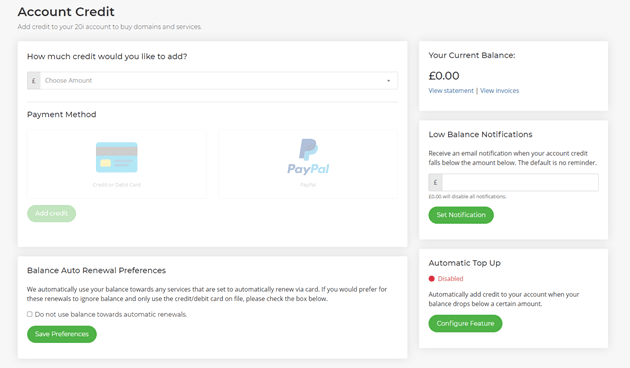
- Select the amount of credit you’d like to add from the drop-down menu
- Select whether you want to add credit using a card or PayPal
- Select Add Credit to Basket or Add Credit with PayPal
Note: Should an order fail due to insufficient balance in your account, once you’ve added credit to your account you’ll be able to find and re-process the order by going to Customers > Overview > Failed Orders and selecting View Order and then Process. This will retry the order with your new balance.
You'll then be able to complete the order and add balance to your 20i account.
 Austin B.
How do customers sign up to HostShop?
A simple but important question!
With HostShop it’s very easy for leads to sign up and become paying customers with their own accounts to manage their services from.
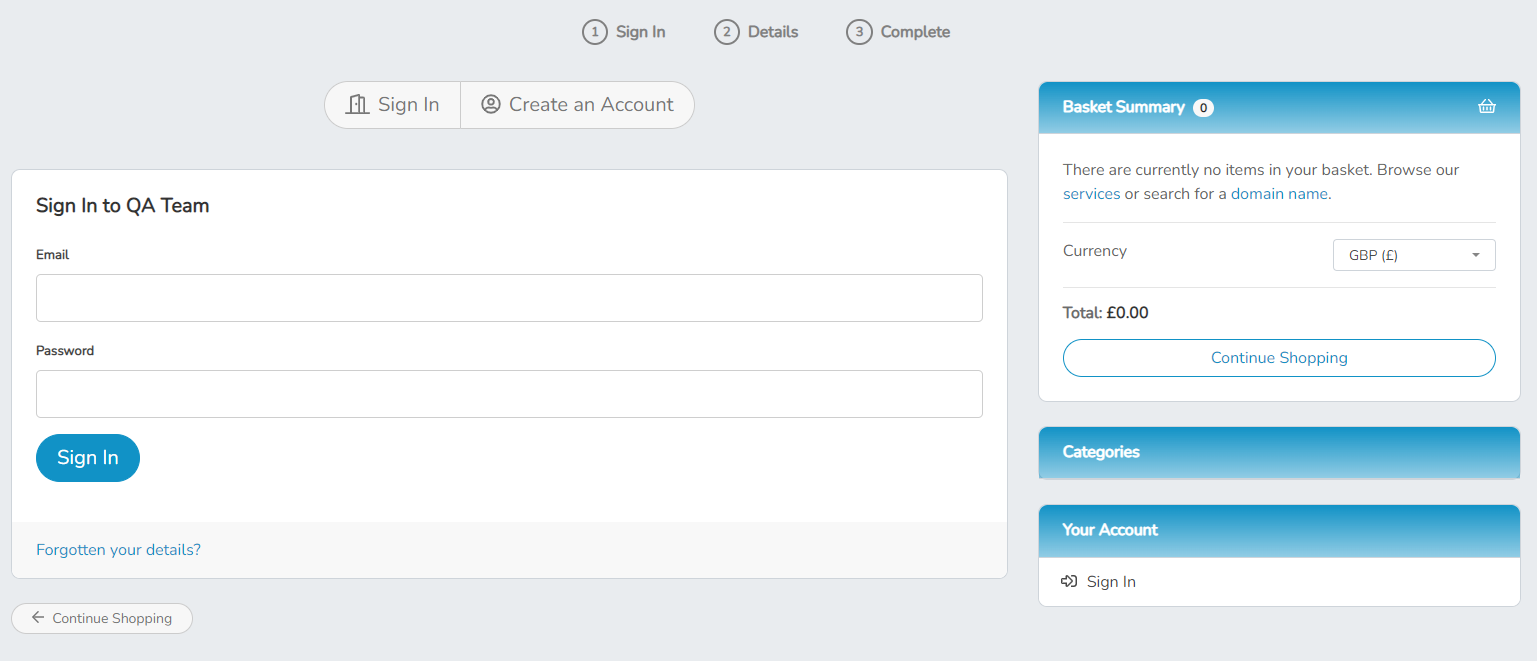
When they visit your shop and select to buy a product, they’ll be prompted to either Sign In or Create an Account.
When creating a new account, they’ll need to verify their email, then enter their contact details and add security questions. The process is:
Sign Up > Receive Verification Email > Complete Registration (Contact/Security Details) > Full Account Access
The customer can now proceed to make their purchase!
 Dominic Elford
Selling Managed Cloud Servers through HostShop
Offering the best products and services to your clients is crucial for the success of your reseller hosting business. Our Managed Cloud Servers product allows you to expand your portfolio and increase your revenue with higher mark-up products. We'll look at how HostShop can help you sell Managed Cloud Servers from 20iCloud, AWS, and GCP, all managed through the My20i control panel. We will also explore how you can create your own cloud provider brand, and the benefits of offering global data center locations.
Earn More with Higher Mark-Up Products
Managed Cloud Servers offer you the opportunity to increase your profits due to the high demand for reliable and scalable cloud services. With HostShop, you can easily add these services to your existing product offerings, and set your own prices with higher mark-ups, which can lead to a significant boost in revenue. By offering Managed Cloud Servers, you can meet the needs of a wider range of clients, from startups to large enterprises.
Sell 20iCloud, AWS, and GCP Managed Cloud Servers through My20i
HostShop's integration with My20i, our powerful control panel, allows you to manage multiple cloud server providers like 20iCloud, AWS, and GCP from one centralized interface. This simplifies the management process for you and your clients, enabling them to access and manage their cloud servers with ease. With HostShop and My20i, you can provide a seamless user experience that encourages customer loyalty and repeat business.
Create Your Own Cloud Provider Brand
HostShop enables you to create a unique brand identity by customizing the appearance of your reseller storefront and control panel. This allows you to replace the 20iCloud branding with your own, ensuring that your clients associate the high-quality Managed Cloud Hosting with your brand. By establishing a strong brand presence, you can attract more clients and foster long-term relationships built on trust and professionalism.
Offer Global Data Center Locations to Reach Customers Worldwide
To serve your clients better and meet their diverse needs, 20i's cloud server offering provides access to a wide range of global data center locations. With data centers spread across various regions, you can ensure that your clients' websites and applications have minimal latency and optimal performance, regardless of where their users are located. By offering a global infrastructure, you can attract clients from around the world, expanding your market reach and increasing your potential revenue.
Conclusion
HostShop's Managed Cloud Servers product, combined with our web hosting billing and automation platform, provides an ideal solution for web hosting resellers looking to grow their business and revenue. By selling Managed Cloud Servers from 20iCloud, AWS, and GCP, creating a unique brand identity, and offering global data center locations, you can meet the needs of a diverse clientele.
 Austin B.
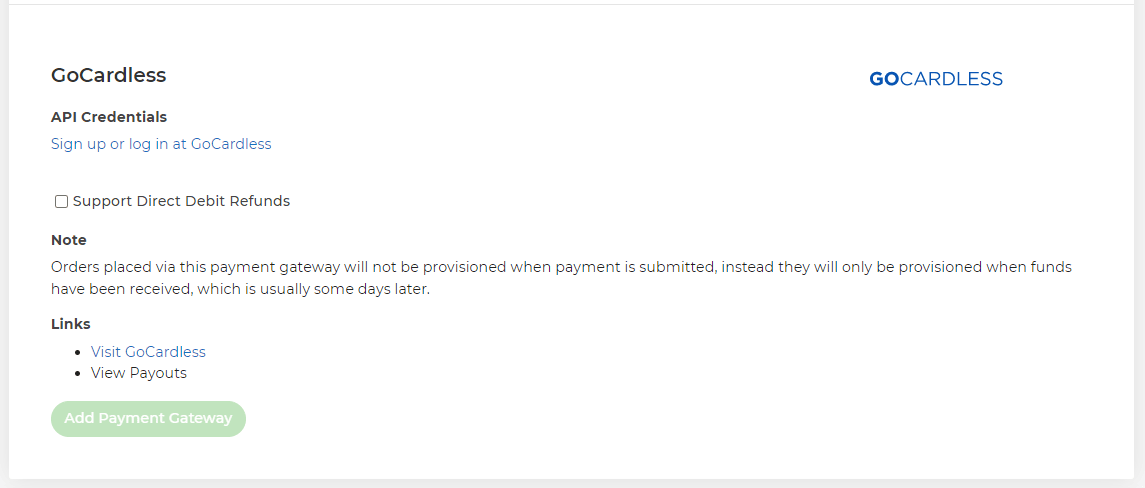
Connecting HostShop to GoCardless
The GoCardless payment gateway is a way of taking secure payments from your customers through HostShop. It allows customers to set up recurring Direct Debit payments.
This helps to reduce late payments, avoid card fees and reduce accounting admin. To add GoCardless to HostShop:
⦁ Head to Payment Gateways via Hostshop > Payment Gateways
⦁ Select GoCardless from the dropdown
⦁ Select Sign Up or Log In at GoCardless
⦁ If you have an existing GoCardless account enter your email address and password and select Connect Account. If you don't have an existing GoCardless account follow their sign up process to create one
⦁ You’ll then be redirected back to 20i – GoCardless should then show as Live and Enabled.
Your customers will then be able to select to add/use a Direct Debit at the checkout in your HostShop.
 Dominic Elford
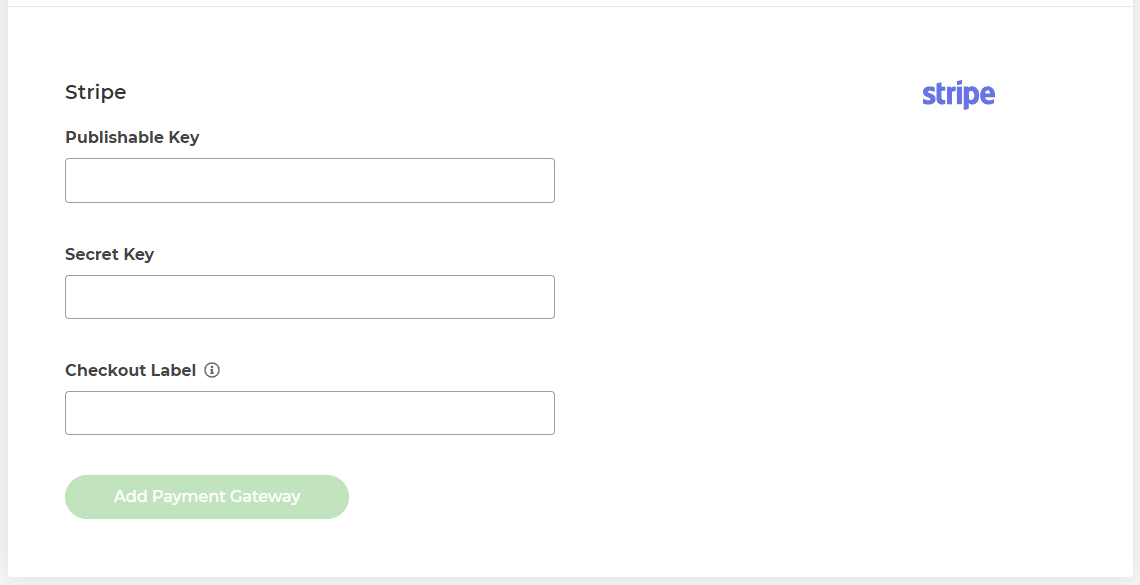
How do I setup Stripe as a payment gateway?
Stripe is a well-regarded payment gateway provider you can use to take credit and debit card payments from your customers. It’s very easy to set up and link with 20i HostShop.
In order to set up Stripe as a payment gateway:
- Log in to My20i
- Head to the Payment Gateways section and select Stripe from the list of payment gateways.
Now head to your Stripe account and go to the Developers section: https://dashboard.stripe.com/apikeys
Note: You’ll need to make sure your Stripe account has been activated, follow the guide here to see how to do that.
From here, you’ll need your Publishable Key and Secret Key. Copy each key into the relevant field within My20i.
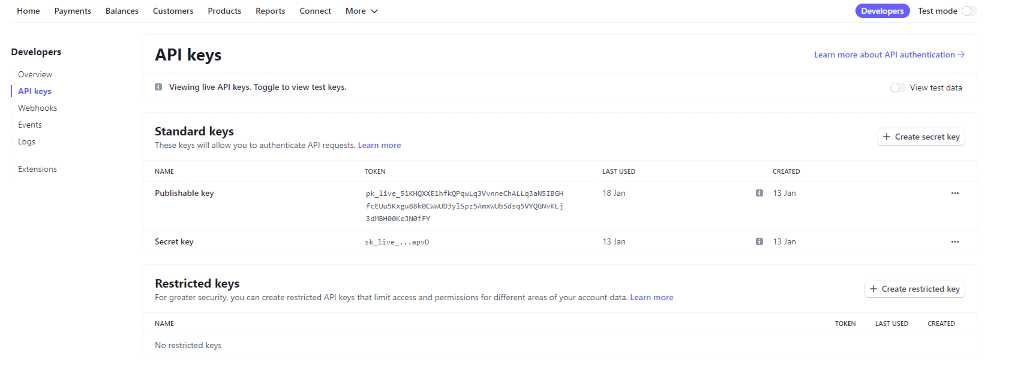
Once done, select Add Payment Gateway.
You'll now be able to accept credit and debit card payments from your customers.
 Dominic Elford
How do StackCP Users pay with balance in HostShop?
Before StackCP Users can pay with balance in HostShop you will need to either add balance as a product they can purchase or they will need to earn balance as commission from the affiliate system. You can find more information on these topics here:
Once a StackCP User has some account credit they can select it as the payment gateway at the checkout.
 Dominic Elford
How do I set a specific address only for customer invoices?
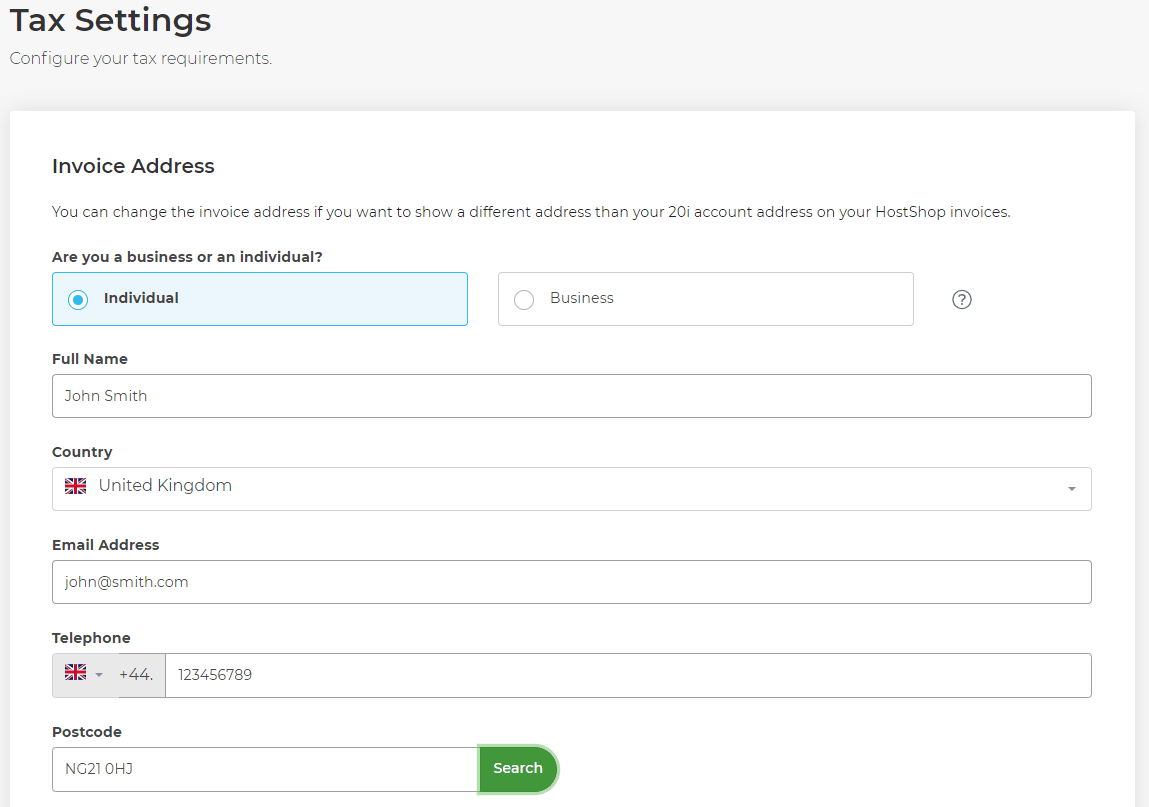
In some situations, you may wish to display a different address to what is set in your My20i account on your invoices – it’s possible to update this from HostShop.
First, head to Hostshop > Tax Settings. You’ll see your current address set under the Invoice Address section – if you wish to alter this, select Edit Invoice Contact.
Once you’re happy with the edits you’ve made, select Update Details – new invoices generated from this point will now show the contact information you’ve added.
 Dominic Elford
How do I manage fraudulent orders within HostShop?
To ensure the payments and orders you receive are legitimate, HostShop has an inbuilt fraud management system which will detect – based on certain factors – whether an order that is placed by a customer is abusive or potentially fraudulent.
If the order meets the required criteria for it to be flagged as abusive, it can be managed within the fraud checking facility available in Pending Orders.
To check this:
- Login to My20i
- Head to Hostshop > Pending Orders
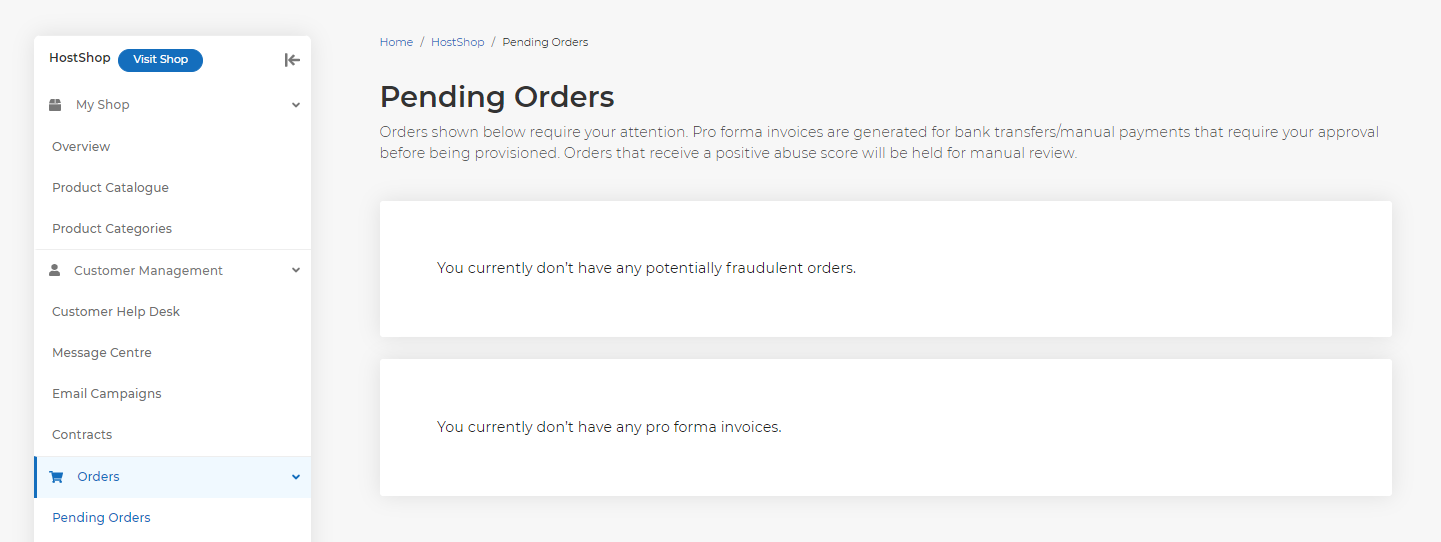
If you have any potentially fraudulent orders they’ll appear here. If you receive a fraudulent order you’ll be emailed to let you know as well.
To manage a fraudulent order, select View to see why the order has been flagged.
VPS are automatically flagged because VPSs are commonly used for abusive purposes.
We have three options:
- Complete Order - you can select this is you believe the order is from a genuine source
- Drop Order - select this is if the order looks genuine, but the customer has decided they don’t want to proceed
- Reject Order - select this if the order looks abusive. This means future orders by the same customer are more likely to be rejected.
 Dominic Elford
How do I add and sell VPS services?
With HostShop your product lineup isn’t just limited to hosting and domains. You can also resell virtual private servers (VPS) with your 20i reseller discount.
To set these up, you’ll need to:
Log in to My20i
Head to the Product Catalogue section
Select Add New > Product
For Product Type, select VPS Products.
If you would prefer to use a Custom Category, this can be selected now.
The next step is to select either Managed VPS or Unmanaged VPS
Now, select your VPS Size - this is the specification of server that you would like to sell.
Choose your Default Price, and the Renewal Period.
Select Create Product

In our example we’ll be adding the 1 GB Unmanaged VPS. We’ve selected the 1 GB VPS and hit Create Product.
We now can add a price and other renewal periods by repeating the process above. For monthly, a default price of £9.99 has been added which we’re going to leave in place. This gives us a £2.50 markup on the cost of the VPS.
Business tips
If you need advice about how to sell VPS to your customers, please see our VPS Product Guide or this blog post: How to sell Virtual Private Servers. It covers how to explain what a VPS is, customer myths, marketing and sales tips.
 Chris Wright
Setting your own cloud server brand in HostShop
Setting up your own cloud server brand on top of the 20iCloud infrastructure offers several advantages, especially when it comes to distinguishing your business in a competitive market. By creating your own brand with a unique name and logo, you can leverage the existing capabilities of major cloud infrastructure providers like 20iCloud, AWS, and Google Cloud, while adding a personal touch to your services.
There are several reasons why you may want to add your own brand to help your cloud server stand out in the market:
- Brand Identity: Creating your own brand allows you to establish a distinct identity that customers can easily recognize and associate with your business. A unique brand name and logo can help create a memorable impression, which is critical in a crowded market.
- Customization: By having your own brand, you can tailor your cloud server offerings to cater to specific customer needs and preferences. This may include custom features, pricing plans, and support services, enabling you to differentiate your brand from competitors.
- Market Perception: With your own brand, you can position your cloud server as an independent and innovative solution, rather than just another reseller of existing services. This can help to build trust and credibility among customers, who may perceive your brand as more committed to their success.
- Marketing and Promotion: Having a unique brand enables you to create and execute targeted marketing strategies that showcase the benefits and features of your cloud server offerings. This can help attract potential customers and generate more leads for your business.
- Customer Loyalty: A strong brand can foster customer loyalty, as clients are more likely to stick with a service that they trust and identify with. By providing a personalized and consistent experience, you can build lasting relationships with your customers and encourage repeat business.
Adding your own brand to a cloud server built on top of the 20iCloud infrastructure can significantly enhance your market presence and visibility. It allows you to create a unique identity, customize your offerings, and execute targeted marketing strategies, ultimately helping you stand out from competitors and build lasting relationships with customers.
Steps to set up your own branded cloud server
To begin with, you will need to ensure that you have at least one card payment gateway setup before creating this branded cloud server. We recommend Stripe, as a payment gateway. You can learn how to set up Stripe as a payment gateway here.
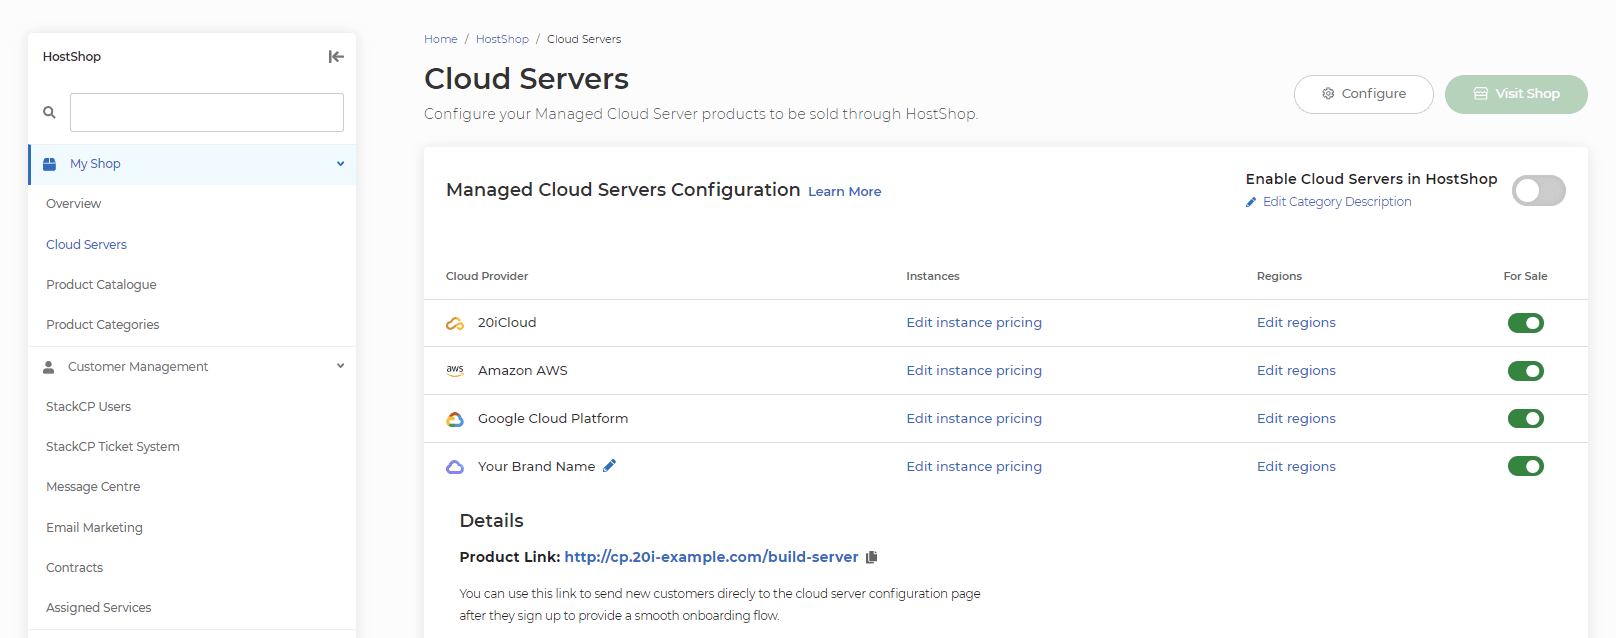
From the Cloud Servers section of Hostshop, you can customise the branded name of your cloud server, alongside the different pricing instances and what regions are available. The product is not for sale by default, but that can be toggled on the righthand side.
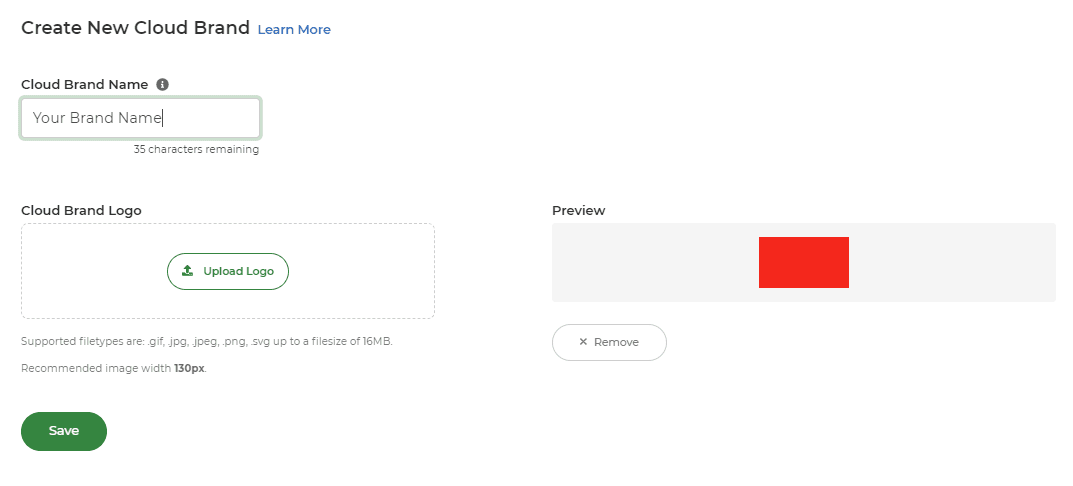
In addition, you can also customise the Cloud Brand Logo. This logo will be displayed next to your Cloud Server product for potential customers to see.
This is what your customers will see upon navigating to the Cloud Server section of your online shop.
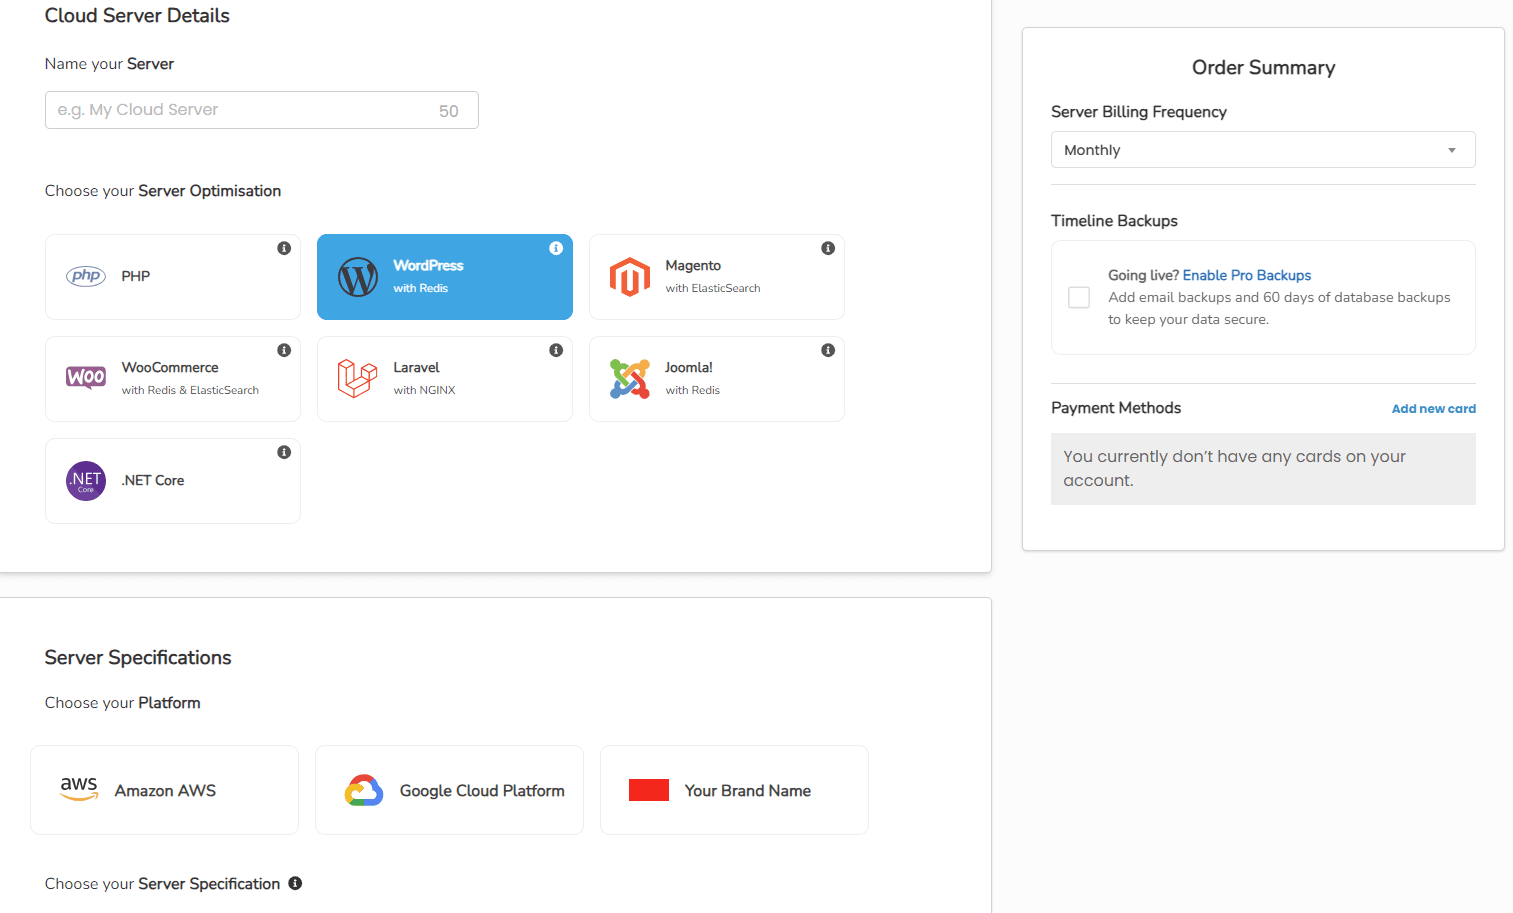
You now have a branded, white-label cloud server to sell to your own customer base.
 Austin B.
How do HostShop Package Plans work?
HostShop Package Plans are the way to create package bundles and plans for your customers. Plans allow you to give your customers an allowance of hosting packages so that they can migrate and create websites within their given allowance limit.
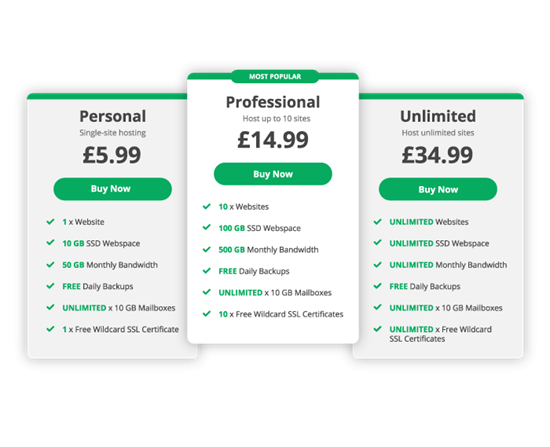
- Like with other hosting products in HostShop, to use HostShop Plans you'll need to first create the Package Types for your plans here. When a customer buys a plan, they'll be able to make as many packages of the selected Type as the plan allows.
- Once you've created your Package Types you'll need to go to the Product Catalogue in the HostShop section of your account.
- You'll then need to select Add New > Product and configure the product you are setting up.

This plan will determine what type of Package your customers can create if they purchase this Plan, which in turn will determine the options and limitations of each package they create within this.
You'll also need to select the number of packages that you want to allow customers to create using the Number of Packages in Allowance dropdown.
Should you wish to set a custom amount, select Custom and the dropdown box will change to a field where you can enter a custom number.
You'll then need to choose a price for the plan and what payment intervals are available then click Create Product.
This will create the Plan as a product in your HostShop, and by default set it for sale.

You can now also customise the name, and description and toggle whether the product is for sale and shows in your shop.
Once a customer has bought a plan, they will be able to create packages for their websites - subject to the limits you've set - in the Manage Service section of their StackCP dashboard.
 Arron C
How do I import customers from WHMCS to HostShop?
HostShop is our Web Hosting automation that give you more than WHMCS. It makes it easy to run your own Reseller Hosting business and is free for our customers.
If you’re looking to import customers from WHMCS to HostShop then you can do so using the 20i tool. This will import the users' contact information from your current WHMCS installation.
To access the tool, head to StackCP Users > Import Users from WHMCS
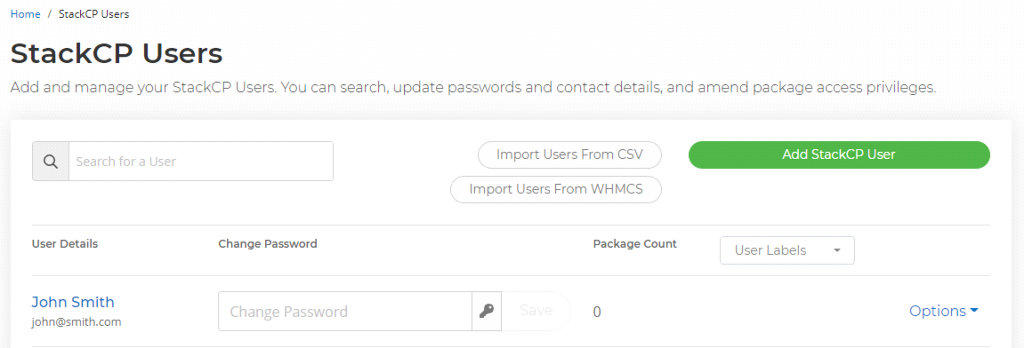
You’ll need to add your WHMCS domain, API Identifier and API Secret.
You can get these by going to System Settings > Staff Management > Manage API Credentials. You'll need to generate an API Credential that maps to a Role with at least GetClients and GetClientsDetails permissions.
You'll need to whitelist your IP address. To do this, go to System Settings > General Settings > Security. Add your IP address to 'Whitelisted IPs' and 'API IP Access Restriction'.
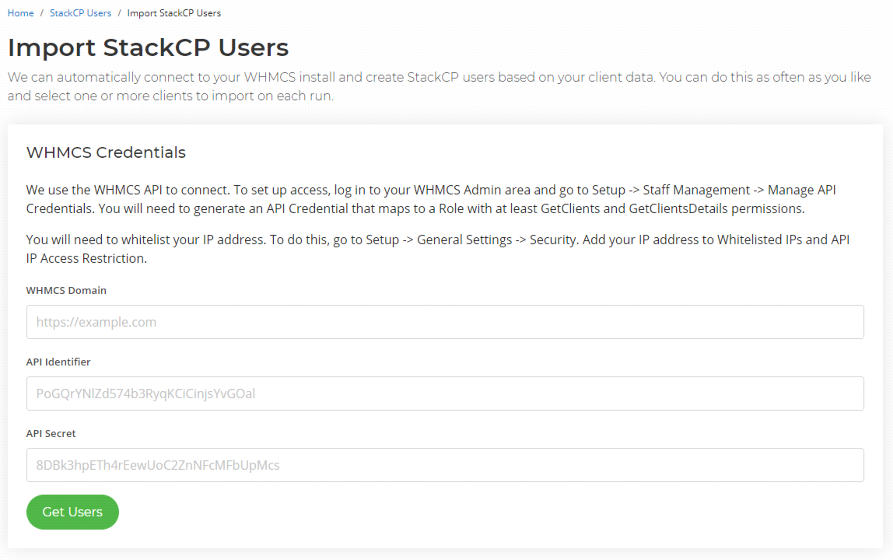
Once you've entered the correct details, select Get Users.
You'll then be shown a list of all your current WHMCS users along with their current status, being either active or inactive. You can filter by their status or if they already exist in StackCP and select the ones you want to migrate-in.
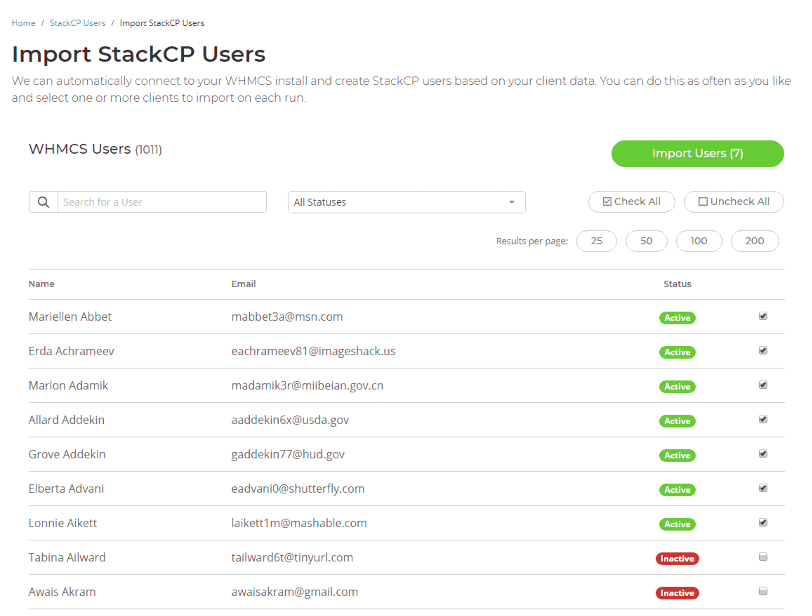
After selecting Import Users, we'll create the relevant StackCP Users for you and import their associated contact information directly from WHMCS.
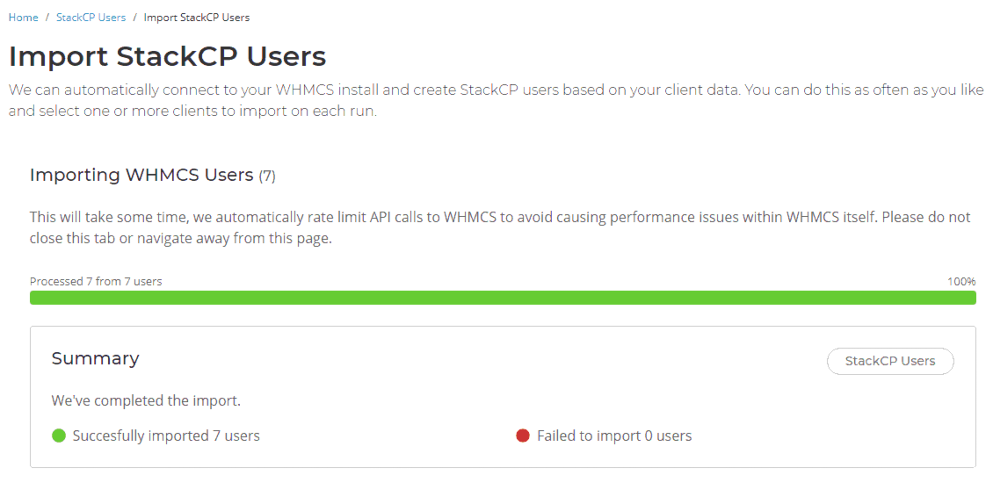
By now heading to StackCP Users, you'll see all of the imported users from your WHMCS installation.
 Dominic Elford
How do I add multicurrency support in HostShop?
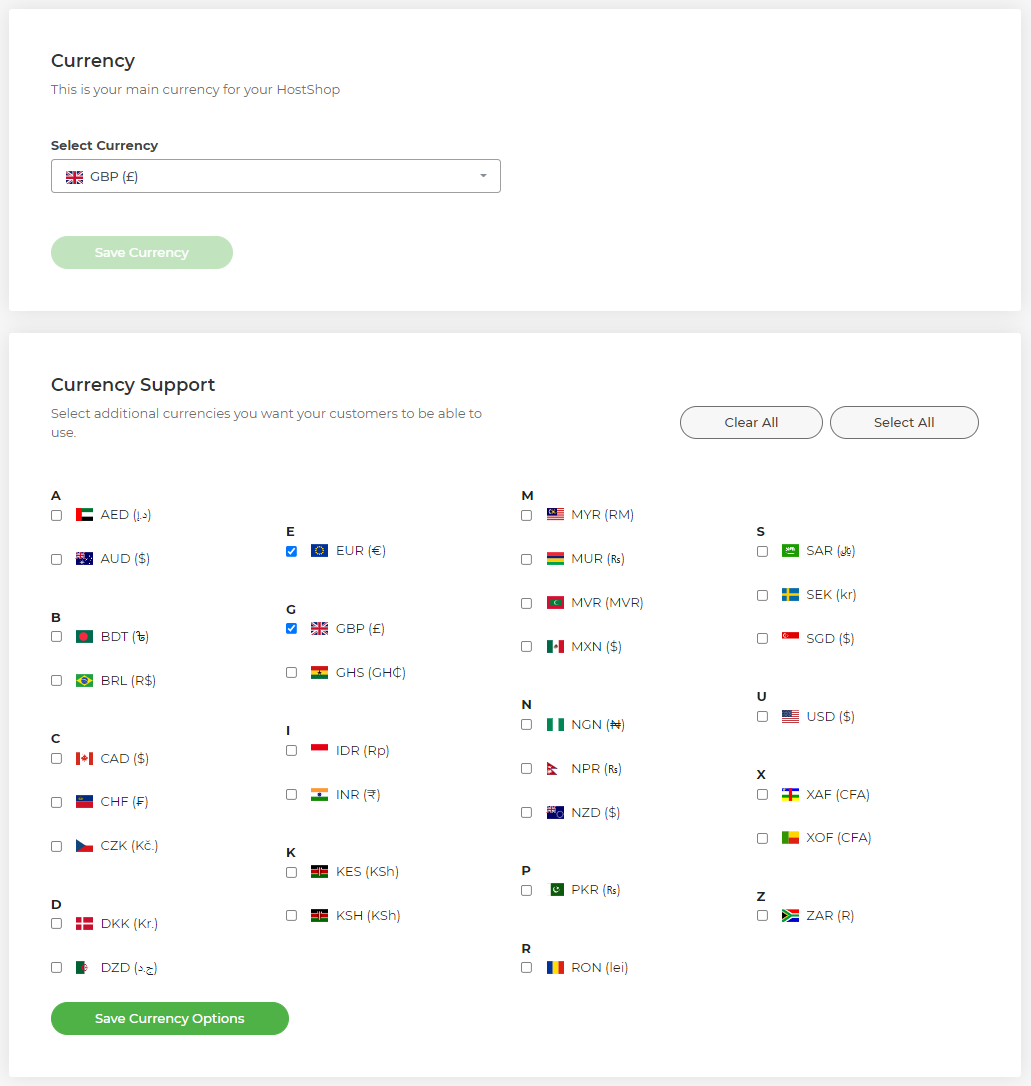
To add multicurrency support to your HostShop you first need to go to the Currencies page.
Here you can select the main currency for your shop. This will be the currency prices are shown by default and you'll set your prices in this currency. The prices of products in other currencies will then be calculated based off the current exchange rate with the main currency.

Once the main currency is selected you can then select any other currencies you wish to support below that.

Any currencies selected will then display at the checkout for StackCP users the first time they make a purchase from the shop. They will be then be able to make a choice of what currency they want to use at the checkout.

Note: Once a StackCP User has selected a currency this cannot be changed.
 Arron C
How do HostShop Emails & Messages work?
Email Templates
Email templates can be configured by going to Manage Reseller > Email Templates. By default, templates have already been created for you for all different HostShop scenarios.
Updating the 'from' address for email templates
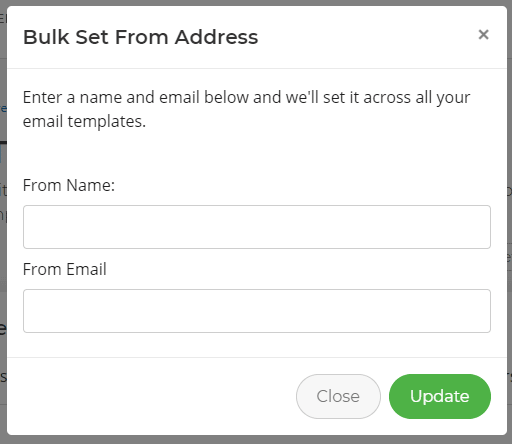
Head to Email Templates, and select Bulk Update From Address - you can then enter the From Name and From Email you’d like all email templates to use.
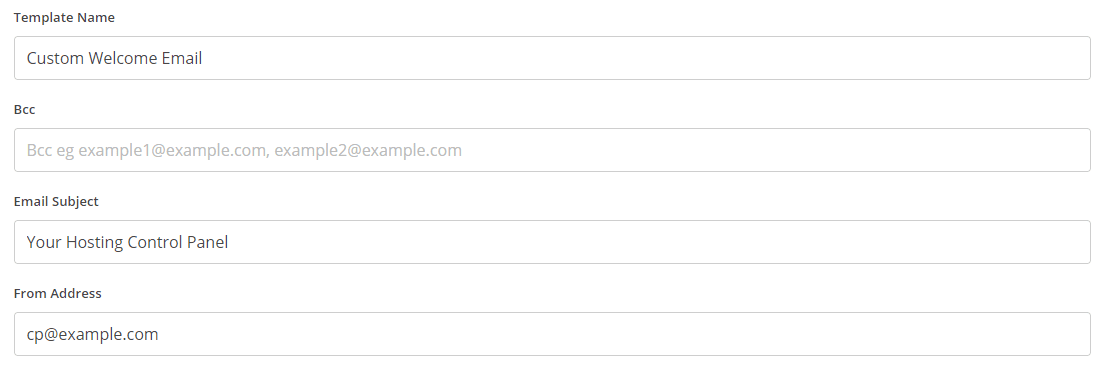
You can also edit the 'from' address on a per-template basis by selecting Options > Edit on the template you want to change and updating the From Address.
Resend Welcome Email
You can resend a StackCP Users welcome email by going to StackCP Users > Options > Resend Email and then selecting the email template you wish to send, then select Send Welcome Email.
Note: Resending welcome emails won’t resend the customers password. This is because we encrypt the stored information, and only they can decrypt it. So you’ll need to reset the customers password manually if they’ve forgotten it.
Sending a control panel message to customers
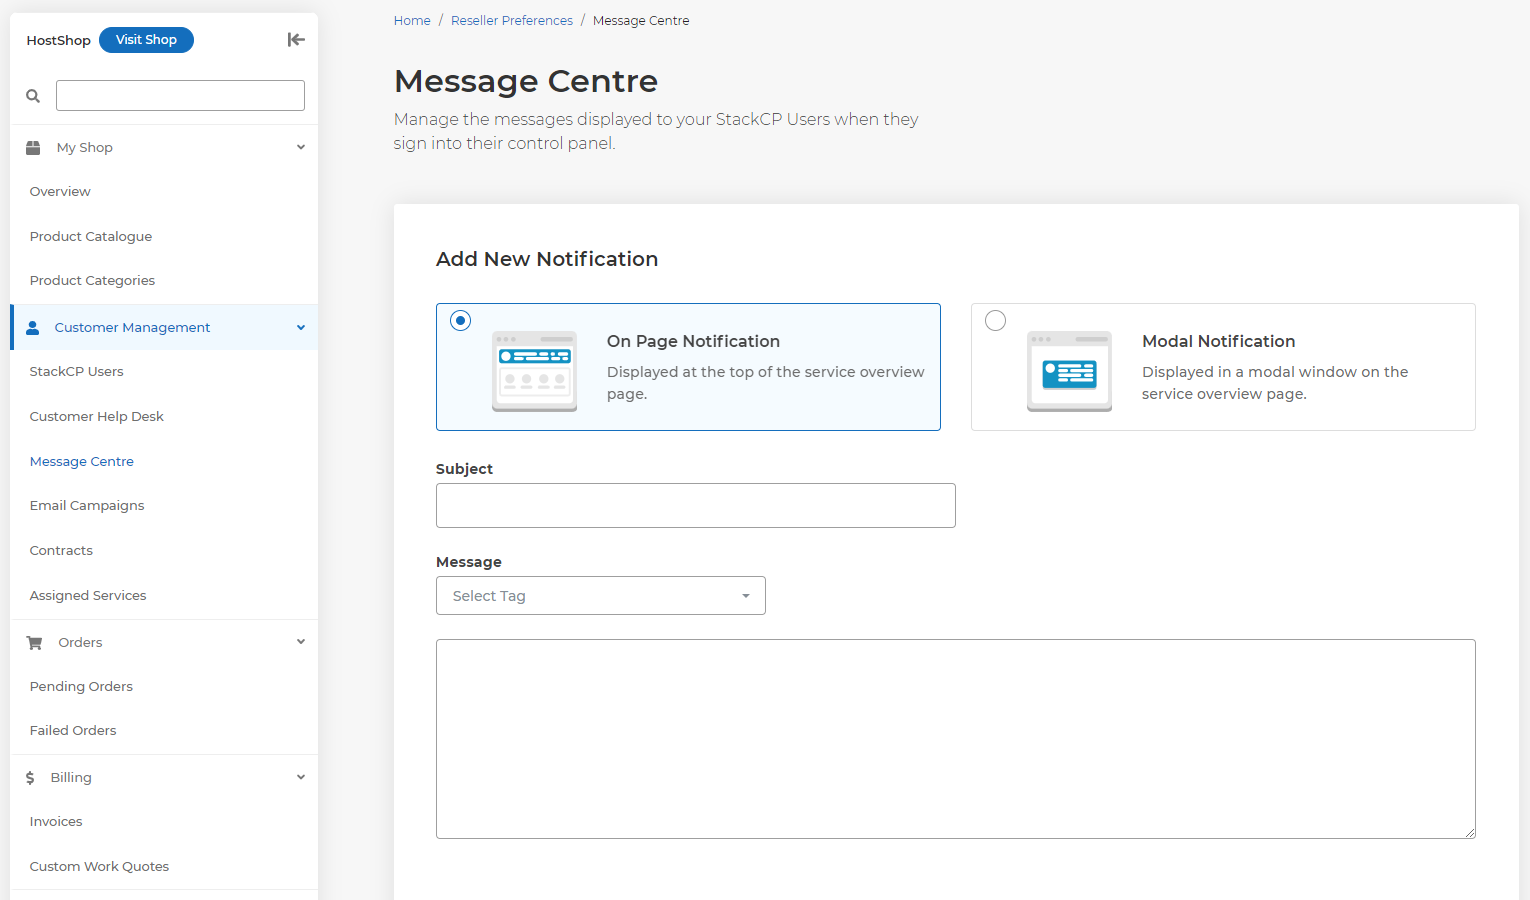
If you’d like to update all customers or a range of customers in their control panel, then you can use the Message Centre. Head to Manage Reseller > Message Centre.
From here you can configure the type of notification you want to send, which can be an On Page Notification that displays at the top of the Service Overview page, or a Modal Notification which will display in a modal window. You can also select who it will reach, such as specific StackCP users or users with a specific package type.
Sending marketing emails
You can send email campaigns to your customers by heading to Hostshop > Email Marketing. You can then configure and send targeted bulk emails to your StackCP Users. There’s a full guide about configuring those here: How do I create and send email campaigns?
 Dominic Elford
How do I edit my HostShop presales template?
With HostShop we offer the ability to quickly and easily install one of our reseller website templates. They're aimed at a reseller of web hosting who does not currently have their own website and would like a head start.
The reseller hosting website templates are static HTML themes which you can customise to showcase the products you’ve set up within HostShop. They're managed from the Free Resources section in My20i. As they're static themes, data is not pulled in automatically from HostShop. So, to adjust the appearance, you’ll just need to edit the HTML and/or CSS of the template.
Note: We can’t provide development or coding support for presales templates, but we offer an example below.
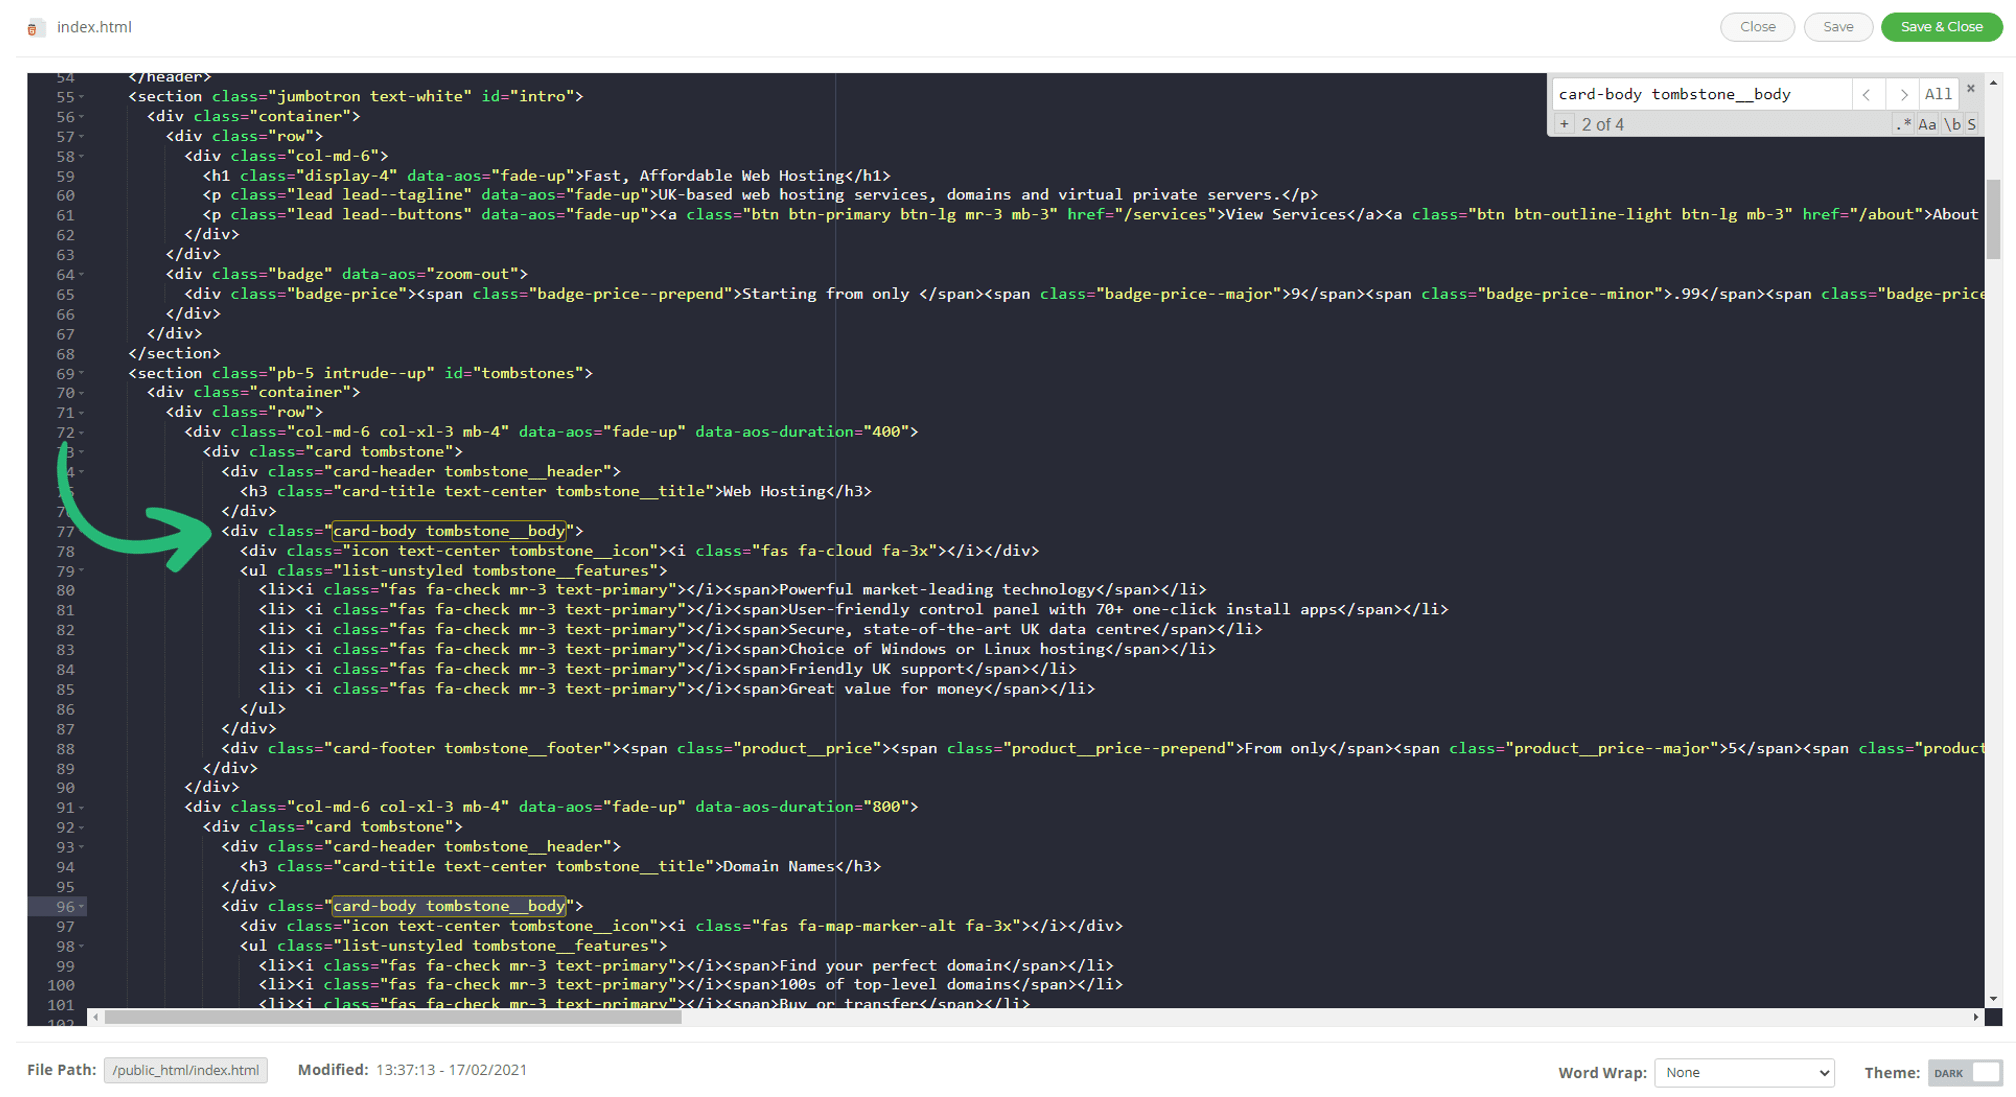
To edit your chosen template, connect via either File Manager or FTP. To change any information on the front page of a template, head to the public_html directory and edit the index.html. All other directories you see will relate to the different pages of the presales template.
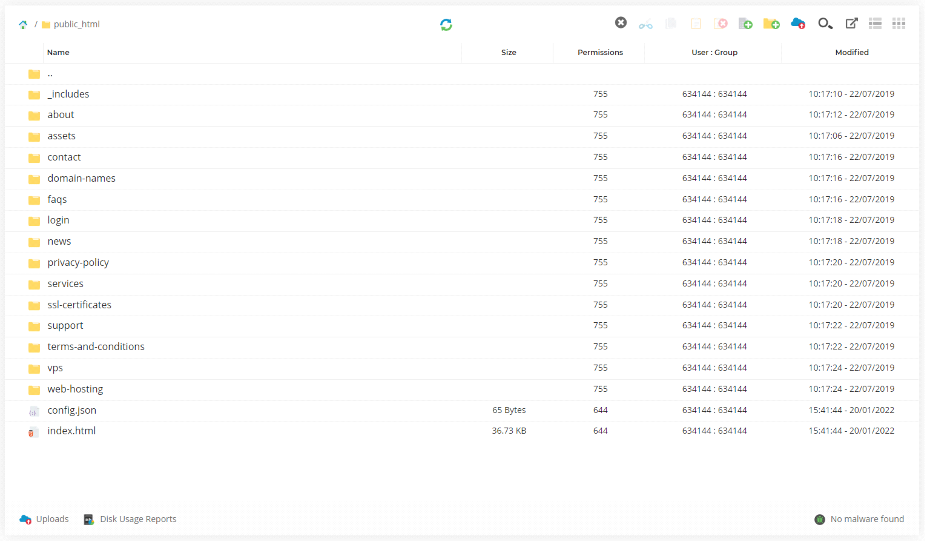
For example, if you wanted to edit the Web Hosting panel, you’d want to locate the following div class within the index.html file in public_html:
div class="card-body tombstone__body"
Within this div class, you can update the details that show in the Web Hosting panel.
If you need further assistance, we’d recommend contacting a web developer or using a CMS such as WordPress to create a sales site.
 Dominic Elford
What are the product description variables in HostShop?
When creating a Product for your HostShop setup and adding a description, you’ll note that there are some variables you can add. These list the limitations and features that are - and are not - available for that package type, dynamically.
Complete List of Product Description Limit Variables
This information pulls directly from your set package type limits. So, if you set up a package type to have the Malware Scanner available and have mailboxes up to 10GB in size, these variables will display these values accordingly. It means that you don't have to copy them across for every one of your Products manually.
These will need to have double curly brackets around them, and start with the tag ‘limits.’, for example:
{{ limits.display.mailboxes }}
{{ limits.malwareScan }}
You can also use an if statement with the variable to check if it’s true and take action as necessary. For example, if we wanted to check if the Web Builder is available for a package and then display something accordingly, you can use:
{% if limits.webBuilder %}
Here's a full list of the available variables for package limits:
- accessErrorLogs
- accountSummary
- addFreeWeb
- additionalFtpUsers
- allFutureOneClick
- allowExternalSsl
- appManager
- autoDiagnostics
- awstats
- backups
- bandwidth
- blockVisitors
- canSetEmailQuota
- canSetQuotaNotification
- cdnCaching
- cdnOptimisation
- cdnSecurityHeaders
- cdnStatistics
- changeParent
- contacts
- customDocRoot
- customPrimaryDocRoot
- directoryIndexing
- dkimSignatures
- dns
- dnsSec
- domainContacts
- domainPrivacy
- domains
- emailSummary
- fileManager
- filePermissions
- freeSsl
- ftp
- googleTranslate
- highEmailNotification
- hotlinkProtection
- htaccessErrors
- imapSync
- lock
- lowEmailNotification
- mailAutoresponders
- mailboxes
- mailCatchAllForwarders
- mailDistributionLists
- mailForwarders
- mailJunkFilterLogs
- mailJunkFilters
- maintenanceMode
- malwareReport
- malwareScan
- manageAppPool
- manageWpAdminUsers
- manageWpChecksumReport
- manageWpDatabase
- manageWpPlugins
- manageWpSearchReplace
- manageWpSiteSettings
- manageWpStaging
- manageWpThemes
- manageWpUpdates
- manageWpUsers
- maxMailboxSize
- mssqlDatabases
- mysqlDatabases
- names
- nameserverCheck
- nameservers
- passwordProtectedDirectories
- phpConfig
- phpMyAdmin
- platformReinstall
- primaryFtpUnlock
- pushTransfer
- remoteMysql
- scheduledTasks
- sitemapGenerator
- ssh
- stackUsers
- statsBandwidth
- statsDisk
- subdomains
- switchPhpVersion
- temporaryURL
- timelineBackups
- usageormation
- webalizer
- webBuilder
- webForward
- webmail
- webRedirect
- webspace
- whois
- wpAdmin
The following relate to the one-click installs available, and would only be usable on package types based on our Linux hosting platform.
limits.apps
'limits.apps' is how you'd get those apps, so rather than {{ limits.AppName }} it's {{ limits.apps.AppName }}
- abantecart
- agoracart
- b2evolution
- backdrop
- bamboo
- buddypress
- cachet
- cakephp
- cmsmadesimple
- concrete5
- coppermine
- craftcms
- cubecart
- dolphin
- dotproject
- dolibarr
- drupal
- e107
- elgg
- expressionengine
- fengoffice
- flarum
- fluxbb
- formalms
- formtools
- freshrss
- geeklog
- gibbon
- gnusocial
- helpcenterlive
- invoiceninja
- invoiceplane
- joomla
- kanboard
- laravel
- limesurvey
- magento
- mambocms
- mantisbt
- matomo
- mediawiki
- modx
- moodle
- mybb
- nucleus
- opencart
- openwebanalytics
- oscommerce
- oscomphoenix
- osticket
- phpbb
- phpcoin
- phpformgenerator
- phpfreechat
- phpfusion
- phplist
- phpmailer
- phpmyfaq
- phpnuke
- phproject
- phprojekt
- piwigo
- prestashop
- processwire
- reviveadserver
- roundcube
- salessyntax
- serendipity
- silverstripecms
- simplemachinesforum
- slim
- snipeit
- squirrelmail
- suitecrm
- tcexam
- textpattern
- troubleticketexpress
- typo3
- vtiger
- webcalendar
- wordpress
- xerte
- zencart
- zenphoto
Why won't my VAT number validate within HostShop?
We use the automated VIES VAT number validation system to automatically verify VAT numbers entered in to our system.
We recommend verifying that the company name registered with the European Commission matches your 20i account exactly. You can do that by comparing the differences:
- Enter your VAT number online at http://ec.europa.eu/taxation_customs/vies/ - without spaces - and note the "Name" field.
- Check your company name through My20i at Contact Details. If you have a different Trading Name set, this will be used for comparison.
While case sensitivity doesn't matter, minor differences do. For example, "Ltd" vs "Limited" would cause a verification failure.
If you're unable to verify the number online, it will be the same for our automatic system so in most instances it's just a case of trying again later.
If you see !! or || when checking your VAT number against VIES you can safely omit anything after those characters when entering your company number into the contact details section at 20i, this will still pass their validation checks.
 Austin B.
How do I change the currency in HostShop?
In HostShop you can change to your local currency. We currently support over 20 currencies, but please let us know if you need yours added.
To do this:
- Log in to My20i
- Head to HostShop on the side navigation.
- Select Payments and then Currencies
From here, you can select your main currency from the dropdown menu, then select Save Currency.
You can also select Additional Currencies that are available for your customers' use by selecting the corresponding currencies using the checkboxes and then select Save Currency Options.
 Dominic Elford
Setting Up Managed Cloud Hosting In HostShop
Before starting, you’ll need to ensure that you have one of the following Payment Gateways configured and enabled:
- Stripe
- Sage Pay
- Square
- Verifone (2Checkout)
Open up the Cloud Servers page and enable the sale of Cloud Servers using the toggle switch in the top-right corner.
You’ll see a list of our current cloud server providers, which at present are 20iCloud, AWS, Google Cloud Platform, and your own custom-branded cloud server based on the 20iCloud platform.

Next to each server provider you can edit the instance pricing, the available regions, and whether or not servers from that provider are available for purchase by your clients.
Edit Instance Pricing
After opening the instance pricing window for a server provider, you’ll be able to edit the pricing for each server specification available within each region.
For example, with the 20iCloud provider, you can edit the pricing of the Micro, Small, Medium, and Large servers (among others) and this can be set per region, which in this case would be the UK and USA regions.
An example of this is shown in the image below.
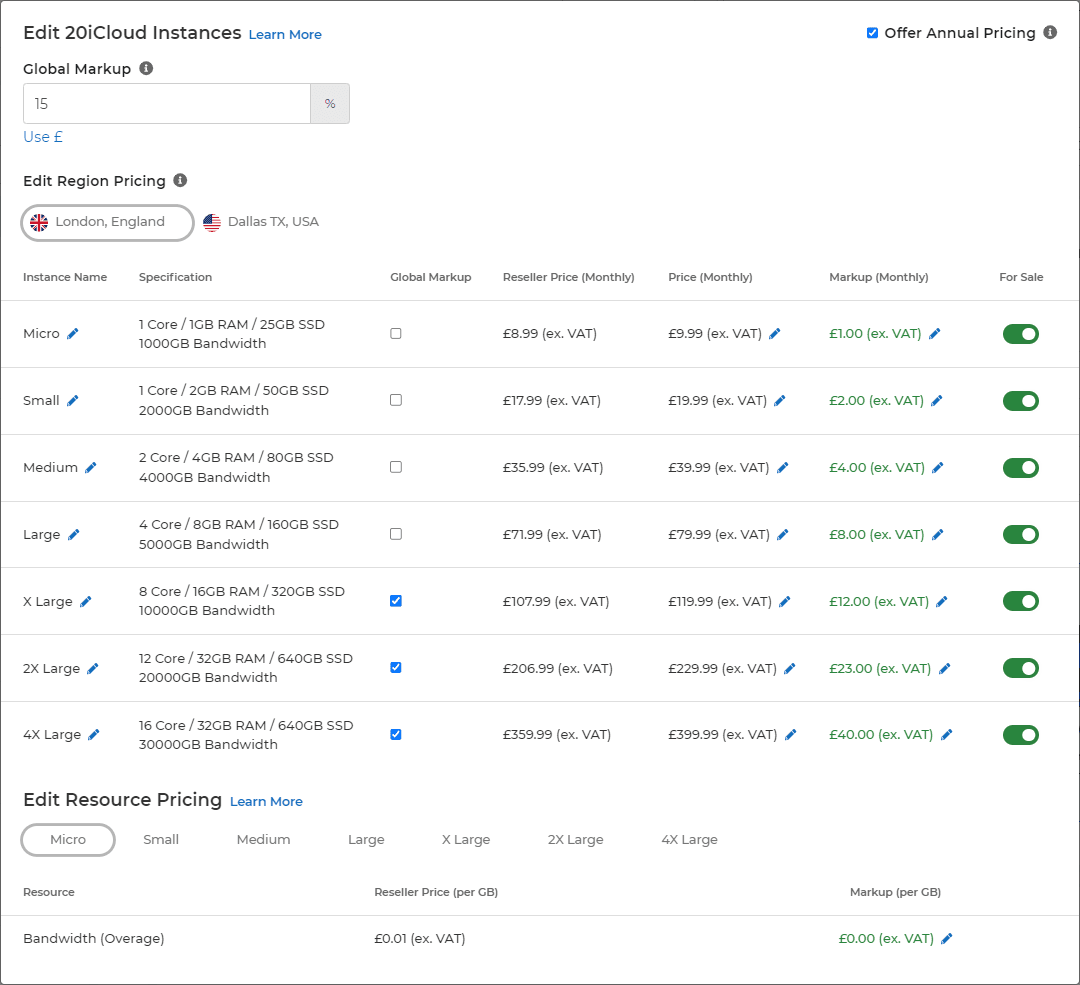
Here, we’ve set the global markup rate to 15%, meaning the price at which your clients will be buying the servers is 15% higher than the price you’ll be paying for them.
Please note that we’ve only selected for 3 of our servers to use the global markup rate in this case. The other servers will use the price that’s been set next to the server itself. For example, the Small server would be £19.99 in this case, which is a £2 markup over the original Reseller price.
At the bottom of this window, you can also set the cost of any additional bandwidth usage and disk space, if applicable to the server provider in question.
The last thing to note is that we’ve enabled Annual Pricing in the top-right corner, which allows your clients to pay for 12 months up-front in full. The annual price is simply the monthly price multiplied by 12.
Edit Regions
Here you can select the regions to make available for a particular cloud server provider. The available regions are different for each provider.

Cloud Server Optimisations
Below the Server Configuration section, you will find the Server Optimisations section. From here you can choose which optimisations you would like to make available for purchase.
The current optimisation options include:
- PHP
- WordPress with Redis
- Magento with ElasticSearch
- WooCommerce with Redis & ElasticSearch
- Laravel with NGINX
- Joomla! with Redis
- .NET Core
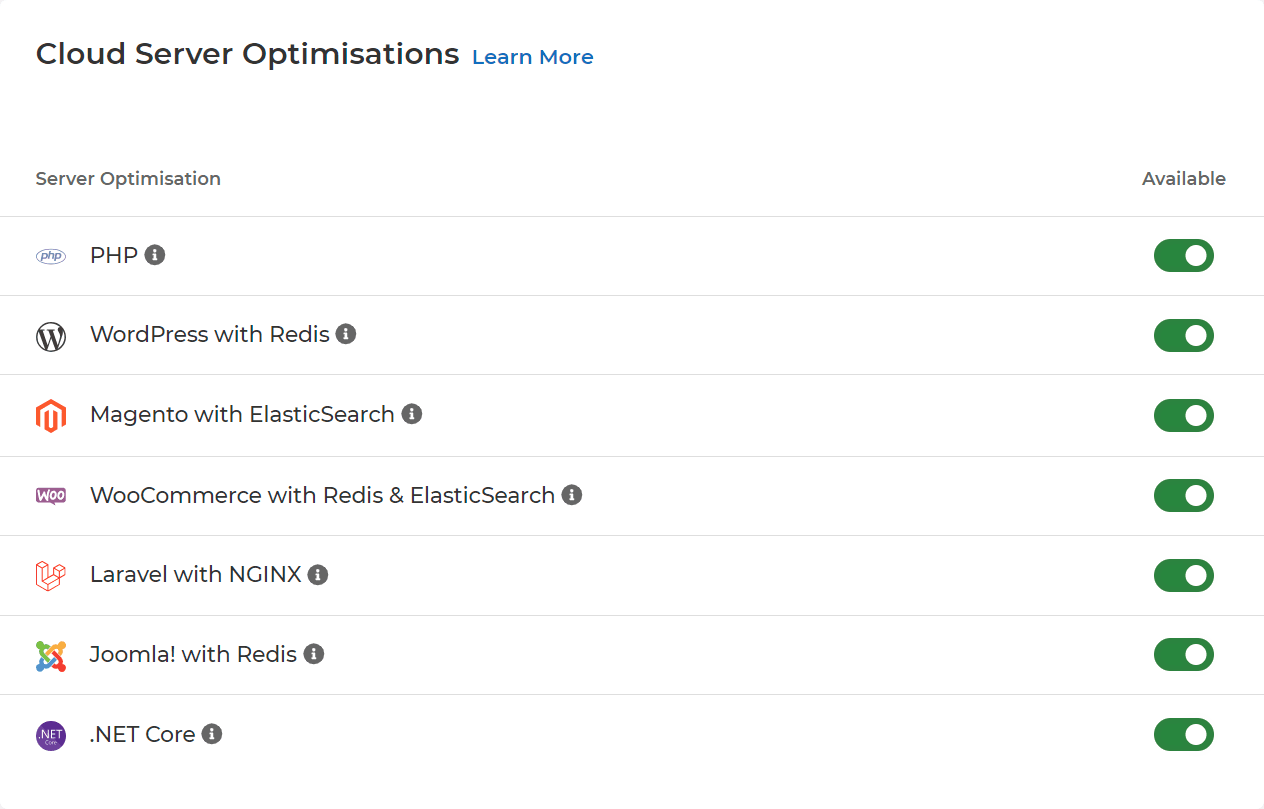
Cloud Server Addons
The final section allows you to enable and configure pricing for the server add-ons, which currently includes the Timeline Backups Pro service. The price can be set as a percentage-based markup over the wholesale Reseller price.
 Joshua Rosato
Understanding & Managing HostShop Invoice States
In this guide we’ll look at the various HostShop invoice states and how to manage them effectively. We’ll also go into how to handle chargebacks, refunds, and invoices marked as “Possible Abuse”.
Unpaid
An invoice will have the status “Unpaid” if no attempt has yet been made to pay it.
Possible Abuse
An invoice may be marked as “Possible Abuse” immediately after being paid if the client is using details that are known to be suspicious. One such example is the use of temporary email domains. The invoice will be moved to the Pending Orders page and require an Abuse Check. Clicking “Resolve Abuse” will change the invoice status to “Paid”.
Paid
An invoice will have the status “Paid” when the payment has been received and the services are ready to be provisioned.
Handling Chargebacks
A paid invoice can be marked as charged back by clicking “Mark Charged Back” if the client has created a chargeback at their bank. This will change the invoice status to “Outstanding Debt”.
The debt status can be manually removed by clicking “Remove Charge Back” once the issue has been resolved; the invoice status will automatically revert to “Paid”.
Bank Transfers and Manual Payments
When using Bank Transfer or manual payments, you can manually mark an invoice as “Awaiting Payment” once the client has informed you that the payment has been made.
This can be used as a reminder to check back in 5-7 working days to ensure the payment is correctly processed and received.
Mark Settled
Payment should be marked as “Settled” once the client has paid the full amount and the service is ready to be provisioned. Marking an invoice as settled will also change its state to “Paid”. This cannot be undone.
Provision Services
In some cases, the services linked to an invoice are not provisioned until the “Provision Services” option is clicked. This action is irreversible. Provisioning an invoice does not change its payment status.
Marking an Invoice as Complete
An invoice should be marked as Complete once the payment is settled and the services have been provisioned. This marks the end of the invoice’s lifecycle.
Refunding An Invoice
An invoice can be refunded by clicking “Refund”. You can choose to refund all or part of the total amount. This will then generate a separate refund invoice.
Note: No refund will be attempted at the payment gateway. All refunds are manual and will require you to manually refund the payment back to your customer.
 Joshua Rosato
Managing HostShop Failed Orders
Why Do Orders Fail?
Insufficient Funds:
- If your My20i account balance is too low when a customer purchases, renews, or transfers a domain, the order will fail.
- HostShop requires adequate funds in your My20i account to process all orders automatically.
Provisioning Issues:
- Sometimes, orders fail due to errors in the provisioning process. For example, a domain might not activate if it hasn’t been successfully purchased in your Reseller account.
How to Manage Failed Orders
Add Funds to Your Account:
- Navigate to your My20i account balance page: Add Funds.
- Use the auto-top-up feature to ensure your account automatically refills when the balance drops below a certain amount. We recommend setting this amount slightly above the cost of your highest-priced product.
Reprocess Orders:
- After adding funds, visit the "Failed Orders" section in HostShop.
- Locate the failed orders (e.g., domain purchases, renewals, or transfers) and select the option to reprocess them. This will attempt to provision the orders again.
Check Invoices:
- For failed renewals or transfers, review the invoice associated with the order. You can often manually provision the invoice directly from the invoice page.
Best Practices
Enable Auto-Top-Up:
- Prevent failed orders by ensuring your account balance never runs low.
Monitor High-Cost Items:
- Set your auto-top-up threshold above the cost of your most expensive product to cover unexpected purchases.
- By managing your account balance and reprocessing orders through the "Failed Orders" queue, you can maintain smooth operations and avoid disruptions for your customers.
 Austin B.
How do I add a product image in HostShop?
One of the new features introduced in HostShop 3 is the ability to add images to your products. Adding images not only enhances the visual appeal of your HostShop store but also helps convey more information about the products you offer, making it easier for customers to understand and engage with your offerings. Whether it's a logo, or a promotional banner, visuals can create a more professional and trustworthy storefront—helping you stand out and drive more interest in your services.
The following steps outline how to add a product image to your Hostshop product:
1. Head to the Product Catalogue page
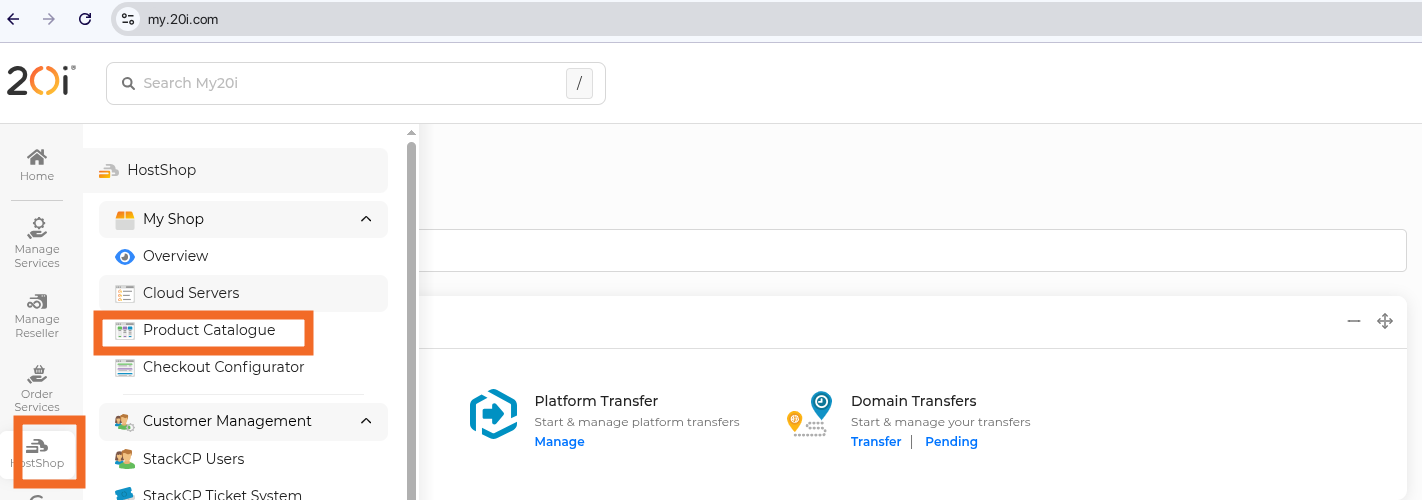
2. On the Product Catalogue page, you would have a list of all your products organized by category. Click the Edit Icon beside the product you want to add an image to

3. You should now be on the Product Details page. To the left, you will be able to see the upload Image Icon. Click on it to bring up the Image Picker on your device

4. After selecting the image from your device the Upload image icon should show a preview of the newly added image. You will now be prompted to Save the changes on the bottom right of the page. Click on the Save Changes button to finalize these changes
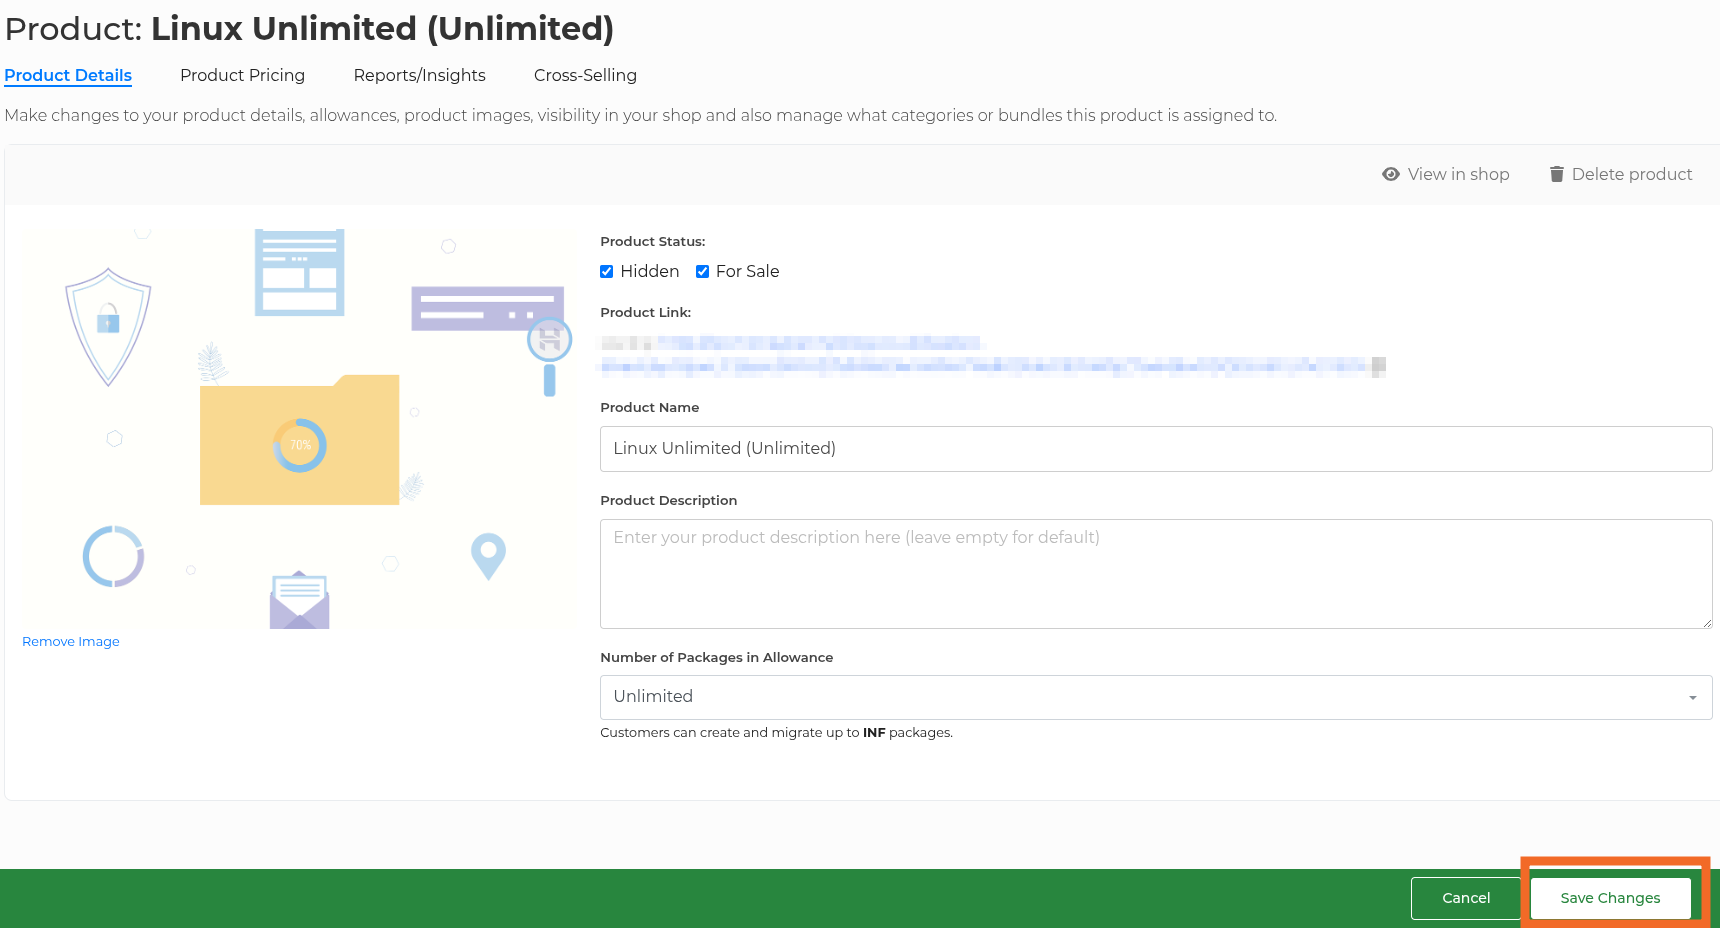
5. A message on the top right will confirm that your changes have been saved.

At this point, your product will now have an image added to your HostShop store
If you run into any issues with any of these steps, please feel free to reach out to our support team, who will be more than happy to deal with any queries you may have.
 Joshua Miner
