
How do I set up Automatic Timeline Backups?

With our Timeline Backups product, automatic snapshots of your website files and databases are taken on a daily basis, and can be restored at any point.
You don't have to take any action to configure this service. Once activated, we include all of your website files and databases as standard. To view any of the previous snapshots taken, you should visit the Timeline Backups Manager page in My20i, click Manage Cog next to the package you are interested in and choose Restore. This will load a calendar of your available snapshots to restore from.
From the Restore page you can:
Select Snapshot
This option allows you to view and restore any of the previous snapshots for your services for that day selected within the calendar view.
The Snapshot Time dropdown shows the date and time of all previous snapshots we've taken. If you want to go ahead with a restore, select the snapshot time, choose the target and how you'd like the data to be restored and click 'Restore'.
Target Package
This option allows you to select a target package for your packages snapshot to be restored to.
From the Hosting Package Management page, you can:
Snapshot
This option allows you to run an 'on-demand' snapshot of the particular service. This is a manual task which you do as well as the daily snapshots that are taken automatically. Once completed, you can go to Restore and you will see the snapshot that has just been taken.
Note: the Snapshot takes a backup of all domains and subdomains on a given package.
Previous Actions
This section shows all previous 'manual' tasks against that snapshot. This does not include the automatic, daily snapshots.
Restore Individual Files
To restore individual files:
- Head to File Manager and locate the file you want to restore a previous version of.
- Right-click on the file and select View File History.
- Find the date/time you want to restore from and select Restore.
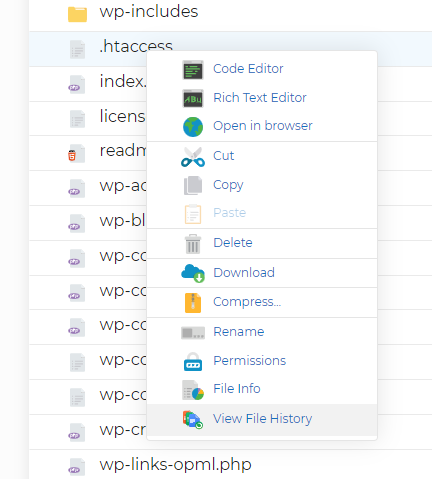
The individual file will be restored, leaving all other files the same.
Restore Individual Folders
To restore individual folders:
- Head to File Manager and locate the folder you want to restore a previous version of.
- Right-click on the folder and select View Folder History.
- Find the date/time you want to restore from and select Restore.
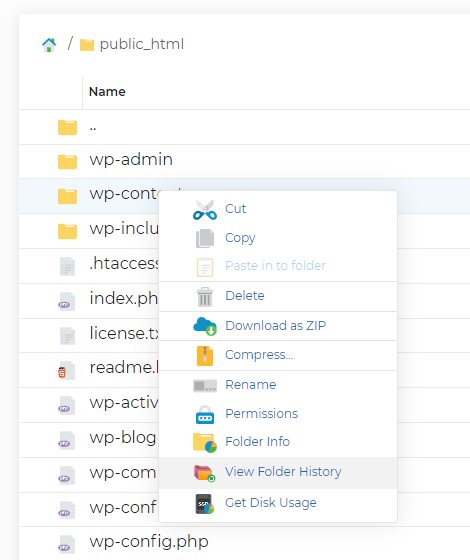
The folder and its contents will be restored.