Reseller Hosting – Other Questions
Reseller Hosting other support: this is where you'll find our more miscellaneous Reseller Hosting articles. Don't forget to use our search tool!
How do I create and send welcome emails?
As a 20i hosting reseller, there are two types of welcome emails that can be sent to your customers:
- Package Welcome Emails - when they are assigned a hosting package
- StackCP User Welcome Emails - when they are given access to StackCP
Firstly, you’ll need to create the templates that will be used. To do this:
- Head to Email Templates from the My20i homepage.
- Select Create New and choose your Template Type. In this example we’ll be setting up a Package Welcome Email.
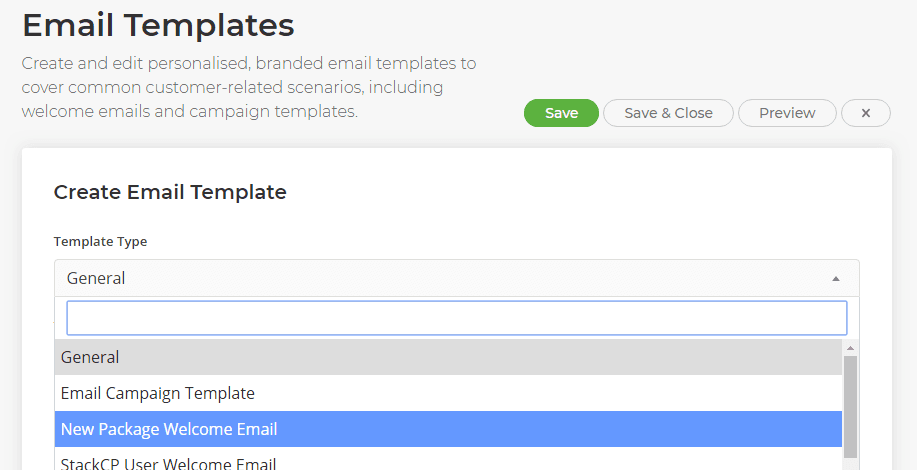
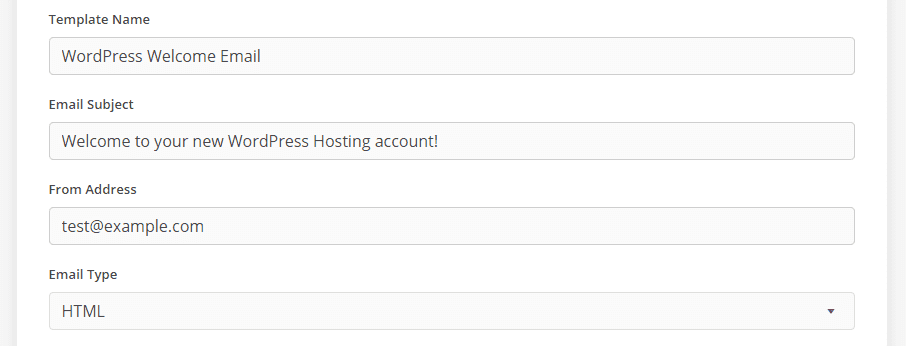
- Give your template a name so you can identify it. For example, ‘WordPress Welcome Email’.
- Enter the email subject that will appear when your customer receives the email, for example ‘Welcome to your new WordPress Hosting account!’
- We’d recommend leaving the email type as HTML, but you can also use plain text if you wish.
- Select Load Default Template and you’ll be given a full example of a welcome email.
- Should you wish to edit the default template, you can use the email tags to include additional dynamic content to your email.
- You can select Preview to view your email template before saving.
- Select which hosting package types you would like to utilise this template. You can select multiple hosting pack types.
- Finally, select Save & Close.
This process can be used for any kind of email, such as newsletters.
You can send a welcome email when you create a hosting package.
When you select Add Hosting from the Manage Hosting section, you can assign a StackCP user to the hosting package. Doing so will then send the email address associated with that StackCP user the welcome email for the hosting package type that’s been chosen.
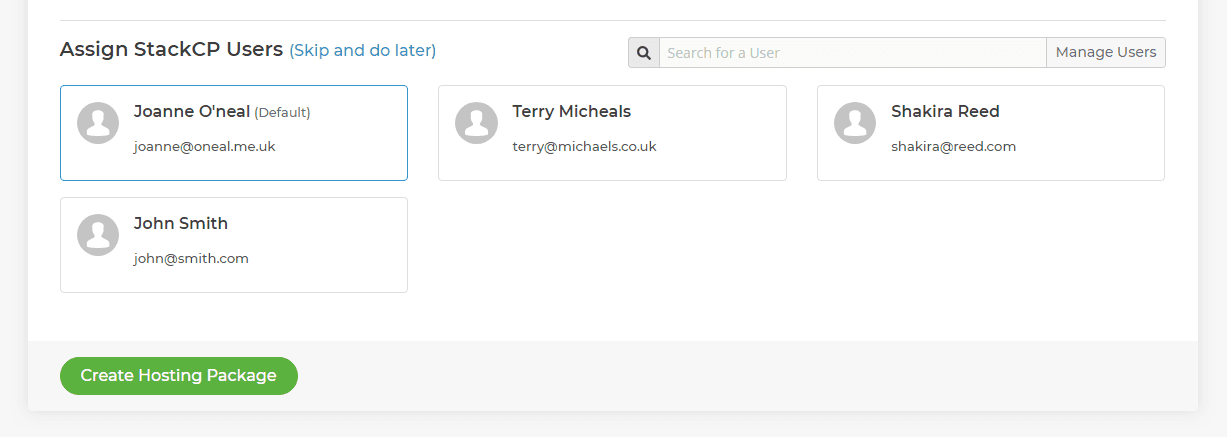
To resend a welcome email, simply locate the hosting package from Manage Hosting, then select Options > Resend Welcome Email. You can then choose the StackCP user to send the welcome email to.
 Austin B.
How do I use the 20i Maintenance Mode tool?
When developing a site you may want to put up a maintenance page. You can use the 20i Maintenance Mode tool to do that. The maintenance page can be bypassed using a password, so only selected users can view the progress of the website's development. The tool is accessed directly from your My20i account.
To use the tool:
- Head to Manage Hosting > Options > Manage
- Select Maintenance Mode
Here you'll have two options: Configure (all domains) & Configure. If you want to set up Maintenance Mode for individual domains on the package, select Configure next to the domain in question. Choose Configure (all domains) to put all domains on the package behind a maintenance page.
Note: You can set your default maintenance page and maintenance login page templates via Default Website Pages.
To configure the maintenance page:
- Select Configure and check Enable Maintenance Mode
- You'll need to set a password to allow selected users to authenticate and bypass the maintenance page
- We'll set a default theme for your maintenance page, but you can configure your own by selecting Customise Page Templates
- Once done, select Save
Your selected domains will now be behind a maintenance page and visitors will be prompted for a password to view the site.
Note: If a wrong password is entered, you'll be redirected to the Maintenance Page template. To view the password field again you'll need to re-visit the URL. Once you've logged in, your session will be saved for one hour before automatically ending. At that point you'll need to reauthenticate with the password.
 Austin B.
Domain status clientHold: meaning and troubleshooting
When checking WHOIS for a domain, one of the entries that will show is the Domain Status.
This is a brief summary of the current state of the domain and will change based on what the registry is currently doing with it. Usually these are rather self-explanatory: for example, a domain status of ‘ok’ simply means the domain is working correctly.
Some, however, are unclear at a first glance but can be rather important to be aware of.
What does the Domain status clientHold mean?
One such status is clientHold. In this status, the domain registrar has put a hold on the domain until the current owner of the domain takes action that they require.
During this hold, the domain may stop resolving any DNS until the verification has passed.
This will result in any emails not arriving at the domain, as well as the sites on it becoming inaccessible. As such, it’s important that you work to clear this status as soon as possible.
The action required to clear the status can differ depending on the context, however a few common requirements are as follows.
How to resolve the clientHold status:
Contact Verification
Whenever a new domain is registered or the contact details on an existing domain are modified, the domain will be put into clientHold while the registrar verifies the new details. This verification process usually involves accepting an email sent to the Admin contact email of your domain.
Once accepted and the steps in the verification link are followed, the status should be lifted, and the domain will come back online within a few minutes.
Expired Domain
Occasionally, upon a domain date passing its expiry date without being renewed, the domain will be placed into clientHold to suspend it until payment is made.
If your domain is in clientHold, check the expiry date. If it’s due for renewal, the best course of action would be to renew it with your current registrar as soon as possible. The renewal should bring the domain back online once complete.
Compliance Issues
In rare cases, the registrar may suspend or place a domain in clientHold due to the contents of the site on the domain, or the domain name itself, not following the terms set by the registrar.
In situations such as this, it’s best to reach out to your registrar directly. Confirm why the domain has been put on hold, and the necessary steps you need to take in order to clear the status.
In most situations, the best step on seeing the clientHold status placed on your domain would be to reach out to your current domain provider and confirm why it’s been placed on hold. Once this is known and the necessary steps are followed, your domain will be brought back online by the registry and DNS should begin resolving as normal.
 Reudiger Dalchow
What happens if I exceed my US Reseller Hosting Tier limits?
Our US Reseller Hosting is available in three different tiers - Reseller 25, Reseller 100 or Reseller Unlimited. Reseller 25 and Reseller 100 are subject to usage limits.
We reommend to compare all features and the pricing for our reseller hosting plans before getting started. If your requirements change you can upgrade or downgrade your plan to meet your hosting business needs.
What happens if I exceed my Disk Space limits?
Reseller 25 has a disk space limit of 30GB, and Reseller 100 has 150GB capacity. Reseller Unlimited remains truly Unlimited.
If you go over your account's allocated disk space usage, you'll receive a daily warning email for 6 days that prompt you to either upgrade or reduce the amount of disk space being used. If the account is still over quota on the 7th day, then the account will be restricted. You'll then need to upgrade or contact support for further help. If you can reduce disk space to under your account quota you won't get any further emails and your account will be unrestricted.
What happens if I need more mailboxes?
The Reseller 25 tier has a limit of 50 email accounts - once the limit is met, it will not be possible to provision another mailbox until either an existing mailbox is removed, or the Reseller Hosting account is upgraded to the next tier.
Reseller 100 includes 500 email accounts and Reseller Unlimited includes unlimited mailboxes.
All mailboxes included in out plans have a 10GB storage. If you or any of your web hosting customers need more storage, you can order more storage at any time.
Are there any limits on the number of StackCP users?
There are no limits on the number of StackCP users that can be created on any of the Reseller Hosting plans.
Is it possible to oversell my tier limits?
Yes, overselling is possible. A StackCP User can be allowed to add unlimited disk space, an upgrade would be required by the Reseller if their total disk space, emails accounts, or number of accounts is hit.
 Chris Wright
How do I allow clients access to StackCP?
As a Reseller, you may want to give your clients access to StackCP.
They can use StackCP to carry out many site management tasks themselves - without needing to bother you with support requests - so it's definitely worth doing! It also lets them use the HostShop store to upgrade their services.
To do this you need to create StackCP users:
- Log in to My20i
- Under Customer Management select StackCP Users

- If you don't already have a StackCP User created select Add StackCP User and enter your client(s) credentials.

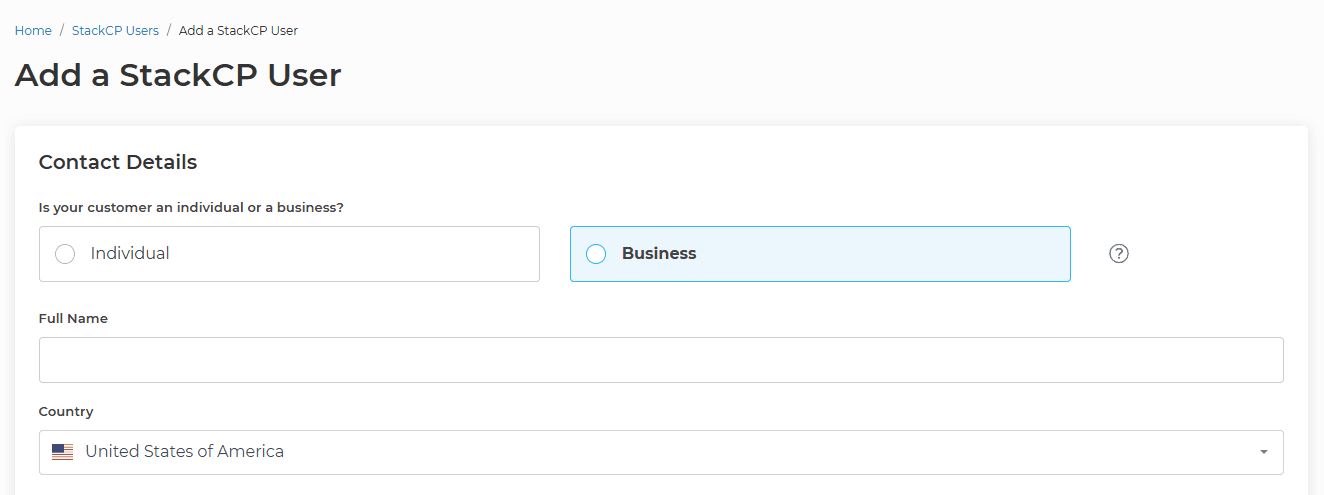
- Then select Add StackCP User.
- You'll be taken back to the StackCP Users list. The user will have been assigned a password - change this if you want.
- To assign the StackCP user to a Hosting Package and give them Domain Access, hover over Options and select Edit

- Select the Package you'd like to give them access to, along with access to the relevant domain, and select Save.
Your new StackCP user is now set up.
You can now email your client their StackCP login email address and password, they can then log into their control panel via https://stackcp.com or your customer login URL.
 Austin B.
How do I view the most recent backups taken by Timeline Backups?
Timeline Backups take an automatic daily backup of all your websites and databases and store them for 30 days.
If you have the Timeline Backups product you may want to view the most recent backups of your site.
To do this:
- Log in to My20i.com
- Head to Timeline Backups.
- Select Manage next to the package you'd like to view backups for.
- Select View Snapshots next to either the webspace snapshots or database snapshots that you're looking for.
After selecting View Snapshots you'll see the Snapshot Time drop-down, which will have all the snapshots from the previous 30 days.
 Austin B.
How do I set up Automatic Timeline Backups?
With our Timeline Backups product, automatic snapshots of your website files and databases are taken on a daily basis, and can be restored at any point.
You don't have to take any action to configure this service. Once activated, we include all of your website files and databases as standard. To view any of the previous snapshots taken, you should visit the Timeline Backups page in My20i, click Manage Snapshots next to the package you are interested in and choose Restore Snapshot next to the website or database you wish to view.
From the management page you can:
View Snapshots
This option allows you to view and restore any of the previous snapshots for your services.
The Snapshot Time dropdown shows the date and time of all previous snapshots we've taken. If you want to go ahead with a restore, select the snapshot time, choose the target and how you'd like the data to be restored and click 'Restore'.
Take Snapshot
This option allows you to run an 'on demand' snapshot of the particular service. This is a manual task which you do as well as the daily snapshots that are taken automatically. Once completed, you can go to Restore Snapshot and you will see the snapshot that has just been taken.
Note: the Snapshot takes a backup of all domains and subdomains on a given package.
View Previous Actions
This section shows all previous 'manual' tasks against that snapshot. This does not include the automatic, daily snapshots.
Restore Indvidual Files
To restore individual files:
- Head to File Manager and locate the file you want to restore a previous version of.
- Right-click on the file and select View File History.
- Find the date/time you want to restore from and select Restore.
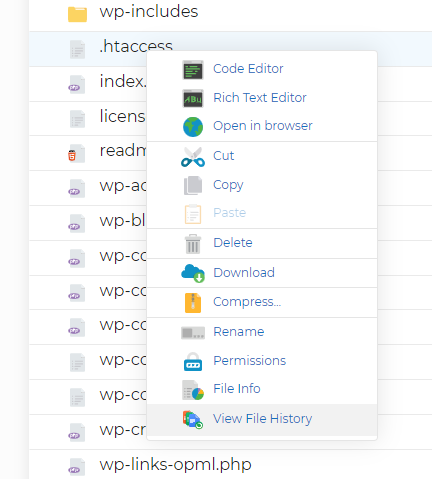
The individual file will be restored leaving all other files the same.
Restore Individual Folders
To restore individual folders:
- Head to File Manger and locate the folder you want to restore a previous version of.
- Right-click on the folder and select View Folder History.
- Find the date/time you want to restore from and select Restore.
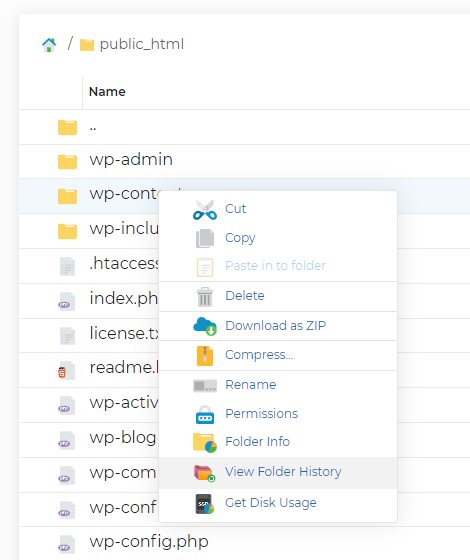
The folder and its contents will be restored.
 Lloyd Cobb