WordPress Support – Migrations Questions
Migration support articles: everything you need to know about migrating your website from another hosting company to 20i.
Error 500 after migrating a WordPress website using Wordfence
After migrating a WordPress website you may see a 500 error when testing the website. If you’re using the Wordfence plugin then chances are this is caused by an old path used within the files that will need to be updated.
To confirm if this is the issue, you can check the error logs on the package. You can do this by following these steps:
- Sign in to My20 and navigate to Manage Hosting > Options > Manage
- Select Access/Error Logs
If the issue is due to the path Wordfence is set to use then it will show an error similar to this:

This will display the path from your old host which will need to updated within the .user.ini in the website files.
Before we do that, you’ll need to get the path you need to replace it with. This can be retrieved when managing the hosting package under the Account information section on the right-hand side.
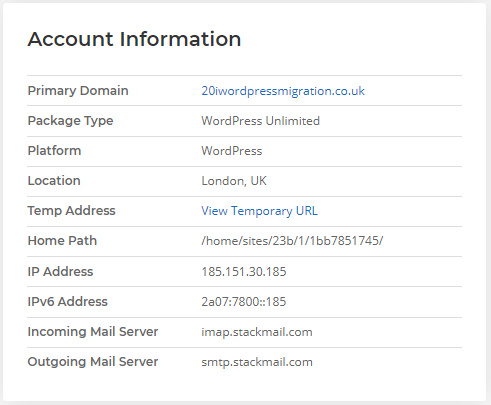
The home path will be the one needed and, in this example, it will be: /home/sites/23b/1/1bb7851745/
Next you will need to go to the file manager and locate the .user.ini which in most cases will be in the public_html folder - but this can depend on how the website is set up. Once you find the .user.ini file, edit it and it should look something like this:
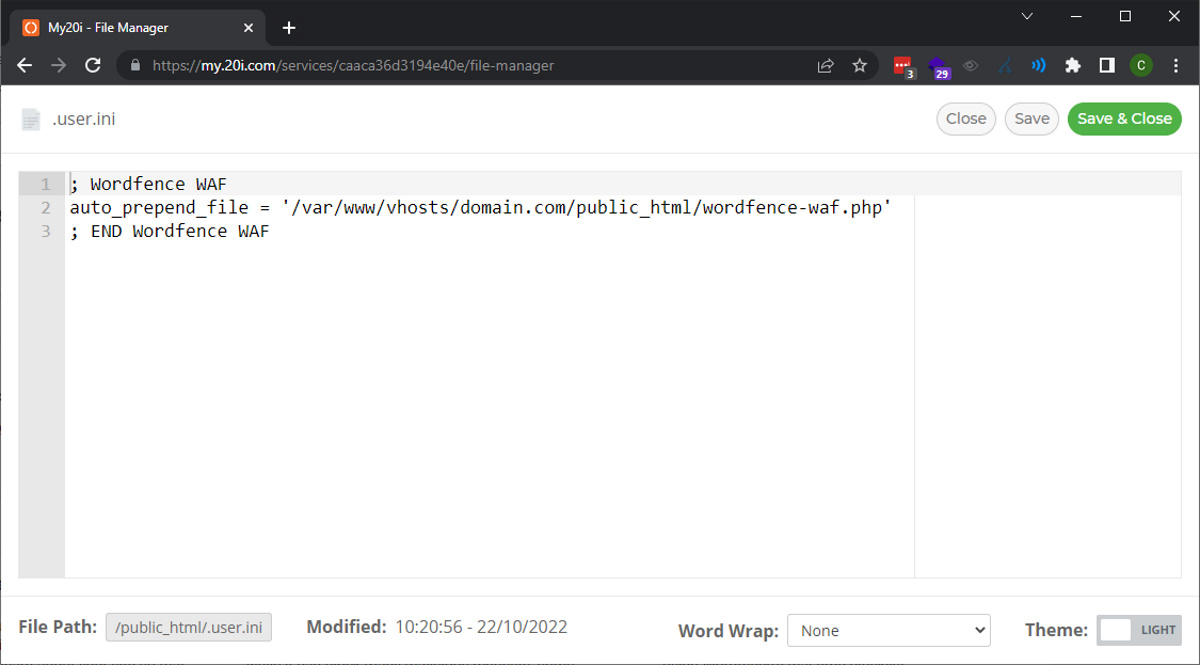
You’ll need to change the /var/www/vhosts/domain.com to the home path link, appended with /public_html/wordfence-waf.php
So in this example you’d need to change /var/www/vhosts/domain.com/public_html/wordfence-waf.php to /home/sites/23b/1/1bb7851745/public_html/wordfence-waf.php
The path will need to follow the same path where the wordfence-waf.php file is located which should be the same location as the .user.ini by default.
Save the changes to the file and test the website again. This should have resolved that error. If there’s an error still showing on the website, then it’s possible that there could be another problem. The error log should have more information about it.
If there are still problems, please contact our support team who will be able to help further.
 Reudiger Dalchow
How do I migrate a website manually?
20i provide an automatic 'one click' Migration Centre that supports migrations from the largest hosts and most popular control panels. This is available to all customers for no extra charge.
However, it's not always possible to migrate a website automatically. For these cases the process of a site migration has 3 key stages:
- downloading the data from the old provider
- importing the data into 20i
- updating the website configuration file
We've laid out the steps usually required for a manual site migration below.
1. Create the hosting package at 20i. This provisions the website to our platform, lets you access the site over the temporary URL, and ensures that you have FTP access.
2. Start downloading your website files from the old provider: make an FTP connection using your previous FTP account details, and download all files from the web space to your local computer.
3. Download your database. You'll need a backup of all databases the website is using. All major hosts will be running the phpMyAdmin management software that lets you import and export your databases via a website. The steps are:
- First, access phpMyAdmin (My20i > Manage Hosting > [select package] > phpMyAdmin)
- Click the database you wish to backup down the left-hand side
- Click the 'Export' tab at the top of your page
- Leave 'Quick' selected under Export Method
- Select your desired format: we recommend SQL for most cases
- Click 'Go'
4. Upload the files to 20i. To access 20i FTP before you change the nameservers or update DNS for your domain, you'll need the FTP hostname displayed in the 'Nameserver Check' section. This automatically appears for any domains not using our nameservers as the last section down the right-hand side when you're managing your hosting packages.
5. Create a database at 20i. You can do that via My20i > Manage Hosting > [select package] > MySQL Databases. Note down the hostname, database name/username and password for your new database as you'll need these details later.
6. Import your database backup to the newly-created database. Once again we recommend using phpMyAdmin for this purpose:
- My20i > Manage Hosting > [select package] > phpMyAdmin
- Automatically login to phpMyAdmin for each of your databases. Click the 'Import' tab at the top of your page.
- Browse your computer for the database export you have taken previously
- Select the format that matches the export: this will be SQL for most cases
- Click 'Go'
If the import fails, you may wish to try again with 'Enable foreign key checks' unchecked.
7. Update the credentials in the website configuration file. The exact file you need to update depends on the software the website is running, but we've listed the most common configuration files below:
- WordPress: wp-config.php
- Joomla: configuration.php
- Drupal: sites/default/settings.php
- Magento: app/etc/local.xml
8. The website will now be fully functional on our platform. To test the website, we provide a Temporary URL that will be visible down the right-hand side of the control panel. For a more complete test, you can modify your hosts file, which allows you to override the domain name at your PC, so you can visit your domain at 20i while the rest of the internet still reaches the current website.
9. Time to go live! Once tested, you can change the nameservers of the domain and (optionally) transfer the domain in.
 Austin B.
How do I move my site to the WordPress platform?
You can move between all our Linux, WordPress and Windows Platforms using the Platform Transfer icon inside My20i.
To do a platform transfer:
- Login to My20i.
- Select the Platform Transfer icon from the homepage.
- Select the package you would like to transfer and then select the WordPress platform icon.
- Confirm the Hosting Package Type you want the package transferred to.
- Select Begin Transfer.
Note: Before performing a migration to the WordPress platform, please note the following requirements:
- WordPress must be installed in the website root. That is, the WordPress install sits inside the public_html folder.
- The WordPress install (including all plugins and themes) must be compatible with at least PHP 7.0, we currently support the latest version of PHP 8.1 across the platform
- The webspace must not contain any software or code that does not belong to WordPress
- Any subdomains or additional domains must be pointing to the same WordPress install and hence configured as a WordPress Network (Multisite)
A platform transfer will also cause the DNS records on our nameservers to be reset, to ensure the package points towards 20i services. You will need to reconfigure any external DNS records after the platform transfer completes.
 Austin B.
How do I migrate a WordPress site automatically?
Migrating a Wordpress website to 20i's scalable platform is quick and easy using our Migration Centre.
To Get Started:
- Log in to My20i
- Click on Migrations in the left navigation panel
- Click Start Migration
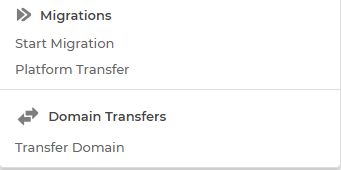
4. Choose WordPress from the list and click Next.
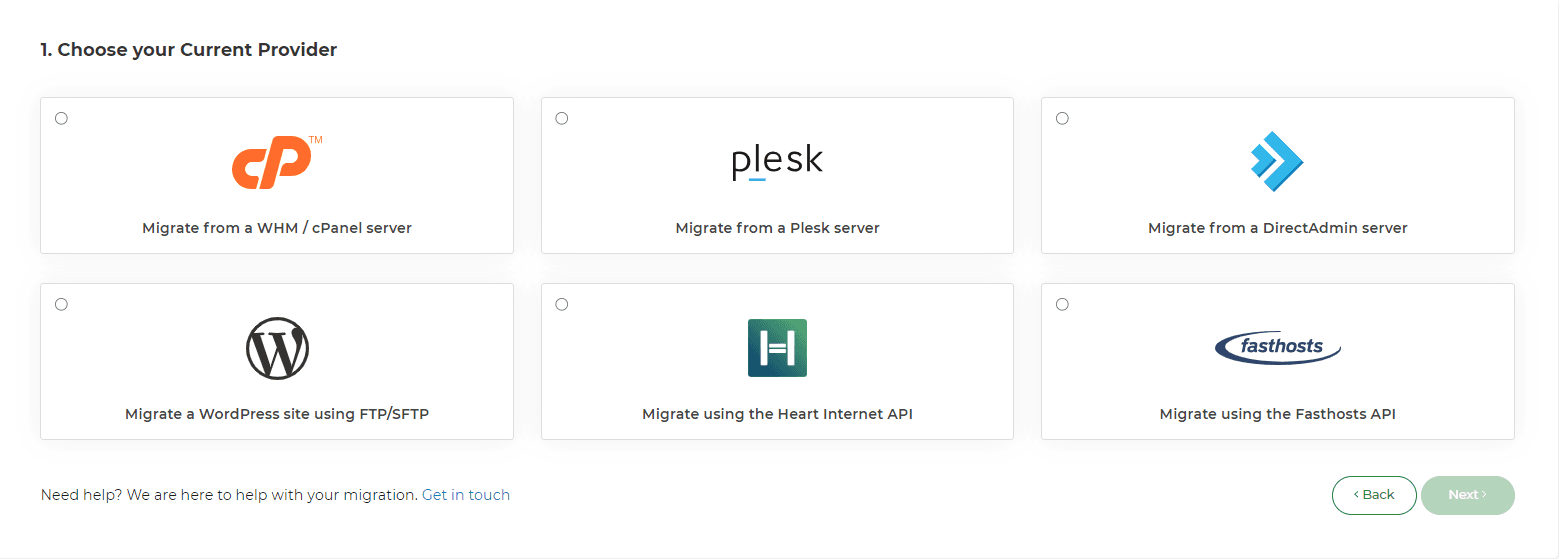
5. Enter the required credentials: hostname, domain, username and password for FTP, and click Next.
6. Go to Migrations Overview in My20i at any time to see the status of your migration. You’ll be notified when it’s successfully completed.

7. Once the migration status has been updated to 'Complete' you can head to Manage Hosting to view the website.
Note: This will only migrate the website to 20i. If you have emails to move as well, you can use our Email Migration tool once the migration has completed.
DNS Records
Note: The Migration Centre does not transfer DNS records.
By default, DNS records will be configured so that they point all services to 20i's services, such as mail and FTP. For example, if you are using Office365 or Gmail you'll want to remove our standard MX records and ensure the Office365/Gmail DNS records have been added before you continue, to avoid any interruption to your mail service.
After migrating your websites, databases, and email, the final step is to update your domain names. You can either transfer your domain name to 20i or leave it with its current registrar and simply point the name servers to your 20i hosting.
If you intend to use our free SSL certificates, the nameservers must be transferred to 20i as a security measure required by the certificate-issuing authority.
Transferring Domain Names
To transfer your own or your customers’ domain names to 20i, head to Transfer a Domain from the Migration Centre section of your 20i control panel. Enter the domain name(s) you want to transfer, confirm them, and then check out.
You can see the progress of your domain transfers from Migration Centre > Pending Domain Transfers. Please note that DNS propagation typically takes an hour but can take anywhere up to 24 hours as a global update is rolled out, so it may be a while before your domain resolves after the nameservers have been updated.
Updating Nameservers
If you’d prefer to update your nameservers with your current domain registrar (meaning you have your non-20i domain pointing to your 20i hosting) instead of transferring your domain to 20i, you will need to log in to your domain registrar’s control panel and update the nameservers to the following:
• ns1.stackdns.com • ns2.stackdns.com • ns3.stackdns.com • ns4.stackdns.com
If your registrar doesn’t support 4 nameservers, simply add as many as it will support. It can take up to 48 hours for nameserver changes to propagate across the web, but in the vast majority of cases, it will be completed much faster.
Congratulations, you’ve successfully migrated to 20i!
Important: You can never have too many backups! Before you delete any data with your old hosting company, please back it up on a separate physical device and/or have a copy in cloud storage. You can also download your data at any time via My20i, or purchase our Timeline Backups service for automatic daily backups.
 Austin B.
Why could my WordPress migration fail?
The following conditions should be met for the WordPress FTP migration tool to migrate a site. These conditions are usually met by default, unless you've made changes to your WordPress installation.
What to do if a WordPress migration has failed
If your migration fails, adjustments may need to be made to allow the migration tool to work correctly:
- The migration tool looks for the directory with the wp-config.php configuration file. If you’ve manually moved the wp-config.php file to another directory (sometimes done for security) then you’d need to move it to be with the rest of the core WordPress files.
- File and directory permissions should be consistent with WordPress best practice, i.e. directories set to 755 and files set to 644.
- Our IPs used for the FTP migration tool should not be blocked: 185.146.165.4 & 45.8.227.14. If you use a web application firewall (WAF) ensure these IPs are whitelisted.
- Ensure the website's domain name points to the correct web host. If the nameservers for the domain name don’t point to the right host then the migration will fail.
If you’re having trouble diagnosing what’s wrong, please feel free to contact support within your account from the support area.
 Austin B.