Web Hosting – Website Extras Questions
Web Builder Pro licence
After installing the web builder to a hosting package you may see a ‘Upgrade to PRO’ option when editing the website using the website builder.

You may also see a ‘License is not active yet’ message when visiting the website if you have set up a web builder package specifically.
This is expected when first installing the web builder. When a hosting package is created it’s allocated to our standard platform which doesn't have the correct licence installed. After you have installed web builder, it will automatically upgrade the hosting to move to a Kopage Pro Server which removes the upgrade message and gives you full access to the Pro licence.
Please be aware that the upgrade process can take up to 30 minutes to complete.
 Austin B.
How to use the Schema Generator
Our Schema Generator creates the full markup code in JSON-LD for you.
Unlike other schema generators that are available, ours lets you include markup for the entities that your content is about. This will help you build a content hierarchy by defining a parent page for your content.
We will walk you step by step through the use of the schema markup generator and how to add entities and site hierarchy to your schema code.
While the code might appear a bit complicated, that’s why we’ve come up with this generator. It will make it quick and easy for you to get complex structured data for your webpages.
As an example, here we use the schema markup for an FAQ page but everything we explain is easily transferable to the other applications.
Choose what schema you want to generate
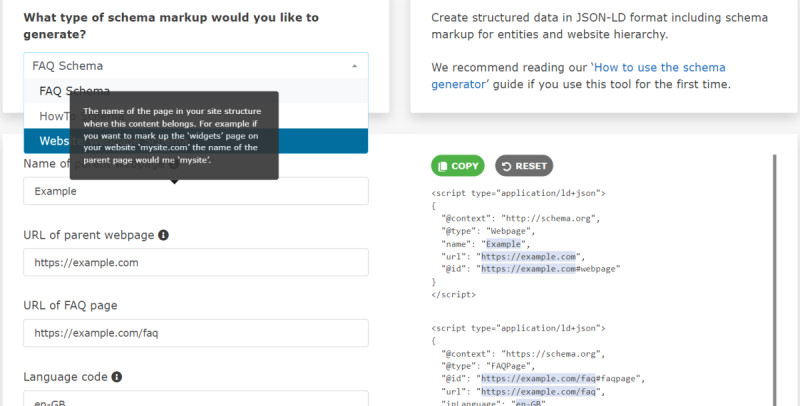
This is pretty self-explanatory and the same as with any other schema generator you might have used before. Just chose the kind of schema markup you want to create and click on it.

Define the hierarchy with schema for the parent page
One of the unique features of our generator is that we enable you to implement a clear hierarchy to your content by defining a parent page for each content page you mark up.
To learn more about why you should add a hierarchy structure to your website via schema markup, we recommend the article: Schema markup for your website hierarchy
First you have to put in the name of the webpage you want to define as the parent page and then the URL of this page in the second field.

Here the parent page is defined in the first code snippet and the defined page is already integrated in the main snippet of the schema code with "isPartOf": {"@id": "https://www.example.com#webpage"} to indicate that the main content is part of the defined parent page.
Basic input fields for FAQ schema
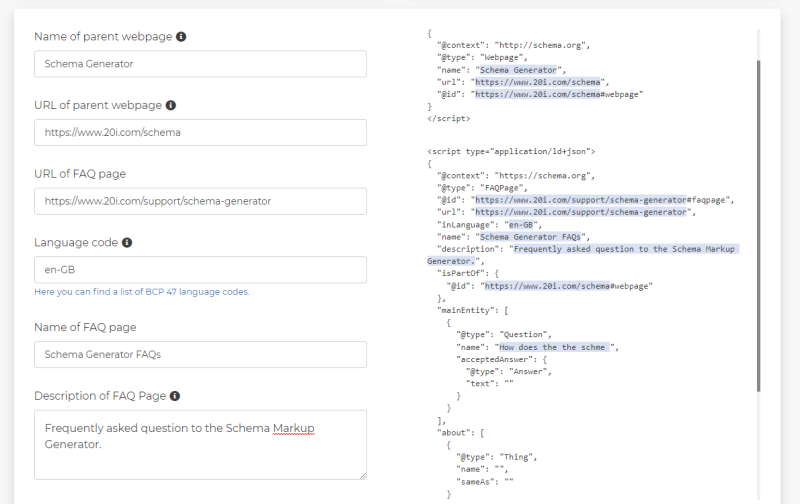
Input the base data for the FAQ page you want to mark up (use equivalent data if you apply this to any other page than a FAQ page).
All fields should be self-explanatory. Please make sure you use the correct language code. You can find a list of BCP 47 language codes under the input field if need some help to find the right language code.

Input your FAQ Question and Answers
This should need no long explanation as it is the same as with every other schema generator for FAQs. Just input the questions and answers for your FAQs. If you are marking up a HowTo page, then you input the steps the user should follow in your how to guide - simple as that.
20i Schema Generator for entities
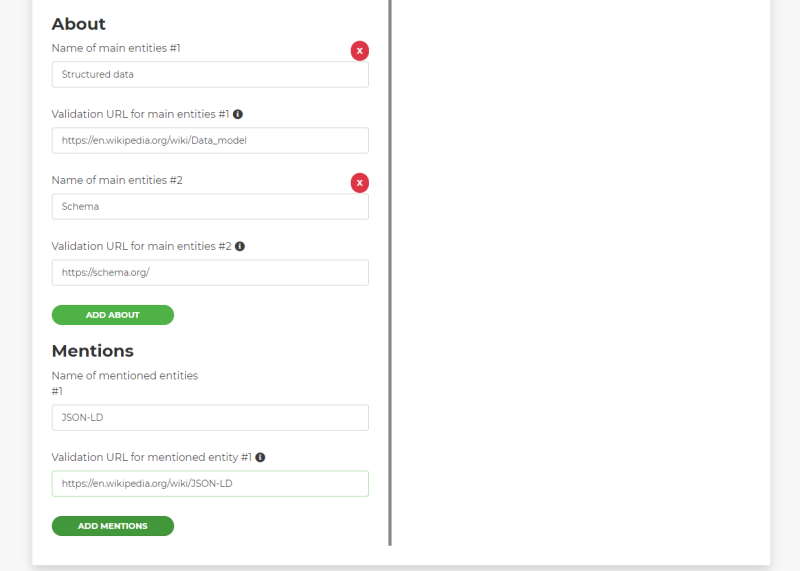
This is the second unique feature this Schema Generator offers you. You can use structured data to mark up the entities your content is regarding. The schema property "about" lets you clarify which the main entity of your content is and what high authority website (in a lot of cases this will be Wikipedia) validates the entity.
It is strongly recommended to use only the main focus entity for this markup.
With "mentions" you can go a bit wilder. As it says if you mention something in your content that has some relevance and is a recognised entity – put it in your structured data.

For more information about how this kind of entity is useful for your website, please read the article: FAQ schema markup – and the trick you didn’t know
Copy the generated schema code and validate it
The structured data will be generated on-the-fly as you input the variables. You can make changes at any time, and they will be transferred to the generated code.
Once you have all the information put in the fields you can use the green ‘copy’ button you find on top and at the end of the structured data field, to copy the whole code to your clipboard.
We recommend to always validate the code with either the Rich Results Test tool by Google or the validator tool by Schema.org.
Paste the code into you content page and validate again to make sure that everything is fine.
Where to put the schema code on you page?
There is always the question where to put the schema code? In the header, the footer or the html body?
Actually it doesn’t really matter. A lot of CMSs will provide a plugin or add-on to place schema code on your pages. But you can just paste the generated JSON-LD in the source code of your page. Just make sure it does not break up any other code and is easy to find.
I prefer to paste the schema code at the end of the header or the start of the html body.
The difference to other schema generators
There are other tools to generate structured data for you, true.
But this is the first that will let you define a hierarchical structure for your website and mark up the entities you focus on with schema code.
Both are essential when you want to improve you semantic SEO. With this tool you can clearly define the topic and building clusters that lead to the main pages you want the focus to be on.
Go to the Schema Generator.
 Reudiger Dalchow
How do I view the most recent backups taken by Timeline Backups?
Timeline Backups take an automatic daily backup of all your websites and databases and store them for 30 days.
If you have the Timeline Backups product you may want to view the most recent backups of your site.
To do this:
- Log in to My20i.com
- Head to Timeline Backups.
- Select Manage next to the package you'd like to view backups for.
- Select View Snapshots next to either the webspace snapshots or database snapshots that you're looking for.
After selecting View Snapshots you'll see the Snapshot Time drop-down, which will have all the snapshots from the previous 30 days.
 Austin B.
 Ben Gayson