WordPress Support – Common WordPress Errors Questions
Why do I get an Internal Server Error 500 and how to fix it?
A white screen or Internal Server Error (error 500) usually means a script used by your website is throwing an exception and/or fatal error. When this happens, it will be logged by our system and you can view recent errors inside the Access/Error Log of our control panel.
A '500 Internal Server Error' message on your site is frequently due to a mistake in the site file such as a .htaccess file or web.config file.
The first step in troubleshooting this is to check the Access/Error logs. To get these:
- Login to My20i
- Select the package that is showing the internal server error
- Select Access/Error Logs under the Logs and Stats section
You'll want to look at the ‘Error Logs’ section and see if you can see the file path where the issue is. For example, you may see:
[code]www.yourDomain.com [Tue Sep 05 09:49:41 2017] [alert] [client xx.xxx.xxx.xx:xxxxx] /home/sites/xx/x/xxxxxxxxx/.htaccess[/code]
Windows
If you're running a Windows hosting package, don’t forget to recycle the app pool after making any changes to your site configuration. You can do this by logging into the hosting package, selecting ‘Application Pool’ and then selecting ‘Recycle Pool’. Error logs do not show in the control panel on Windows packages.
WordPress
A common cause of an internal server error on WordPress sites is if you are running an incompatible PHP version. Some errors are thrown if the server is running a version of PHP that is not compatible with the website code. We currently support PHP 5.3, 5.4, 5.5, 5.6, 7.0, 7.1, 7.2, 7.3, 7.4, 8.0, 8.1, 8.2, 8.3 and 8.4 on our Linux platform. You can switch between all of these versions using the 'Switch PHP Version' icon inside the control panel
If you're running WordPress, you should check if your WordPress admin area is still accessible. This is usually accessible by visiting http://your-domain.com/wp-admin.
If it is, we'd recommend disabling each plugin and theme and revisiting the site in turn to try and identify the root cause.
Also, if your website is on our WordPress hosting platform, please note that this platform only allows PHP 7 and higher. While WordPress core is compatible with all those PHP versions, certain plugins and themes may not be. If so, we recommend hosting the website on our Linux platform. You can automatically migrate packages from WordPress to Linux via the 'Platform Transfer' area of My20i.
Increase the PHP Memory Limits
Sometimes the internal server error may occur if you are exhausting the PHP memory limit. You can increase this by:
- Logging in to My20i
- Select PHP Configuration
- Scrolling down until you see memory_limit. Change this to 1024M, and select Update PHP Configuration
- Retry the page that was showing an internal server error by refreshing using CTRL + SHIFT + R. If this did not work then you should set the memory limit back to 512M
 Austin B.
How to fix the "Error Establishing Database Connection" in WordPress
The Error Establishing Database Connection error is one of the most commonly experienced errors on WordPress sites. The error itself indicates that the connection between your website files and the database has dropped.
As the database is queried for most of your WordPress site’s content, this drop of connection stops any of the site content from displaying until the connection is re-established. So it’s important to address this error as soon as possible.
There are a number of reasons that the connection to the database may drop – the details that are being used to attempt the connection may be incorrect, or the database itself may not be loading correctly or may have been corrupted. This guide will break down the core areas to check to re-establish the connection as soon as possible and get your site loading.
Note: Take a backup of your website database before attempting any of the following solutions. You can do so using our Timeline Backups service.
1. Checking wp-config.php
In a WordPress site, the database connection details are held within a file called wp-config.php, generally located in the root folder of your WordPress site. If you navigate to this file using our File Manager or via FTP, you’ll see code such as the following:
// ** Database settings - You can get this info from your web host ** //
/** The name of the database for WordPress */
define( 'DB_NAME', 'database_name_here' );
/** Database username */
define( 'DB_USER', 'username_here' );
/** Database password */
define( 'DB_PASSWORD', 'password_here' );
/** Database hostname */
define( 'DB_HOST', 'hostname_here' );
/** Database charset to use in creating database tables. */
define( 'DB_CHARSET', 'utf8' );
/** The database collate type. Don't change this if in doubt. */
define( 'DB_COLLATE', '' );
Each section is labelled via comments that show what each area is used for.
The main details you’ll need to check here are the Database name, Database hostname, Database username and Database password. If any of these details are wrong, the connection to the database won’t be possible and you’ll need to change the details accordingly. But where do we find these database details?
Your site’s database details can be accessed and updated via your hosting package:
- Log into My20i and head to your Manage Hosting area
- Select Options > Manage on the hosting package you’d wish to edit
- Head to the Web Tools section and select MySQL Databases

- Under Manage MySQL Databases you’ll see your databases and their current Server, Database/Username and an area where you can update the password
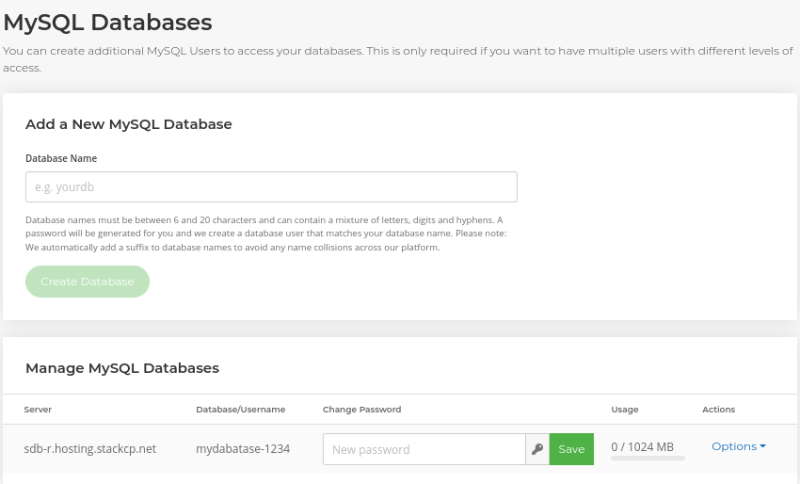
Going back to the wp-config.php file, you can use the above details to fill out and update your connection details:
- The Server is your Database hostname
- Database/Username is the Database name and Database username
- The Database password is the password you’ve added to the Change Password area.
Once these have been updated, recheck your site and the database connection error should no longer display.
2. Checking the database connection
You can also use the above details to test whether your database connection is working. This can be useful to find out if the problem is with the details being used or if there’s something wrong with the database itself.
To do this, head to your site’s File Manager or use FTP to create a new file in the root folder of your site. You can name this whatever you’d like, but make sure that the file is saved as a .php file such as test.php.
Once done, add the following code to the file:
$host = 'hostname';
$user = 'username';
$pass = 'pass';
$test = mysqli_connect($host, $user, $pass);
if (!$test) {
die('MySQL Error: ' . mysqli_error());
}
echo 'Database connection is working properly!';
mysqli_close($test);
Replacing ‘hostname’, ‘username’ and ‘pass’ with the database hostname, database username and database password respectively.
Once that’s set up and saved, load the script via your site. If, for example, you named your file test.php you can load this by visiting your site and appending /test.php to the end of the URL i.e., domain.com/test.php.
If the script loads and displays an error, there’s a problem with the details being used. If it instead displays the line Database connection is working correctly! then the credentials being used for the database are correct.
If that’s the case, and your site is still showing a database error, then the problem may be with the database itself. It will need to be repaired.
3. Repairing a corrupt database
The issue can sometimes be that your database itself has become corrupt. This isn’t a common occurrence. However, it can happen with the amount of data, rows and tables that can be created and removed by various third-party plugins and functions.
One way to test if this is the case is to try and connect via wp-admin. If you receive the following error:

It means that the database has been corrupted. Fortunately, there are tools that can be used to repair this, using both WordPress and PHPMyAdmin.
4. Using WordPress’ database repair tool
To access the tool WordPress provides to fix this, you’ll need to edit your wp-config.php file and add the following line of code before the line: ‘/* That’s all, stop editing! Happy publishing. */’.
Define(‘WP_ALLOW_REPAIR’, true);
Once this code has been added, head to the following URL:
https://domain.com/wp-admin/maint/repair.php
Replacing ‘domain.com’ with your domain. This will open up a repair wizard built into WordPress that will attempt to repair your database. Follow the steps in the wizard and, when it’s finished repairing, your site should come back online.
Once you’ve finished with the repair tool, remove the above line of code from your wp-config.php file.
WordPress CLI also provides a quick tool to repair the database. To access this, connect to your site via SSH and navigate to the root folder of your WordPress installation. You can then run the command:
wp db repair
This will start a full repair of the WordPress database.
5. Repairing a database with phpMyAdmin
You can also repair the database using phpMyAdmin.
To do so:
- Log into My20i and head to your Manage Hosting area
- Select Options > Manage on the hosting package you’d wish to edit
- Head to the Web Tools section and select phpMyAdmin
- Select Sign-In on the database you need to repair
- You’ll be signed into phpMyAdmin. Select your database on the left, and you’ll see a selection of your database’s current tables.
- Select all of your tables with the checkbox next to each
- From the drop-down at the bottom of the screen, select Repair table
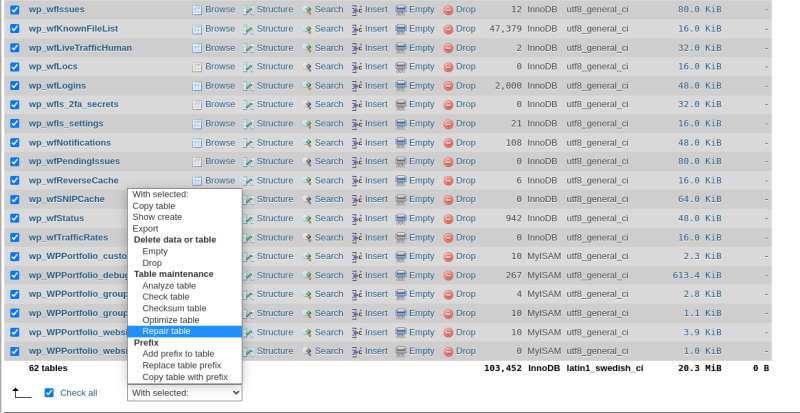
This will run the SQL REPAIR TABLE command on all of your selected tables, which will attempt to repair and remove any corruption or broken data from these tables.
6. Repairing corrupted WordPress files
In some rare instances, the issue may lie with the files of the site rather than the database itself. This can happen when the connection during an FTP upload is interrupted, or malware infects the WordPress site and modifies the core files. If this is the case, you’ll need to replace the core files of the site with a fresh copy directly from WordPress.
In order to do this, first head to download WordPress’ latest version – you can find this here:
https://wordpress.org/download/
Once you have a copy of these files, unzip them on your local device and remove the wp-content and wp-config.php files. Then, connect to your site via FTP and upload the folders and files to your site’s root folder, overwriting your current core files with the fresh upload.
Note: provided that you remove the wp-content files, doing this won’t affect the content of your website – text, images etc.
Once done, your site should be loading with the correct files necessary.
Alternatively, you can use the following WP CLI command after connecting via SSH to achieve this as well:
wp core download --force
There are a number of potential causes and fixes for ‘Error Establishing a Database Connection’ errors within WordPress. By making use of the above steps, you should be able to pinpoint and fix this error, and bring your site back online as soon as possible. Always be sure to take a backup before attempting any form of manual change to your site files and database.
 Austin B.
Why can't I edit my WordPress pages using Elementor?
Elementor is a widely used website builder for WordPress that allows for a more advanced, yet streamlined approach to designing and creating your site. Many customers prefer to use this over WordPress’ own inbuilt tools, and our platform fully supports the use of this builder to create your perfect eCommerce store, blog or general website.
The setup comes with an integrated website builder that loads separately to WordPress’ main website builder, which includes a live preview and drag-and-drop UI for page customisation. This preview, however, can sometimes have issues loading. If this occurs, you may see the following error:
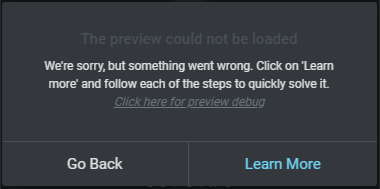
The error itself is very non-indicative, and so it can be a little unclear as to what the cause may be. However, there’s a few steps that you can take to narrow down and quickly resolve this error, allowing you to get back to building your site as fast as possible.
Plugin Conflicts
One cause of the above can be a conflict with other installed plugins or themes on your WordPress site. Plugins can provide a wide variety of functionality and tools to add to your site, but most are developed entirely separate from one another.
As a result, they can define rules or classes that will share names. Or they may try to use similar resources which can lead to internal conflicts and cause specific parts of these plugins and themes to fail to load, as with Elementor above.
Thankfully, there’s a quick way to determine whether or not this is the cause. That’s through Elementor’s built-in debugging tool Safe Mode. Safe Mode attempts to load Elementor’s tools without loading any other themes or plugins – it purely uses just what Elementor comes with. This allows you to see whether or not the problem is with other plugins or themes on the site.
To activate Elementor’s Safe Mode:
- Log into wp-admin on your WordPress site
- Navigate to Elementor on the left-hand side of the screen, and select Tools from the pop-out window that appears
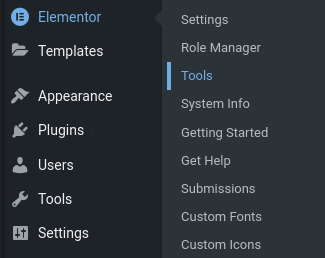
- Under General, select Enable under Safe Mode then select Save Changes
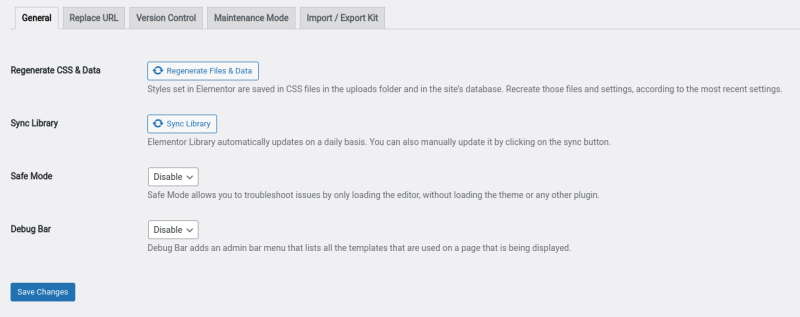
Now, retry loading the page editor again. If this now loads without the error, then there’s a plugin or theme on the site that will be conflicting with a function needed to load Elementor’s web builder preview. It would be best from here to disable any non-critical plugins temporarily to narrow down the potential causes.
If the preview still shows the error in Safe Mode, then it’s possible the issue may be a conflict with our Website Acceleration Suite instead.
Conflicts with our web optimisations
Elementor makes use of a number of JavaScript files when loading the preview of the page to allow for full editing. As a result, any optimisations outside of their own performance suite that make changes to JavaScript files can cause conflicts and result in the preview failing to load, including our own Web Acceleration Suite.
If you have any JavaScript optimisations enabled, you’ll want to disable these to allow the preview to load once more. To do this:
- Log into My20i and head to your Manage Hosting page
- Select Options > Manage on the hosting package you’re currently experiencing the error on
- Under CDN, select Web Optimisations
- You’ll see a section for JavaScript Optimisations on this page. Ensure these are switched off. In particular, Defer JavaScript should be disabled.

Once these have been disabled, retest once more and the preview should be loading.
Feel free to contact our support team should you experience any other issues.
 Reudiger Dalchow
Why can I not use modrewrite on the /wp-content/uploads directory?
The error rewrites_uploads_blocked refers to a security rule implemented into our system to protect WordPress sites on our platform – it prevents mod_rewrite rules from working from within your uploads directory, which is a common target for malware and attacks.
This rule is built into our shared hosting platform, and as such is not possible to disable. Should you need to have content within your uploads folder make use of mod_rewrite rules, you’ll need to either change the upload directory within your WordPress install, or move the site to our Managed Cloud Hosting, and request to our support team via ticket we remove the rule on your setup.
How do I change the uploads directory on my WordPress site?
Should you wish to take the option to change your WordPress site’s uploads directory, you’ll need to do the following:
- Access your site via the File Manager within My20i, or use FTP to connect to your site following this guide.
- Navigate to wp-content, and create a new folder with the name you want to use for your new Uploads folder.
- Navigate to your wp-config.php file and open it.
- Scroll down until you see the line:
/* Add any custom values between this line and the "stop editing" line. */
And beneath that, add the following:
define('UPLOADS', 'wp-content/yourfoldername');
Replacing yourfoldername with the name of the folder you created.
Once done, save the file and close it.
This will change your uploads folder globally, and newly uploaded files will be stored within this directory instead.
Note: Previously uploaded files will not be moved automatically – you will need to move any pre-existing files in your uploads folder to the new folder you created.
 Ruth Turner
Can I make XMLRPC requests to my website?
XMLRPC is a key attack target and denial of service vector against any WordPress site, so we filter traffic towards it as part of our Web Application Firewall.
Known "trusted" applications and networks are permitted access, but unknown sources and especially any web browser-based requests to xmlrpc.php are blocked for security reasons.
This won't prevent any of the below applications from working correctly, but does mean you won't be able to visit /xmlrpc.php on your WordPress website. It's not anything to worry about.
By default, the following are allowed to access xmlrpc.php files on sites hosted by 20i:
- All connections from the Automattic (WordPress.com) network which includes JetPack
- WordPress Android/iPhone Apps
- BlogStomps
- Blogo
- Zapier
- IFTTT
- Open Live Writer
- Ulysses
If there is another application you'd like to add to this whitelist, we'll be happy to review on a case-by-case basis. Please reach out to our support team.
 Chris Wright

 Jordan Graves