We've developed a bespoke provisioning and addon module for WHMCS that allows 20i Resellers to sell 20i addons directly through WHMCS. This now includes support for SSL certificates, Premium Mail, Mailbox Quota Addons, and Website Turbo.
SSL Certificate Product Configuration
There are three different SSL certificate products you can sell from 20i via the WHMCS module. These are:
- GeoTrust Simple SSL Certificate
- GeoTrust Rapid SSL Wildcard Certificate
- GeoTrust Extended SSL Certificate
To sell these certificates, you will first need to create a new product group for SSL Certificate products; this group can be named as you choose. After that, click "Create a New Product." Set the group to the one you just created, with the type set to 'Other' and the name to one of the product names from above that you wish to sell.
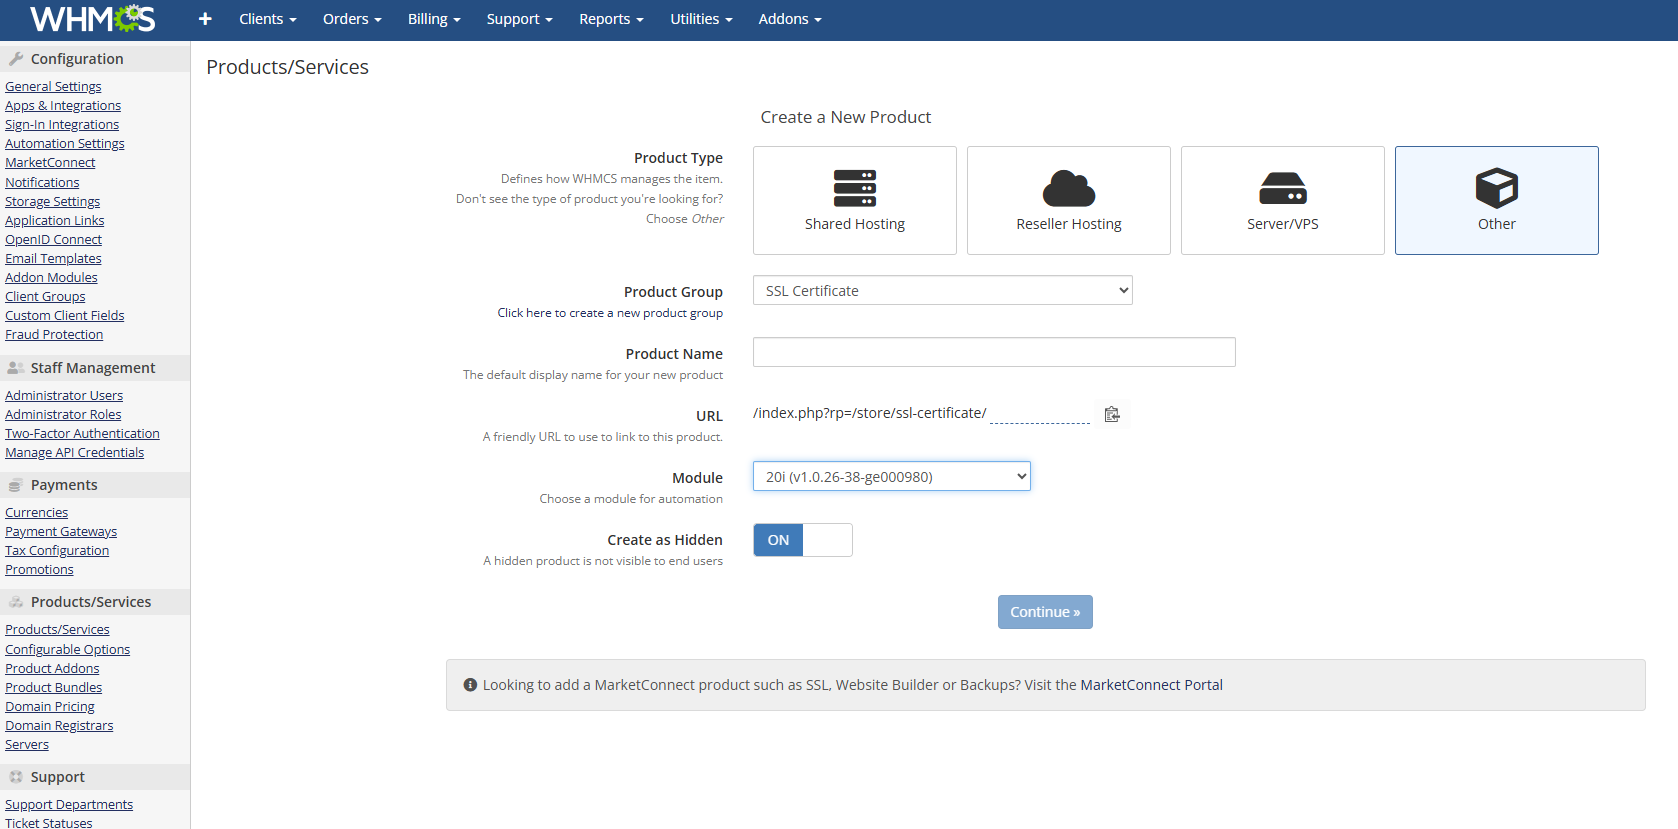
Note: The product name must be typed exactly to match the checks made against the product name in the code.
Select 20i for the product module and create the product. Please ensure that your pricing options only offer annual pricing, as this is how SSL Certificate products are billed in 20i. Also, ensure that the 'allow multiple quantities' option is left unchecked. Furthermore, ensure the module settings are correct, then finally you'll need to add the following custom fields for the product (ensure each field is named correctly, as these fields are checked against in the code):
+--------------------+------------+------------+----------------+--------------------+-----------------+
| Field Name         | Field Type | Admin Only | Required Field | Show on Order Form | Show on Invoice |
+--------------------+------------+------------+----------------+--------------------+-----------------+
| Domain             | Text Box   |            | X              | X                  | X               |
+--------------------+------------+------------+----------------+--------------------+-----------------+
| subdomain          | Text Box   | X          |                |                    | X               |
+--------------------+------------+------------+----------------+--------------------+-----------------+
| contact_type       | Text Box   | X          |                |                    |                 |
+--------------------+------------+------------+----------------+--------------------+-----------------+
| contact_first_name | Text Box   | X          |                |                    |                 |
+--------------------+------------+------------+----------------+--------------------+-----------------+
| contact_last_name  | Text Box   | X          |                |                    |                 |
+--------------------+------------+------------+----------------+--------------------+-----------------+
| contact_company    | Text Box   | X          |                |                    |                 |
+--------------------+------------+------------+----------------+--------------------+-----------------+
| contact_email      | Text Box   | X          |                |                    |                 |
+--------------------+------------+------------+----------------+--------------------+-----------------+
| contact_phone      | Text Box   | X          |                |                    |                 |
+--------------------+------------+------------+----------------+--------------------+-----------------+
| contact_address1   | Text Box   | X          |                |                    |                 |
+--------------------+------------+------------+----------------+--------------------+-----------------+
| contact_address2   | Text Box   | X          |                |                    |                 |
+--------------------+------------+------------+----------------+--------------------+-----------------+
| contact_city       | Text Box   | X          |                |                    |                 |
+--------------------+------------+------------+----------------+--------------------+-----------------+
| contact_state      | Text Box   | X          |                |                    |                 |
+--------------------+------------+------------+----------------+--------------------+-----------------+
| contact_postal     | Text Box   | X          |                |                    |                 |
+--------------------+------------+------------+----------------+--------------------+-----------------+
| contact_country    | Text Box   | X          |                |                    |                 |
+--------------------+------------+------------+----------------+--------------------+-----------------+
| tlsCertificateId   | Text Box   | X          |                |                    |                 |
+--------------------+------------+------------+----------------+--------------------+-----------------+
Website Turbo
To add Website Turbo as an addon product for hosting packages, please first create a Website Turbo product in Setup > Product Addons. Select 'Independent Product' as the product type, and give the product a name of your choice. Then, choose the 20i module for automation and leave 'Auto-assign to products' turned off. Now you can enter your pricing options on the next screen. We strongly recommend that you configure pricing similar to how you have configured your hosting products, to which you wish to assign Website Turbo, and check the prorata billing checkbox.
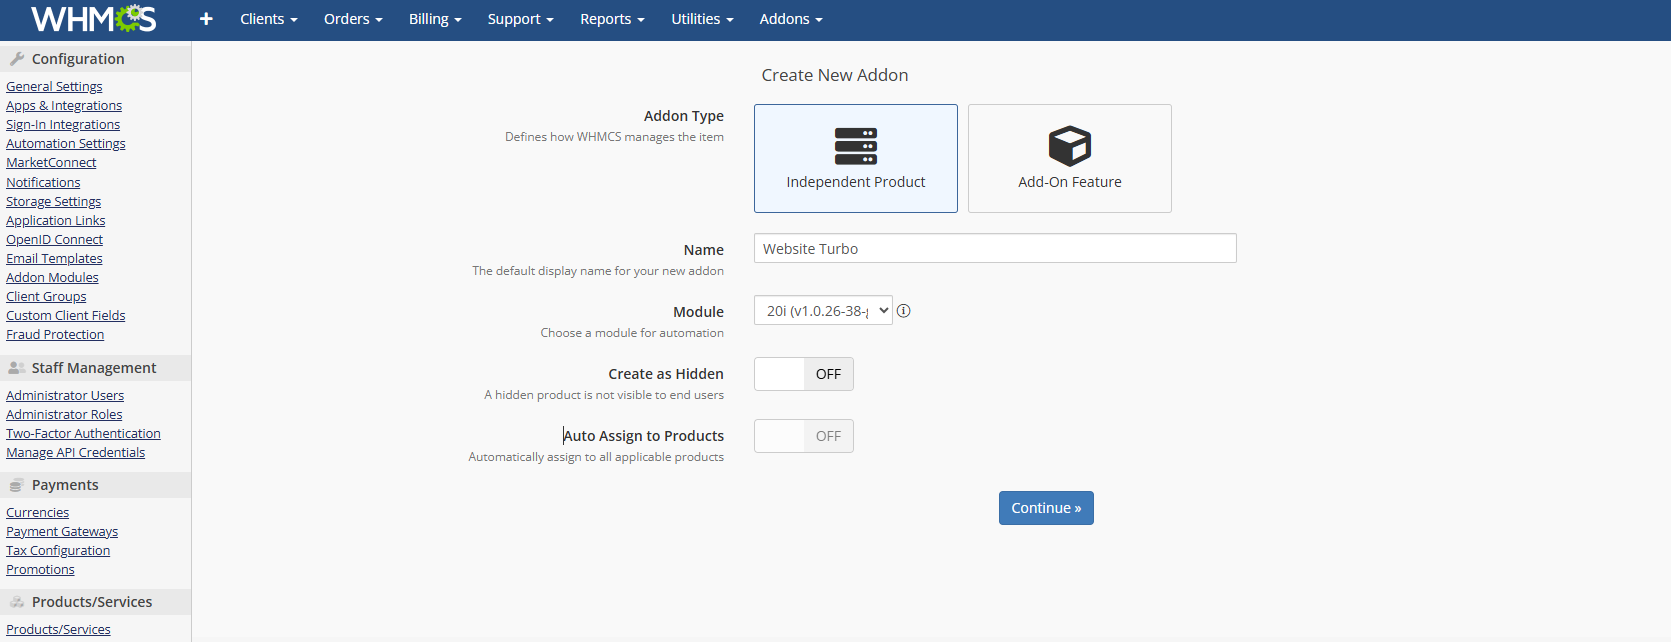
Next, please ensure that the module settings appear as shown above and create a text box in the custom field tab with the name 'websiteTurboId', setting it to admin-only.

Finally, under Applicable Products, select the product group to assign this to, which will be the product group that contains your 20i hosting products.
Premium Mailboxes
If you haven't already, create a new product group for Premium Mailbox/Mailbox Quota Addon products, naming it as you choose. After that, click to create a new product. Set the Product Type as Other and set the Product Group as the group you just created; the Product Name must be set as 'Premium Mailbox'.
Note: The product name must be typed to match exactly as checks are made against the product name in the code.
Select 20i for the product module and create the product.
Please ensure that your pricing options offer annual pricing only, as this is how Premium Mailbox addons are billed in 20i.
Ensure 'Allow Multiple Quantities' is left unchecked. Ensure the module settings are correct. Then, you'll need to add two custom fields: a text box called 'Mailbox', which is a required field and can be displayed on the order form (not just in the admin area). This is the field that will store the selected mailbox. After that, you will need a custom field, which is admin-only and is called 'premiumMailboxId', which is a text box.
Mailbox Quota Addons
To add a Mailbox Quota Addon, create a new product group for Premium Mailbox/Mailbox Quota Addon products. You can name this to your preference. After that, click to create a new product. Set the Product Type as Other and set the Product Group as the group you just created, the Product Name name must be set as 'Mailbox Quota Addon (10GB)'.
Note: The product name must be typed exactly as it appears in the code, as checks are made against the product name.
Select 20i for the product module and create the product.
Please ensure that your pricing options only offer annual pricing, as this is how Mailbox Quota Addons are billed in 20i.
Ensure that 'Allow Multiple Quantities' is left unchecked. Ensure the module settings are correct. Then, you'll need to add two custom fields: a text box called 'Mailbox', which is a required field and can be displayed on the order form (not admin-only). This is the field that will store the selected mailbox. After that, we need a custom field, which is admin-only, called 'mailboxQuotaAddonId', that is also a text box.
Note: Whilst the Mailbox Quota Addon is an addon product, due to limitations in WHMCS, it must be created as an actual product. The module handles hiding this from unauthenticated users (as we have no knowledge of which packages and mailboxes they have), and the option to select a package and mailbox is handled during the order process.
