Integrating WHMCS with your Reseller Account
1. Overview
Setting up Web Host Manager Complete Solution (WHMCS) with your 20i Reseller Hosting account allows you to automate the provisioning of your 20i services to your own clients. Clients will be able to buy products from your site without the need for you to set them up manually from within your 20i account.
Note: you can also use HostShop, 20i's free and fully integrated billing solution as an alternative to WHMCS. View Setup Guide.
2. Getting Started
To set up WHMCS with 20i you'll first need to buy a licence. If you don't have an existing licence you can purchase 20i's discounted WHMCS licence and switch this over using the guide here: How do I change the license key WHMCS uses?
Once you've bought the WHMCS licence you'll need to install it to your webspace.
3. Installing WHMCS
At 20i we give you a one-click installation process for WHMCS. To use this, head to https://my.20i.com/whmcs. You'll see the 'Install' button next to your active licence. Select this and you'll be prompted to select a package and a directory to install WHMCS.
Once you’ve installed WHMCS, log in to your admin panel: www.Yourdomain.com/yourWHMCSdirectory/admin
Now that you’ve logged in you'll need to obtain the combined API key. This can be found within your 20i Reseller account by going to “Manage Reseller” > “API”, or by going here: https://my.20i.com/reseller/api
Note: Please keep a note of the Combined API Key as this will be used later on.
4. Adding Custom Client Fields
When your clients sign up and buy products, a StackCP User needs to be created to allow them access to manage their products. Their level of access can be controlled by you as the Reseller. To enable StackCP User creation when your clients sign up you'll need to create a custom client field.

• You can name the first field anything you like, for example, “StackCP User”.

• You can now proceed to create product/services fields.
5. Connecting to the API
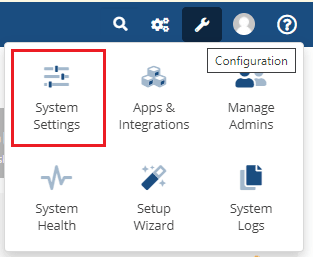
- Within your WHMCS admin, navigate to “System Settings” > “Servers”
- You can use any valid hostname, for example, "20i.com".
- You will need to enter your default name servers this will be:
ns1.stackdns.com
ns2.stackdns.com
ns3.stackdns.com
ns4.stackdns.com
Note: If you have Virtual Nameservers (custom nameservers) you can enter these instead.
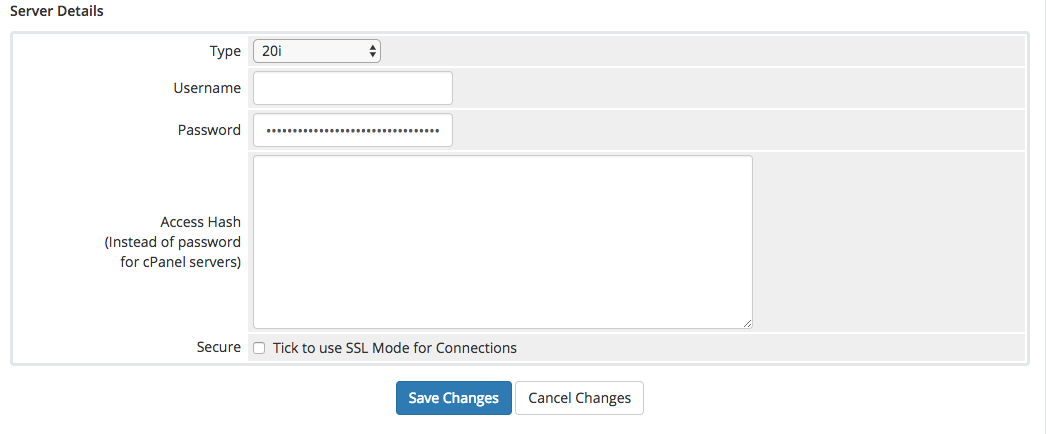
• Locate server details a little further down the page and select “20i”. You can leave the username blank and then enter in the combined API key as the password.

6. Creating product/services fields
- You'll now want to add the products that you'll be selling from 20i via WHMCS. These will be the hosting package types that you've set up within your My20i account.
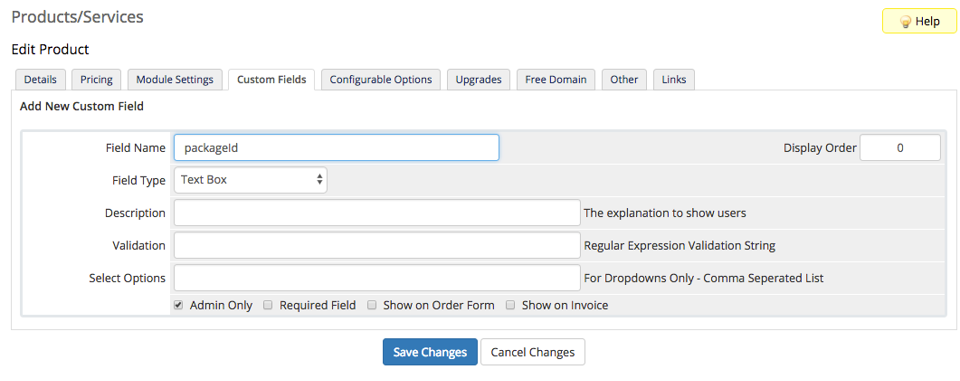
- Navigate to “System Settings” > “Products/Services”. Create a product group if you don't have one using whatever details you like. Then create a new product. On that product select the 'Custom Fields' tab.
- The Field Name will need to be “packageId”. You will need to select this field to be 'Admin Only'.
- Once you've done this head to the 'Module Settings' tab. From here, select '20i' from the 'Module Name' drop-down menu.
- From the 'Type Code' dropdown, select the package type for the product you're configuring.
- Select 'Save Changes'.
Note: For each product/service you configure you'll need to add a new custom field.

You can now proceed to set up 20i as the domain registrar.
7. Setting up domain registrars
- Within your WHMCS admin, navigate to “System Settings” > “Domain registrars”.
- You should see '20i' in the list of modules, please select 'Configure'.
- Enter your combined API key into the 'Password' field. (You can leave your admin username blank)
- Select your admin user.
- Select your custom user field that you created. Our example was “StackCP User”.
You can now click 'Activate'.

Note: If your WHMCS installation is hosted elsewhere, you'll need to ensure outgoing port 3000 is open to ensure our API can connect.
8. What's next?
Now the 20i WHMCS module should now be linked with your account. If you already have services and StackCP users within 20i then you'll want to import those into your WHMCS set up.
If you have existing user/products with us that you wish to add to your WHMCS installation, please see our guide on adding them here.
Note: WHMCS is still a very much liked billing and automation option for resellers. But there are more options on the market. You should read about WHMCS alternatives.
