Reseller Hosting – Reseller Account Questions
Reseller account support articles: information about your 20i Reseller Hosting account, should you not wish to chat live or email our support team.
How can I clone a site with Timeline Backups?
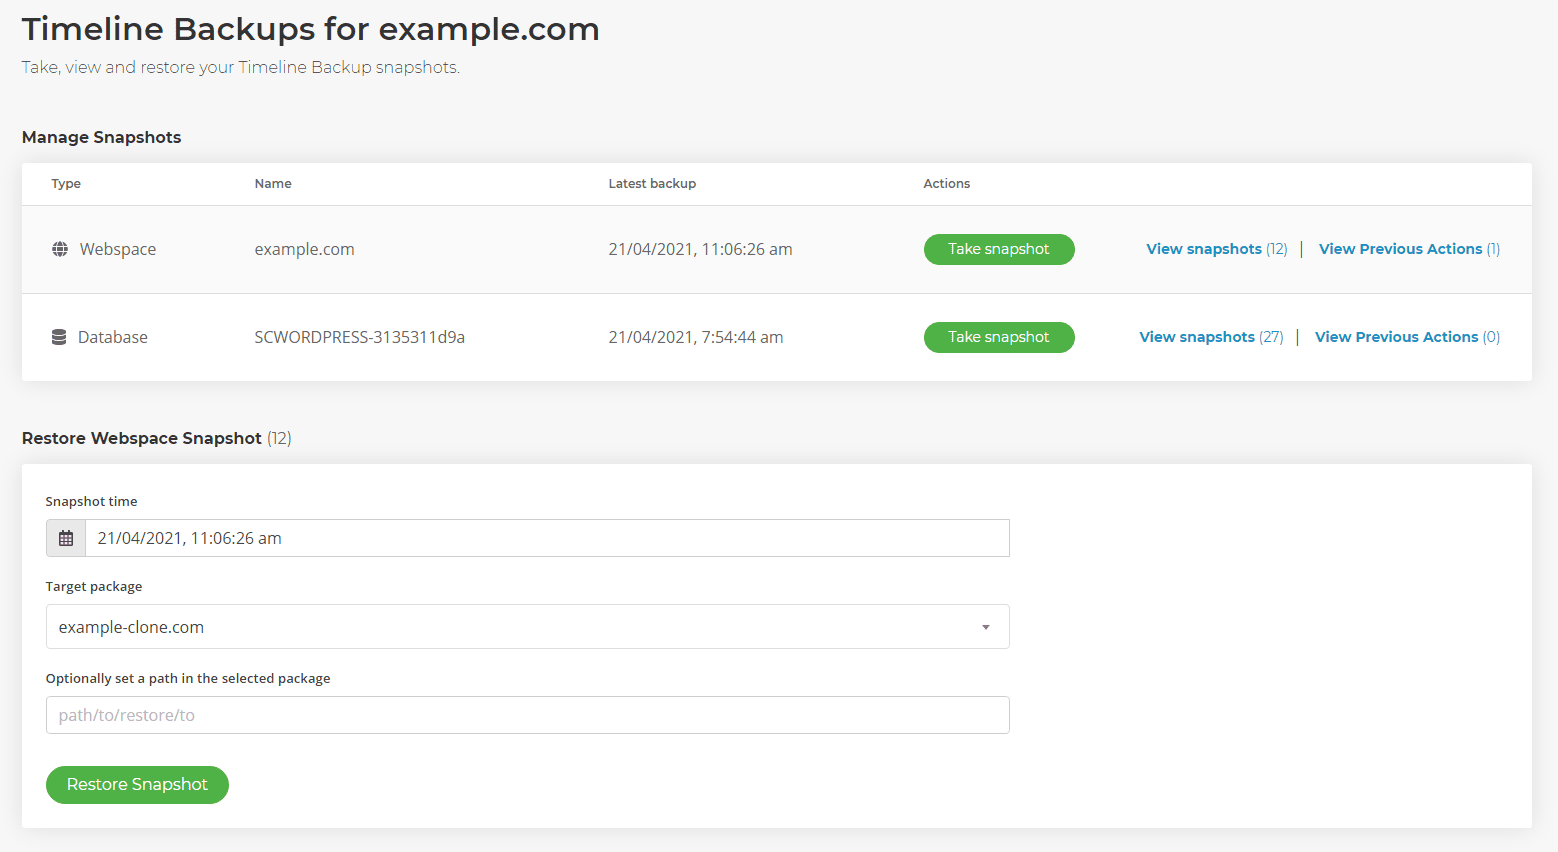
Timeline Backups allow you to restore data between hosting packages, making them an ideal tool to assist with 'cloning' websites in your account.
For example, if you wanted to clone example.com into a package called example-clone.com:
- Set up an empty package with domain name example-clone.com
- Head to the Timeline Backups Page
- Click View snapshots next to example.com
- Select a snapshot time
- Set the target package to be example-clone.com
- Start the restore by pressing the Restore Snapshot button
The control panel will show you when the restore is in progress. Navigating away from the page will not cancel the restore and you can view on any previous jobs by heading back into the Manage Snapshots area for example.com and clicking View Jobs.
How do I activate my free SSL?
Every 20i hosting package comes with a free wildcard SSL certificate, enabling you to use the more secure HTTPS protocol to keep your site users secure.
To activate the SSL, you’ll need to make sure you’ve pointed the domain name to our nameservers (why our nameservers are required).
These are:
- ns1.stackdns.com
- ns2.stackdns.com
- ns3.stackdns.com
- ns4.stackdns.com
With that done, you need to:
- Go to Manage Hosting.
- Select Options > Manage on the hosting package which you wish to activate the SSL.
- Under Security, click on the SSL/TLS icon.
- You will then see your domain name and an option to Activate Free SSL next to it - select this and the SSL will be applied to your domain.
- If you’d like all your visitors to use SSL connections (i.e. for HTTPS to always be used), simply select the Enable option at the bottom of the page.
Once the SSL Certificate has been activated, it will take up to 30 minutes to secure your website. This is due to the changes needed to be made on our load balancers.
 Lloyd Cobb
How does my customer log in to the StackCP control panel?
If you're a 20i Reseller, you can give your customers access to their hosting packages using the white-label login at www.stackcp.com. StackCP is your customer's premium web hosting control panel, designed as a superior alternative to the industry-standard 'cPanel', ensuring an intuitive and efficient management experience.
You can set your own control panel URL from the Your Brand section of My20i. You can modify the look and feel of your customers' control panel in the StackCP Theme section under Reseller Preferences.
Creating a StackCP User
1. Visit the StackCP Users area under Reseller Preferences
2. Click Add a StackCP User in the top right
3. Enter your customers details and select Add Stack User
4. You'll be directed back to the StackCP overview page, and a random password will be shown. You can use this or change the password as desired.
5. Under "Options" click Edit
6. Around half way down the page, you will see a section titled Package Access
7. Select the packages you wish this user to have access-to
8. Remember to save your access changes by choosing Save Permissions
Your customer can now log in to their StackCP control panel and will have access to the packages you have specified. The features, or icons visible to them inside StackCP will depend on the limits configured on your hosting package. You can control these via your Package Types.
Using FTP Login Details
For compatibility reasons, we create a StackCP user for each of your hosting packages that allows logins to the control panel using the websites FTP details. However, this access is limited as features like Recover Password and multi-package access are not available using this style of login.
 Lloyd Cobb
How do I change my US Reseller Hosting Tier?
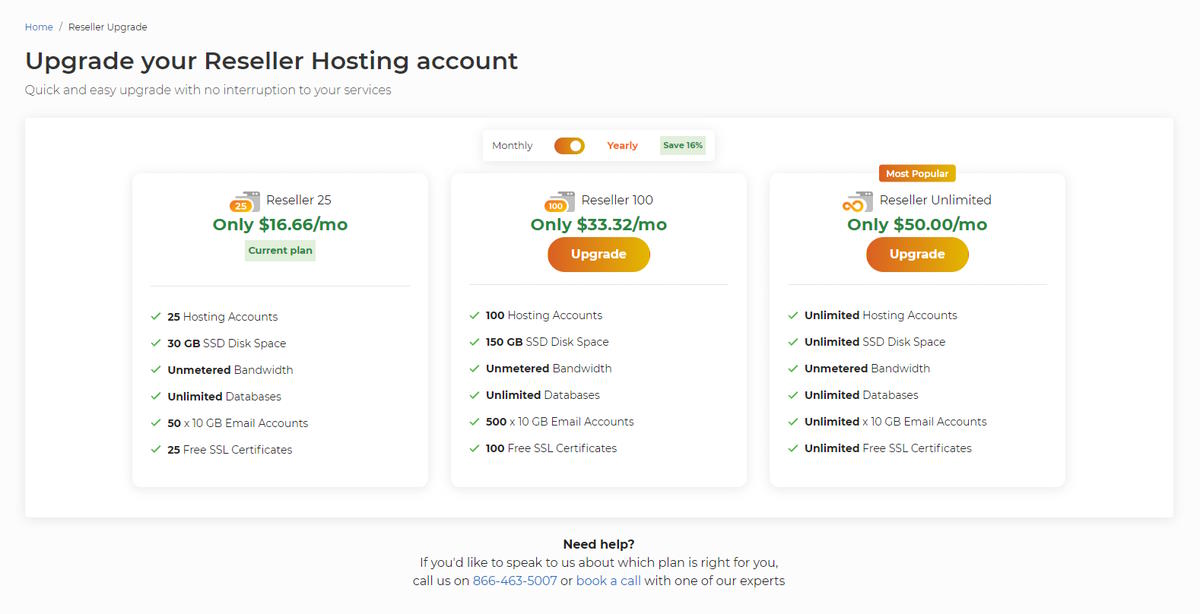
Our US Reseller Hosting is available in three different tiers - Reseller 25, Reseller 100 or Reseller Unlimited. Reseller 25 and Reseller 100 are subject to usage limits - see here for more information.
How do I upgrade my Reseller Hosting to the next tier?
To upgrade your Reseller Hosting account, you would need to go here - This can be accessed by selecting Upgrade Options on the My20i homepage.
How do I downgrade my Reseller Hosting to a lower tier?
In order to downgrade your Reseller Hosting package, you would need to contact our Technical Support team via a Support Ticket. The team is available 24 hours a day, 7 days a week. A ticket can be raised from within your My20i account here.
Comparing the 3 Reseller Hosting Plans
- Reseller 25: Catering to startups and small businesses, this plan includes 25 hosting accounts, 30 GB SSD disk space, unmetered bandwidth, and 25 free SSL certificates. With a monthly cost of $19.99 after the first month, it also comprises 50 x 10 GB email accounts, complimentary malware scanning, and expert support.
- Reseller 100: Aimed at expanding businesses, this plan features 100 hosting accounts, 150 GB SSD disk space, unmetered bandwidth, and 100 free SSL certificates. Priced at $39.99/mo after the first month, it additionally provides 500 x 10 GB email accounts, complimentary malware scanning, and expert support.
- Reseller Unlimited: Crafted for established businesses and agencies, this plan grants unlimited hosting accounts, SSD disk space, bandwidth, and SSL certificates. For $59.99/mo after the initial month, it encompasses unlimited 10 GB email accounts, free malware scanning, and expert support.
See all the features and how 20i Reseller Hosting compares to our competition.
Which Reseller plan should I choose?
- Reseller 25: Perfect for startups and small businesses with a limited clientele, seeking a cost-effective yet robust reseller hosting solution.
- Reseller 100: Appropriate for growing businesses with an expanding client base, necessitating increased resources and scalability.
- Reseller Unlimited: Optimal for well-established web hosting businesses and agencies managing an established clientele, requiring flexibility and unlimited resources.
 Chris Wright
Integrating WHMCS with your Reseller Account
1. Overview
Setting up Web Host Manager Complete Solution (WHMCS) with your 20i Reseller Hosting account allows you to automate the provisioning of your 20i services to your own clients. Clients will be able to buy products from your site without the need for you to set them up manually from within your 20i account.
Note: you can also use HostShop, 20i's free and fully integrated billing solution as an alternative to WHMCS. View Setup Guide.
2. Getting Started
To set up WHMCS with 20i you'll first need to buy a licence. If you don't have an existing licence you can purchase 20i's discounted WHMCS licence and switch this over using the guide here: How do I change the license key WHMCS uses?
Once you've bought the WHMCS licence you'll need to install it to your webspace.
3. Installing WHMCS
At 20i we give you a one-click installation process for WHMCS. To use this, head to https://my.20i.com/whmcs. You'll see the 'Install' button next to your active licence. Select this and you'll be prompted to select a package and a directory to install WHMCS.
Once you’ve installed WHMCS, log in to your admin panel: www.Yourdomain.com/yourWHMCSdirectory/admin
Now that you’ve logged in you'll need to obtain the combined API key. This can be found within your 20i Reseller account by going to “Manage Reseller” > “API”, or by going here: https://my.20i.com/reseller/api
Note: Please keep a note of the Combined API Key as this will be used later on.
4. Adding Custom Client Fields
When your clients sign up and buy products, a StackCP User needs to be created to allow them access to manage their products. Their level of access can be controlled by you as the Reseller. To enable StackCP User creation when your clients sign up you'll need to create a custom client field.
• You can name the first field anything you like, for example, “StackCP User”.

• You can now proceed to create product/services fields.
5. Connecting to the API
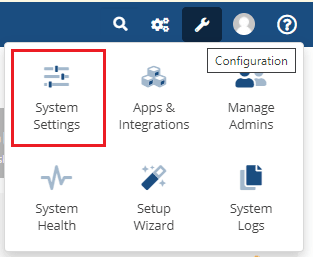
- Within your WHMCS admin, navigate to “System Settings” > “Servers”
- You can use any valid hostname, for example, "20i.com".
- You will need to enter your default name servers this will be:
ns1.stackdns.com
ns2.stackdns.com
ns3.stackdns.com
ns4.stackdns.com
Note: If you have Virtual Nameservers (custom nameservers) you can enter these instead.
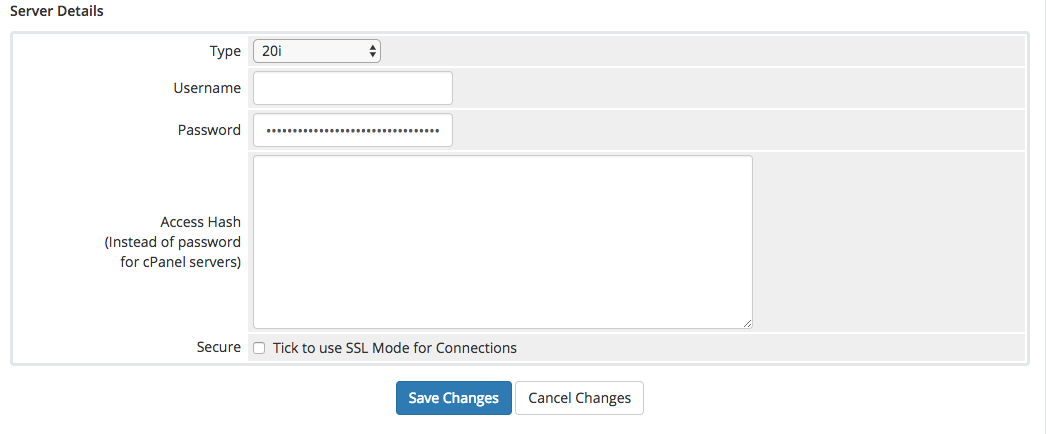
• Locate server details a little further down the page and select “20i”. You can leave the username blank and then enter in the combined API key as the password.
6. Creating product/services fields
- You'll now want to add the products that you'll be selling from 20i via WHMCS. These will be the hosting package types that you've set up within your My20i account.
- Navigate to “System Settings” > “Products/Services”. Create a product group if you don't have one using whatever details you like. Then create a new product. On that product select the 'Custom Fields' tab.
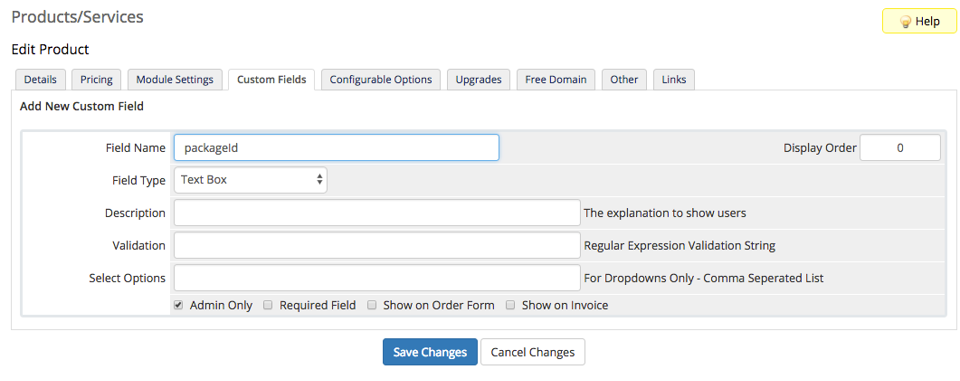
- The Field Name will need to be “packageId”. You will need to select this field to be 'Admin Only'.
- Once you've done this head to the 'Module Settings' tab. From here, select '20i' from the 'Module Name' drop-down menu.
- From the 'Type Code' dropdown, select the package type for the product you're configuring.
- Select 'Save Changes'.
Note: For each product/service you configure you'll need to add a new custom field.
You can now proceed to set up 20i as the domain registrar.
7. Setting up domain registrars
- Within your WHMCS admin, navigate to “System Settings” > “Domain registrars”.
- You should see '20i' in the list of modules, please select 'Configure'.
- Enter your combined API key into the 'Password' field. (You can leave your admin username blank)
- Select your admin user.
- Select your custom user field that you created. Our example was “StackCP User”.
You can now click 'Activate'.

Note: If your WHMCS installation is hosted elsewhere, you'll need to ensure outgoing port 3000 is open to ensure our API can connect.
8. What's next?
Now the 20i WHMCS module should now be linked with your account. If you already have services and StackCP users within 20i then you'll want to import those into your WHMCS set up.
If you have existing user/products with us that you wish to add to your WHMCS installation, please see our guide on adding them here.
Note: WHMCS is still a very much liked billing and automation option for resellers. But there are more options on the market. You should read about WHMCS alternatives.
 Austin B.
How do I suspend or disable a hosting package?
With Reseller Hosting, you have the ability to enable and disable individual hosting packages as you see fit. This can be useful to limit access to services temporarily without removing them from your account entirely.
Note: Disabling a package will also disable emails on that package.
To disable a package:
- From the My20i control panel, click Manage Hosting.
- Locate the hosting package you wish to disable from the list, and select Options -> Disable.

In order to re-enable a package you have disabled:
- As before, click Manage Hosting from the My20i control panel.
- Find the disabled hosting package you wish to enable, and select Options -> Enable.

Packages that are disabled will have '(Disabled)' appending to their domain name on the Manage Hosting page, and will display a holding page – you can customise this page in your Default Pages area within Reseller Customisation.
Note: It takes around 30 minutes for websites to deactivate once the option has been selected, the same also applies for activating websites.
 Lloyd Cobb
Does 20i have an affiliate program?
Yes, we currently have an affiliate program.
You can promote our WordPress Hosting, Reseller Hosting and Managed Hosting If someone uses the link you provided to make a purchase, you'll receive commission on sales.
Please see 20i Affiliates for more details.
 Austin B.
Are there any reseller hosting guides?
When you've signed up with 20i you get access to a range of guides and data sheets including a "Getting Started with Reseller Hosting" guide. This guide covers the basics of establishing yourself as a Reseller Host and covers areas such as the reseller management, migrations, managing users and more.
This is a comprehensive step-by-step guide that goes through all the stages of setting up your account and getting going with your reseller hosting business.
Free reseller hosting business startup guides
We also have a publicly-available guide which we add to regularly on the 20i Blog: Reseller Hosting: Make Your Business a Success.
There is always more to learn though! We share regular tips from across the web on our Facebook and Twitter feeds, from both the business side and the web design perspective.
 Austin B.
How do I add a domain reference?
A domain not yet registered with 20i or registered elsewhere is often referred-to as a 'domain reference'.
Whenever you wish to add a package to your account you should use the 'Add Hosting' page inside My20i. If the domain is already registered with 20i you can select it from a drop down menu. Otherwise, you can type the domain you wish to host on our platform in the input field.
There's no need to 'Add a domain' before creating the hosting - so you can just get started!
We provide a temporary URL for all packages which allow you to visit the site before the domain resolves, so this is a perfect way of building sites before the domain is registered.
 Lloyd Cobb
How do I customise the header and footer of an email template?
As a 20i hosting reseller you can add your own branding to the header and footer of the email templates that are sent to your customers.
This is part of our white-label Reseller Hosting, which lets you customise all customer facing hosting products and communication.
- Head to Reseller Preferences and select Email Component Templates.
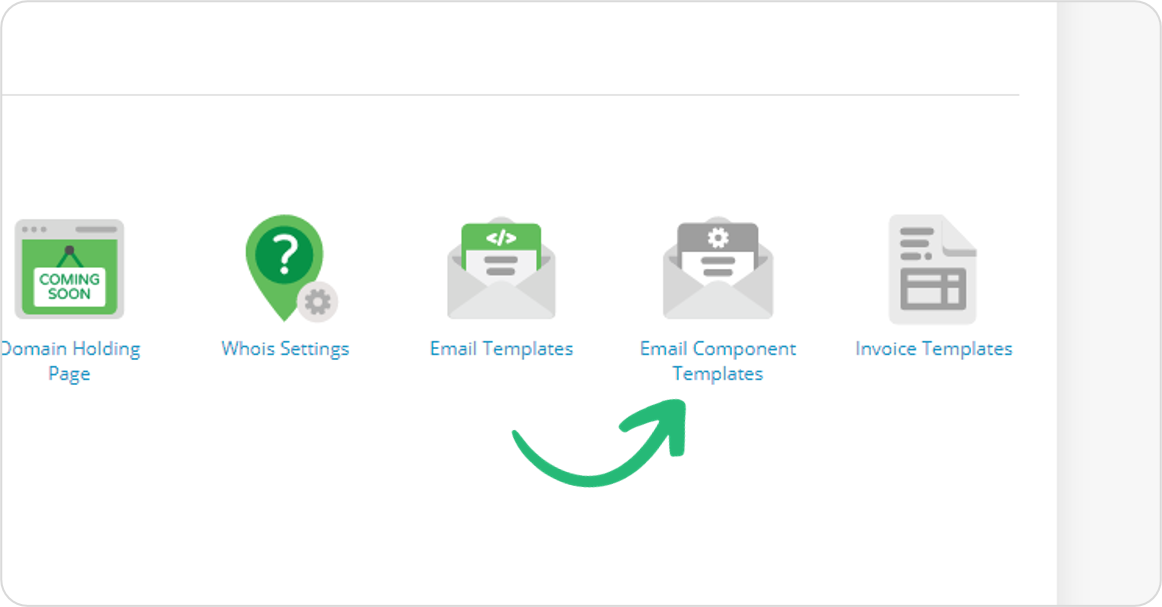
- Select Create Template. Here you can add your HTML to create a header and footer templates which you can then apply to your emails.
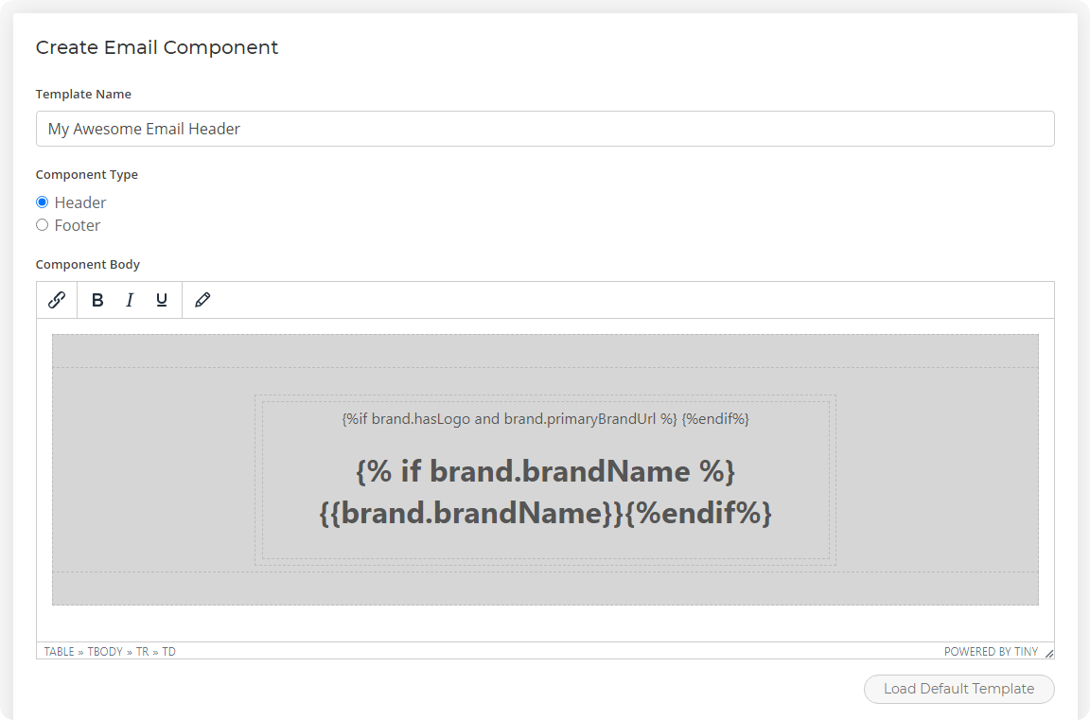
- Select Save.
- Head to Email Templates and select Options > Edit on the template you want to apply your custom header and footer to.
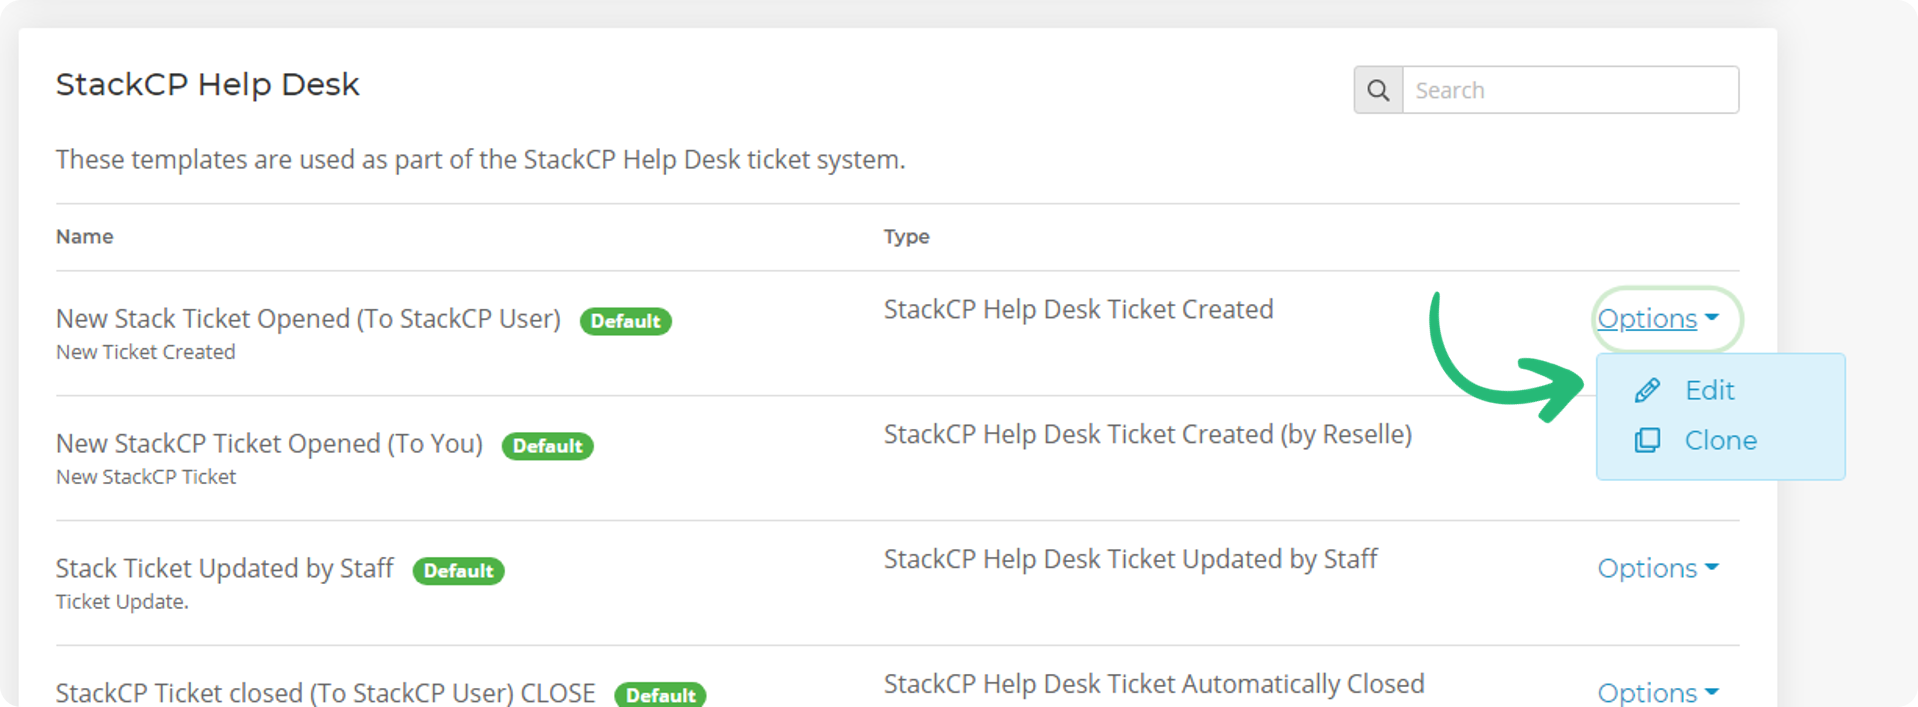
- Select the Use a custom header and/or footer component checkbox to use your customised settings. Please note, this will remove the contents of the email template body due to removing the default header and footer, so make sure you've got a copy of that first.

- Once done, select Save.
The email template will now have your custom branding when sent to your customers.
 Austin B.
Can I use WHMCS with my Reseller Hosting Package?
Yes - you can absolutely use WHMCS with our platform. We offer a WHMCS module that integrates perfectly with our platform.
You can find the module by logging in to your My20i account and going here: WHMCS.
We have a full comprehensive guide on integrating WHMCS with your reseller account to get you started as quick as possible.
All our Reseller Hosting plans come with a free WHMCS module and get a discount on their WHMCS license.
Note: you can also use HostShop, 20i's free and fully integrated billing solution as an alternative to WHMCS. View Setup Guide.
Read more about why it might be right for you to consider an alternative to WHMCS
 Austin B.
What does "Platform Transfer Failed" mean?
The most common reason platform transfer failures occur when moving to our WordPress hosting platform and the website does not currently meet the requirements.
In order for your site to work on our WordPress platform, you should ensure:
- You have a WordPress install in the public_html directory of your webspace
- WordPress is up to date - PHP 7 compatible
- Any additional plugins or themes should also be PHP 7 compatible
- The webspace is being used for no other software and just WordPress
- Any additional domains or subdomains point to the public_html directory and are therefore configured using a WordPress Network and not additional code/directories.
If any of the above requirements are not met, the transfer may fail or your website may not work correctly.
Note: We recommend making sure your website runs correctly using PHP 7 on our Linux Web Hosting platform before switching to WordPress. This is because our Linux platform allows you to easily Change PHP Version allowing you to resolve any version-related issues before transfer.
If you have any other platform transfer issues, our Support Team are here to help.
 Lloyd Cobb
Can I set a default PHP version for my packages?
Yes, you can set the PHP version you'd like your different package types to be provisioned with.
If you are a hosting reseller you might want to set a default PHP version for certain packages you offer to your customers.
Why set a default PHP version?
As a web developer, agency or owner of multiple websites setting a default PHP version can bring benefits in managing your projects.
With each new version of PHP, there are often changes to the language and new features introduced, which can affect how websites and applications function.
Having a default PHP version simplifies the process of managing different versions of PHP. It allows administrators and developers to easily switch between versions when necessary, without having to modify configuration files for every website or application you manage.
It also helps to prevent compatibility issues with plug-ins or themes if you are hosting WordPress websites.
How to set the default PHP version
To set this, firstly head to Manage Services > Configure Types. You can set the default PHP version on a per-package type basis, just select Options > Edit on the package type you'd like to set the PHP version on.
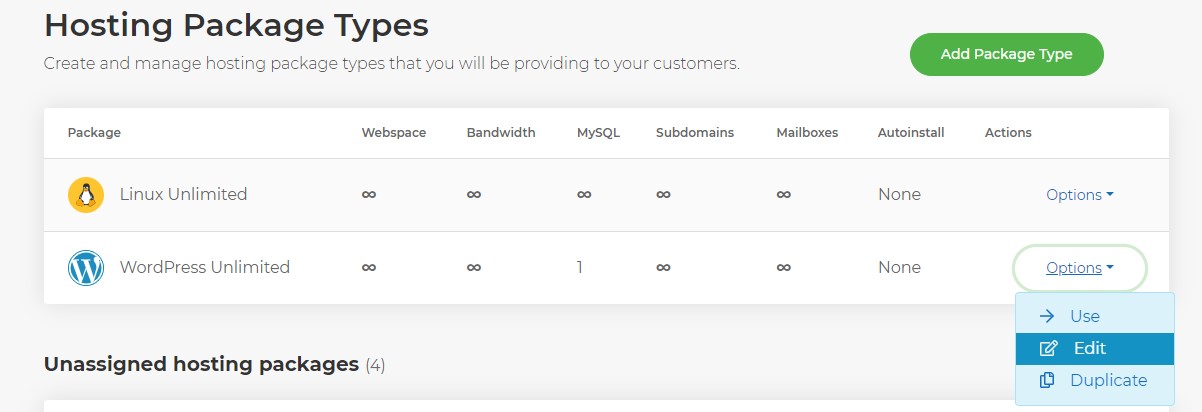
Head to the section (near the bottom) entitled Default PHP Version. Select the default PHP version you'd like to be used on this package type and select Save Changes.

When a new package is created using the package type you've edited the default PHP version will be what you've just set.
 Austin B.
I get a 500 error from a new hosting package on Windows
Internal server errors (Error 500)
Our Windows platform connects to our central storage system using authenticated access. This can take up to 30 minutes to fully provision for new websites.
If you've recently created a Windows hosting account and receive a 500 error via the temporary URL please check back again in 30 minutes to allow setup to complete in full. You can find more information about internal server errors here: Why am I getting an internal server error?
 Lloyd Cobb
How do I add a domain mapping or alias?
From My20i, head to Manage Hosting > Select Package > Domains. This area allows you to configure all domain names associated with that hosting package.
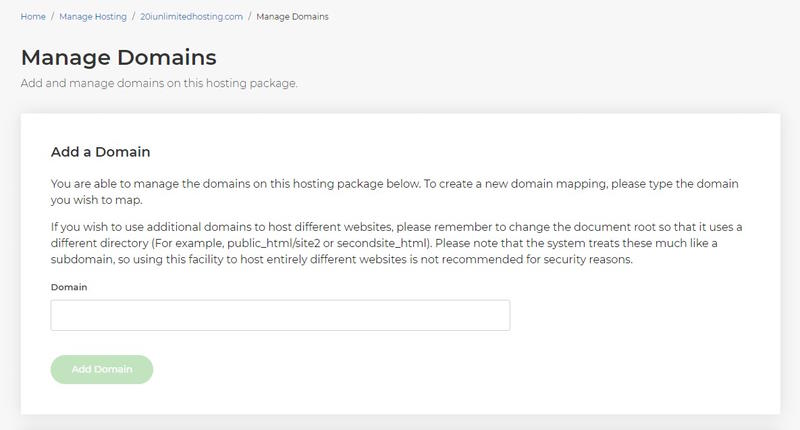
Domain mappings or aliases are simply additional domains that point to exactly the same files - an identical document root - as your primary domain name on the package. So, to alias or map a domain simply type it in the 'Domain' box.
Note: don't include 'www' and leave the document root as the default public_html.
What is domain mapping?
Domain mapping enables the connection of multiple domains with a primary domain or content management system (CMS). It can be used to have separate domains in the same CMS installation. WordPress Multisite networks are one example where domain mapping can be used.
All mapped domains can be managed from a single source. You can create subpages for your blog, shop, log-ins for employees, subsidiaries of your business or categories under the roof of your main domain.
You can serve different content for each of your mapped domains while the files are all in the CMS installation of the main domain.
Why use domain mapping?
It can be very helpful when you have a vast range of services or products that all justify a distinct domain name. With domain mapping you can connect them all, which makes it easier to and update all subpages in your network
What is the difference between domain mapping and domain redirecting?
Redirecting does what is says. Users are redirected from one domain to the target you set. This can be confusing and lead to less trust if the user has not searched for the target domain. The user will also see only the content of the domain the redirect is set to.
Domain mapping works different as it connects the content via a multi-site network. The URL they see in the browser does not change. Different content can be served for each domain, so the user can have a distinct user experience on each domain while all are managed from one root directory.
 Lloyd Cobb
What can the Migration Centre move?
As a 20i Reseller our Migration Centre gives you free and unlimited website migrations. The Migration Centre helps ease migrations from other providers. Currently, we support 6 types of migration sources:
- Migrate from cPanel
- Migrate from Plesk
- Migrate from DirectAdmin
- Migrate from Fasthosts
- Migrate from Heart Internet
- Migrate a WordPress site using FTP. This can migrate any WordPress site you have FTP details for.
The Migration Centre will copy all your website files, databases and mailboxes* over to the 20i platform. Once the website migrations are complete, we will automatically update the DNS records on our nameservers to point the website and mail records to the new hosting package.
Then you need to test the newly migrated package and update the nameservers on the domain name to point to our platform, like you'd do with any manual website transfer.
Please note the Migration Centre does not migrate domain names. These can be done quickly using our control panel before or after the website migration.
To access the Migration Centre, follow the Start a Migration icon from the homepage of My20i.
Note: *Migrating a WordPress site using FTP details will not migrate any mailboxes associated with the package.
 Lloyd Cobb
How do I clone a hosting package?
With your 20i Reseller Hosting Account, you can easily clone an entire package's contents from one domain over to another with no manual moving of files or the database.
- Head to Add a Hosting Package and select Clone from an Existing Package.
Note: There's a 5 GB disk space limit on the packages that can be used to clone-from. The purpose of the tool is to allow the cloning of template packages to quicken the development process for new sites.
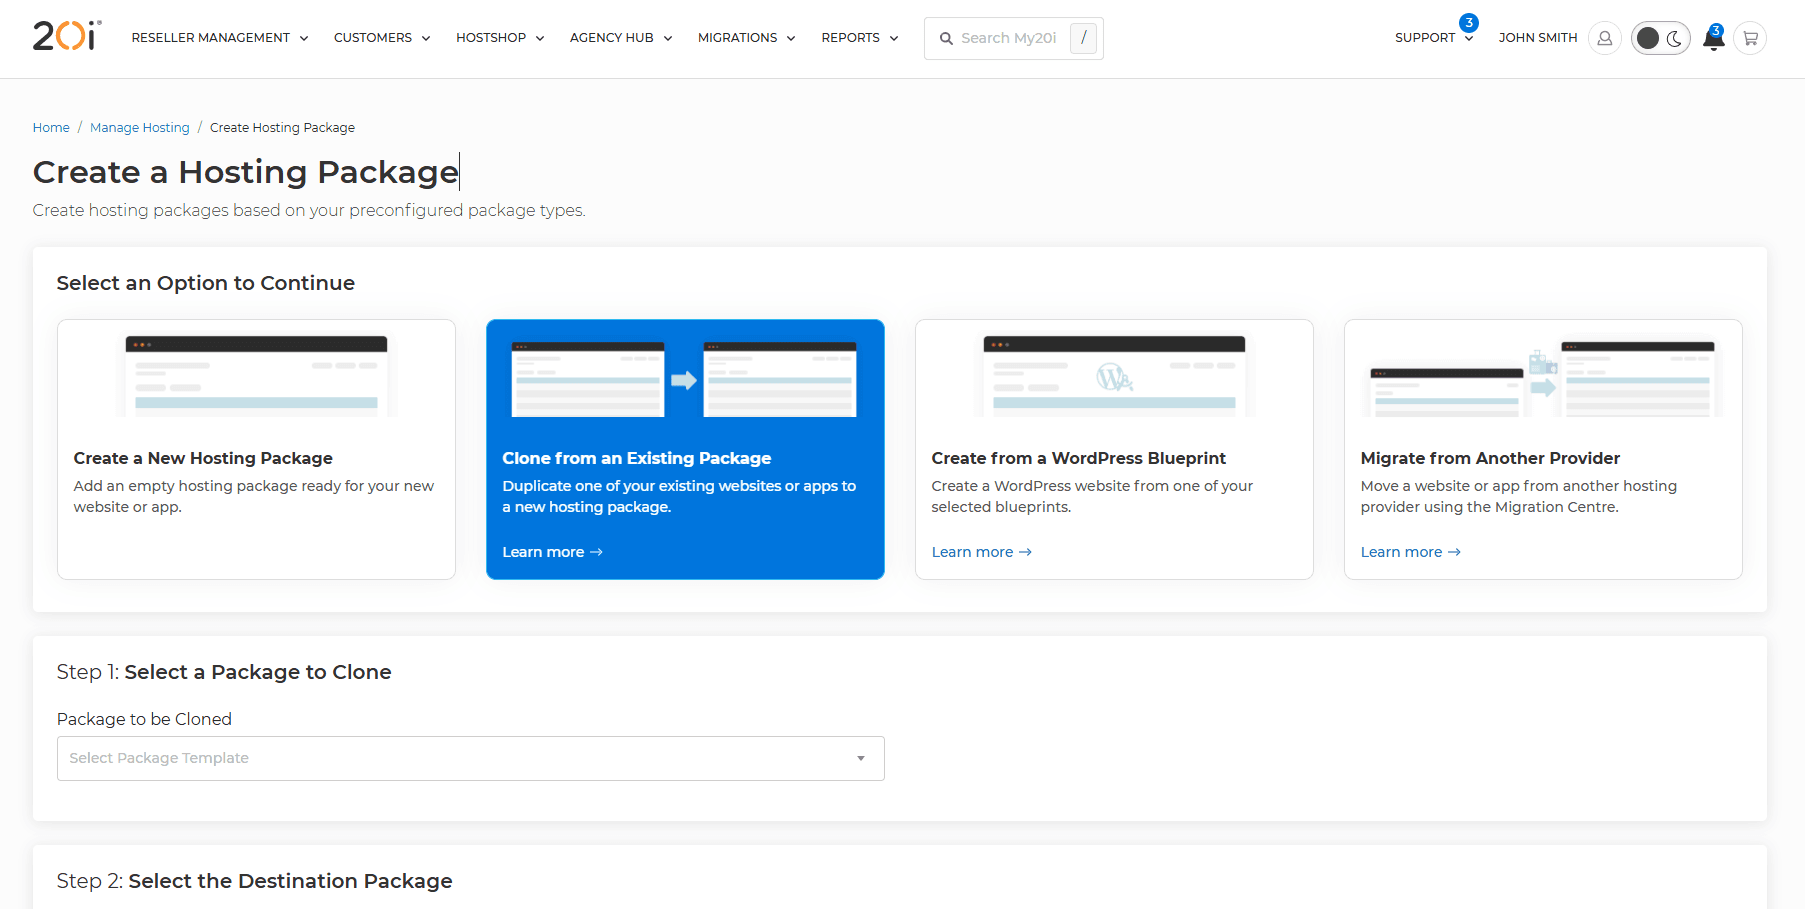
- Choose which package you'd like to clone and the name of the destination package.
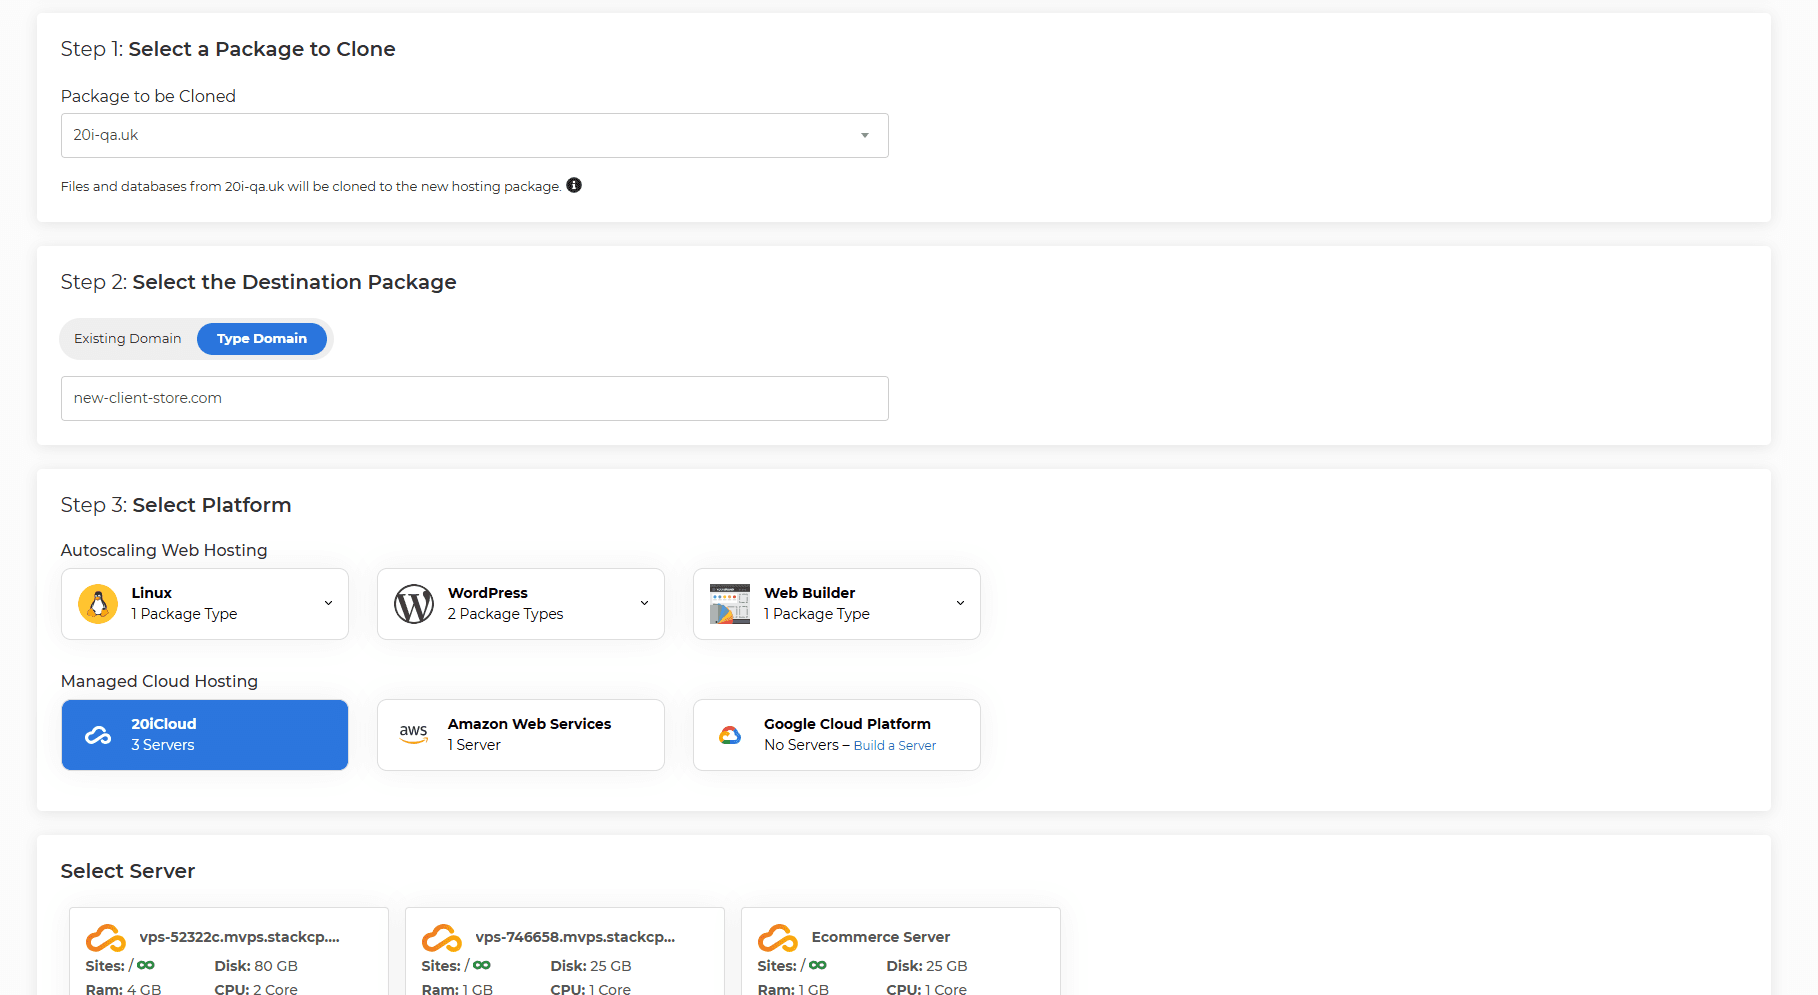
- Choose the Platform and assign any StackCP Users if required.
- Then select Create Hosting Package.
Cloning a package can take up to 30 minutes.
If you access the package via Manage Hosting > Options > Manage, you'll see 'This package is being cloned, please wait...' if it's not yet complete. The time it takes to complete a clone will depend on the size of the site being cloned, the larger the site and its associated files and databases the longer the clone will take.
Note: The tool will try to detect database config files such as wp-config.php and update those details, however, the tool is intended to clone template sites to live domains, so it may not always be able to detect those files.
 Austin B.
How do I switch my default data centre?
Resellers have the option to select what Data Center they wish to create a package in as a part of the package creation process. When creating their first package, they’ll have the option to select either our UK or US Data Center – once this has been selected, this will be made the default Data Center for the account.
Creating a package in the unselected Data Center will require purchasing the Additional Data Center add-on. So, as an example, if a Reseller chose the UK Data Center and wished to use the US Data Center afterwards, they would need to purchase the Additional Data Center add-on in order to do so.
Note: Reseller 25 and Reseller 100 customers can only use our US Data Center – should you wish to purchase the Additional Data Center add-on, you will need to upgrade to Reseller Unlimited.
How do I change my default Data Center?
Should you wish to change your default Data Center, there’s a specific process you’ll need to follow in order to action this. The steps are as follows:
- First, purchase the Additional Data Center location add-on available via My20i – the option for this is available during the package creation process.
- Using our Platform Transfer Tool, transfer all packages from your current Data Center to the new Data Center purchased with the add-on. We have a guide on how to do this available here.
- Once all of your packages have been transferred to the preferred Data Center, raise a ticket with our Support Team requesting to change the default Data Center.
- Our Support Team will action this change, and then you’ll have the opportunity to cancel the Additional Data Center Add-on if it is no longer required.
 Ruth Turner