Email Hosting – Spam & Junk Email Questions
Spam and junk email support: no one likes spam and junk email. Here's where to find out how to deal with it when you're using 20i email.
Can I add SPF records for my domain name?
Sender Policy Framework (SPF) records help reduce the chance of your domain being spoofed in spam messages. It can also increase the deliverability of e-mail to external providers such as Gmail and Outlook.
We maintain an SPF record that is kept up to date with all IP addresses used to transmit email from our network. This ensures that any email sent from our services passes an SPF check. To use this on your domain, you need to add a TXT record in DNS.
How to add SPF records automatically
By default, all newly provisioned hosting packages will have an SPF record for Stackmail added automatically. If you don't want this to happen, then you can opt-out by following the steps below:
- Go to Account Preferences in My20i.
- Select Do not automatically add Stackmail's SPF record to my DNS zones and click Save.

How to add SPF records manually
Firstly, access the DNS Management interface for your domain name. If the domain is registered with us, you can access this from the Manage Domains area of the control panel.
If the domain is not with us but is assigned to a hosting package, you can reach this interface via the Manage Hosting -> Select Package -> Manage DNS section.
Towards the bottom of the Manage DNS page, you will see 3 inputs to allow you to add new records. To add it:
- Leave the Name field blank
- Select TXT for Type
- Enter v=spf1 include:spf.stackmail.com a mx -all as data

Then save the changes. Your domain is now protected by an SPF record.
You can use the same record for all domains that use our mail services, however it should be noted that the above record will tell external providers all of your e-mail should originate from our network. If this isn't the case the record should be updated accordingly.
 Lloyd Cobb
What are my email sending limits?
Email Account Limits
The following limits apply to all messages sent via authenticated SMTP. This will primarily be used for email sent via a mail client, but can also include mail sent via your website if configured to send via SMTP.
We impose a limit of 8,000 messages per e-mail address per 24 hours.
The following limits also apply:
- No more than 10,000 recipients per day.
- No more than 2,000 unique recipients per day.
- A single email may not be sent to more than 100 individual addresses.
As an example, if you were to send 100 emails to 5 different e-mail addresses within a 24 hour period. We would count 100 messages, 500 total recipients and 5 unique recipients.
Web Server Limits
A limit of 500 messages per day is imposed on all e-mail sent by our web servers. E-mails sent by the web servers should be no larger than 5 MB in size. This applies to all messages sent via the PHP mail() function.
Email Size Limits
Our mail system accepts attachments up to 32MB in size, and the maximum message size in our network is 50MB.
Autoresponders
An autoresponder only sends once every 8 hours per sender.
Zero Tolerance Spam Policy
We take a zero tolerance stance against the sending of unsolicited email, bulk emailing and spam. It's to keep our email hosting's excellent reputation. Please refer to our Acceptable Use Policy for more information.
Please note: The distributed nature of our network means email can leave through different servers at different times. As a result, you may see periods when you can send a greater number of messages than the limits mentioned above. However, this behaviour should not be relied upon and is not supported. If you do wish to send a larger number of e-mails than any of the limits mentioned above, we would recommend looking at a specialist marketing email platforms such as SendGrid, Mailgun, or Mailjet.
New Mailbox Limit
When a new mailbox has been set up, the sending is limited to 50 per day for 7 days. This is actually an abuse rule to prevent new mailboxes being set up and used immediately to send out high volumes of spam emails. To preserve the platforms reputation and protect mail being sent from being spoofed as spam by third parties this rule was put in place to protect that status.
 Lloyd Cobb
How do I stop emails going to junk?
Here are the best ways to stop emails from being put in the junk mail folder.
Add an SPF Record
SPF - Sender Policy Framework records help reduce the chance of your domain being spoofed in spam messages. It can also increase the deliverability of e-mail to external providers such as Gmail and Outlook. You can set these to be added automatically to new packages in the Account Preferences of your 20i account or you can add them individually by adding a TXT record to the domain with the data v=spf1 include:spf.stackmail.com a mx -all. This tels other providers that 20i is a confirmed sender of your domain's emails.
Please see here for further information: Can I add SPF records for my domain name?
Add a DKIM Record
DKIM, like SPF, is a standard that enables a specific aspect of the email sending process to be authenticated. The premise of DKIM is to check that an email is really from the domain or sender that it said it was sent from and if it has been altered in any way in transit.
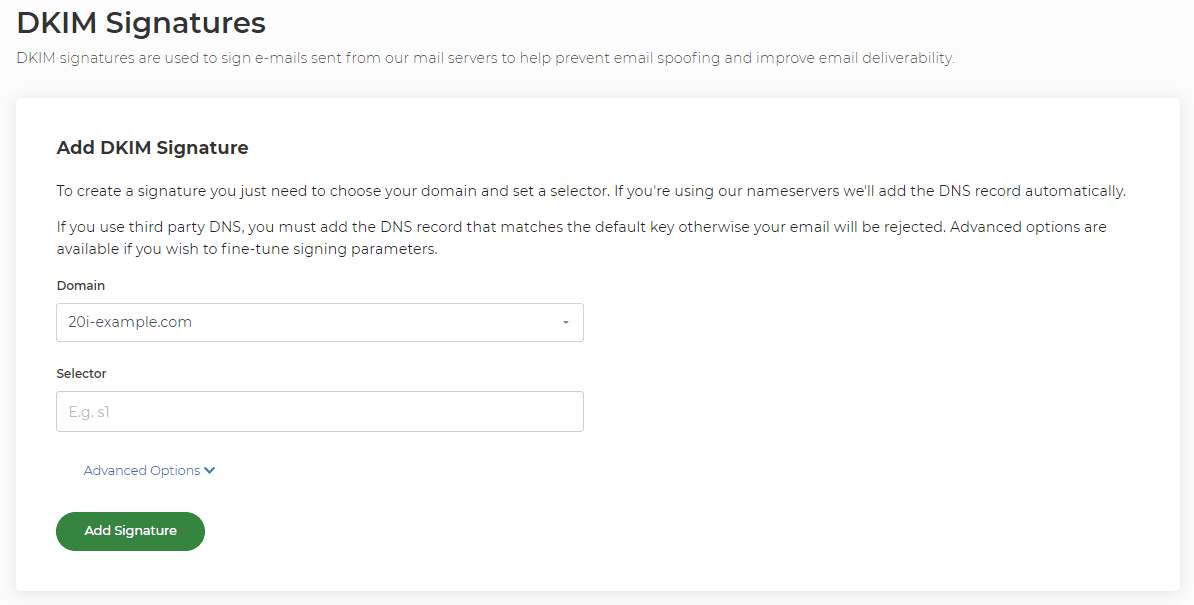
You can add one by going to the hosting package for the domain and to the DomainKeys section. You then need to select the domain you wish to add on to and add a Selector. This can be any value or name you like. It’s simply a field to identify the DKIM record. Then select Add Signature. If your nameservers are with us we'll automatically add this as a TXT record for you. If your name servers are elsewhere you'll need to go to 'Options' for the newly created DKIM and copy the DNS Name and DNS Value to a TXT record with your current DNS provider.
Please see here for further information: How do I add a DKIM record?

Add a DMARC Record
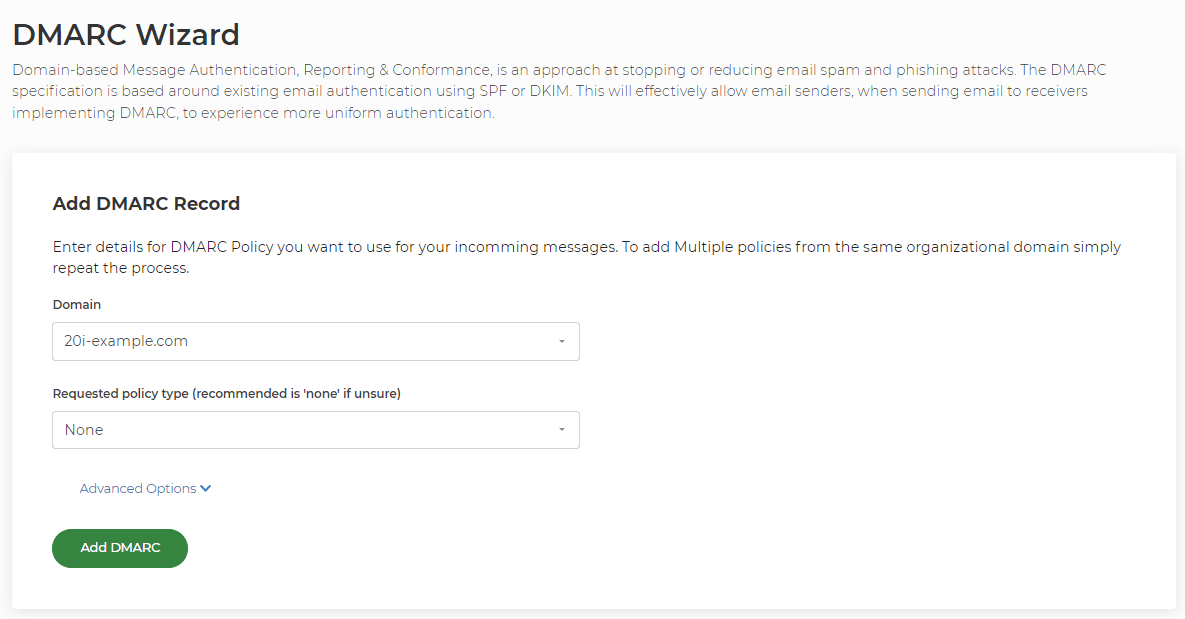
DMARC - Domain-based message authentication, reporting and conformance records facilitates authentication designed to give email domain owners the ability to protect their domain from unauthorised use, commonly known as email spoofing.
You can generate and add a DMARC record to a hosting package via the DMARC Wizard. You will need to select a domain name to add this record for and the request policy type. The policy type can be quarantine or outright reject. Quarantine will place the email in the recipient's spam/ junk folder, whilst the reject policy will reject the email and it will not arrive within the mailbox.
Generating a DMARC record will automatically add it into your DNS zone.
Please see here for further information: How do I add a DMARC record?

Edit the Junk Mail Filters
If incoming emails are the issue then you can allow-list the mail in the Junk Mail Filters section of any hosting package. In the Junk Mail Filters section, you can set the general filtering level to tell us how strict we should be with incoming spam filtering.
If you just want to allow a particular address this can be done by allow-listing it for a domain or the mailbox on the package. If you want to allow a single mail address then you would need to add 'thataddress@thedomain.com' and if you want to allow a whole domain then you should add '*@thedomain.com'. This will allow mail from the address/domain to bypass our spam filtering.
Please see here for further information: How do I allow-list all email from a specific domain/mailbox?
Reseller Help - How do I support my clients?
These steps should help you provide helpful and effective support to your clients.
1) If your customer is suggesting their sending emails are going to the junk folder, we'd recommend confirming which mailbox they're sending from, and to. Whilst it's difficult to check 'why' an external server may have filtered the email, adding both an SPF and DKIM record should prevent this from happening.
2) If an incoming email has been placed in the junk folder, request the client provides the email headers, this will show a spam score and help determine the root cause for the email to have been filtered.
 Austin B.
How do I add a DKIM record?
DKIM, like SPF, is a standard that enables a specific aspect of the email sending process to be authenticated.
The premise of DKIM is to check that an email is really from the domain or sender that it said it was sent from and if it has been altered in any way in transit.
As a hosting reseller your customers might ask you to add DKIM records for them, so it is import to understand them and know how to add them.
Specifically, DKIM (DomainKeys Identified Mail), provides a foundation for distinguishing legitimate mail. A DKIM signature is placed in the header of emails sent by 20i’s mail servers, so that the receiving mail server can then validate the signature using a public cryptographic key (2048 bit). It's added as a TXT record in the Manage DNS section for the domain name.
DKIM does not outright mean all emails will be delivered. However, it does provide the receiving mail server with further information so it can make a more informed decision on the best way to handle the email.
If you'd like to read more about DKIM, we'd recommend this blog post: DKIM Demystified.
How to add a DKIM record at 20i
- Head to Manage Hosting and 'Manage' the package you want to add a DKIM record.
- Select the DomainKeys icon.
Firstly, we'll explain how to add a simple DKIM record to your DNS.
- Ensure you’ve selected the domain you want to add the DKIM record-to.
- Add a Selector. This can be any value or name you like. It’s simply a field to identify the DKIM record. Then select Add Signature.

- If your nameservers are with 20i, we’ll automatically add the correct TXT record for you.

The signature will be added immediately to emails sent from the mailboxes under the domain selected. We will have automatically added a DNS record to Manage DNS. You may wish to wait for this to resolve for DKIM to be effective.
From here you’re all done: your emails will use DKIM as a method to authenticate email.
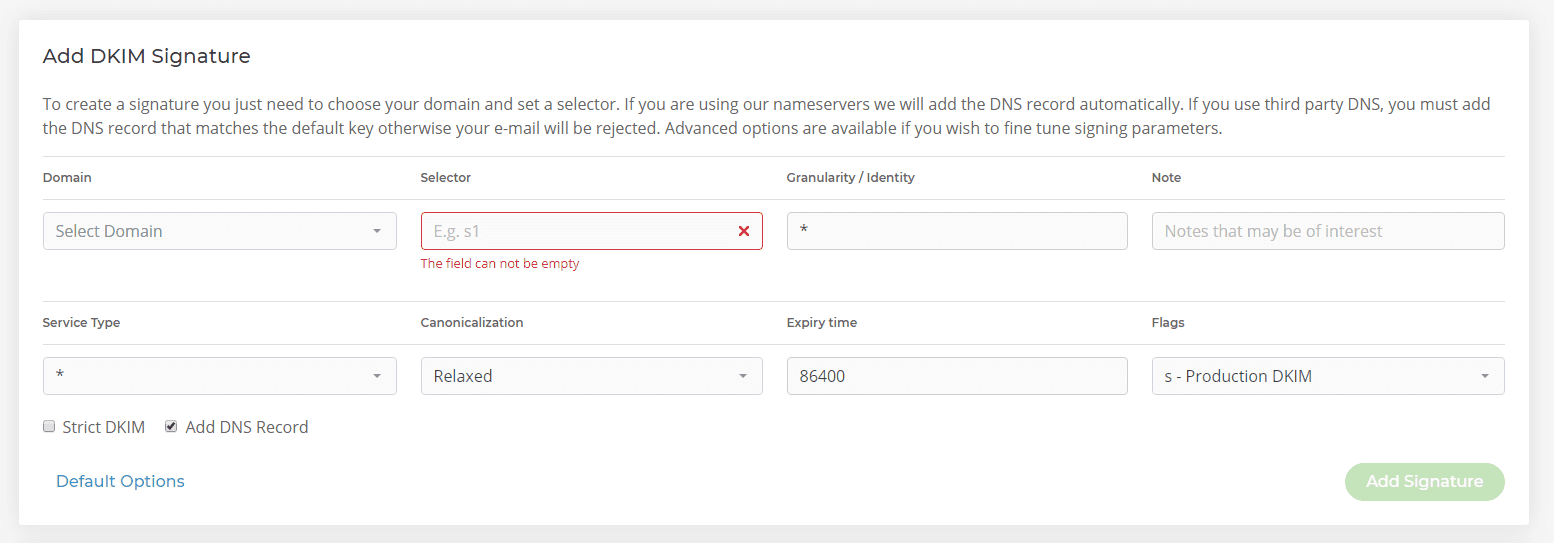
You can also use the Advanced Options section.
ℹ️ Note: This is only recommended if you’re familiar with customising DKIM signatures. Below is a description of each section and how it alters the DKIM signature that’s added to the header of emails sent.

Selector – This is a unique identifier for the DKIM record and can be set to any value you like. For example you could set it to indicate the name of an office location or the signing date (e.g. “october2019”).
Granularity/Identity – By default this is set to a wildcard value: '*'. You can use this field to set the DKIM record to be assigned to a specific mailbox, allowing you to constrain which mailbox can use this selector legitimately. For example, if you set the value of this field to be ‘sales’, only your sales@domain.com mailbox will use this DKIM signature. This field must match the local part of the signing address (mailbox).
Note – This field does not form part of the DKIM record or signature and is simply there so you can record any information about this record for your own information.
Service Type – Currently, DKIM only supports signatures added to messages sent via ‘Email’ (i.e. SMTP). However, in the future the DKIM standard may add more service types such as IM or VoIP, which we’ll then be able to support. This field can be left to either ‘*’ or ‘Email’ - changing this won’t influence behaviour at present.
Canonicalization – Some mail servers and relay systems may modify an email in transit, potentially invalidating a DKIM signature. There are two options you can set: 'Simple' and 'Relaxed'. If you expect your email to be modified in any way, you should select Relaxed which is more forgiving to changes made the header and body of the email.
Expiry Time – This is the time which, when elapsed, the DKIM signature will be invalidated in the mail header. By default it’s set to 86400 seconds (1 day). You may wish to extend this if you believe deliverability of the email will take longer than 1 day.
Flags - There are two flags available: 'Production' and 'Testing'. If you select Testing, you'll still receive a response to the email and the DKIM signature from the remote mail server, but the email won't be treated with different behaviour. Verifier systems may wish to track testing mode results to assist the signer. You'll mostly want to use Production.
 Austin B.
Why is my domain blacklisted, and how do I get it removed?
What is a domain blacklist?
A Domain Name System Blacklist (DNSBL) is a list that allows internet service providers (ISP) and other website administrators to block emails or traffic from specific systems. It's usually those that are known for sending spam and other malicious content. Normally, a blacklist contains domains, email addresses or IP addresses.
Having a domain blacklisted can prevent emails being sent. Instead, 'bounce back' messages are received from the server that has rejected the email.
Why is my domain blacklisted?
Having a domain blacklisted usually results from the degradation in the reputation of the domain itself. Most often this is caused by sending emails that have been classified as "spam-like". If your IP is listed on a blacklist this may be due to the reputation of your ISP itself. There are various ways that you can improve the sender reputation of your domain name.
- Add an SPF Record: https://www.20i.com/support/email-hosting/spf-records
- Add a DKIM Record: https://www.20i.com/support/domain-names/add-dkim
- Test the emails that are being sent using online tools: https://www.mail-tester.com/
- Send emails using only authenticated SMTP over an SSL/TLS Connection.
How can I delist my domain?
You'll want to remove your domain from blacklists as soon as possible because they're often shared between providers. If you believe you've fixed the root cause of the listing, by ensuring spam isn't being sent, head to the blacklist providers site and follow their blacklist-removal process.
You may find two types of removal process:
Self-Service Removal – This means that you can remove the blacklist manually without much trouble or waiting. You must ensure you have fixed the issues before doing this. If the domain is listed again it may be more difficult to remove.
Time-Based Removal – Most blacklists have a time-based process whereby domains that have lower-level listings will be removed on a periodic basis, usually 1-2 weeks. Higher-level listings may take a longer period of time to be removed.
 Austin B.
The Impact of Marking Forwarded Emails as Spam
At 20i, our email hosting offers the ability to forward your emails from one account to another, streamlining communication and ensuring you never miss an important message.
However, marking these forwarded emails as spam in your primary mailbox, especially within services like Hotmail, affects us as your forwarding provider.
Here's why it's essential to understand the repercussions...
Understanding Email Forwarding with 20i
Email forwarding is a service that allows you to automatically redirect incoming emails from one address to another. It's especially useful if you have multiple email addresses and want to manage your emails from one central location.
The Feedback Loop (FBL) and 20i
When you use services like Hotmail and mark an email as spam, they have a system called the Feedback Loop (FBL). This notifies the sender - in this case, 20i - that their sent email has been marked as spam.
How Marking Forwarded Emails as Spam Impacts 20i
- Unjust Penalties for 20i: When you mark a forwarded email as spam, 20i, your forwarding provider, gets penalized even though we merely relayed the email to you. This could lead to our service getting blacklisted or facing delivery issues in the future.
- Potential Service Interruptions: If 20i is wrongly blacklisted due to excessive spam complaints, it may disrupt our ability to forward legitimate emails to you and other users.
- Strain on Our Reputation: Constant spam markings hurt our sending reputation, making it increasingly difficult for genuine emails to reach users' inboxes across various email platforms.
Better Practices to Handle Unwanted Forwarded Emails
- Filter Instead of Marking as Spam: Use filters to organize or move unwanted emails to a separate folder. This avoids the negative consequences of marking an email as spam while keeping your inbox clutter-free.
- Adjust Forwarding Settings: If you consistently find unwanted emails from a particular sender, consider adjusting your forwarding settings on 20i's platform.
- Address Issues at the Source: If certain emails are consistently bothersome, it's better to unsubscribe or block them at the original email address, rather than marking them as spam after they're forwarded.
Conclusion
As your trusted email forwarding provider, 20i aims to provide a seamless service. Marking forwarded emails as spam affects our ability to offer this service optimally. If you have any questions or need help adjusting your settings, our support team is always here to assist.
 Andrew Porter