Databases – MySQL Questions
MySQL database support: if your website uses a MySQL database, here's where you need to look if you have any questions about it.
Building a MySQL instance on CentOS 7
You might need a larger database - for large ecommerce stores or complex sites, for example. To do this, you can configure a CentOS 7 VPS as a MySQL instance on an Unmanaged virtual private server.
This guide will show you how to build a MySQL instance using a 20i VPS.
Step 1 - Install MariaDB
You'll first need to install MariaDB - here's a guide: https://www.tecmint.com/install-mariadb-in-centos-7/
Once you've installed MariaDB you can test the installation by running the following:
[root@vps-b92a95 ~]# mysql -V
Which should give you:
mysql Ver 15.1 Distrib 10.1.44-MariaDB, for Linux (x86_64) using readline 5.1
Step 2 - Access MySQL
You can access MySQL with:
[root@vps-b92a95 /]# mysql -u root -p
You will then be prompted for the password, set when following the guide above. It might be easier to use the VPS password for convenience at this stage.
Enter password: Welcome to the MariaDB monitor. Commands end with ; or \g. Your MariaDB connection id is 15 Server version: 10.1.44-MariaDB MariaDB Server Copyright (c) 2000, 2018, Oracle, MariaDB Corporation Ab and others. Type 'help;' or '\h' for help. Type '\c' to clear the current input statement. MariaDB [(none)]>
Step 3 - Create the database
So now that MariaDB is installed, you will want to create the databases and database users within MariaDB.
To create a database:
[root@vps-b92a95 ~]# create database DATABASE_NAME;
If the site is to be hosted on the shared platform and the database is to be hosted on the VPS, you should create a user with remote access privileges.
So in this format:
[root@vps-b92a95 ~]# create user 'DATABASE_USER'@'%' identified by 'PASSWORD';
For example:
[root@vps-b92a95 ~]# create user 'wordpress_user'@'%' identified by 'password123!';
Now that the user and databases are created, you will want to grant all privileges.
[root@vps-b92a95 ~]# grant all privileges on DATABASE_NAME.* TO 'USER_NAME'@'%';
For example:
[root@vps-b92a95 ~]# grant all privileges on wordpress_testing.* TO 'wordpress_user'@'%';
Then let the privileges take effect:
[root@vps-b92a95 ~]# flush privileges;
You can check to see if the users and databases are accessible:
[root@vps-b92a95 /]# mysql -u wordpress_user -p wordpress_testing Enter password: Welcome to the MariaDB monitor. Commands end with ; or \g. Your MariaDB connection id is 18 Server version: 10.1.44-MariaDB MariaDB Server Copyright (c) 2000, 2018, Oracle, MariaDB Corporation Ab and others. Type 'help;' or '\h' for help. Type '\c' to clear the current input statement. MariaDB [wordpress_testing]>
Step 4 - Upload the .SQL file
Once you're happy with the database and user access, you can now look at uploading the database file to the server. You can use WinSCP if you're a Windows user. When the file is uploaded, you'll need to import the file:
[root@vps-b92a95 ~]# mysql -u DATABASE_USERNAME -p DATABASE < importedfile.sql
For example:
[root@vps-b92a95 ~]# mysql -u wordpress_user -p wordpress_testing < wordpress-3132333666.sql
Now that the database is imported you should open the firewall for the incoming MariaDB connections:
[root@vps-b92a95 ~]# firewall-cmd --permanent --add-service=mysql && firewall-cmd --reload
Conclusion
So that's the server all set up and ready. You would need to update the configuration file to connect to the database on the VPS, and you should be good to go.

What's the maximum MySQL database size allowed?
At 20i, each MySQL database you create can store up to 1024 MB (1 GB) of data. As databases comprise of only text, this is a lot of space in real terms; to put it into perspective, a 20i customer’s average database size is just 10 MB.
In the rare event that you need more than 1024 MB, you'll need to add an additional database. You aren't able to add more MySQL databases to websites hosted on our WordPress hosting platform; you will need to complete a Platform Transfer first.
If you have a Home, Business, or Reseller Hosting package with us, there’s no limit to the number of additional databases you can add. If you have a Starter Hosting package, you are limited to one MySQL database but you can upgrade your hosting package through My20i, or purchase an additional hosting plan.
For a step-by-step guide on creating new MySQL databases, please see the following article: How do I create a MySQL database in My20i.
While 1024 MB is enough storage for the majority of databases you may occasionally need a larger one. If you do need to host a database larger than this that can be done using a Managed Hosting on a VPS.

How do I create a MySQL database in My20i?
You can create MySQL databases in seconds directly from your My20i control panel.
This option is unavailable for packages hosted on our WordPress platform due to its WP-optimised nature. If you need to create a MySQL database, you'll need to carry out a Platform Transfer to move the website to our Linux Web Hosting platform.
Starter Hosting packages are limited to one MySQL database. For more databases, you can upgrade your hosting package through My20i, or purchase an additional hosting plan.
To create new MySQL databases:
1. Log in to My20i and select Manage Hosting.
2. Choose Manage next to the hosting package you wish to create a MySQL database for.
3. Under Web Tools, select MySQL Databases. Here you can complete the following actions:
- Create new MySQL databases. Each MySQL database has a maximum size of 1024MB (1GB).
- Manage existing databases.
- Add additional MySQL users to databases.
- Manage your additional MySQL users.
4. Under Add a new MySQL Database, choose a name for your database. Database names must be between 6 and 20 characters long, and we automatically add a suffix to avoid name collisions with other users.
5. Once you have chosen a name, click Create Database. Your new MySQL database will automatically appear in the Manage MySQL Databases section underneath.
From here you can change the automatically generated password, monitor usage, remove your MySQL database, or log in to your database.

How do I download or back up my MySQL Database?
There are various ways to export your MySQL databases for safe keeping or transfer. The first method allows you to back up multiple databases via your My20i control panel and the second on a 'per database' basis via phpMyAdmin.
Backup/Restore
The control panel provides an easy way to download all databases associated with your hosting package. To access this page:
- Access the Backup/Restore page: My20i > Manage Hosting > [select package] > Backup/Restore
- Ensure Databases is checked under Backup Type
- Click Create Backup
A backup task will then be queued by our system. Once finished, a download link will be provided; this usually takes 1-2 minutes, dependent on the size of the database. You can then download a zip file containing all your MySQL databases.
As a 20i Reseller you'll also have the ability to back up your website files and databases in bulk. Choose 'Back Up Web Hosting' from the My20i homepage and select the packages you wish to back up.
phpMyAdmin
Here's a video covering the movement of .SQL files using the phpMyAdmin tool included in My20i:
The phpMyAdmin management software lets you import and export your databases.
- Login to your database via phpMyAdmin (My20i > Manage Hosting > [select package] > phpMyAdmin)
- Choose the database you want to back up down the left hand side
- Click the Export tab at the top of your page
- Leave Quick selected under Export Method
- Select your desired format - we recommend "SQL" for most cases
- Click Go
Within a few seconds a download should begin in your browser.

How do I import a .sql file via the command-line?
If you've set up SSH access for a package then you can use one of two methods to import a MySQL database via the CLI.
If needed, please see our guide on how to connect to your package via SSH.
MySQL CLI
To import a SQL file via the command line, you can use the mysql command. Here’s how.
mysql -h hostname -u username -p database_name < file.sql
Replace hostname with your database server name.
Replace username with your database username.
Replace database_name with the name of the database where you want to import the SQL file.
Replace file.sql with the path to the SQL file you want to import.
After entering the command, you'll be prompted to enter the password for the specified username.
Enter the correct password, and the import process will begin.
Make sure the SQL file contains valid SQL commands and is in the correct format for the database you're using.
If the import is successful, the data from the file will be imported into the specified database.
Compressed Files
If the database file is zipped then you’ll need to unzip it first.
For a .zip file you can use the unzip command:
unzip databasefile.sql.zip
For a .gz file you can use the gunzip command:
gunzip databasefile.sql.gz
From here you can proceed to import the unzipped file as normal.
If the database file is zipped then you’ll need to unzip it first.
WP CLI
To import a SQL file using the WP-CLI tool, you can follow these steps. WP-CLI is a command-line tool for managing WordPress installations, and it includes a command for importing databases.
1. Navigate to your WordPress installation:
SSH into your package and navigate to the root directory of your WordPress installation.
2. Backup your current database (optional but recommended):
It's a good practice to create a backup of your existing database before performing an import. You can use the following WP-CLI command to export your database:
wp db export
This command will create a SQL dump of your database in the WordPress installation folder. You can use it as a backup in case anything goes wrong.
3. Import the SQL file:
Use the wp db import command to import the SQL file. Here's the command:
wp db import file.sql
4. Verify the import:
After the import is complete, you can verify by checking your WordPress site to ensure that the data from the SQL file has been imported correctly.
That's it! You've successfully imported an SQL file into your WordPress database using WP-CLI.
This method is especially useful for migrating WordPress sites or importing data into a new WordPress installation.

How do I check MySQL Database sizes across packages in My20i?
20i provides an easy way to monitor and view all MySQL database sizes across all packages in your My20i account.
To access the MySQL Database Size Reports:
- Login to My20i.
- Head to the Reporting section on the home page and select MySQL Database Sizes.
You’ll see a full list of all the databases under your 20i account and their sizes. You’re also shown which domain they are associated-with so that you can manage the MySQL database, should you need-to.

How do I import a .sql file via phpMyAdmin?
You can use phpMyAdmin to import an .SQL file with your database information. To do this:
- Log in to your database via phpMyAdmin (My20i > Manage Hosting > [select package] > phpMyAdmin)
- Choose the database you want to import your .SQL file to from the left hand side.
- Click the Import tab at the top of the page.
- Select Choose File and locate the .SQL file on your device or computer.
- Click Go
The .SQL file will be uploaded and imported to the database you've selected.
For further help there's a video showing how to import and export databases via phpMyAdmin:
20i's shared web hosting offers 1 GB MySQL databases.

What is MariaDB?
MariaDB is a fork of MySQL.
The database structure and indexes of MariaDB are the same as MySQL. This makes MariaDB a backward compatible, drop-in replacement for MySQL.
We currently run a combination MariaDB version 10.6
and 10.11
To check the version of MariaDB:
- Head to Manage Hosting, then phpMyAdmin.
- Select the database in the left-hand panel.
- Select the Query tab at the top.
- Type the query: SELECT VERSION(); and select Go.
- The version of MariaDB will then be outputted.

How to create a Stored Procedure, View & Routine using CLI & Workbench
When trying to create a View, Routine or Procedure for your database from within PHPMyAdmin, you may encounter an error similar to the following:
#1142 - TRIGGER command denied to user '_sso_XXXXX'@'1.2.3.4' for table 'my_table'
This error relates to how you sign in to PHPMyAdmin and the permissions that are granted to that user.
If you sign in to the database through My20i using single sign-on (or SSO for short), the system creates a temporary user to access and navigate through your database.
This is because we do not store passwords in plain text. As such, the UI does not display the details for signing in as the actual MySQL user.
The temporary user it creates, _sso_XXXX, does not have the necessary permissions to create Views, Routines, or Procedures and is, therefore, unsuitable for setting these up.
In addition, security risks make it impossible to log in directly to phpMyAdmin using a username and password.
Alternative Methods
The two methods to get around this are setting up Remote MySQL Access and connecting to the hosting package via SSH to use MySQL CLI.
Stored Procedures
Workbench
In the Navigator, go to your database > Stored Procedures
Right-click and select 'Create Stored Procedure'.
Define the procedure; in this example, the procedure is called 'CalculateTotalSales'.
Enter the code:
BEGIN
SELECT SUM(amount)
INTO total_sales
FROM sales
WHERE product_id = product_id
AND sale_date BETWEEN start_date AND end_date;
END
Click apply and then finish. If you encounter any errors, check your SQL query.
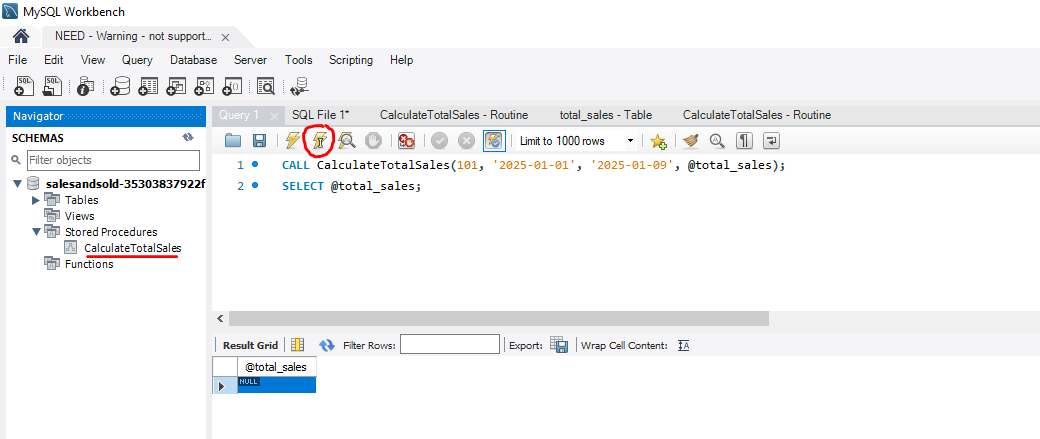
You can test the procedure to ensure it has been added correctly simply by opening a new query tab within the UI and then action the following code by hitting the lightning icon.
CALL CalculateTotalSales(101, '2025-01-01', '2025-01-09', @total_sales);
SELECT @total_sales;
CLI
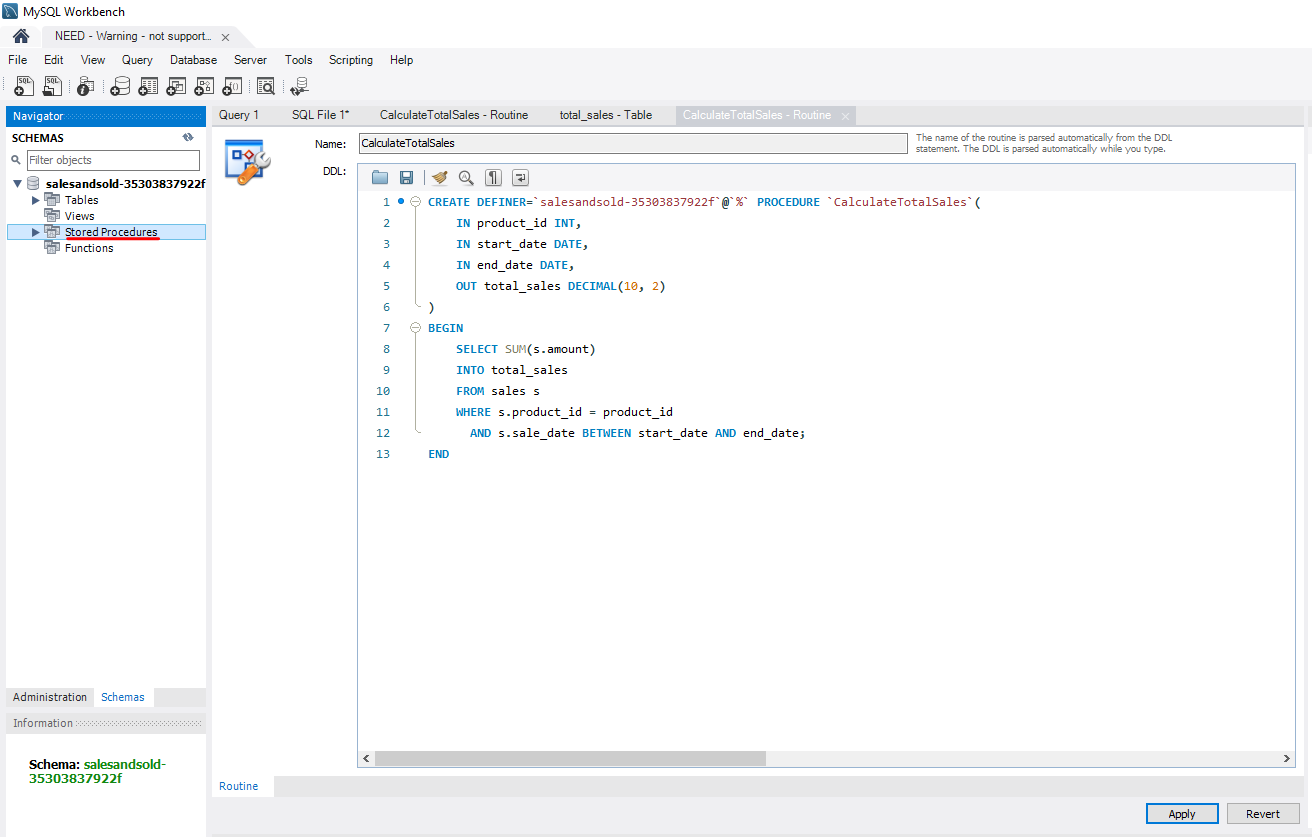
To begin with, a Procedure will need to be created within a .SQL file. In this example, an essential procedure to calculate the total number of sales has been made. PhpMyAdmin may help when populating your SQL file, but you won't be able to execute this via phpMyAdmin.
DELIMITER
CREATE PROCEDURE CalculateTotalSales(
IN product_id INT,
IN start_date DATE,
IN end_date DATE,
OUT total_sales DECIMAL(10, 2)
)
BEGIN
SELECT SUM(s.amount)
INTO total_sales
FROM sales s
WHERE s.product_id = product_id
AND s.sale_date BETWEEN start_date AND end_date;
END $$
DELIMITER ;
Next, load the .SQL file into your database via MySQL CLI. First, upload the newly created .SQL file to your hosting package's root using FTP or the File Manager. You will then need to connect to your hosting package via SSH and load the .SQL file.
mysql -u [username] -p [database] -h [hostname] < procedure.sql
You will be prompted for a password once the procedure has been created. To confirm the procedure has been created correctly,
MariaDB [wordpress-35303439ccfa]> SHOW PROCEDURE STATUS WHERE db = 'wordpress-35303439ccfa';
+------------------------+---------------------+-----------+--------------------------+---------------------+---------------------+---------------+---------+----------------------+----------------------+--------------------+
| Db | Name | Type | Definer | Modified | Created | Security_type | Comment | character_set_client | collation_connection | Database Collation |
+------------------------+---------------------+-----------+--------------------------+---------------------+---------------------+---------------+---------+----------------------+----------------------+--------------------+
| wordpress-35303439ccfa | CalculateTotalSales | PROCEDURE | wordpress-35303439ccfa@% | 2025-01-23 17:36:53 | 2025-01-23 17:36:53 | DEFINER | | utf8mb3 | utf8mb3_general_ci | latin1_swedish_ci |
+------------------------+---------------------+-----------+--------------------------+---------------------+---------------------+---------------+---------+----------------------+----------------------+--------------------+
1 row in set (0.004 sec)
View
Workbench
In the Navigator, select the database in the top left, right-click Views, and click 'Create View'.
Once the View has been created, populate the query box with the code for the query. Once done, click 'apply'.
A popup window will ask you to review the script. Click 'apply' and then 'finish' to complete the configuration of the View.
To verify that the View has been created and configured correctly, go to the Navigator, select the database in the top left, right-click Views and the View should be presented to you. In addition, you use the query box to run a SQL command to select the View.
CLI
To create a View, generate a new SQL file and populate it with the relevant queries. Using phpMyAdmin may help when populating your SQL file, but you won't be able to execute this via phpMyAdmin. This is the example that will be loaded via MySQL CLI.
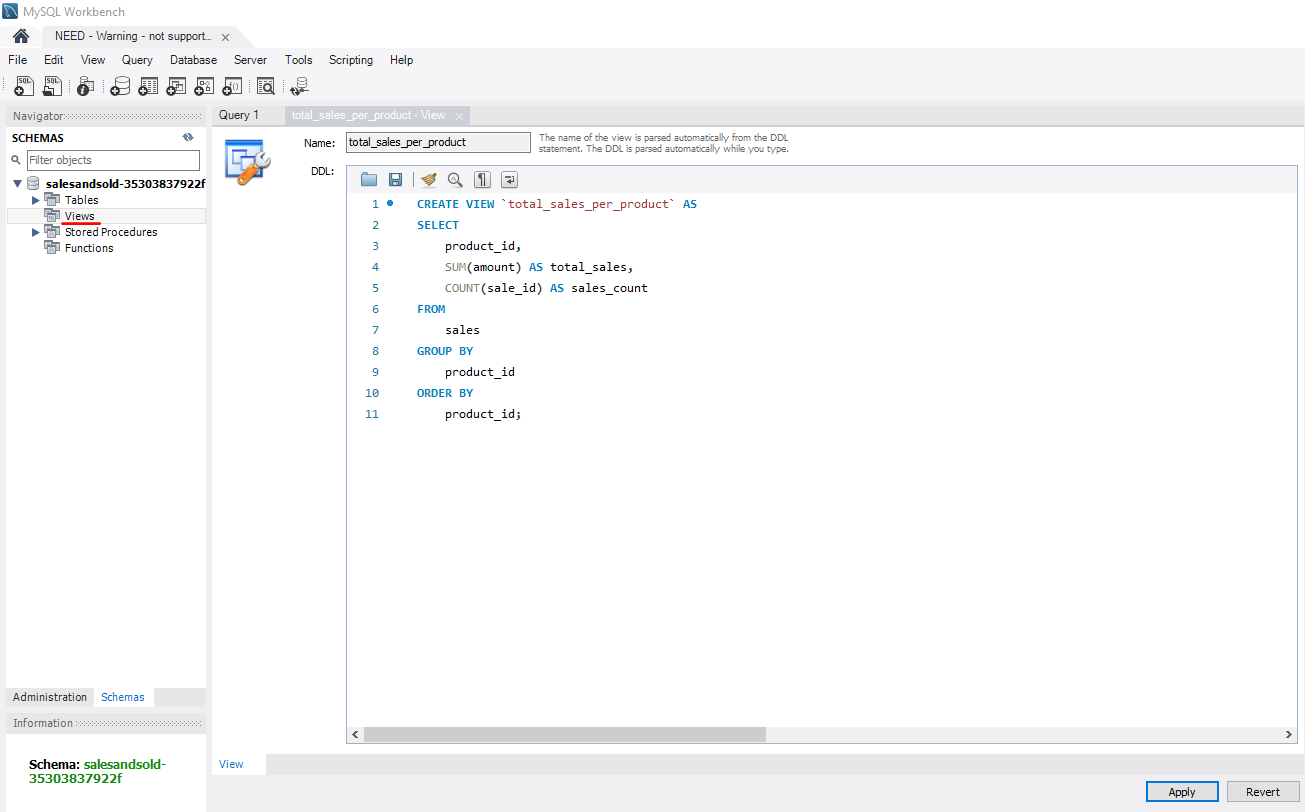
CREATE OR REPLACE VIEW product_sales_summary AS
SELECT
product_id,
sale_date,
SUM(amount) AS total_sales
FROM
sales
GROUP BY
product_id, sale_date
ORDER BY
product_id, sale_date;
SELECT * FROM product_sales_summary;
You will need to load the SQL file to the database. In order to do this, upload the SQL file to the web space via the File Manager or by using FTP. Once uploaded to the root of the web space, connect to the hosting package using SSH and then run the following MySQL import command.
mysql -u [username] -p [database] -h [hostname] < view.sql
You can query your View by using the following query within MySQL CLI:
SELECT * FROM total_sales_by_product;
+------------+-------------+
| product_id | total_sales |
+------------+-------------+
| 101 | 420.50 |
| 102 | 250.00 |
| 103 | 450.00 |
+------------+-------------+
Routine
Workbench
In the Navigator, go to your database > Stored Procedures
Right-click and select 'Create Stored Procedure'.
Define the procedure; in this example, the procedure is called 'GetProductSales'.
Enter the code, in this example we will be using the following:
BEGIN
DECLARE total_sales DECIMAL(10, 2);
SELECT SUM(amount)
INTO total_sales
FROM sales
WHERE product_id = product_id
AND sale_date BETWEEN start_date AND end_date;
SELECT
product_id AS ProductID,
start_date AS StartDate,
end_date AS EndDate,
total_sales AS TotalSales;
END

One done, apply and then save the changes made.
To verify this has been done successfully, you can click the drop-down arrow in the top left corner for the Stored Procedures. The newly created routine should be present. Alternatively, action the following SQL query and change the DB name where appropriate.
SHOW PROCEDURE STATUS WHERE Db = 'salesandsold-35303837922f';

CLI
Similarly to the procedures, an SQL file must be generated to contain the routine. This will be uploaded to the database using MySQL CLI. The routine example is as follows:
DELIMITER $$
CREATE PROCEDURE GetProductSales(
IN product_id INT,
IN start_date DATE,
IN end_date DATE
)
BEGIN
DECLARE total_sales DECIMAL(10, 2);
-- Calculate the total sales for the product in the given date range
CALL CalculateTotalSales(product_id, start_date, end_date, total_sales);
-- Output the result
SELECT
product_id AS ProductID,
start_date AS StartDate,
end_date AS EndDate,
total_sales AS TotalSales
FROM dual;
END $$
DELIMITER ;
Once the SQL file has been uploaded to the root of your hosting package's web space, please connect to the hosting package via SSH and import the SQL file to the MySQL database.
mysql -u [username] -p [database] -h [hostname] < routine.sql
You can then call the routine via the following query:
CALL GetProductSales(101, '2025-01-01', '2025-01-09');
+-----------+------------+------------+------------+
| ProductID | StartDate | EndDate | TotalSales |
+-----------+------------+------------+------------+
| 101 | 2025-01-01 | 2025-01-09 | 420.50 |
+-----------+------------+------------+------------+
1 row in set (0.001 sec)
Query OK, 1 row affected (0.001 sec)
