Email Hosting – Email Accounts Questions
Email account support articles: find answers quickly if you have any questions about your email account, such as how to rename your mailbox.
Can 20i Support migrate my emails if I use WordPress FTP migration?
To migrate your emails and mailboxes to 20i email hosting, you can use our in-house Email Migrations tool. This will let you migrate your IMAP mailboxes, your Gmail mailboxes and your Outlook mailboxes into 20i.
To do this:
- Log in to My20i.
- Select which package you want to migrate emails into via Manage Hosting.
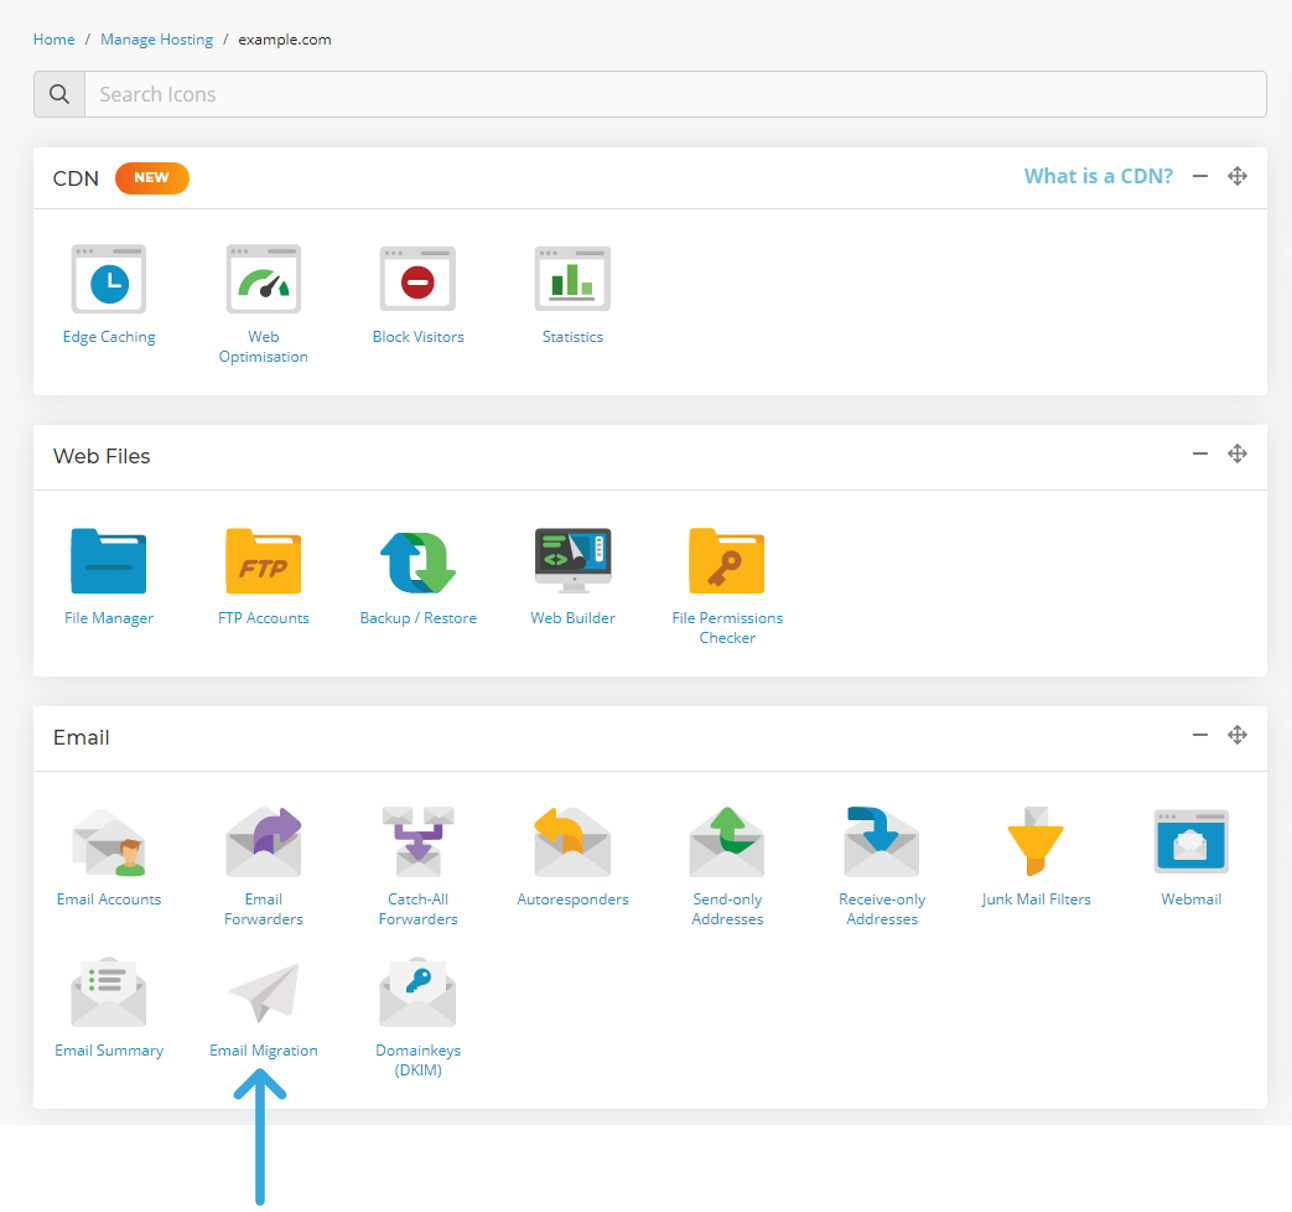
- Select the Email Migrations tool that is within the emails section.
- You can now simply enter the relevant credentials and select then select Sync.
If you the sync fails to start, this is likely due to the credentials not being correct. You should confirm that the password you have used is correct and that the hostname is also correct.
All 20i WordPress Hosting includes an unlimited number of 10 GB email mailboxes.
 Austin B.
I've reached my mailbox quota size. What can I do?
With 20i all mailboxes have 10 GB of data storage. It's unlikely that you should ever fill this unless you're receiving a large amount of mail or have a lot of emails with large attachments.
All the emails and attachments you have in your mailbox are stored on a server, and each mailbox is given a specified amount of space on the server, 10 GB in the case of 20i. Once that space has been filled by emails and their associated data, you will no longer be able to receive emails.
To check your mailbox usage:
- Log in to My20i and go to Reports > Mailbox Usage.
- Locate your mailbox and the usage will be displayed next to it.
Note: The storage shown on this page is only updated periodically. For the exact storage usage continue the following steps:
- Click on Manage.
- Locate the mailbox on the page you are redirected to.
- Select Options > Webmail.
- The current, up to date, usage will be displayed in the bottom left.
Steps to free up more space in your mailbox:
- Delete emails from your Trash folder. When emails are deleted from your inbox or other folders they will go to your trash. These emails are still accessible to you and are recoverable but are still taking up room on the server and so are using your mailboxes storage space. Once you delete emails from your trash they are gone completely. After this they’re no longer recoverable so only delete emails you’re sure you don’t need.
- Create a local backup of your emails. This will depend on the mail client you are using to view your emails, but most modern mail clients include an option to create a backup of your mailbox which you can then hold on to your computer. You can find a guide to doing this in Outlook here.
- You can also remove your sent emails if you no longer need a copy yourself. Deleting emails from your sent folder will not remove them from the recipient's inbox but will free up space on our server for your mailbox
To upgrade your mailbox to more than 10 GB:
- Head to Manage Hosting > Options > Manage > Email Accounts.
- Locate your mailbox with high usage.
- Next to the mailbox, you should see the option to upgrade. To get an extra 10 GB storage costs £9.99/$9.99 for the year - less than 3 pence/cents a day.
- Select this and check out to increase the mailbox by an additional 10 GB.
- You can purchase as many 10GB upgrades for your mailbox as you want. There is no limit to this.
What Happens When a Mailbox is Full?
When your mailbox reaches its storage limit, any new emails sent to it will be rejected by the server. The sender will receive a bounceback message letting them know the email could not be delivered.
These undelivered emails are not stored or queued — they are permanently lost unless the sender resends the message after you've cleared space in your mailbox.
To avoid losing important emails:
- Regularly delete old or large messages.
- Empty your Trash and Spam folders.
- Consider upgrading your mailbox quota if you're consistently hitting the limit.
 Austin B.
How to use the email migration tool
To migrate your emails and mailboxes to 20i, you can use our in-house Email Migrations tool. This will let you migrate your IMAP mailboxes, your Gmail mailboxes and your Outlook mailboxes in to 20i.
Note: You'll need to have set up the mailboxes within 20i first using the same password as currently used by the mailbox. Here's how to set up a mailbox.
- Head to My20i > Manage Hosting > Options / Manage > Email Migration
- Enter the relevant credentials and then select Sync.
- Hostname - This will be the hostname of the mailserver that you are syncing your emails from. If you're not sure what this is then it may be worth asking your previous hosting provider what this is.
- Username - This will be the mailbox that you are syncing.
- Password - This will be the password of the mailbox at your previous host and of the newly created mailbox at 20i. Please note: you'll need to have set up the mailboxes within 20i first using the same password as currently used by the mailbox.
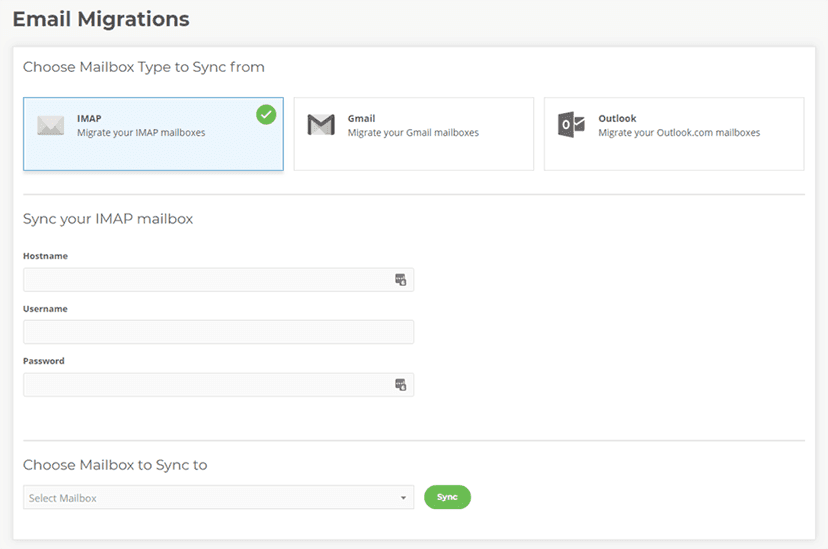
Once the sync has completed, your emails will have migrated over to 20i's email hosting.
My email migration has failed, what should I do?
If the sync fails to start, this is likely due to the credentials not being correct. You should confirm that the password you have used is correct and that the hostname is also correct - try logging into the previous hosts webmail to confirm the details are correct.
Can I use the email migration tool more than once for the same mailbox?
Yes, you can use it as many times as you want. You may want to do this if you've recently switched MX records so mail now routes to 20i, to get the latest copy of the mail from the preivous mail server you can simply redo a mailbox migration. This will then only migrate emails that are new, so you won't have any duplicate emails.
Does the email migration tool move or copy emails across?
The email migration tool copies the emails and folders across to 20i, so no emails are "removed" from your old mailserver/mailboxes.
Can I only perform one mailbox migration at a time?
Yes, you can only perform one mailbox migration at a time per package.
Where can I find my hostname?
Your previous host will be able to tell you your hostname. It is worth trying mail.yourDomain.com as that is a common hostname that is used.
Should I keep or change the DNS prior to an email migration?
It is strongly recommended that you change the DNS to 20i after the email migration has completed. This will ensure any future emails will be received to the correct mailbox.
 Austin B.
How do I set up email on my iPhone?
There's a quick and easy way to set up email on your iPhone or iPad. On the device you wish to set up mail:
Auto-Configuration
- Head to Manage Hosting > Options > Manage.
- Select Email Accounts.
- Select Options > Account Setup.
- You'll then see the Download iOS Mobile Profile button, select this to download the correct information to your iPhone to set up your email account.
- Review and install the profile on your phone, you'll need to enter your mailbox password to complete the setup.
Manual Configuration
To set up your 20i mailbox on an Apple iPhone or iPad, you need to:
- Head to the Settings icon and locate the Apps option.
- Go to Mail.
- Then select Mail Accounts.
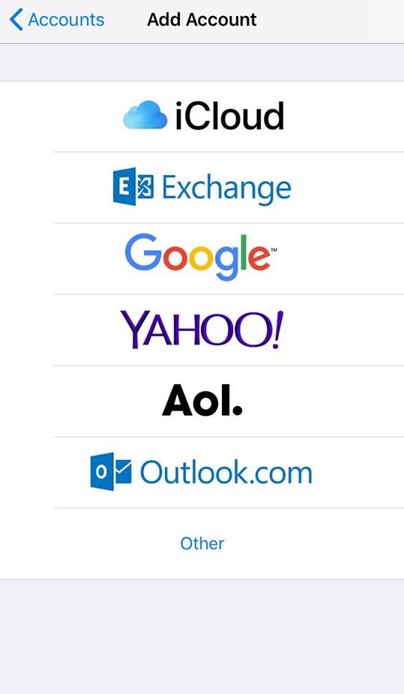
- Next, click Add Account
- Select Other from this list.
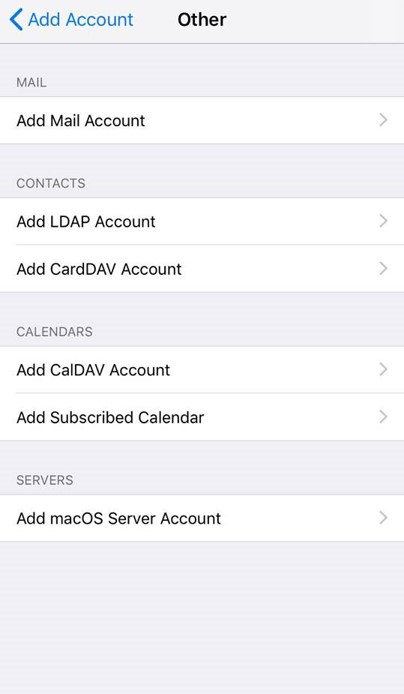
- Select Add Mail Account.
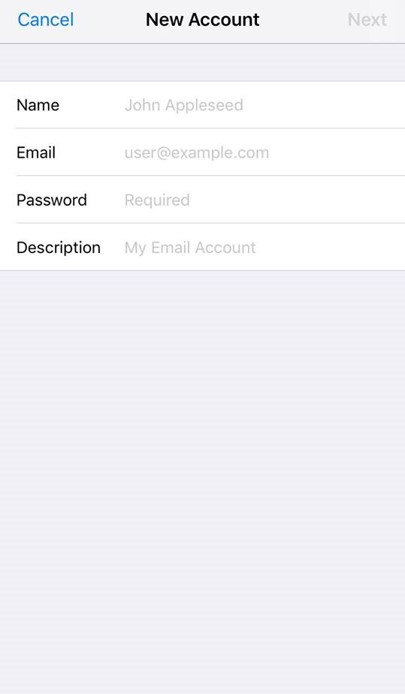
- Input the information requested:
Name: Anything
Email: example@yourdomain.com
Password: Mailbox Password
Description: Work, Business...etc
IMAP:
Incoming Mail Server
Host Name: imap.stackmail.com
Username: example@yourdomain.com
Password: Mailbox Password
Outgoing Mail Server
Host Name: smtp.stackmail.com
Username: example@yourdomain.com
Password: Mailbox Password
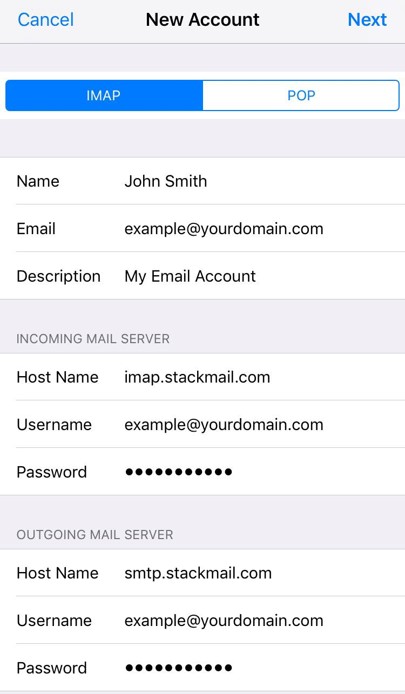
- Finally, select the mail account and go into the Outgoing Mail Server settings. Select Primary Server, make sure SSL is switched on and the port is set to 587.
Click here for our guide to set up email with Outlook.
 Austin B.
What are MX records?
An MX (Mail Exchange) record is a type of DNS record that specifies the mail server responsible for accepting email messages on behalf of a domain. It's used to route email messages to the correct server and ensure that they are delivered to the right recipient.
How do MX records work?
When an email message is sent to an email address at a specific domain, the recipient's mail server looks up the MX records for that domain to determine the mail server responsible for accepting email for that domain. The email is then sent to that mail server, which delivers it to the correct recipient.
MX records are used to ensure that email messages are delivered to the correct mail server and that they reach their intended recipients. They are important for the proper functioning of email services and are necessary for any domain that wants to receive email.
A domain can have multiple MX records, each with a different priority. The priority is specified in the MX record, with lower numbers indicating higher priority. If the highest-priority mail server is not available, the email is delivered to the next-highest-priority server, and so on. This allows for email delivery to be maintained even if one of the mail servers is down.
If you are using our email services, then the MX record that you would need to use is ‘mx.stackmail.com’. If your DNS is handled through 20i, this MX record will be added to your DNS zone by default.
MX records FAQs
Do you need an MX record to send email?
No, an MX record is not required to send email. It is only necessary for receiving emails. Some recipient email servers may reject emails from domain names with no MX record due to spam filter settings.
Where should my MX record point to?
Your MX record should point to the hostname of the mail server responsible for accepting email for your domain.
Can an MX record be an IP address?
No, an MX record must be a hostname and cannot be an IP address.
Is an MX record a DNS record?
Yes, an MX record is a type of DNS (Domain Name System) record. More information in our guide to DNS records.
What happens if there is no MX record?
If there is no MX record for a domain, email servers will not know where to deliver email for that domain, and email sent to that domain may be bounced or rejected.
How do I fix ‘no MX record found’ for domain?
To fix "no MX record found for domain" issue, you need to create an MX record for your domain pointing to the correct mail server hostname, and ensure it is properly configured to receive email.
What is the difference between MX and SPF records?
MX (Mail Exchange) records specify the mail server responsible for accepting email messages on behalf of a domain, while SPF (Sender Policy Framework) records are used to prevent email spoofing by specifying which mail servers are authorised to send email on behalf of a domain.
 Chris Wright
Why can't I send emails?
There are a few very common reasons why you may not be able to send emails using 20i email hosting.
Are your email settings are correct?
Make sure the email account username and password that you enter in your email client are correct. The details you'll need to be using are found below:
Account type: IMAP- Incoming mail server: imap.stackmail.com.
- Outgoing mail server: smtp.stackmail.com.
- Incoming server port (IMAP): 993
- Use the following type of encrypted connection: SSL
- Outgoing server port (SMTP): 465 (or 587)
- Use the following type of encrypted connection: TLS
For further information, please see: How do I setup my 20i mailbox in Outlook?
Are email sending limits being hit?
Our mail platform has several limits in place in order to protect the reputation of the mail platform and prevent large quantities of spam emails being sent. Currently, our mail limits are as follows:
Web servers: 500 emails a day.
Mailboxes: 8000 emails a day.
Message size/attachments: our webmail system accepts attachments up to 32MB in size, and the maximum message size in our network is 50MB.
If any of these limits are breached, then it won't be possible to send mail from that hosting package or mailbox. In the case of the message size/attachment limit, you'll simply need to look at reducing the size of the email or the attachment being sent.
Where do the MX records point?
You can easily ensure 20i serves the emails by using the tool here: https://mxtoolbox.com
If we host the emails then you'll see mx.stackmail.com returned. If anything else is returned you may wish to contact the provider to determine the cause of the issue.
Is the mailbox disabled for suspicious activity?
If you're receiving the following error when trying to send that the mailbox may have been disabled for sending suspicious emails.
If you've received this error, please get in touch with our Support Team, they'll be able to get this resolved for you.
Reseller Help - How do I support my clients?
These steps should help you provide helpful and effective support to your clients.
1) It's best to determine exactly what the client is seeing, we'd recommend asking for a screenshot of the error they're receiving. From there you may be able to determine from the above guide why they may be having issues. e.g. (Sending mail from this address has been disabled due to suspicious activity)
2) We'd recommend checking the settings within the mail client, it may also be helpful to request a screenshot of these to. We'd then recommend comparing those against the recommended settings above.
3) Specific examples will always help, ask which mailbox they're sending from, when they send an email, did they receive a bounceback email and what did it say?
 Austin B.
WordPress knowledge: use SMTP with and without plugins
Sending emails directly from your WordPress site can be critical to your site’s success. It could be from a contact form to help your clients get in touch if they’re interested in your services, order emails to confirm details and provide receipts for purchases, or password reset emails to allow users access to their accounts.
WordPress itself comes with functionality out of the box that can allow for sending emails, but it’s not as secure as it could be, and can more often than not result in your business-critical emails resulting in the Spam folder.
Making use of SMTP with your WordPress site, however, can ensure that all of these important emails make it to their intended audience. Setting them up is much easier than you’d think. This guide will step you through what SMTP is, why it’s important to make use of it on your WordPress sites, and explain a couple of ways for you to get started using SMTP as soon as possible.
What is SMTP?
SMTP, also known as the Simple Mail Transfer Protocol, is the main protocol used to send and receive email. A majority of email systems make use of SMTP to send out emails between servers. These emails can then be retrieved using email client protocols such as IMAP or POP3.
Why should I use SMTP with WordPress?
By default, WordPress makes use of PHP Mail using the wp_mail function to send emails from contact forms, product orders and other functions that send out automated emails. However, PHP Mail lacks any form of authentication – it simply sends with the from address it’s provided directly from the server itself.
As a result, PHP Mail often gets used to spoof email addresses, commonly enough that some mail hosts simply mark emails from PHP Mail as spam or may even get blocked.
SMTP, on the other hand, connects to a mailbox directly and authenticates the connection using the mailbox password before it sends. This means that only setups with the correct mailbox details can actually send out emails. This is considered much more secure and can ensure that your site’s emails are less likely to be seen as spam and make their way to your intended recipients.
How can I connect using SMTP?
Connecting your WordPress site to your mailboxes using SMTP first requires you to understand where your emails are hosted – each mail host has a different hostname for their SMTP services. Knowing what this is can save you a headache in the long run. Some services have setups available to allow you to use smtp.yourdomain.com to connect, but this requires that subdomain on your domain to be pointed to their services.
If your emails are hosted here with us at 20i, our SMTP settings are as follows:
Hostname: smtp.stackmail.com
Port: 465 (SSL) or 587 (TLS)
Security: SSL/TLS
Username: Your email address you want to send with
Password: The password of the mailbox you want to send with
If you use Office365 to host your mailboxes instead, you’ll need to use their SMTP details:
Hostname: smtp.office365.com
Port: 587
Security: STARTTLS
Username: Your email address you want to send with
Password: The password of the mailbox you want to send with
Other mail hosts will provide guidelines or quick references online that will specify the SMTP connection details you need. If you’re unsure, check with them directly to confirm.
Once you have the details you need, it’s time to connect. Doing so can be done a couple of ways, depending on how confident you are with coding.
Connecting to SMTP using a Plugin
If you’re unsure and want an easy way to do it, there are a great number of WordPress plugins that handle the heavy workload of the connection for you, allowing you to simply pop in your SMTP details and begin sending straight away. We'll demonstrate the setup SMTP in WordPress with a plugin using two examples of popular ones. These are:
WP Mail SMTP
WP Mail SMTP is a free plugin that comes with a wizard that runs automatically upon installation and steps you through setting up your SMTP connection. When you first install it, you’ll be prevented with the following screen:
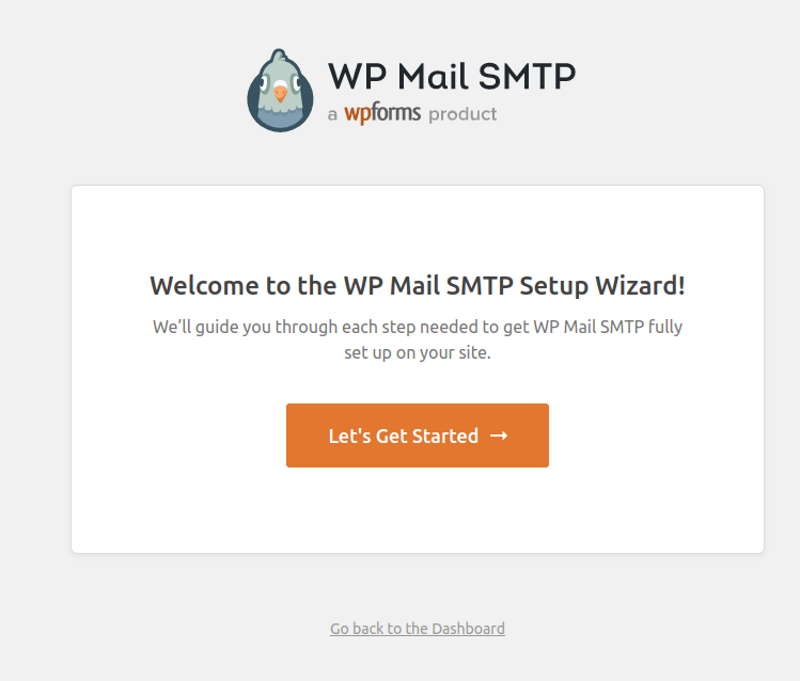
Select Let’s Get Started and you’ll be presented with some options for what type of SMTP service you use – there’s various auto configurations for different hosts, such as Google, Office365, Mailgun and SendGrid. If you use 20i’s mail services, you’ll want to select Other SMTP. If you’re unsure, check with your current mail host.
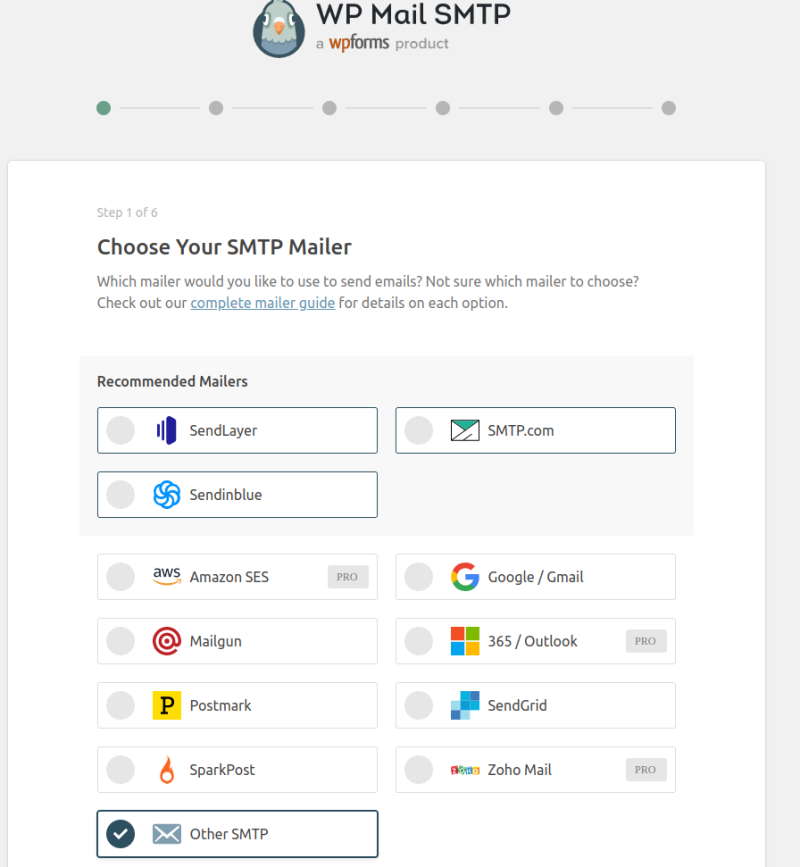
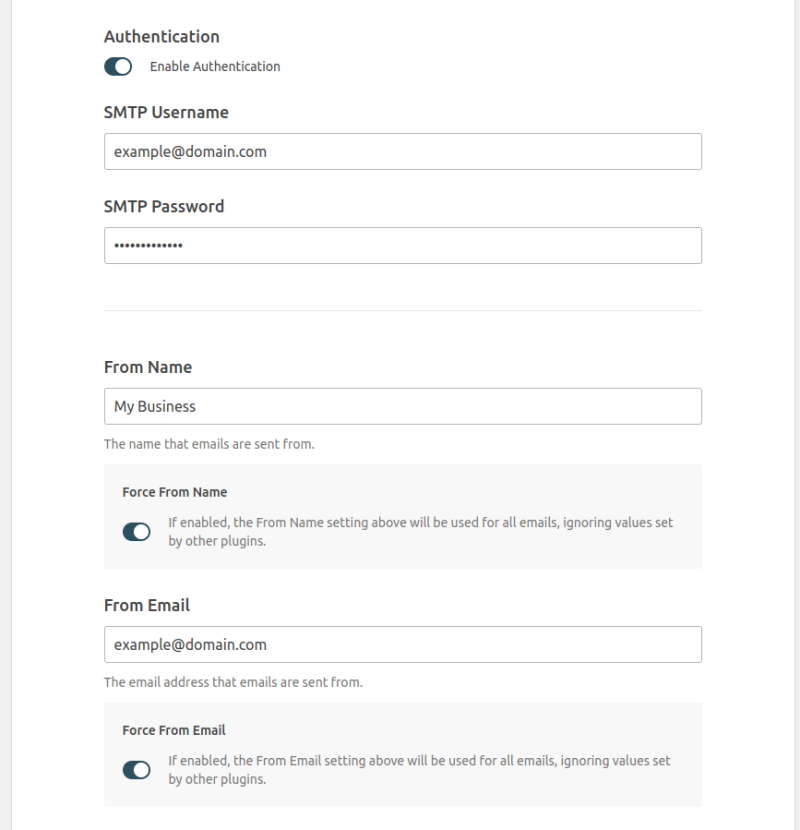
On the next page, you’ll be presented a form – follow the steps here to fill out your details. SMTP Host is where you’d input your hostname, and Encryption is your security – we recommend SSL or TLS, depending on what host you use.
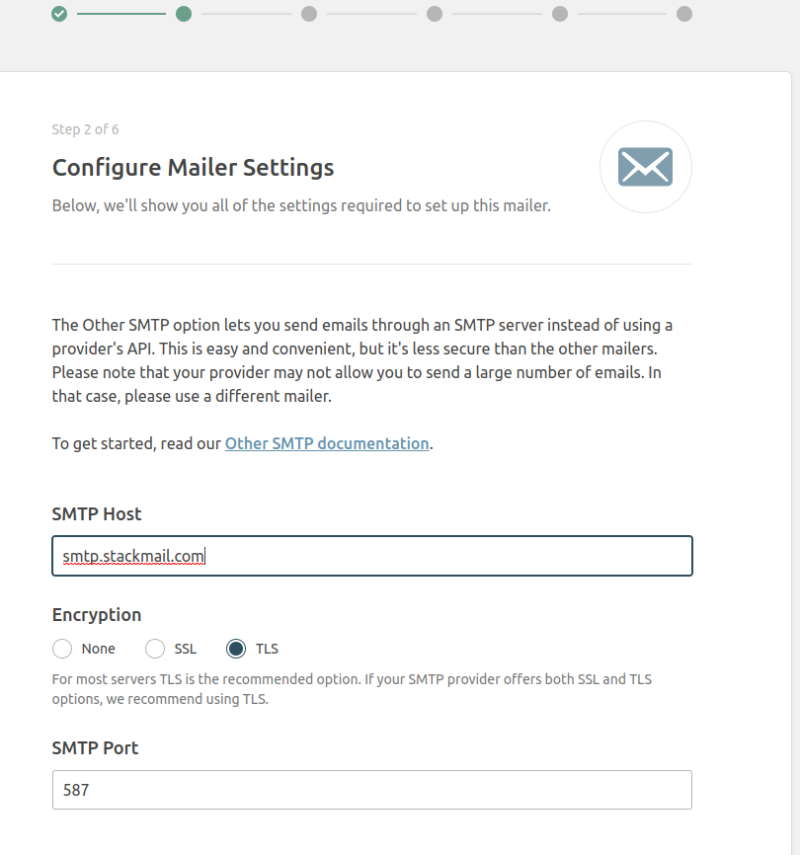
Make sure that Authentication is enabled, then input your SMTP Username and SMTP Password – these are the email and the mailbox password respectively. Lastly, set a From Name, which is the name that will appear as the sender of the email, and the From Email. You’ll want to make sure the From Email matches the SMTP username.
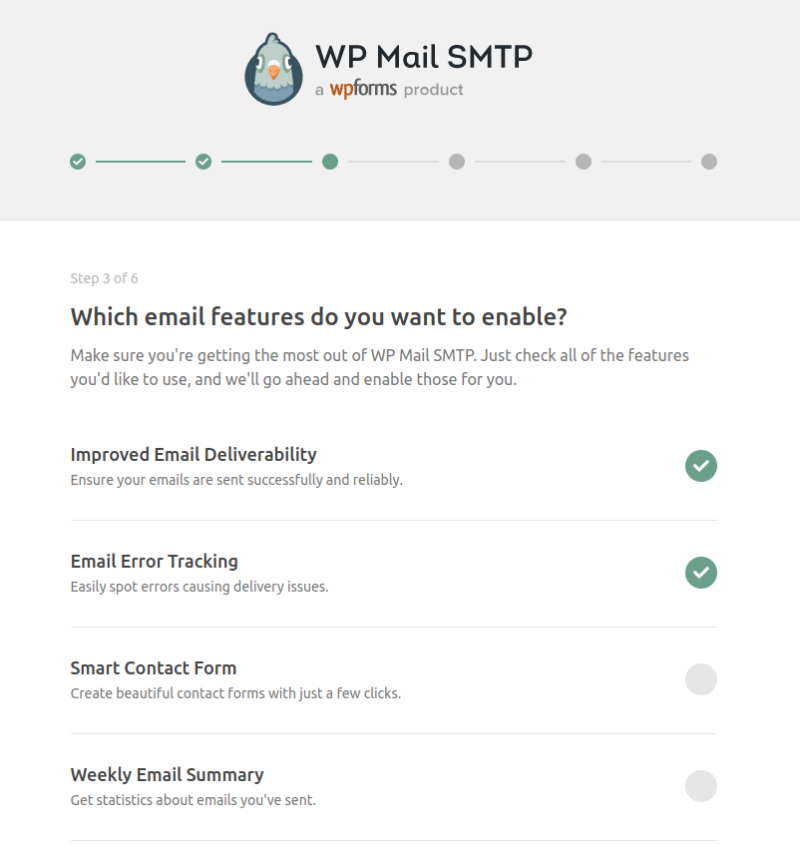
WP Mail SMTP will then prompt you with some additional preferences – you can choose to enable these based on what you’d like of the plugin. If you’re unsure, leave it as default.
WP Mail SMTP will then run a quick test of the settings you’ve used – if there’s any errors, you’ll then be prompted to recheck your details.
If not, you’ll see the following screen:
And you’re all set to send your emails using SMTP.
Easy WP SMTP
Easy WP SMTP aims to make setting SMTP up and testing as quick and as simple as possible. Once it’s installed, head to the Settings tab of your WP Admin area, and you should see a new option for Easy WP SMTP.
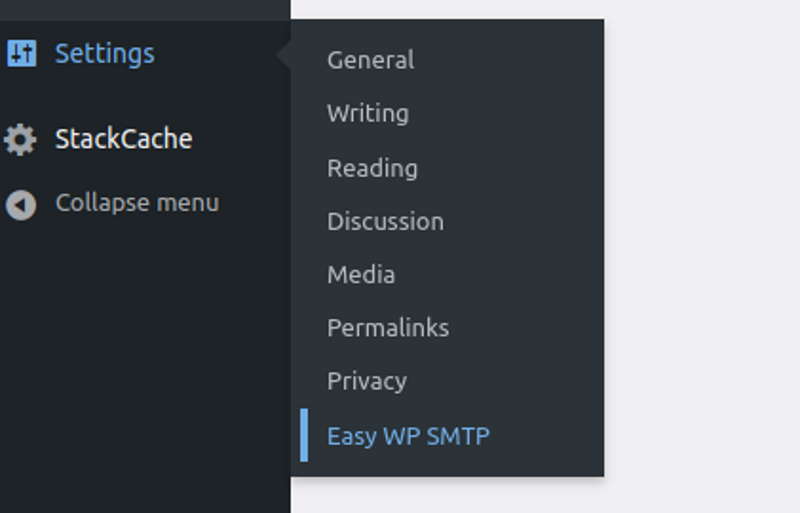
Once selected, you’ll be greeted with a form with all of your needed details. From Email Address is the email address you wish to use for sending, and your From Name is the name you want the email to appear to come from. Reply-To Address is the address used for the Reply-To field, and you can also set a BCC Email Address if you want to have a copy of the email sent to another mailbox.
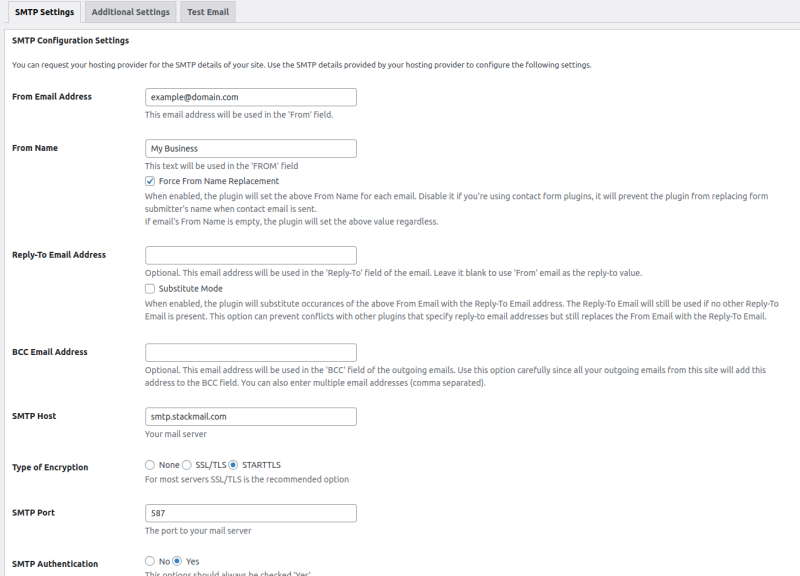
Below that, you have entry fields for your SMTP Host, which is your email provider’s SMTP hostname, the Encryption, which is the security, and your SMTP Port. Set these to your mail provider’s required settings, and select Yes on SMTP Authentication.
Lastly, enter the mailbox you wish to send from into SMTP Username and the mailbox’s password in SMTP Password, and hit Save Changes.

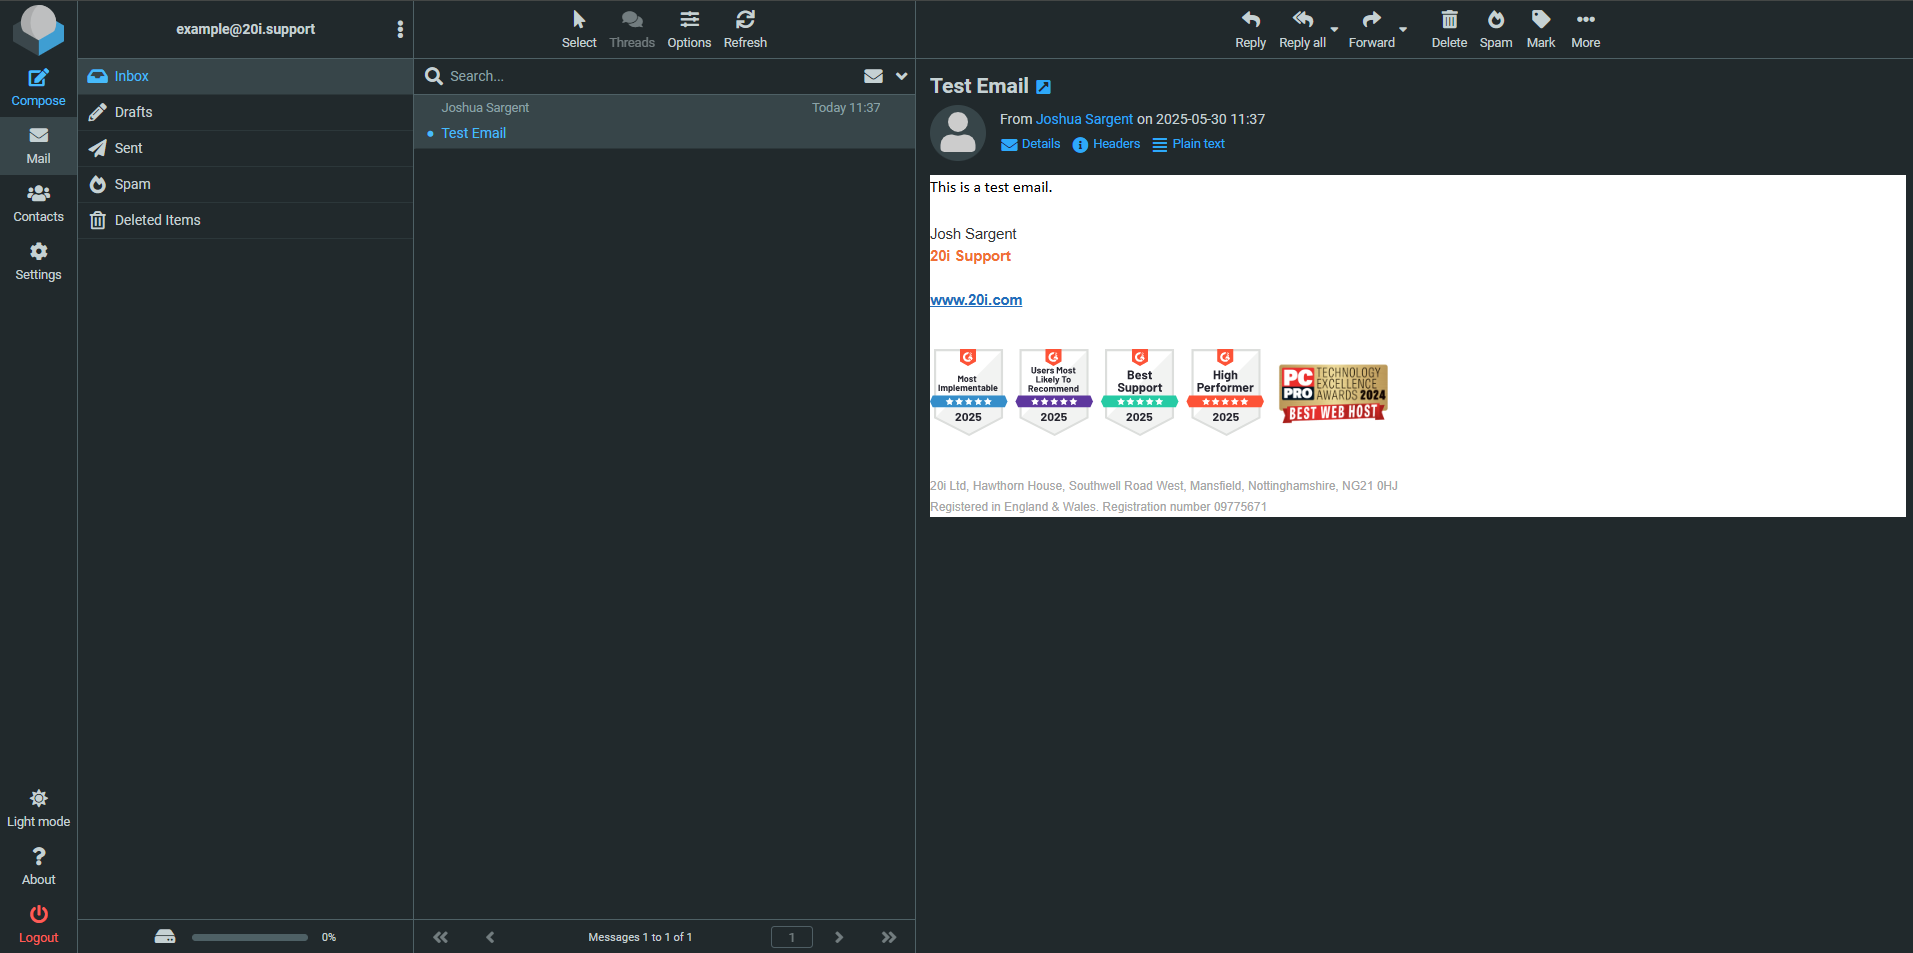
You can then navigate to the Test Email tab at the top of the form, and send a test email to check the SMTP settings are configured correctly.
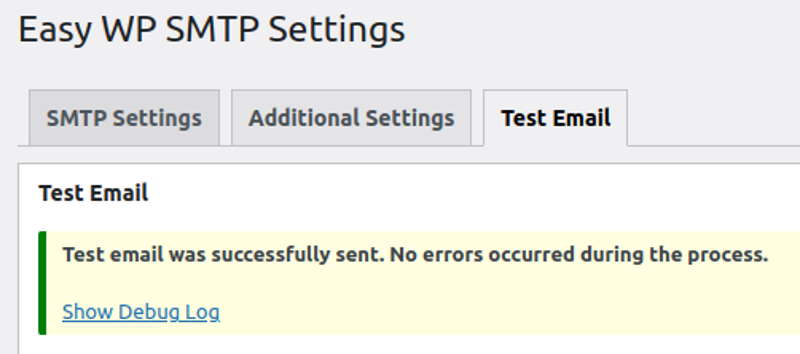
If everything is configured correctly, you’ll get a popup confirming your email went through, and you’ll be all set to begin sending emails from your WordPress site using SMTP.
Without Plugins
If you’re more confident with PHP coding and the inner workings of WordPress, you can also set up your SMTP details directly using code. To do this, you’ll need to have set up a WordPress child theme – WordPress themselves provide a guide on how to do so here [ https://developer.wordpress.org/themes/advanced-topics/child-themes/ ]
Note: Before attempting this, make a backup of your site files so that you have a restore point.
In order to do so, first head to your wp-config.php file in the core folder of your WordPress site and add the following code:
// Configure your site to use SMTP
define( 'SMTP_USER', 'email@example.com' ); // Username to use for SMTP authentication
define( 'SMTP_PASS', 'MAIL_PASSWORD' ); // Password to use for SMTP authentication
define( 'SMTP_HOST', 'smtp.stackmail.com' ); // The hostname of the mail server
define( 'SMTP_FROM', 'email@example.com' ); // SMTP From email address
define( 'SMTP_NAME', 'FROM_NAME' ); // SMTP From name
define( 'SMTP_PORT', '587' ); // SMTP port number - likely to be 25, 465 or 587
define( 'SMTP_SECURE', 'tls' ); // Encryption system to use - ssl or tls
define( 'SMTP_AUTH', true ); // Use SMTP authentication (true|false)
define( 'SMTP_DEBUG', 0 ); // for debugging purposes only set to 1 or 2
This sets up the base configurations for your SMTP setup – you’ll want to modify the values above to match the recommended settings provided by your email host, and your own personal preferences.
Then, head to your child theme folder in wp-content > themes and open functions.php. In this file, add the following code:
// Configures SMTP authentication for your site
add_action( 'phpmailer_init', 'send_smtp_email' );
function send_smtp_email( $phpmailer ) {
$phpmailer->isSMTP();
$phpmailer->Host = SMTP_HOST;
$phpmailer->SMTPAuth = SMTP_AUTH;
$phpmailer->Port = SMTP_PORT;
$phpmailer->Username = SMTP_USER;
$phpmailer->Password = SMTP_PASS;
$phpmailer->SMTPSecure = SMTP_SECURE;
$phpmailer->From = SMTP_FROM;
$phpmailer->FromName = SMTP_NAME;
}
And that’s it – your site should now be able to use SMTP for sending your emails directly from your website.
Setting up SMTP with the above steps can ensure that your sent emails are safe, and better improve your chances of having them arrive with your clients without being flagged as spam and potentially missed.
 Austin B.
How can I change my mailbox password?
Changing passwords for any mailbox can be done through the My20i control panel.
- Log in to My20i and select Manage Hosting.
- Select Manage on the hosting package that contains the mailbox you wish to change the password on.
- Choose Email Accounts under Email.
- Simply locate your mailbox and enter a new password and click Update. Your new password will have been successfully saved.

Note: You will not be able to recover your old password for the mailbox. We do this to increase your security.
 Austin B.
How do I create a mailbox?
To create a new email mailbox:
- Select Manage Hosting.
- Select Manage for the package you wish to add the mailbox to.
- Select Email Accounts - enter the prefix of the mailbox you wish to create and select Create Email Account.
A password will automatically be generated for you, but you can change this if needed. You will have immediate access to your webmail account by selecting Options -> Webmail.
 Austin B.
Can I add SPF records for my domain name?
Sender Policy Framework (SPF) records help reduce the chance of your domain being spoofed in spam messages. It can also increase the deliverability of e-mail to external providers such as Gmail and Outlook.
We maintain an SPF record that is kept up to date with all IP addresses used to transmit email from our network. This ensures that any email sent from our services passes an SPF check. To use this on your domain, you need to add a TXT record in DNS.
How to add SPF records automatically
By default, all newly provisioned hosting packages will have an SPF record for Stackmail added automatically. If you don't want this to happen, then you can opt-out by following the steps below:
- Go to Account Preferences in My20i.
- Select Do not automatically add Stackmail's SPF record to my DNS zones and click Save.

How to add SPF records manually
Firstly, access the DNS Management interface for your domain name. If the domain is registered with us, you can access this from the Manage Domains area of the control panel.
If the domain is not with us but is assigned to a hosting package, you can reach this interface via the Manage Hosting -> Select Package -> Manage DNS section.
Towards the bottom of the Manage DNS page, you will see 3 inputs to allow you to add new records. To add it:
- Leave the Name field blank
- Select TXT for Type
- Enter v=spf1 include:spf.stackmail.com a mx -all as data

Then save the changes. Your domain is now protected by an SPF record.
You can use the same record for all domains that use our mail services, however it should be noted that the above record will tell external providers all of your e-mail should originate from our network. If this isn't the case the record should be updated accordingly.
 Lloyd Cobb
How can I rename a mailbox?
You can easily rename an email mailbox within your 20i account.
- Head to Manage Hosting > Options > Manage.
- Select Email Accounts.
- Select Options > Change Mailbox Name.
- Enter the new name for the mailbox and select Save.
 Austin B.
What are my email sending limits?
Email Account Limits
The following limits apply to all messages sent via authenticated SMTP. This will primarily be used for email sent via a mail client, but can also include mail sent via your website if configured to send via SMTP.
We impose a limit of 8,000 messages per e-mail address per 24 hours.
The following limits also apply:
- No more than 10,000 recipients per day.
- No more than 2,000 unique recipients per day.
- A single email may not be sent to more than 100 individual addresses.
As an example, if you were to send 100 emails to 5 different e-mail addresses within a 24 hour period. We would count 100 messages, 500 total recipients and 5 unique recipients.
Web Server Limits
A limit of 500 messages per day is imposed on all e-mail sent by our web servers. E-mails sent by the web servers should be no larger than 5 MB in size. This applies to all messages sent via the PHP mail() function.
Email Size Limits
Our mail system accepts attachments up to 32MB in size, and the maximum message size in our network is 50MB.
Autoresponders
An autoresponder only sends once every 8 hours per sender.
Zero Tolerance Spam Policy
We take a zero tolerance stance against the sending of unsolicited email, bulk emailing and spam. It's to keep our email hosting's excellent reputation. Please refer to our Acceptable Use Policy for more information.
Please note: The distributed nature of our network means email can leave through different servers at different times. As a result, you may see periods when you can send a greater number of messages than the limits mentioned above. However, this behaviour should not be relied upon and is not supported. If you do wish to send a larger number of e-mails than any of the limits mentioned above, we would recommend looking at a specialist marketing email platforms such as SendGrid, Mailgun, or Mailjet.
New Mailbox Limit
When a new mailbox has been set up, the sending is limited to 50 per day for 7 days. This is actually an abuse rule to prevent new mailboxes being set up and used immediately to send out high volumes of spam emails. To preserve the platforms reputation and protect mail being sent from being spoofed as spam by third parties this rule was put in place to protect that status.
 Lloyd Cobb
How do I enable subaddressing on a mailbox?
Subaddressing can be used to organise your email, so certain messages go to folders automatically. For example, if you have box@yourdomain.com you can now use box+tag@yourdomain.com. When the message is delivered, it will automatically be moved in to the 'tag' folder.
Enabling this feature can be done via My20i or StackCP.
- Head to Manage Hosting or Manage Domains and select Manage for the hosting package/domain
- Select the Email Accounts icon
![]()
- On the email account you wish to add Subaddressing to, select Options > Enable Subaddresses.
After this, you’ll need to allow the platform 30 minutes to set up this feature.
You’ll then be able to have emails auto-filter to folders when following the format in the example above.
 Ruth Turner
How do I add SRV records for Office 365?
SRV records - service records used in Office 365 - can be added via our DNS Management interface inside the control panel.
If the domain is registered with us, you can get to this from the Manage Domains area of the control panel. If the domain is not with us but is assigned to a hosting package, you can reach this interface via the Manage Hosting -> Select Package -> Manage DNS section.
We can automatically add these records for you using the Office 365 DNS record tool, please see the guide about that here: How do I add Office 365 DNS records?
Towards the bottom of the Manage DNS page you will see 3 inputs to allow you to add new records. To add one:
- Select SRV from the Type dropdown.
- In the Name field, type: _sip._tls
- In the Data field, type: sipdir.online.lync.com
- Enter 100 for Priority.
- Enter 1 for Weight.
- Enter 443 as the Port.
For the second record, select Click to add another record. A new row will appear.
- Select SRV from the Type dropdown.
- In the Name field, type: _sipfederationtls._tcp
- In the Data field, type: sipfed.online.lync.com
- Enter 100 for Priority.
- Enter 1 for Weight.
- Enter 5061 as the Port.
Remember to save the records by clicking 'Update DNS'.
That's it!
Your SRV records are now added. Our nameservers will start answering with them almost instantly - but may take up to 2 minutes. If you're running through the Microsoft setup wizard or DNS checker you will be able to continue shortly.
The above SRV records are correct as of 26th Feburary 2017, but we recommend checking your Microsoft account for any changes.
 Austin B.
Why are the IMAP folders missing from my iPhone or iPad?
If you can successfully send email and view any new messages in your Inbox, but aren't able to view additional subfolders, then it's likely that you have an incorrect IMAP Path Prefix setting on the device.
To correct this, take the following steps:
- Go to Settings > Mail > Accounts > Select your e-mail address > Account > Advanced
- At the bottom of this screen, you should see 'IMAP Path Prefix'. Leave this blank or, try entering 'INBOX'
- Save the changes, and then navigate back through the Email Account settings pages saving as required
You'll now be able to view all folders in the account. If that doesn't help, or it's already set up like that, you may need to remove and re-add the e-mail account on your device.
Get your own free personalised email address today
Register your domain name with us and get 100 free 10GB email accounts. Easy set up with Apple Mail or manage with our user-friendly webmail. Our email hosting is perfect for business and personal projects.
 Lloyd Cobb
Getting a "mail certificate name mismatch" / "cannot verify server identity" error?
This error usually occurs when a mail client is using a secure connection to the mail server under a custom hostname that hasn't been covered by our Free SSL.
For example, if imap.yourdomain.com is being used to set up mail in a mail client but an SSL hasn't been applied to the hosting package, then our mail servers default *.stackmail.com SSL won't cover the imap.yourdomain.com hostname. This will result in the "mail certificate name mismatch" / "cannot verify server identity" warning.
To avoid the certificate warning, you can:
- Apply our Free SSL to the hosting package at 20i and wait 30 minutes. Read more about applying the free SSL
- Use imap/smtp.stackmail.com for the mail client setup. Read more about setting up a mail client
 Lloyd Cobb
What are the recommended Thunderbird Mail client settings?
There are various methods of connecting to mailboxes on our platform. We always recommend IMAP as that helps keep messages in sync between various devices and our webmail system. This is our recommended configuration for Thunderbird mail clients for your email.
Incoming Server ("Account Settings" > "Server Settings")
Server Name: imap.stackmail.com
Username: Your e-mail address
Port: 993
Connection security: SSL/TLS
Authentication method: 'Normal password'
Outgoing Server (SMTP)
Server Name: smtp.stackmail.com
Port: 587
Connection Security: STARTTLS
Authentication method: 'Normal password'
Username: Your e-mail address
If you choose to use domain-branded server names, such as mail.your-domain or imap.your-domain, the secure connection may throw a certificate warning due to a common name mismatch. This can be safely trusted and your connection will remain secure.
We have a video showing the setup process:
 Lloyd Cobb
 Joshua Miner
 Harry Leverton


 Josh Sargent