WordPress Support – Frequently Asked Questions Questions
How to change your WordPress URL
Rebrands and name changes take place from time to time, so you might need to update the WordPress URL that your site uses. Or, you may have finally finished creating your site on a development domain or subdomain and be ready to bring your site live, but you’re unsure how to go about doing so.
define( 'WP_SITEURL', 'http://20i-example.com' );Change the WordPress URL with WP-CLI
For this fourth step, you will require SSH access to utilise WP-CLI (this is available to all 20i customers). Once you have connected to the hosting package via SSH, change directory to your WordPress installation – this is public_html for WordPress hosting packages. You will then need to run the following two commandsL
wp option update home 'http://20i-example.com' wp option update siteurl 'http://20i-example.com'
Search and Replace with a plugin
Occasionally there may be other instances of the old URL being set within the database after a URL chance. Editing the database of your site manually can be risky if you’re unfamiliar with the process.
Alternatively, you can use a third-party plugin to do it for you.
We recommend Better Search Replace. This plugin provides an easy to understand UI in your wp-admin area where you can search for certain entries in your site’s database and update them. This includes searching for your current site URL and updating it.
To do this:
- Log into your wp-admin area of your site, and search for the Better Search Replace plugin in your site’s Plugins > Add New area
- Select Install and Activate
- Better Search Replace will now appear as an option under Tools. Select it from the dropdown menu, and you’ll be presented with a form like below:

- Enter your current URL in Search for and the URL you’re updating to in Replace with. You’ll see further down a selection of checkboxes:

- Use Run as dry run if you want to see what tables the search and replace will update without actually changing anything, and hit Run Search/Replace
- Once you’re happy with what changes will be made, uncheck the Run as dry run option and run the search and replace again
This will update all of your site’s URLs in the database for you.
Updating your site’s URL on WordPress can be handled with multiple different tools and approaches depending on where and how your site is hosted. Always make sure to take backups before making any major changes like this, to ensure that you have a restore point.
FAQs
Do I need to add a redirect to allow my WordPress site to load the new URL?
WordPress should automatically redirect any attempts to connect to your old URL to the new domain you’ve added, so a redirect shouldn’t be required.
I finished updating all of my site’s URLs but the old site still shows, what’s going on?
It’s likely due to one of three reasons. Either the old URL still exists inside the domain in some form, a redirect exists on the domain that is correcting to the old URL or the old URL is caching.
Check your database and .htaccess for any references to the old URL, and run a full purge of the Edge Cache.
Jordan GravesWhat are the Free Tools with WordPress Hosting?
We have a suite of WordPress Tools which make the management of WordPress sites much easier.
Austin B.WordPress caching: what you need to know
Optimising your WordPress site for performance can be done in a variety of ways, but few are as important as implementing caching for your site.
Through caching, a lot of the heavier processes and queries that WordPress runs on each page load can be reduced significantly or outright bypassed thanks to temporary storage. So your sites can load as quickly and efficiently as possible and improve your Google CWV (Core Web Vitals).
This can help improve usability and ensure your site experience is the best it can possibly be.
We’ll go over the fundamentals of caching in regard to WordPress in this guide, how caching can be implemented and why you should consider using our inbuilt caching solution, StackCache on our WordPress optimised hosting platform.
Why do I need my WordPress site to cache?
WordPress, at its core, runs on PHP code compilation and back-and-forth query checks within your site’s database. For example, if you want to load your WordPress site’s homepage, the following happens:
- WordPress loads and checks wp-config.php
- It sets up any default constants set in this file
- It then connects to the database, and begin querying for content
- Active plugins are loaded, as well as the pluggable.php file
- The site then loads any defined rewrite rules
- The site’s theme is loaded, and the corresponding functions.php file
- Once all this information is gathered, WordPress parses all the data for the requested page
- It then fetches the page or post contents from the database
- Finally, it loads the site template and displays the page as it should appear with all data
The above generally occurs within the space of seconds.
However, by implementing caching, many internal queries can be stored locally, which can bypass the need to dive into the database and files. The cached content will be loaded instead, vastly increasing your loading speed and site’s performance.
What do WP cache plugins do, and how do they help with the website’s performance?
WordPress caching plugins come in all shapes and sizes. Most generally handle static HTML caching to reduce the amount of processing required per load time.
Most of these will store the cached content locally in a cache folder, a majority of which are found in the wp-content folder. These files are then checked per site load and prioritised in loading over the core files of the site to cut down time and allow for faster speeds.
Some provide additional minification and compression functions for your CSS and scripts to allow for quicker load times.
They may also provide tools that allow for you to prioritise core files over JavaScript, which can be quite slow to load. This will allow your site to load what's essential to get the site to display much faster, reducing your TTFB (Time To First Byte) and load times overall.
What is the advantage of caching with your hosting and not as a plugin?
A plugin alone will naturally have limitations. Even with the plugin locally storing processes to avoid them being re-run, where these files are stored can still lead to slowdown in the long run.
Anyone connecting to the site still has to connect to the webserver, so if you’re in Australia and your site files are stored in the UK, it’s going to take some time for the site to load even when cached due to the amount of network hops and latency of the connection.
This is where 20i handles things differently. By integrating our caching solutions with our hosting’s built-in CDN.
We can store any cached site files directly on the CDN nodes. This means that anyone connecting to your sites will have the caching served directly from the nodes rather than the webserver. This vastly improves load times by completely bypassing having to reach our webservers directly and pushing your site’s performance further still.
How does the 20i WordPress cache solution work?
As caching is so important to the speed and performance of any WordPress site, we’ve taken it upon ourselves to develop our own caching plugin called StackCache.
StackCache acts as a normal WordPress caching feature, but integrates fully with our CDN and Edge Cache to allow you to fully control your site’s performance globally from a singular interface.
Not only this, StackCache compliments Edge Caching directly as it handles all the dynamic content of your site, while the Edge Cache handles all your static content to ensure that all resources get served faster for your visitors. You can specify how long to handle specific types of caching such as Image and JavaScript caching from either the Edge Caching area or StackCache itself.
On top of this, StackCache comes pre-built with our WordPress-optimised hosting, meaning that you can get your site loading faster as soon as it’s placed onto our hosting – no extra setup or additional installs required. And, if you want to get more advanced with your caching solution, you can set additional Cache-Control and Expires headers via a .htaccess file, and StackCache will follow these to store even more for your site.
As you can see, caching can have a major impact on your site’s performance. With our built-in Edge Caching and StackCache solution, our hosting works with you to provide you easy access and control of your site’s caching, allowing you to push the best speeds possible out of your sites.
Reudiger DalchowDo you support WordPress multisite?
Yes! All our platforms have full support for a WordPress Multisite network. You just need to follow the Create A Network article from the WordPress codex to get this setup.
Lloyd CobbWhen does StackCache clear my cache automatically?
Our inbuilt StackCache plugin stores your site files and content locally to get the best-possible speeds out of your WordPress website.
However, when you’re working on your site, you’ll want to make sure any changes you do make are reflected on the site itself. As such, we’ve integrated rules that StackCache follows automatically so that it clears the cache to show the latest renditions of your site.
Depending on the type of changes made to the site, different amounts of content will need to be cleared. Below is a full breakdown of the different types of cache clear that StackCache does automatically, and what triggers these to be cleared.
Events that fully purge the WordPress site cache
Changes made to the WordPress site that affect the whole site, such as swapping the site’s theme, will need a clear of the entire site’s current cache. So we purge the cache for the whole site in the case, including all pages and resources.
Here’s a list of events and actions that will trigger this type of purge request:
- Switching the WordPress theme
- Saving settings in the Customise area
- Activating a plugin
- Deactivating a plugin
- Autoptimize cache purge: When a cache clear is requested in Autoptimize, StackCache will also do a full clear.
Events that purge a single page
For changes that only affect a small section of the site, such as editing a single page or updating a current post, a full clear isn’t usually necessary. So StackCache will only run the clear on the URLs that have been changed rather than the whole site.
The events that trigger this are listed below:
- Moving a post to the Trash folder
- Deleting a post or page from the site
- Restoring a deleted post
- Editing a post or page
- When a post or page comment is added or updated
- Updating a post
Note: Our StackCache system treats WooCommerce products as posts, and so any changes made to your products that match with the above will also fire off cache requests.
Can I make StackCache purge more frequently?
Sometimes, based on how often you update aspects of your site, you may want to always make sure that you’re displaying the latest version of your site. Rather than just running cache clears on individual parts of the site, you can enable options within StackCache itself to allow for a more aggressive cache clearing setup. To do this:
- Log into wp-admin on your WordPress site.
- Navigate to the StackCache section in the column on the left-hand side of the page.
- Here, you’ll see StackCache’s main settings. Two of these include:
- Make Automatic Cache Purging Purge Everything: when we detect content changes, we purge the cache automatically for the post/page URL modified, the index page and your site’s RSS feed automatically. Enabling this option will trigger a full cache purge whenever these events are detected.
- Perform Automatic Cache Purging For All Post Types: by default, we only purge the cache automatically when standard post types are modified. Enabling this option will trigger a cache purge regardless of post type.
With this knowledge, you can better manage and customise StackCache to work with your WordPress site. Provide the best possible experience for your visitors by serving fresh content when needed - without sacrificing site speeds.
Reudiger DalchowDo 20i offer WordPress CLI?
If you're using WordPress, you may wish to make use of the WP Command Line Interface (CLI) to make changes to your installation.
How do I manage subdomains on the WordPress platform?
Our WordPress platform is optimised just for WordPress. We've developed our own custom plugin - StackCache - that controls our edge caching tech.
Lloyd CobbHow do I create a WordPress hosting package that includes a set theme and plugins?
When creating multiple WordPress sites, you may want to use a similar structure and appearance. Recreating the same structure over and over with just a few changes can be exhausting – instead, what you may want to do is set up a template, and then use that as a basis for your sites. This template could include a specific theme and some key plugins to get you started off without having to repeat the same work. But how to you go about making and using a template with 20i’s hosting?
The answer comes in the form of 20i’s Clone Package tool. This tool allows you to create direct copies of another package and install it on a fresh one with a new domain.
1. Setting up a template package
First of all, you’ll want to set up your template package. The package can be on either our Linux or our WordPress hosting. However, we would recommend making the template the same package type as the packages you intend to clone them to.
- Log into My20i and select Manage Hosting
- Head to Add Hosting Package
- Either select a domain from the drop-down menu or type your domain to create a domain reference
- Select the Package Type you’d like to create
- Select Create Hosting Package
Once this package has been created, open it up and install WordPress, as well as any plugins and themes you intend to use. Configure them to how you want them to be, and your template will be ready to use.
2. Making use of the clone tool
Now that you have your template set up, you can use it to create your first site.
- Log into My20i and select Manage Hosting
- Head to Add a Hosting Package and select Clone From Existing Package in the top right

- Select the template hosting package you created previously from the dropdown box that appears
- Once selected, create your hosting package as you normally would. Select or type the domain name, choose the Platform Type and assign any StackCP Users if required.
- Select Create Hosting Package to complete setting up the new package
Once the cloning process completes, the site will be set up with all of the themes, plugins and content you put in place on the template, but will have the new domain attached to it. You can do this as many times as you need and can even set up templates for non-WordPress sites such as Magento or Joomla.
By following these steps, you can save yourself time creating the same base site repeatedly. Our cloning tool allows for you to copy site formats across and use them as a basis for future development.
Reudiger DalchowIs it safe to update the PHP version on my website?
Updating your PHP version on a website can be a critical decision that can affect the functionality and security of your website. On one hand, keeping your PHP version up to date is essential for ensuring that your website runs smoothly, quickly and securely.
On the other hand, upgrading to a newer version of PHP can also result in compatibility issues with your existing plugins and themes, which can cause significant problems and even lead to a website crash.
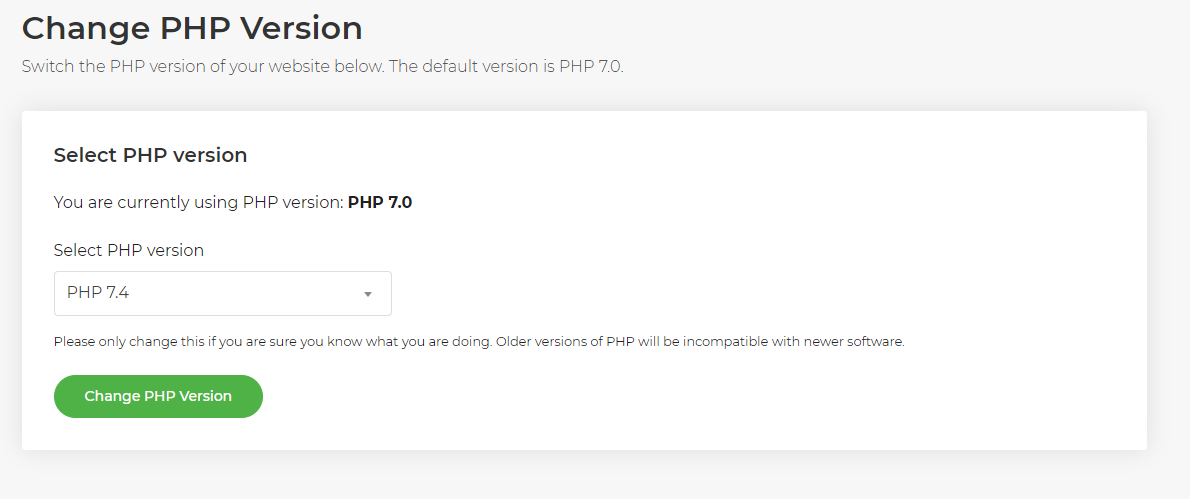
See how to do it here: How do I change PHP version?
Let's take a closer look at the importance of updating your PHP version and some of the potential drawbacks and issues that you might encounter.
Why it's important to keep PHP up to date?
Security
Outdated PHP versions are more vulnerable to security exploits and vulnerabilities. Updating to the latest version of PHP will help ensure that your website is protected from known security threats.
Performance
Newer versions of PHP are designed to be faster and more efficient, which can result in improved website performance and faster page load times.
Improved features
Updating PHP gives you access to new features and functions that can enhance the functionality of your website.
Better support
Support for older versions of PHP is often limited and discontinued, which can make it difficult to find solutions to problems or get help if you encounter issues.
Potential drawbacks and issues
Compatibility
Updating PHP can result in compatibility issues with your existing plugins and themes. Some plugins and themes may not be fully compatible with the latest version of PHP, which can cause significant problems, including broken functionality and even website crashes. If you're switching between any 7.* or 8.* version then all modern plugins and themes should be compatible. However, if you update the PHP version and notice any negative behaviour changes then you can change back instantly to the previous version to resolve any issues.
If you're switching from a very old version of PHP such as 5.6 then you may wish to review your plugin and confirm with their authors if they're compatible with a higher version of PHP.
Cost
Updating PHP can require significant time and resources, including hiring a developer to handle the update, testing and debugging any compatibility issues, and resolving any problems that may arise.
Risk of downtime
Updating PHP can result in unexpected downtime, which can be costly and time-consuming to resolve.
How can I check which version of PHP I am currently running in WordPress?
Use the Site Health Check feature
WordPress 5.2 and later include a Site Health Check feature, which displays information about your PHP version and other critical information about your website. You can access this feature by going to "Tools" > "Site Health" in the WordPress dashboard.
Check with a plugin
There are several plugins available in the WordPress repository that can help you check your PHP version, including "Display PHP Version" and "Health Check & Troubleshooting." Simply install and activate the plugin, and then check the information displayed on the plugin's settings page.
Check via info.php
You can create a new file called "info.php" in your WordPress root directory and add the following code to it: . Then, open the file in your browser, and look for the "PHP Version" section, which will display the version of PHP you are currently running.
PHP Version Tool on My20i
Every 20i hosting package has access to the ‘Change PHP Version’ tool on the My20i hosting control panel. To use this feature, head to Manage Hosting > [Select Package] > Change PHP Version.
PHP versions of WordPress sites can also be changed in bulk using our WordPress Manager.
In conclusion, while updating your PHP version on a website is important for ensuring the security, performance, and functionality of your website, it's important to consider the potential drawbacks and issues that can arise.
Before proceeding with an update, it's recommended to back up your website, test your plugins and themes for compatibility, and consult with a professional developer if necessary.
If you have Timeline Backups, we’d recommend taking a snapshot prior to amending your PHP version. By taking these precautions, you can minimize the risk of unexpected problems and ensure that your website remains secure, fast, and functional.
Austin B.Which PHP functions are disabled on your WordPress platform?
Our WordPress platform has been specifically designed to offer the best security, performance and reliability for WordPress.
Lloyd CobbHow do I run a search and replace in the WordPress CLI?
The WordPress Command Line Interface (CLI) search and replace function is a useful tool when you need to make global changes to your WordPress site's content.
Chris WrightWhat's the difference between a staging site and the ‘Stackstaging’ temporary URL?
Our WordPress hosting platform makes use of both a staging environment, which can be used for site development, and our temporary URLs, which can be used to test a site before the DNS is pointed to 20i.
Chris WrightHow do I use 20i's WordPress staging environment?
Sites on our WordPress-optimised platform have access to a full staging environment. Staging allows you to make a clone of a live WordPress site on a staging server in moments. You can then make changes without affecting the live site.
Austin B.Protecting your WordPress contact form from spam using CAPTCHA
Adding a CAPTCHA to your WordPress contact form is a great way to prevent spam submissions and ensure that the messages you receive are from real users. In this guide, we'll walk you through the process of adding a CAPTCHA to your WordPress contact form using the popular Contact Form 7 plugin.
Chris Wright