My Services – My Account Questions
Account support articles: how to manage your 20i hosting account, like adding credit, viewing balances, our affiliate program and more.
How do I Enable Two-Factor Authentication (2FA) for My20i?
2FA or two-factor authentication is a two-step verification process which offers an extra layer of security when accessing your account. Once enabled, your logins to My20i can only be completed if both your password and an authenticator code is provided. We support TOTP authenticator apps, such as those from Google and Microsoft.
Add a New Authenticator
From inside My20i, follow the link to Security Details under Account Preferences section.
Towards the bottom of this page, you'll see a section titled Two-Factor Authentication. To add your first device, enter your current login password and name the device you wish to add. The Device Name is purely for your own reference.
Adding a Second Authenticator
There's no limit on the number of devices you can add, and we recommend having at least two devices on your account. This is in case one of your authenticators is lost or unavailable. Once a device has been added to your account, future devices can be added by entering a code from an existing authenticator device.
Removing an Authenticator
To remove a device, select delete from the list of your authenticator devices, on the same page.
Lost Device
If you're unable to access your account after it has been protected by 2FA, please call our sales team on 0333 344 2720 (Option 1). We’ll work with you to reset your access. Lines are open 24 hours a day. Alternatively, please email sales@20i.com.
2FA for StackCP Users
Users of the StackCP control panel can enable 2FA themselves. 2FA setup is in the StackCP Security Details menu (top-left). Resellers can manage users' devices and verify 2FA codes in the StackCP Users area of My20i.
Compatible 2FA Apps
We recommend using the 2FA mobile app from either Google or Microsoft, as these have been tested to work on our platform:
Alternatively, other customers have used and had success with the following apps:
- Authy (iPhone/Android)
- AuthenticatorCC (Chrome/Firefox)
- Ente (Windows/Mac/Linux)
- 2fast (Windows/Mac/Linux)
- 2stable Authenticator (Mac)
- Raivo (Mac)
If you'd prefer a different app, our 2FA system should be compatible with all standard TOTP apps.
 Chris Wright
How do I change the Username on my 20i account?
To change your username/email address on your 20i account:
- Head to the Contact Details section in your account
- In the Email Address field enter the new email address/username.
- Select Update Details.
You'll now need to log out and log in using the previous email address to confirm the change.
If you then head back to Contact Details your email address will have updated.
 Austin B.
How do I check my active account login sessions?
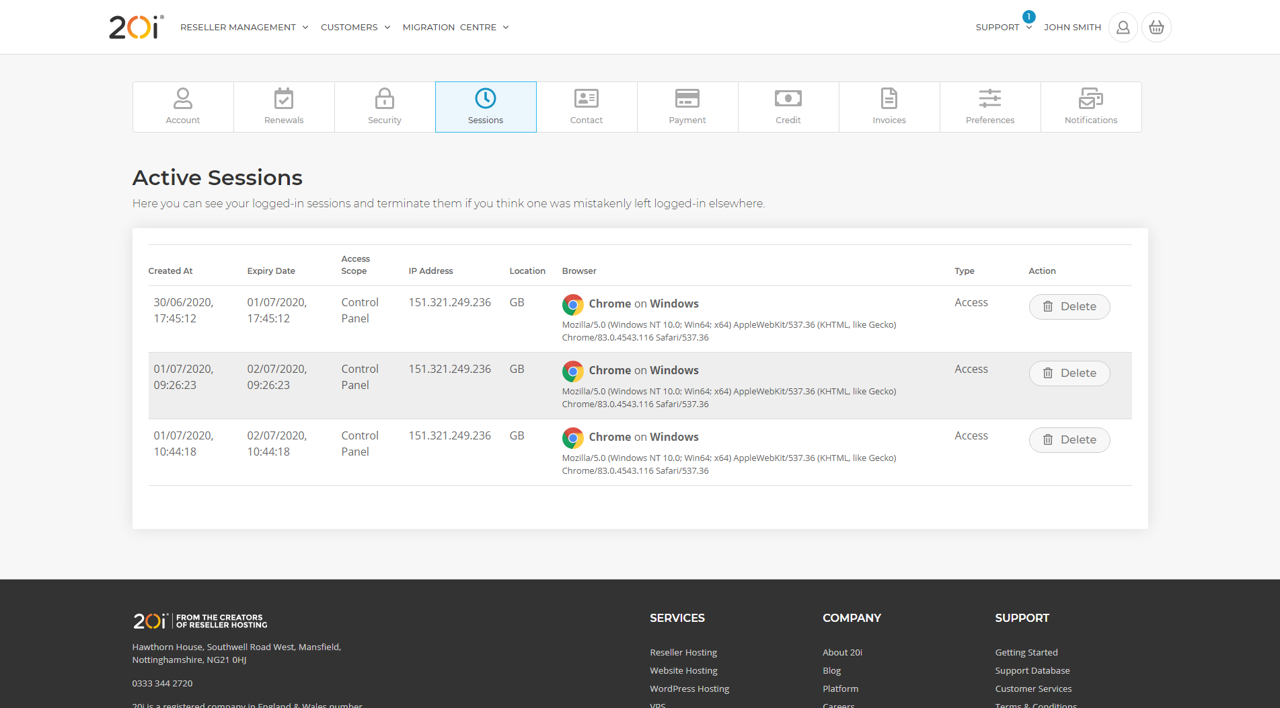
You can view and manage active login sessions to your My20i account, ensuring your account is kept secure. If you've left yourself logged in to a computer that you're no longer using or a public device you can use Sessions to delete the session you're no longer using.
- Choose Account Preferences > Sessions.
- Select Delete to close any active sessions you'd like to close.
 Austin B.
How to view an invoice
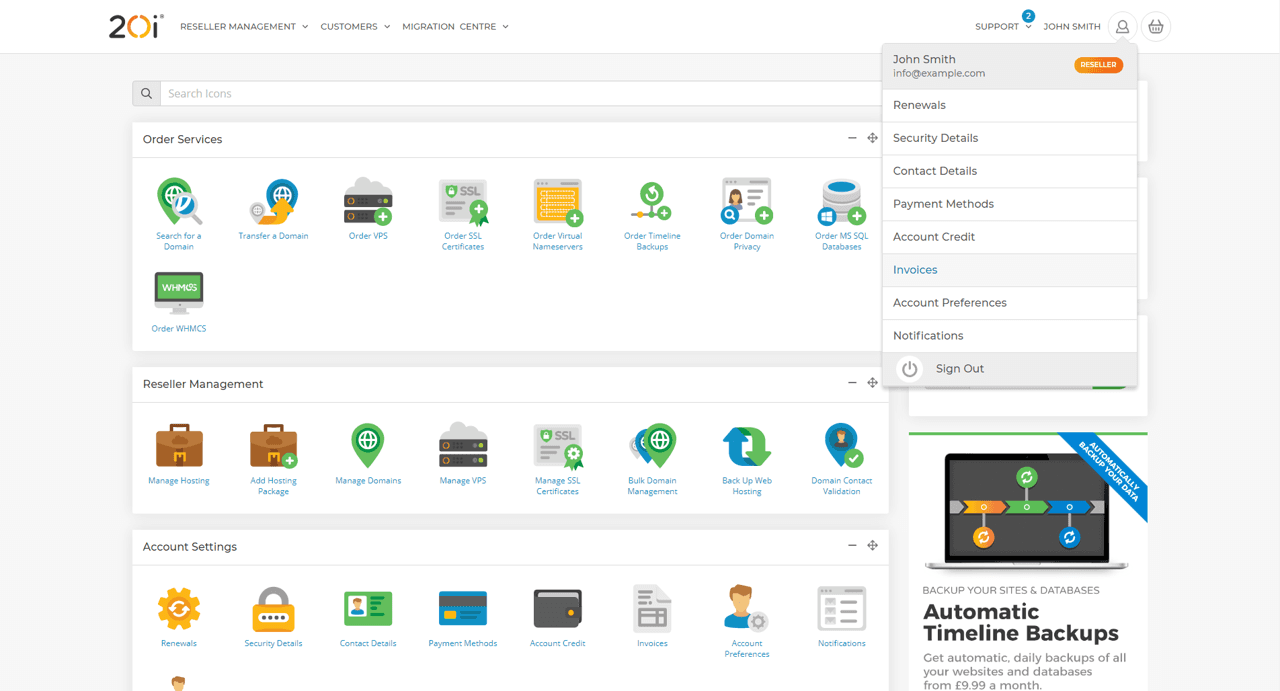
Invoices can be viewed from within your My20i account.
- Choose Invoices from the My20i home page, under Account Settings or from the menu icon on the top right (as below).
- You'll see a detailed breakdown of all your invoices.
- Search by product name to find a specific invoice.
 Austin B.
How to get a balance statement
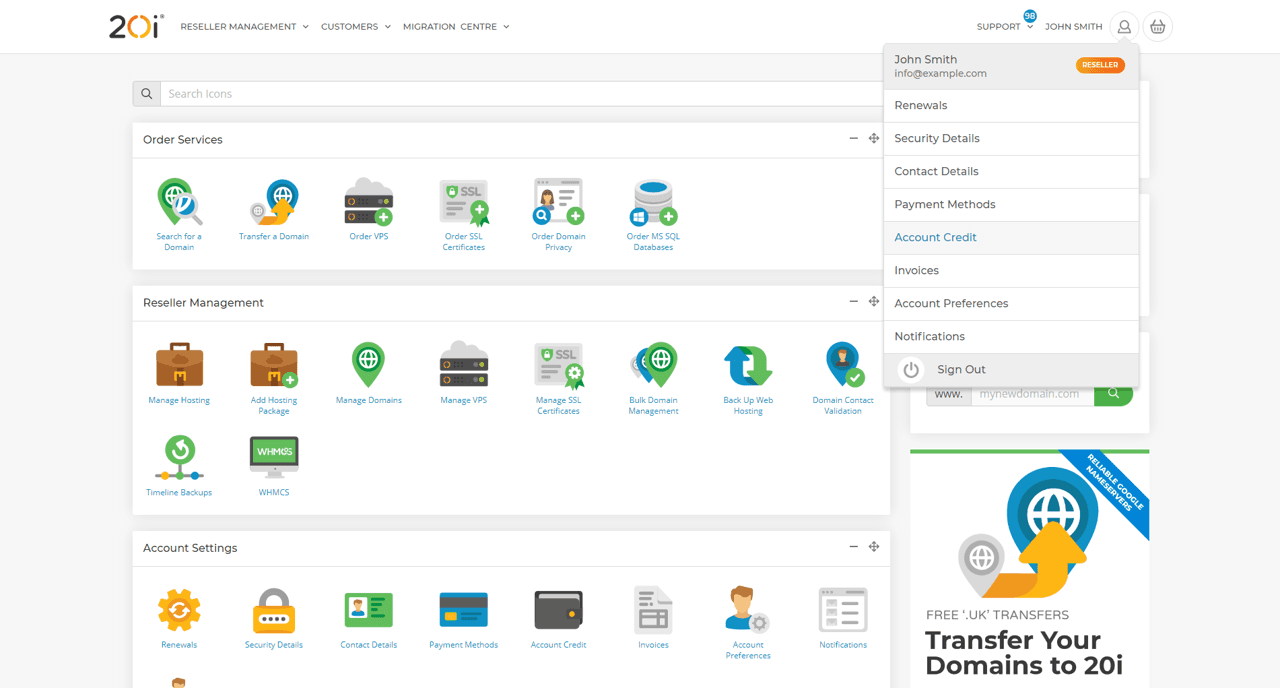
You can view a statement of all transactions made via your account balance through the Balance Statement section.
- Choose Account Credit from within My20i. This is accessed from the Account Settings menu on the My20i home page or from the menu icon on the top right (as below).
- Select View Statement.
- You'll see a statement of all balance transactions within your account.
 Austin B.
How do I add 2FA to my account?
2FA or two-factor authentication is a two-step verification process which offers an extra layer of security when accessing the control panel for your account. Once enabled, your logins to My20i can only be completed if both your password and an authenticator code is provided. We support all common authenticator apps, such as those from Google and Microsoft.
To add 2FA to your My20i account:
- Choose Security Details.
- You'll see a section titled Two-Factor Authentication. To add your first device, enter your current login password and name the device you wish to add. The Device Name is purely for your own reference. Select Add Device.
- You'll be given a QR Code to scan with your 2FA device. Scan this code and select Done to complete the process.
For more information see: How do I Enable Two-Factor Authentication (2FA) for My20i?
 Austin B.
Does 20i have an affiliate program?
Yes, we currently have an affiliate program.
You can promote our WordPress Hosting, Reseller Hosting and Managed Hosting If someone uses the link you provided to make a purchase, you'll receive commission on sales.
Please see 20i Affiliates for more details.
 Austin B.
How do I add account credit to my 20i account?
You’ll need account credit on your 20i Reseller account to take orders through HostShop. When a client orders services like domains, we’ll use account credit to pay for the domain so it can be provisioned automatically. To do this:
- Head to the Account Credit section in your 20i account.
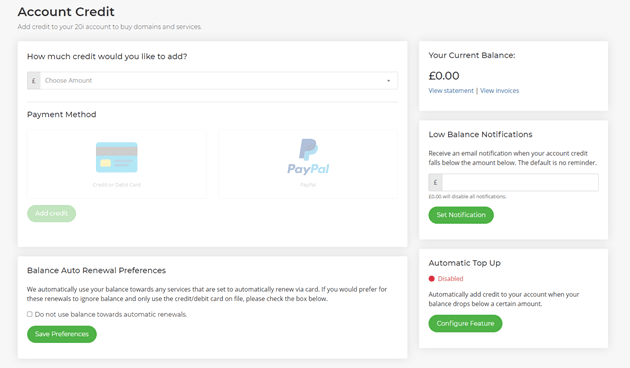
- Select the amount of credit you’d like to add from the drop-down menu
- Select whether you want to add credit using a card or PayPal
- Select Add Credit to Basket or Add Credit with PayPal
Note: Should an order fail due to insufficient balance in your account, once you’ve added credit to your account you’ll be able to find and re-process the order by going to Customers > Overview > Failed Orders and selecting View Order and then Process. This will retry the order with your new balance.
You'll then be able to complete the order and add balance to your 20i account.
 Austin B.
How do I get support from 20i?
20i have a friendly support team based at our Nottinghamshire HQ. They have direct access to our management and development team, and can help you with any technical issues you may encounter.
They're available day and night, every day of the year: 24x7x365.
If you're unsure about what products you require from 20i, you can contact us via a sales enquiry.
You can check the status of our systems at Stack Status.

There are a few channels of technical support:
1. Support Tickets - If you have any queries or questions you can raise a support ticket and our support team will work with you to solve your issue.
From your 20i dashboard, please navigate to the Help & Support tab on the sidebar on the right-hand side of the page.
Once this expands, You will see a list of popular articles from our support database which could help with any issues you have. If not you can contact us by clicking either the Create Support Ticket or Create Sales Ticket option. If you have previously opened a support ticket, you can click the View Tickets to view closed and on-going support tickets.
Upon clicking the Create Support Ticket option, you will be prompted to the customer services section. You can use our AI search function to search our support database for any articles that may help with your issues.
If you cannot find the answers within our support articles, you can raise a support ticket in the Contact Technical Support or Contact Sales sections.
Here, you can select the topic of the support ticket you would like to raise and choose a relevant service (if applicable).
Depending on the option selected our platform will run some auto-diagnostics, these can identify any issues before raising the support ticket and will notify you of any warnings or identified issues.
Once you've selected the Support Ticket method, please fill in the ticket subject and description of the problem or query you would like to address. Once you are satisfied with the above, select the Create Ticket button.
Note: Please provide our support team with as much information as possible, as this will allow our support team to deliver a more accurate response to help you quicker.
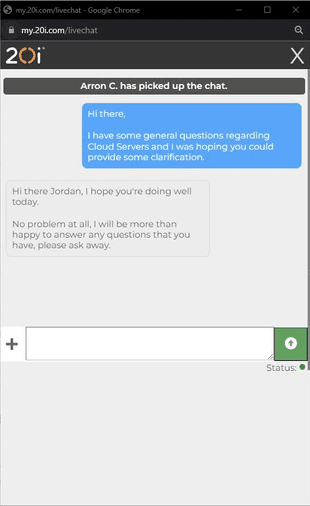
2. Live Chat - You can also start a live chat with a member of the support team and receive one-to-one support. Our experts are happy to help with any problem you have and work with you to resolve any issues.
Similarly to how you would raise a support ticket, a chat can be raised by following the first few steps: navigating to the Help & Support tab in the control panel and then selecting the Create Support Ticket option from the drop-down.
Select the Live Chat Support option and a live chat pop-up window should appear. Please fill in the chat subject and description with as much detail as possible regarding your problem or query.
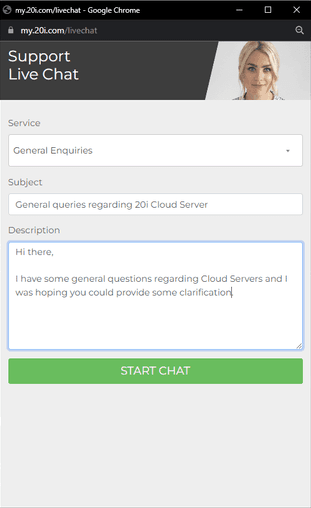
Once actioned, start the chat and you will be in contact with a member of our technical support team.
3. Support Database - Our Support Database compiles all previous customer questions into one area. It's likely that you can find the answer you're looking for here.
 Jordan Graves
What is the "New Login Location" email notification?
If you've received a "New Login Location" notification to your 20i account's main email address, you may be concerned about what this means. In this article, we'll explain exactly that, along with any necessary steps and extra precautions you may need to take.
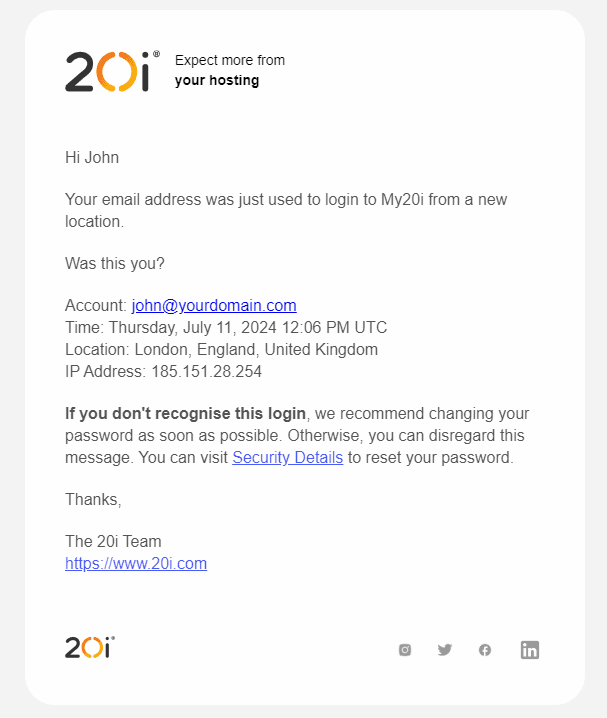
Why have I received a "New Login Location" email?
The purpose of this email is to notify users of a potential security event related to their account.
Specifically, it alerts the user that their account has been accessed from a new location, which could indicate either a legitimate login from a different device or location, or potentially unauthorized access.
This type of notification is a common security measure implemented by many online services to enhance account security and user awareness.
What does this email mean for me?
It's important to note that receiving this email is not necessarily a cause for concern. There are several benign reasons why you might receive such a notification.
For instance, it could be that you have logged into your account from a new device, such as a new smartphone or computer.
Alternatively, it might be due to a change in your IP address, which can happen if your internet service provider (ISP) uses dynamic IP addressing.
Additionally, if you are travelling and access your account from a different geographical location, this will also trigger the notification.
However, if you do not recognize the login activity, it is crucial to take immediate action, such as changing your password, to safeguard your account. We also recommend the use of 2FA on your account whenever possible.
In conclusion, the "New Login Location" email notification is sent as a simple reminder that your account has been accessed from a new IP address. In most cases, this will simply be due to one of the above benign reasons and shouldn't be cause for concern.
If you're at all concerned about your account's security, please don't hesitate to get in touch with our support team.
 Joshua Rosato
Enabling Single Sign-On (SSO) in My20i for Microsoft and Google Accounts
At 20i, we aim to simplify your login process by allowing you to use your corporate Microsoft or Google accounts to access My20i. This Single Sign-On (SSO) feature streamlines password management, making it easier for your organization to manage access for employees and contractors.
Benefits of SSO:
- Simplifies password management.
- Reduces the number of login credentials required.
- Enhances security by allowing corporate identity management.
Here’s a step-by-step guide on how to enable SSO for your My20i account.
Microsoft:
Prerequisites:
Before proceeding, ensure you have:
- Admin access to your Microsoft Azure (Entra) or Google Cloud Console.
- Current My20i account password.
- Ability to create applications within your corporate account settings.
Step 1: Enable SSO
Add My20i as an Application in Google or Microsoft
For Microsoft (Azure Entra):
Log in to the Azure portal.
Navigate to the Azure Active Directory section.
Select App registrations and click on New registration.
Fill in the application details:
- Name: My20i
- Platform type: Select Web from the dropdown
- Redirect URI: Set to
https://my.20i.com/login/openid
Click Register.
Note down the Application (client) ID and Directory (tenant) ID.
Go to Certificates & secrets and create a new client secret. Note this secret.
For Google:
- Log in to Google Cloud Console.
- Navigate to APIs & Services > Credentials.
- Click on Create Credentials and select OAuth Client ID.
- Configure the consent screen if prompted.
- Set the application type to Web application and provide the redirect URI:
https://my.20i.com/login/openid - Click Create and note down the Client ID and Client Secret.
Step 2: Enable SSO in My20i
Log in to your My20i account.
Navigate to the Security Details page.
Scroll down to the My20i Single Sign-On section.
Select Microsoft or Google, depending on your choice of SSO.
Enter the following details:
- Directory (tenant) ID (for Microsoft only)
- Application (client) ID
- Secret
- Current Password for your My20i account.
Optionally, check the box to Require SSO sign in? to disable user password authentication.
Click Add SSO App to complete the setup.
Logging in via SSO
Once SSO is enabled, users can log in using the following steps:
- Navigate to My20i SSO login (https://my.20i.com/login-sso).
- Enter your corporate email address.
- You will be redirected to the Microsoft or Google login page for authentication.
- Upon successful login, you will be redirected back to My20i.
Additional Notes
Team Member Access: You can also create Team Members in My20i who can log in using their corporate accounts.
You will need to ensure that their user email address on the My20i account is exactly the same as their corporate email address that they will use to login via either Google or Microsoft.
Their username should be the local part of their corporate email address. For example, if their email address is johndoe@20iexample.com then their username should be johndoe.
Set their access permissions as needed. For assistance with creating Team Member accounts, please see here.
If you have any further questions or need assistance, please contact our support team.
Enjoy the benefits of simplified access with SSO in My20i.
 Chris Wright
Enforce Two Factor Authentication on StackCP Users or Team Members
You can require your StackCP Users or Team Members to add a 2FA device to their account, improving overall account security.
StackCP
For StackCP Users, head to the StackCP Users page in My20i and select Options and 2FA Not Required to toggle the option on for StackCP Users. The next time the StackCP User logs into their account, they'll be prompted to add a 2FA device.
My20i
For My20i Team Members, head to the Team Members section in your My20i account and click the Edit icon. On the right-hand side you'll see Require 2FA Setup - select the toggle to enable this option. The next time the Team Member logs into My20i they'll be prompted to add a 2FA device.
 Austin B.