One of the major problems with malware is its persistence. This is why 20i’s free Website Malware Scanner makes daily scans of all the sites within your hosting account. It uses a combination of commercial and in-house tools to provide reports detailing malicious content and its location within your site files.
When malware is located on a site, PHP mail and cron jobs are automatically disabled. We do this to preserve sender reputation across the platform and ensure that any sites that are compromised do not send large volumes of spam emails.
We run daily malware scans on all sites on our system – we will only scan files that the system has detected changes on. If no change has been detected, we won't run a new malware scan on these files.
As a Reseller, you can offer this service to your customers free of charge by simply adding it to your Package Types, so they can use this feature in StackCP.
Note: when we refer to “signatures” in this guide, this is referring to the names given to each item of malicious code detected in a file.
1. Best practices when dealing with malware and infected files
- Check the Malware Report produced by the malware scanner to identify if there are any infected files
- Clean and remove the infected files from your webspace
- Identify any vulnerabilities within the site and secure them
Taking regular backups means that you'll always have a restore point if you do find your site has compromised files. You can do this in My20i or automate the process with Timeline Backups.
Checking the Malware Report
The Malware Scanner shows you a full list of sites that are currently infected within your account. If you’re a 20i Reseller, you can access this list by:
- Logging in to My20i
- Selecting Malware Report
- If any of your sites are currently infected, they will be listed here
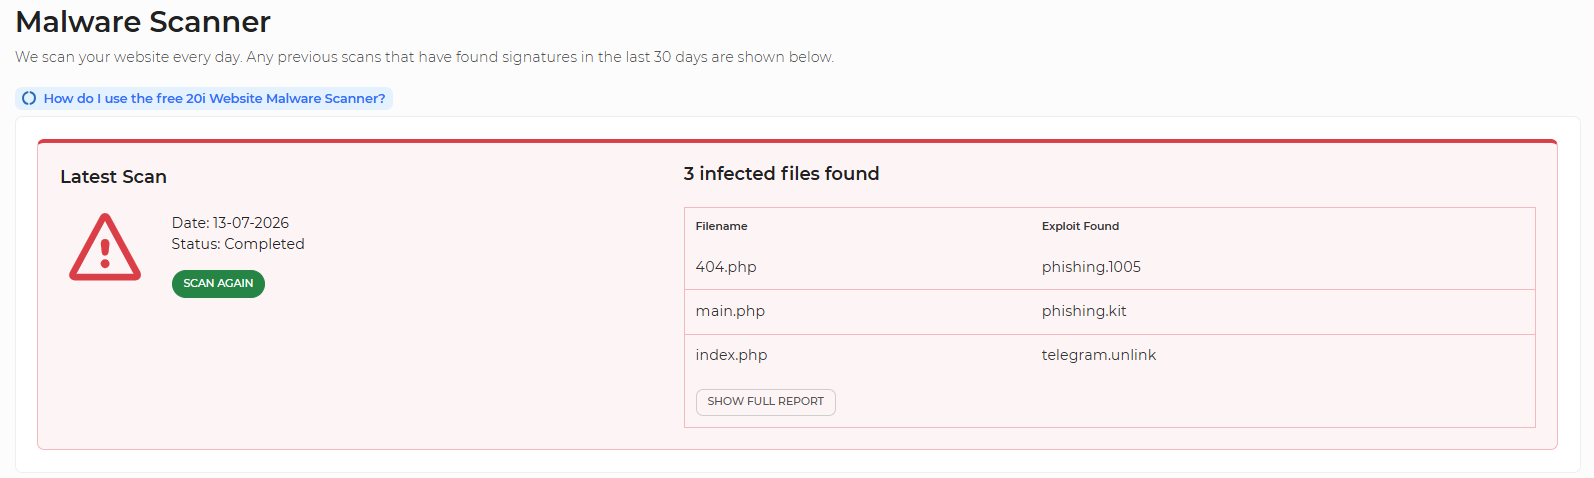
The scanner shows details on the package where the infection has been found, the time of the last scan and the number of infected files. To show a more detailed report, select View Report. You will now see the full list of infected files on the site.
You can also access the Malware Scanner on a per-package basis:
- Log into My20i and head to your Manage Hosting area
- Select Options > Manage on the hosting package you wish to scan
- Under Security, select Malware Scan
From here, you can initiate a fresh scan for the site, view the scan history for the package and view a list of any flagged files that have been detected as potentially harmful.
Should the scan return clean without any issues, you’ll see the following:

If the scanner finds any potentially harmful files or signs of a malware infection, however, you’ll instead see the following:
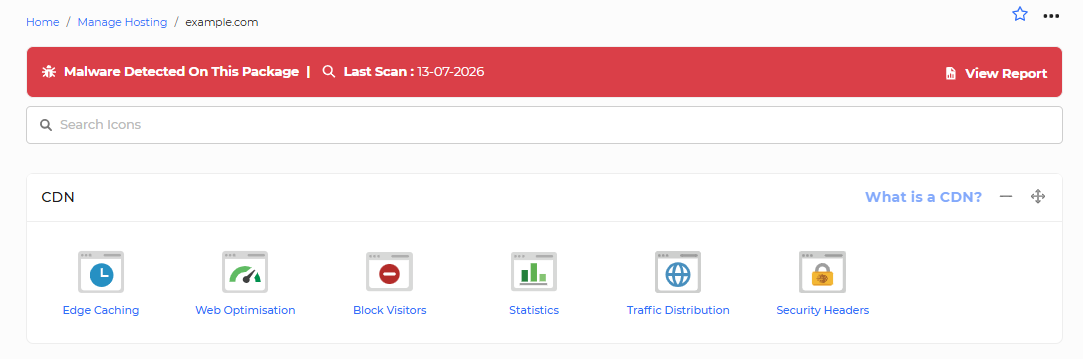
Should any infected files be found on the package, we’ll also add a warning to the package itself to notify you of this. This is visible at the top of the hosting package screen.
Any files that are detected as malware will also show in the File Manager so that you can easily access and review the flagged files.
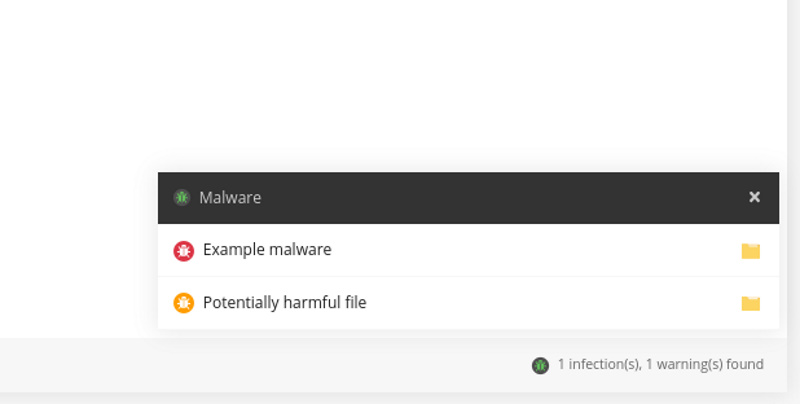
Note: Infections found marked in red indicate that the file could be a risk to the site.
We also have a yellow ‘warning’ state which shows that the signatures found are unlikely to pose a high risk to the site. For example log files, SQL files and .zip backups files. Essentially, a yellow warning state is for information only and won’t impact the sending of mail.
You can ensure that you're notified of any newly discovered malware by checking the Receive Daily Email Alerts? box. An email will be sent to your primary 20i email address when new malware is found. You can also add additional email accounts to receive malware alerts through your Account Preferences. You may wish to create a dedicated mailbox to receive malware alerts.
Cleaning and removing infected files
In most cases, the best way to resolve an issue with malicious content is to remove the compromised files and replace them with versions from a known clean download. That is, download the software again and replace just the files that have been infected from the initial install.
If the files are not needed, then you could also just delete the files completely.
Sometimes an infected file will just have the attackers script 'injected' in the first or last line of a specific file. Sometimes this can be very obvious, in which case you could look to simply remove the malicious script.
You should do this for all the files that have been found by the Malware Scanner.
Further actions you can take
Remove unnecessary or unused plugins and applications from the site. Doing this will not only reduce the number of potential vulnerabilities but also make general site 'housekeeping' simpler.
You should also make sure that any plugins you're using are always kept fully updated. Outdated software versions are much more likely to have security vulnerabilities - leading to compromised sites.
It may also be worthwhile to change passwords such as your database password and FTP password.
Note: Don’t forget to update any configuration files such as wp-config.php after making the changes.
Rescanning the site
You can re-scan the site on demand. Once you believe you’ve removed the malware, head back to the Malware Scanner and select Scan again.
If all infected files are removed, then PHP mail and cron jobs will be re-enabled automatically and there will be no infected files displayed. The scanner will continue to take daily scans of all your websites to ensure you’re always aware of any sites that have been compromised.