HostShop – Products & Services Questions
HostShop products and services support: articles about how a set up and manage the items you sell - web hosting, domains and more - via HostShop.
How do I add a MSSQL database as a product?
If you provide Windows hosting as a service, you may wish to also provide Microsoft SQL databases to customers via HostShop.
To set an MSSQL database up, you’ll need to:
Log in to My20i
Head to Hostshop > Product Catalogue
- Select Add New > Product
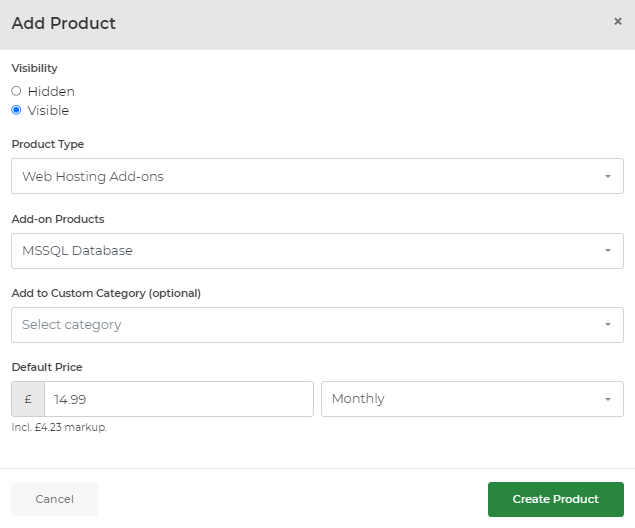
Change Product Type to Web Hosting Add-ons
Change Add-on Products to MSSQL Database
We suggest a recommended price of £14.99, giving you a markup of £4.99. The original £10 price of an MSSQL database is the price of the licence provided directly by Microsoft. Select Create Product.
Next we’ll add an annual renewal option by clicking the Product Pricing tab and checking the text box under Annually from the menu. We’re going to offer a £2.00 per month discount if you pay yearly, so we’ll add the price £155.88 to the field and select Save.
If you now head to your shop, and then select to head to the Client Area, you’ll see the ability to order an MSSQL database.
Note: In order for a customer to order an MSSQL database they will need to have already purchased Windows hosting so the database can be assigned to the hosting package.
 Dominic Elford
How to add custom categories to HostShop?
By default your HostShop will have six product categories. These are:
- Web Hosting
- Managed Cloud Hosting
- Domain Names
- Additional Products & Services
- SSL Certificates
- Virtual Private Servers
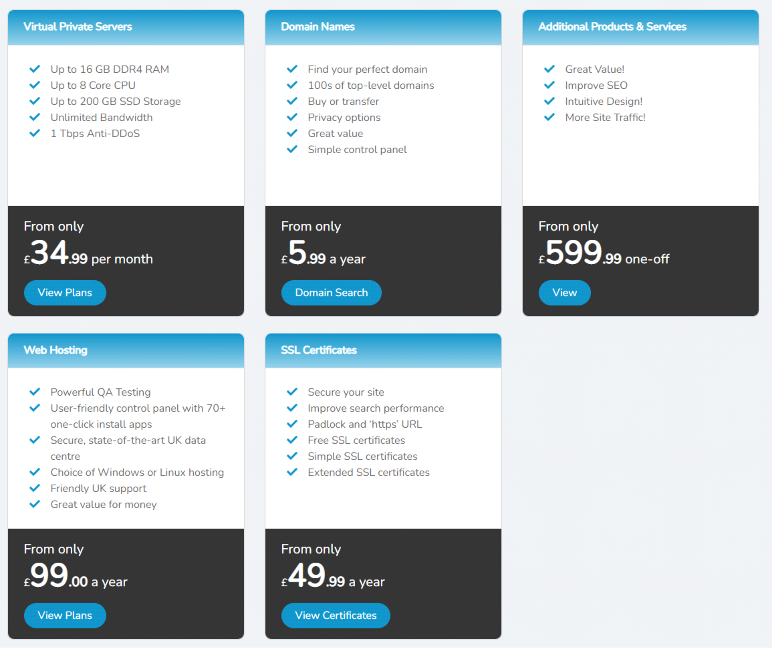
As well as these categories, HostShop gives you the full flexibility to create custom categories, to better suit your business' product range.
To add a new category:
- Go to My20i > HostShop
- Visit Product Catalogue
- Click Add New > Category
When adding a category you need to configure the following:
Visible - This determines whether the category shows in your shop. Normally, you would want to ensure this is visable.
Category Name - the name the category will be known by
Description - the description of the category shown in the shop
Products - The products that are to be in the category.
Link Text - this is the text shown on the button users click to go to the category
Sidebar Icon - here you can set a FontAwesome class to be used as an icon for the category. You can find a list of available icons here.

 Chris Wright
How can I add and sell balance products in HostShop?
In HostShop you can allow customers to add balance to their accounts with you. This balance can then be used to purchase products within HostShop.
Balance can be added in two ways:
- Via the affiliate system as commission. You can read more about the affiliate system here.
- By paying for balance as a product, which is what we will go through here.
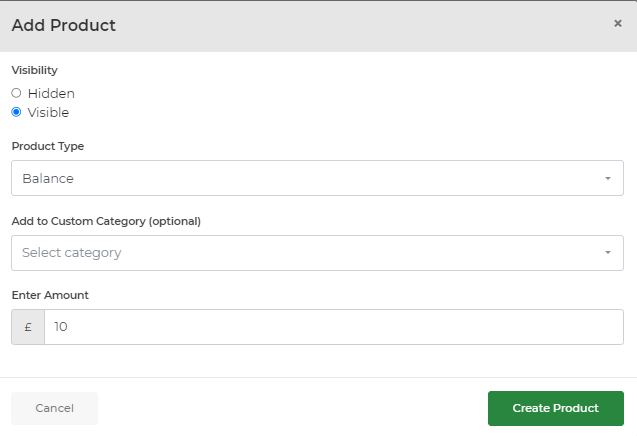
To add balance as a product that users can purchase you need to go to Product Catalogue > Add New > Change Product Type to Balance.
Here you can add the amounts of balance you want your StackCP Users to be able to purchase. To do that you need to enter an Amount, and click Create Product. In our example we're adding a product for £10 of balance.
Once you have Balance products set up in your HostShop your StackCP Users will be able to buy them. To do this, they need to go to their account, access the dropdown menu in the top right under their name and select Account Credit.
This will then take them to their Account Credit page where they can add credit in any amounts you have set and see their Current Balance.
 Dominic Elford
How do I add a billing contract to a service?
You can manually assign a billing contract for a current hosting service to a StackCP User. This is so you can bill them automatically for a set price and set renewal period.
To do this:
Log in to My20i.
Head to Customers > StackCP Users.
Select Options > Manage on the StackCP User who has the service you want to add the billing contract to.

Under the Access & Contracts section, you can add a contract to a service (with the exception of a package), by selecting Manage > Add Contract to Service.

With packages, rather than adding a contract to the service you need to add the package to a Plan. There are two ways you can do this. You can either add a plan to the StackCP User and then assign the package to the Plan or you can directly convert the package to a Plan.
- To do the former you need to click on Add Plan at the top of the Access & Contracts section and select the plan you wish to add before committing with the Add Contract button.

Then on the Plan select Manage Packages.

You can then select the packages you wish to add to the Plan.

Alternatively, you can select Add Service to a Plan and this will let you add the package to a new Plan.

 Arron C
How do StackCP Users pay with balance in HostShop?
Before StackCP Users can pay with balance in HostShop you will need to either add balance as a product they can purchase or they will need to earn balance as commission from the affiliate system. You can find more information on these topics here:
Once a StackCP User has some account credit they can select it as the payment gateway at the checkout.
 Dominic Elford
What are the product description variables in HostShop?
When creating a Product for your HostShop setup and adding a description, you’ll note that there are some variables you can add. These list the limitations and features that are - and are not - available for that package type, dynamically.
Complete List of Product Description Limit Variables
This information pulls directly from your set package type limits. So, if you set up a package type to have the Malware Scanner available and have mailboxes up to 10GB in size, these variables will display these values accordingly. It means that you don't have to copy them across for every one of your Products manually.
These will need to have double curly brackets around them, and start with the tag ‘limits.’, for example:
{{ limits.display.mailboxes }}
{{ limits.malwareScan }}
You can also use an if statement with the variable to check if it’s true and take action as necessary. For example, if we wanted to check if the Web Builder is available for a package and then display something accordingly, you can use:
{% if limits.webBuilder %}
Here's a full list of the available variables for package limits:
- accessErrorLogs
- accountSummary
- addFreeWeb
- additionalFtpUsers
- allFutureOneClick
- allowExternalSsl
- appManager
- autoDiagnostics
- awstats
- backups
- bandwidth
- blockVisitors
- canSetEmailQuota
- canSetQuotaNotification
- cdnCaching
- cdnOptimisation
- cdnSecurityHeaders
- cdnStatistics
- changeParent
- contacts
- customDocRoot
- customPrimaryDocRoot
- directoryIndexing
- dkimSignatures
- dns
- dnsSec
- domainContacts
- domainPrivacy
- domains
- emailSummary
- fileManager
- filePermissions
- freeSsl
- ftp
- googleTranslate
- highEmailNotification
- hotlinkProtection
- htaccessErrors
- imapSync
- lock
- lowEmailNotification
- mailAutoresponders
- mailboxes
- mailCatchAllForwarders
- mailDistributionLists
- mailForwarders
- mailJunkFilterLogs
- mailJunkFilters
- maintenanceMode
- malwareReport
- malwareScan
- manageAppPool
- manageWpAdminUsers
- manageWpChecksumReport
- manageWpDatabase
- manageWpPlugins
- manageWpSearchReplace
- manageWpSiteSettings
- manageWpStaging
- manageWpThemes
- manageWpUpdates
- manageWpUsers
- maxMailboxSize
- mssqlDatabases
- mysqlDatabases
- names
- nameserverCheck
- nameservers
- passwordProtectedDirectories
- phpConfig
- phpMyAdmin
- platformReinstall
- primaryFtpUnlock
- pushTransfer
- remoteMysql
- scheduledTasks
- sitemapGenerator
- ssh
- stackUsers
- statsBandwidth
- statsDisk
- subdomains
- switchPhpVersion
- temporaryURL
- timelineBackups
- usageormation
- webalizer
- webBuilder
- webForward
- webmail
- webRedirect
- webspace
- whois
- wpAdmin
The following relate to the one-click installs available, and would only be usable on package types based on our Linux hosting platform.
limits.apps
'limits.apps' is how you'd get those apps, so rather than {{ limits.AppName }} it's {{ limits.apps.AppName }}
- abantecart
- agoracart
- b2evolution
- backdrop
- bamboo
- buddypress
- cachet
- cakephp
- cmsmadesimple
- concrete5
- coppermine
- craftcms
- cubecart
- dolphin
- dotproject
- dolibarr
- drupal
- e107
- elgg
- expressionengine
- fengoffice
- flarum
- fluxbb
- formalms
- formtools
- freshrss
- geeklog
- gibbon
- gnusocial
- helpcenterlive
- invoiceninja
- invoiceplane
- joomla
- kanboard
- laravel
- limesurvey
- magento
- mambocms
- mantisbt
- matomo
- mediawiki
- modx
- moodle
- mybb
- nucleus
- opencart
- openwebanalytics
- oscommerce
- oscomphoenix
- osticket
- phpbb
- phpcoin
- phpformgenerator
- phpfreechat
- phpfusion
- phplist
- phpmailer
- phpmyfaq
- phpnuke
- phproject
- phprojekt
- piwigo
- prestashop
- processwire
- reviveadserver
- roundcube
- salessyntax
- serendipity
- silverstripecms
- simplemachinesforum
- slim
- snipeit
- squirrelmail
- suitecrm
- tcexam
- textpattern
- troubleticketexpress
- typo3
- vtiger
- webcalendar
- wordpress
- xerte
- zencart
- zenphoto
How do I offer hidden products, purchasable only via a direct link?
If you wish to make a product purchasable only via a direct link rather than being publicly accessible via the shop, you can set a product to Hidden. This will prevent it from showing on your HostShop order page when users and customers view your shop. The generated link provided in your Product Catalogue will still work as normal, allowing you to still offer these products directly to specific clients as required.
To make a product hidden, head to your Product Catalogue within My20i by going to Customers > Product Catalogue. On the product or service you wish to hide, select the Hidden checkbox, but make sure the For Sale checkbox is selected as normal.
When selected, this product now will no longer appear in your HostShop, but you will be able to send customers the Product Link to buy the product directly.
 Dominic Elford
How do I set domain name prices?
With HostShop, you can resell domain names with your 20i Reseller account domain discount. Some of these domain prices are at wholesale price, giving you the opportunity to make as much profit margin as possible. To set the prices for the domain names you wish to sell, you’ll need to:
Log in to My20i
Hover over Hostshop on the left and head to the Product Catalogue section
In the Domain Names Category, select Edit Category.
From here you can add and set the prices for the Top Level Domains (TLDs). In our example, we’re going to select the Add Top TLDs (10) button which will automatically add: .biz, .co, .co.uk, .com, .info, .me.uk, .net, .org, .org.uk and .uk TLDs to our list.
You’ll notice right away that the prices have already been set. This is because we have the Guideline Pricing checkbox enabled next to each TLD, so we’ve pre-populated the price for registration/renewal and the price for a transfer to be our recommended price.
If you'd like to customise a specific price, uncheck the Guideline Pricing checkbox. You’ll then be able to add your own custom price.
If you then head to your shop and select the Domain Names section, you can search for any of the TLDs you’ve made available. Customers will then be able to register domain names with these TLDs.
Note: For domains you've sold through HostShop, or have assigned to customers, you may wish to set those domains to not auto-renew within your My20i account. This way, if the customer doesn't pay for the renewal of their domain it won't be renewed in My20i. There is a preference to prevent new registrations from being set to auto-renew via the Account Preferences page here: https://my.20i.com/account/preferences
 Dominic Elford
How do I add my own custom products and services?
HostShop is extremely flexible. Not only does it allow you to resell 20i’s hosting products and services easily, but you can also add and bill customers for your own services, such as web design, SEO, themes or advertising.
To set a custom product up, you’ll need to:
- Login to My20i.
- Head to HostShop-> Product Catalogue.
- Select Add New > Product
In our example we’re going to add web design as a service, for a small website and/or blog.
For Product Type, select Other Products & Services
In Custom Category field, you can optionally attach the product to one of the categories you've already created.
The next step is to choose your Product Name, for example, we'll choose "Web Design Service"
You will then need to enter the Default Price that you will charge for the product, along with the Renewal Period.
We’re going to select One-off from the Renewal Period dropdown and input a price of £199.99, then select Create Product.
Now, when we head to our shop, when a customer selects to view the Other Products & Services category, they’ll see our web design service as a purchasable product. If you have added the product to a custom category, the product will also be listed there.
 Chris Wright
How do I add a Malware Scanning as a product?
At 20i we provide a free, on-demand malware scanner. This is a product that's often charged for by other hosting companies.
With HostShop, you can offer this service to your customers for a price, giving you chance to make 100% mark-up. To set up malware scanning as a product, you’ll need to:
Log in to My20i
Head to Hostshop > Product Catalogue
Select Add New > Product.
Scroll down to Product Type > Select Web Hosting Add-ons.
Select the Add-on Product dropdown menu and choose Malware Scanning.
As malware scanning comes at no extra cost to you as a Reseller, you can price the service at any price you think is suitable. In our example, we’re going to add a monthly price of £4.99.
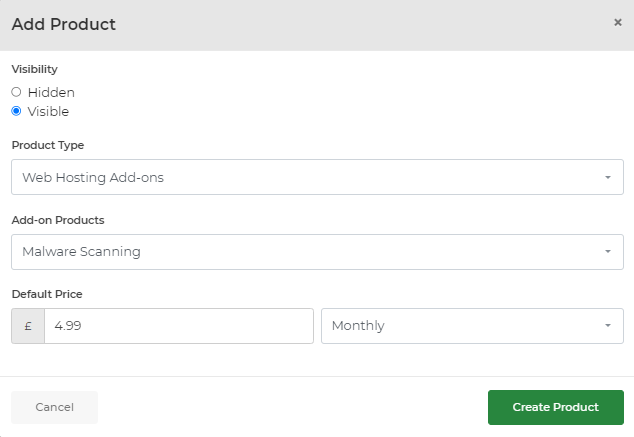
Now, when you head to your shop you’ll be able to go to the Client Area and see Order Malware Scanning as an option.
Customers can then select this and purchase it straight from your shop.
Note: Your customers will need to have ordered hosting with you in order to assign malware scanning to a hosting package.
 Dominic Elford
How do I add domain privacy as a service?
With HostShop you can resell Domain Privacy as an add-on to the purchase of domain names themselves.
To set up Domain Privacy, you’ll need to:
Log in to My20i
Head to Customers > Product Catalogue
Select Edit catagory under the Domain Names tab

Select Category Products and scroll down to the Domain Privacy section.
From here you can give your Domain Privacy product a name and a price.

The option to purchase the Domain Privacy add-on will then show for your customers to purchase for their existing domains when managing them within StackCP.
 Arron C
How do I add and sell VPS services?
With HostShop your product lineup isn’t just limited to hosting and domains. You can also resell virtual private servers (VPS) with your 20i reseller discount.
To set these up, you’ll need to:
Log in to My20i
Head to the Product Catalogue section
Select Add New > Product
For Product Type, select VPS Products.
If you would prefer to use a Custom Category, this can be selected now.
The next step is to select either Managed VPS or Unmanaged VPS
Now, select your VPS Size - this is the specification of server that you would like to sell.
Choose your Default Price, and the Renewal Period.
Select Create Product

In our example we’ll be adding the 1 GB Unmanaged VPS. We’ve selected the 1 GB VPS and hit Create Product.
We now can add a price and other renewal periods by repeating the process above. For monthly, a default price of £9.99 has been added which we’re going to leave in place. This gives us a £2.50 markup on the cost of the VPS.
Business tips
If you need advice about how to sell VPS to your customers, please see our VPS Product Guide or this blog post: How to sell Virtual Private Servers. It covers how to explain what a VPS is, customer myths, marketing and sales tips.
 Chris Wright
How do I add and sell VPS Backups?
If you’ve set up and configured VPS services to be sold in HostShop, you may want to add an extra potential revenue stream with VPS backups. You can add backups as an add-on product to the VPS services which your customers can then also buy.
To set these up, you’ll need to:
Log in to My20i
Head to HostShop > Product Catalogue
Select Add New > Product
Select VPS Add-ons from Product Type
In our example, we’re going to add the backup service for a 1 GB VPS that we’ve already configured to sell. We’ll simply select VPS Backups (1 GB VPS) from the Add-on Products drop down.

A default recommend price has already been added based on the price of 20i reseller price for these types of backup which is £2.99. So the price of £3.75 has been added giving you a £0.76 per month markup. You can adjust your Default Price and Renewal Period at this stage.
 Dominic Elford
How do I add and sell SSL certificates?
Adding SSL certificate options to your reseller hosting services offers more choice for your customers, matching their specific needs, which leads to happier customers and a healthier bottom line.
We provide a free SSL certificate, which you can pass on for free to your customers or put your on price own it to make some extra profit. This one's supported by Let's Encrypt, giving a leg up to your clients' Google ranking and site security. It covers subdomains too, but bear in mind, it needs our nameservers to work properly.
For some customers, particularly those running ecommerce sites, they might be after a bit more. That's where our Simple SSL certificates step in. These SSL are backed by GeoTrust They don't need our nameservers, and they come with a $10,000 warranty. Please note, the Simple SSL only covers the primary domain (and www.), so if the site you want to secure has multiple subdomains you should look at the Wildcard SSL below.
For sites and applications that have multiple subdomains then the Wildcard SSL from GeoTrust will ensure all of those subdomains are secure as standard.
But then, some customers want the full Monty, and that's when you can roll out the Extended SSL certificate. This one costs a bit more, but it has the most rigorous checks, a hefty underwritten warranty of $1.5 million, and an Extended Validation (EV) Certificate.
Please remember that while the term 'SSL Certificate' is widely used, all of our certificates utilize the more modern Transport Layer Security (TLS) protocol version 1.3.
How to add an SSL as a product
With HostShop you can easy add chargeable SSL certificates to your product lineup. This means you can resell the Simple and Extended Validation certificates.
To set these up, you’ll need to:
- Log in to My20i
- Head to the Product Catalogue section.
- Select Add New > Product
Under Product Type, choose SSL Certificates.

There are three types of SSL available to resell: the SSL Simple, Extended SSL and Wildcard SSL. You can read about the differences between those SSLs here.
In our example we’re going to set up the Simple SSL. Select this under SSL Type.
This product can only be renewed on an annual basis. You’ll see we’ve added our recommended price of £49.99 to this product, giving you a £15.00 markup from the 20i Reseller discounted price of £34.99.
Select Create Product. Then head to your shop and select the SSL Certificates category and you’ll see your Simple SSL for sale and ready to be purchased by your customers.
 Chris Wright
How do I add a Product Image in HostShop?
One of the new features introduced in HostShop 3 is the ability to add images to your products. Adding images not only enhances the visual appeal of your HostShop store but also helps convey more information about the products you offer, making it easier for customers to understand and engage with your offerings. Whether it's a logo, or a promotional banner, visuals can create a more professional and trustworthy storefront - helping you stand out and drive more interest in your services.
The following steps outline how to add a product image to your Hostshop product:
1. Head to the Product Catalogue page
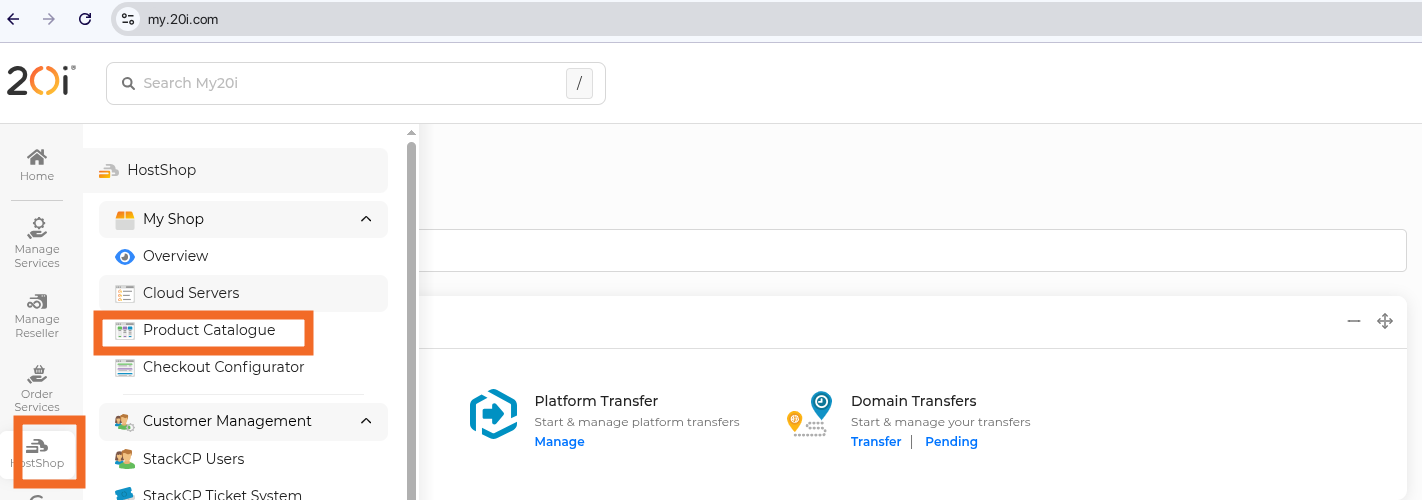
2. On the Product Catalogue page, you would have a list of all your products organized by category. Click the Edit Icon beside the product you want to add an image to

3. You should now be on the Product Details page. To the left, you will be able to see the upload Image Icon. Click on it to bring up the Image Picker on your device

4. After selecting the image from your device the Upload image icon should show a preview of the newly added image. You will now be prompted to Save the changes on the bottom right of the page. Click on the Save Changes button to finalize these changes
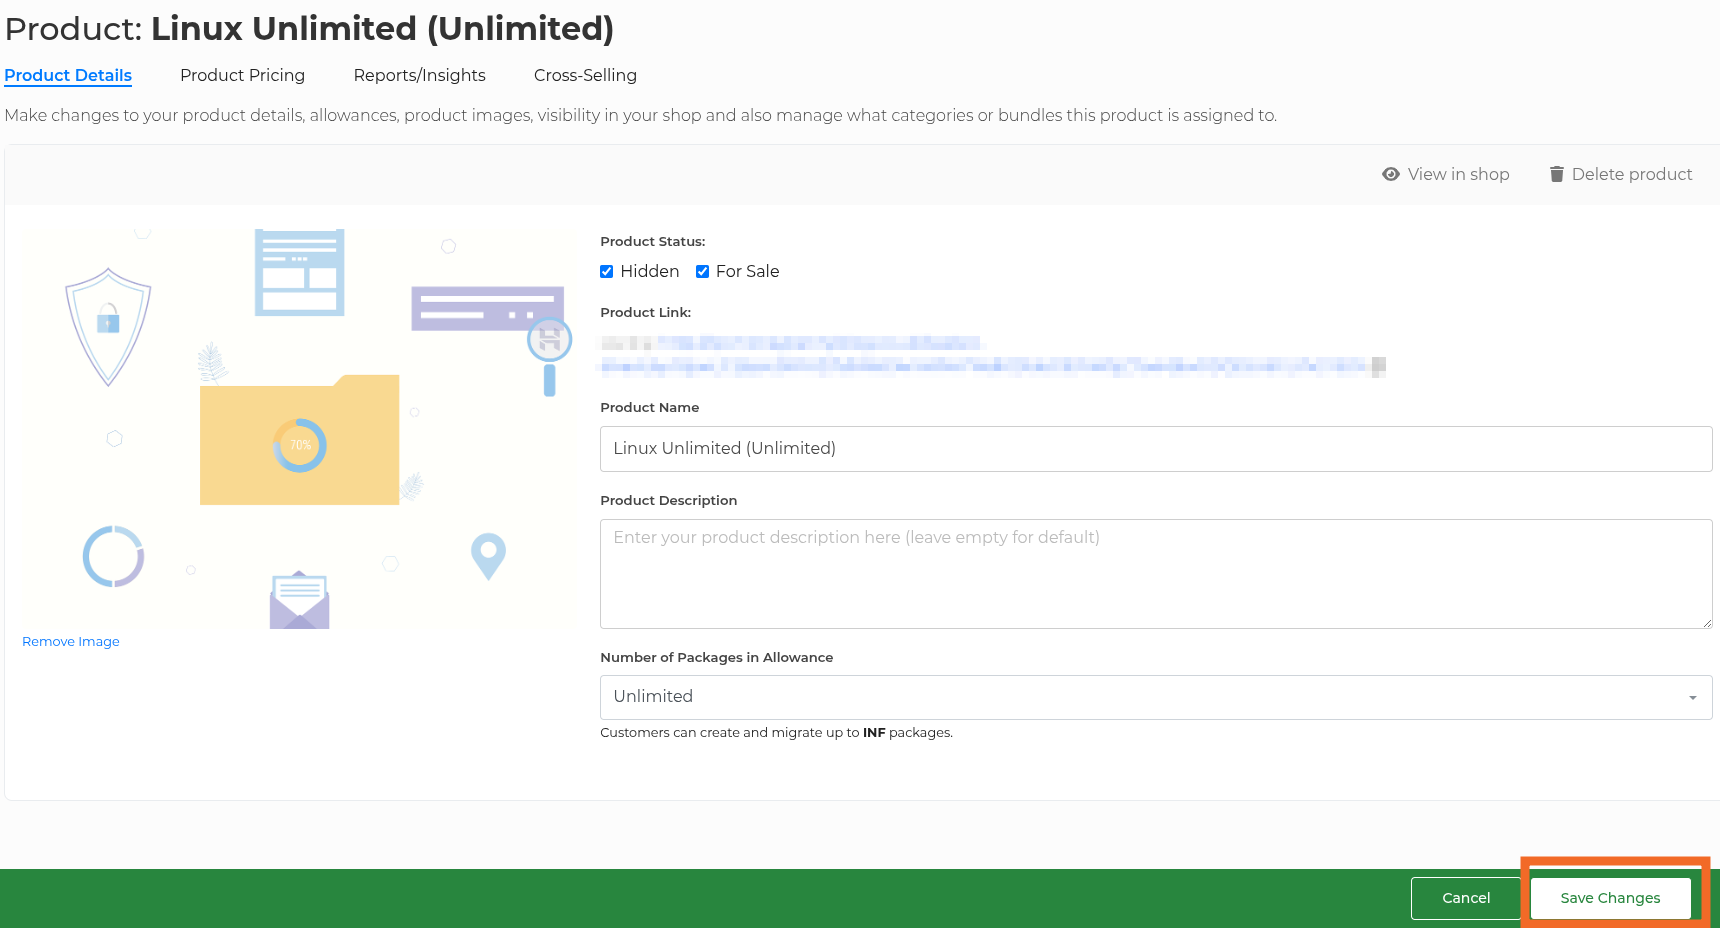
5. A message on the top right will confirm that your changes have been saved.

At this point, your product will now have an image added to your HostShop store
If you run into any issues with any of these steps, please feel free to reach out to our support team, who will be more than happy to deal with any queries you may have.
 Joshua Miner
HostShop - Add Hosting Products
In this guide we will go through the process of creating and adding products to go into HostShop.
Before adding any plans to Hostshop, you first want to create Hosting Package Types within your 20i Reseller.
Once that's done, it's time to create the products in Hostshop. Start by clicking on Hostshop on the left-hand menu bar, then click on Product Catalogue.
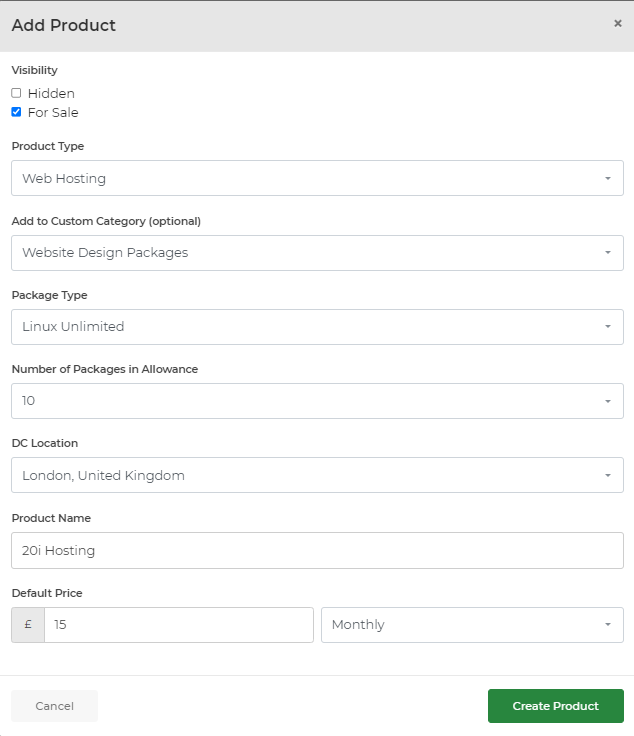
Next, select Add New in the top right corner and select Product.
Select the Visibility as For Sale and the Product Type as Web Hosting.
Choose your Package Type from your list of Package Types you created before, and select the number of packages you want each of this hosting product to have.
Next, choose the DC Location you want your Product to use. Note that by default, you will only have access to either the UK or the US-based DC unless you have purchased the Additional DC Location.
Now give your product a name, and select a price for your product. By default, this will be the monthly price, though you can change this using the drop-down menu.
Select Create Product, and you will be taken to your product overview page. Here, you can update the product pricing to include different payment periods.

 Harry Leverton